
|
OK...A lot of you have been waiting for this. Given the controversy over oil temps you can either wring your hands, point fingers, assign blame and hope Nissan will do
|
|||||||
 |
|
|
LinkBack | Thread Tools | Display Modes |
 05-16-2009, 02:41 PM
|
#1 (permalink) | |
|
A True Z Fanatic
Join Date: Mar 2009
Location: Greenville NC
Posts: 2,883
Drives: 370Z Sport
Rep Power: 978   |
OK...A lot of you have been waiting for this. Given the controversy over oil temps you can either wring your hands, point fingers, assign blame and hope Nissan will do something, or just knuckle down, spend a few bucks and take care of the problem yourself. Your car will like you for it. Actually my car does not seem to run exceptionally hot. Some frisky running in the hills of western NC last weekend rarely saw temps above 245. Regardless, I'm a fan of cool, be it intakes, engine compartment temps or whatever. A cooler was in the plan. I've done several before on Audi TT's so this was not new. I will have to say, the 370 layout made it much easier than I'm used to. I decided to go with a 180 degree thermostatic plate (Mocal) and a Cooler core that I've used before (Tru-cool). The choice of Aeroquipt socketless hose may be controversial, but I suggest you do a google search before rendering judgement on those. Lets get started:
Why? A little research indicates: "TORQUE CUT CONTROL (AT HIGH ENGINE OIL TEMPERATURE) The ECM receives engine oil temperature signals from engine oil temperature sensor. To avoid VVEL performance degradation, the ECM performs the engine torque cut control at high engine oil temperatures. If engine oil temperature is too high, engine oil viscosity will change. As a result, engine oil pressure is decreased. This control affects the VVEL operating angle by operating the VVEL actuator sub assembly. If this control is operated, engine performance will decrease, then maximum engine speed is reduced a bit (Various levels of Limp Mode depending on temp). . The VVEL is a fairly complex system, with a relatively high amount of reciprocating mass and multiple linkages. The lubrication demands are very high to ensure Nissan's life expectancy goals are met. The shearing loads and high pressures exerted on the oil dictate a proper viscosity be maintained in order to resist lubrication failure due to these loads. Because an oil's ability to resist shearing weakens as it gets hot and thins out; a phenomenon plotted as a function of viscosity and shear stability known as the Stribeck curve, it is essential that the oil maintain it's specified viscosity at the appropriate operating temperature. This is why Nissan has engineered a fail-safe which limits power until the oil cools back to its specified operating temperature, because at that temperature it should be at the proper viscosity to withstand the high loads of the VVEL system. 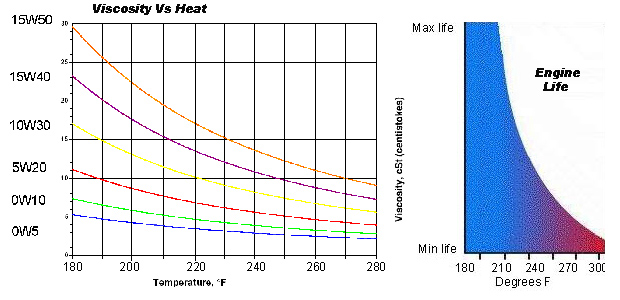 (Note: The engine life graph is just a representation pulled from an article discussing 300,000 mile Porsche 911's and the effect of oil temps on longevity. Take it for what it's worth) Have all your parts handy and do the pre-assembly (Parts list at my link below): Total cost on this system, including a Thermostatic plate is $270 shipped. 10 AER-FBN1000 -10 Aeroquip Socketless Hose, Black $43.70 2 AER-FCM2039 Aeroquip 90 Degree Male Elbow, Aluminum - Aeroquip 90 Degree Male Elbow, Alum. -10 to 1/2" Adapter $22.48 2 AER-FCM1534 Aeroquip Socketless 90 Degree Elbow Fitting - -10 Aeroquip Socketless 90 Degree Elbow Fitting $33.36 2 AER-FCM1514 Aeroquip Straight Socketless Fitting - -10 Aeroquip Socketless Straight Fitting $14.50 1 MOC-2BM810A Mocal 1/2" x -10 ORB fitting $15.99 1 MOC-SP1FT Mocal Sandwich Plate- 20mm Thread $86.95 1 TRU-L7B TRU-Cool 24 Row Racing Oil Cooler $44.95 (11" x 5.75" x 1.5") Shipping Rate: $8.85 Subtotal: $270.78 Alternative Stainless and socketed hose assembly, use these parts in lieu of the socketless hose and fittings above. It is recommended you go with this set-up if you plan to do any tracking of your car where temps may be elevated, and engine movement on the mounts may be exaggerated... : Cost difference is approx + $30 10' section of Aeroquipt Stainless AN10 hose AER-FBA1000-10 $75 (2) Mocal 90 degree fittings MOC-F90-10 @ 15.15 each $30.30 (2) Mocal straight AN10 connectors MOC-FS-10 @ $7.49 $14.98 More detail on page 13, post 189 on the stainless lines From Racer Parts Wholesale http://www.racerpartswholesale.com Notes on installing NPT fittings into the cooler: http://www.mechanicsupport.com/articleFittingTight.html A high temp sealant is probably the best sealer here, such as Loctite #567 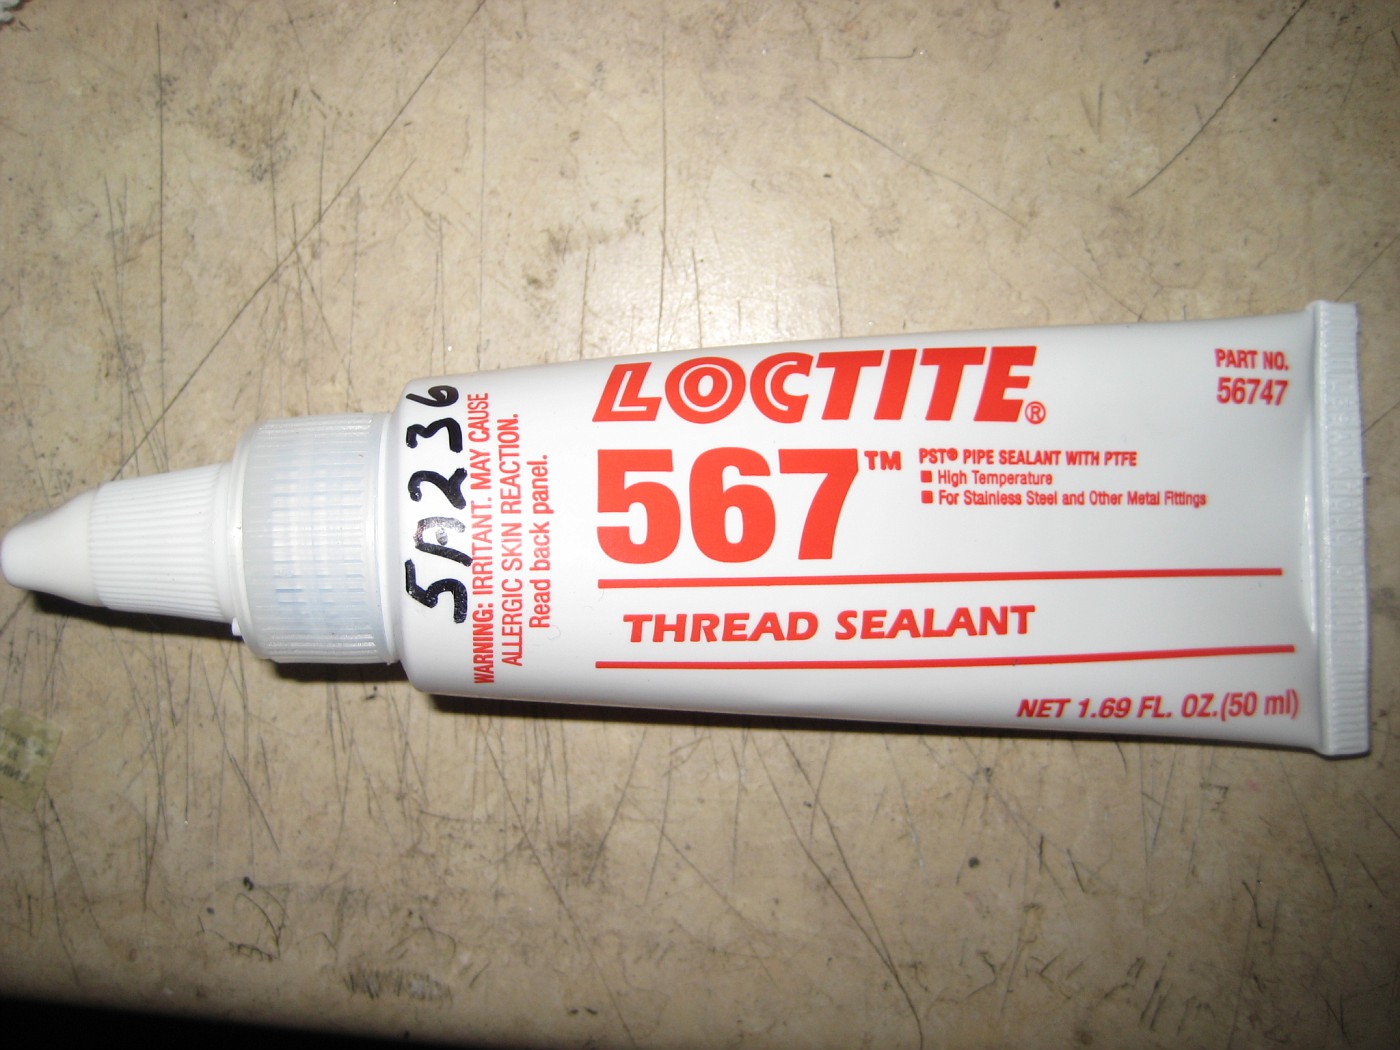 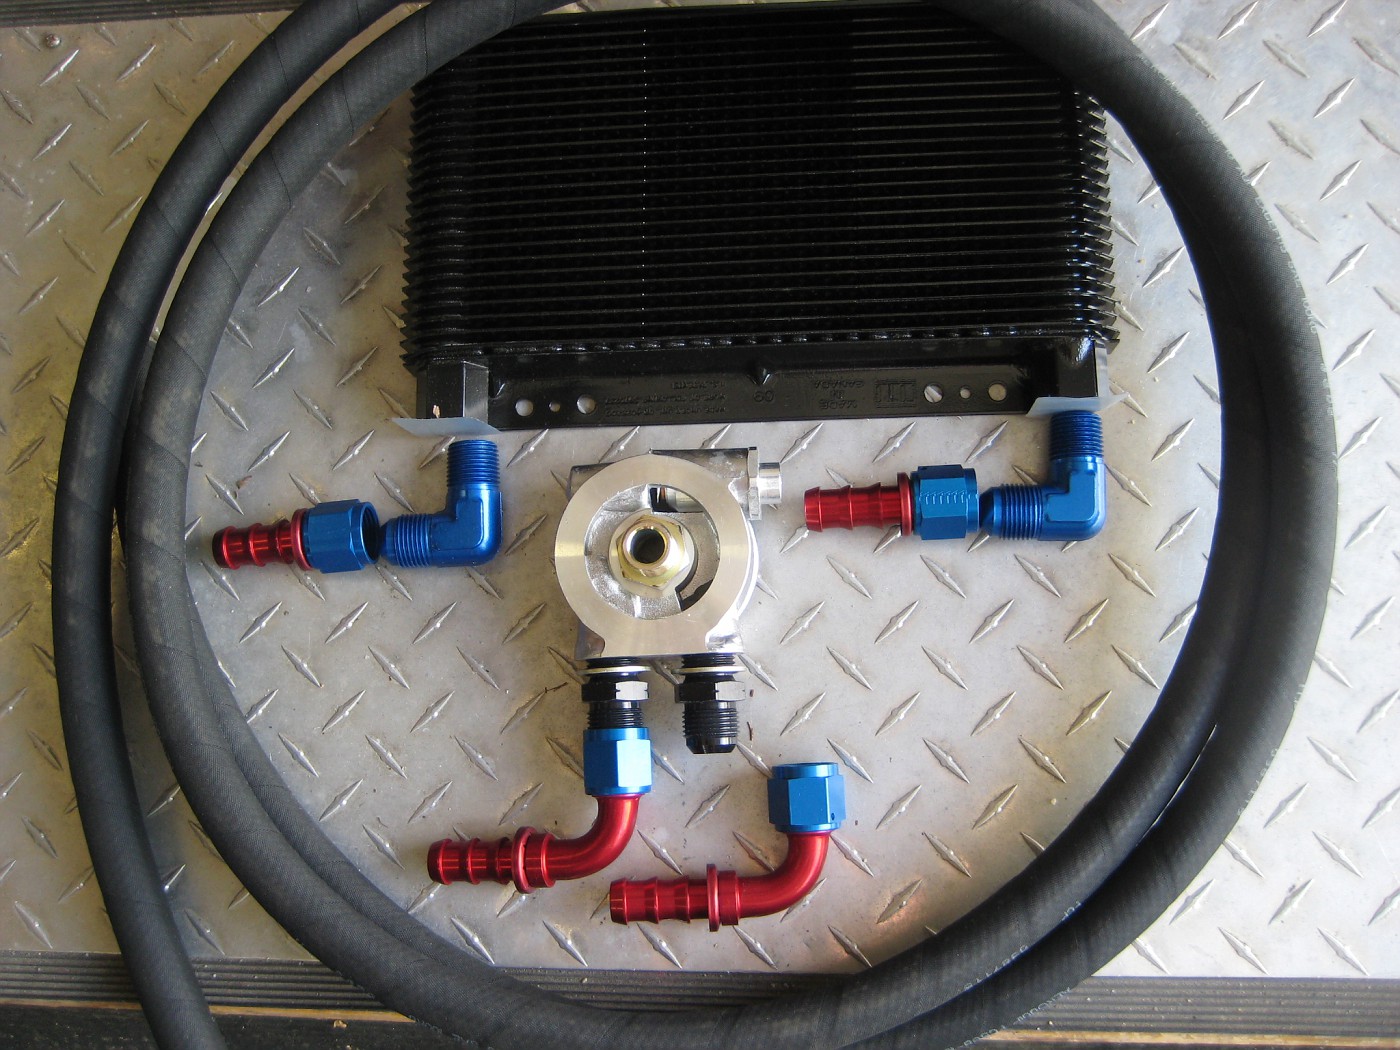 Get the car in the air and pull off the nose and lower cover. This is an easy process documented elsewhere ( I have a lift which does make it easier!) 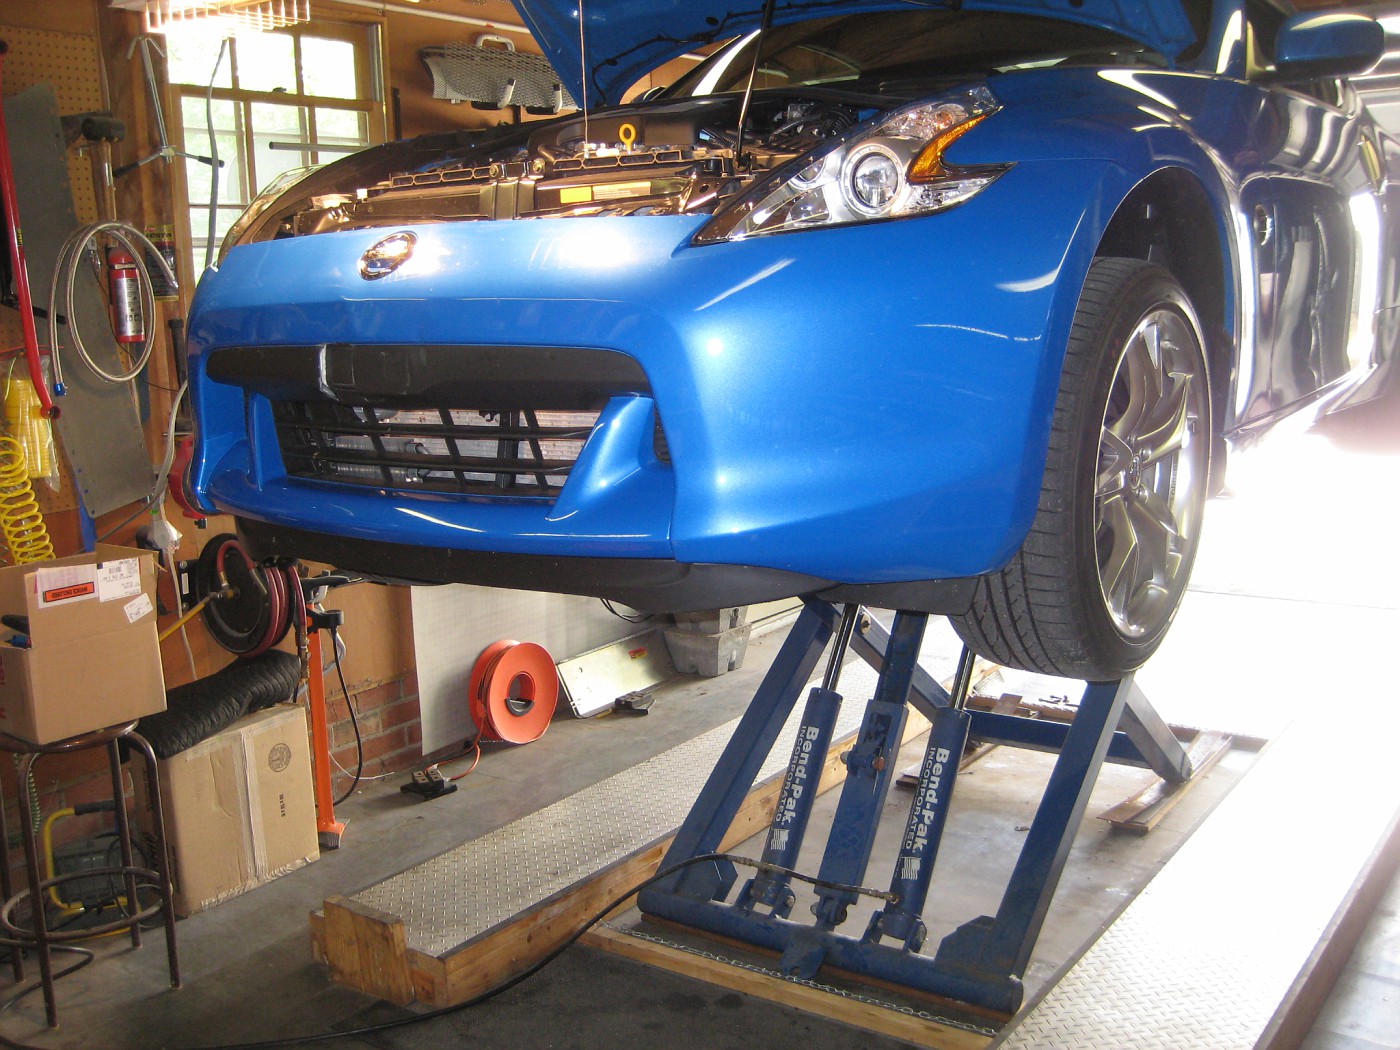 Oh yeah....Ignore my accident damage (soon to be fixed) let's just say the impact bar did its job when I got shoved into that Jeep! 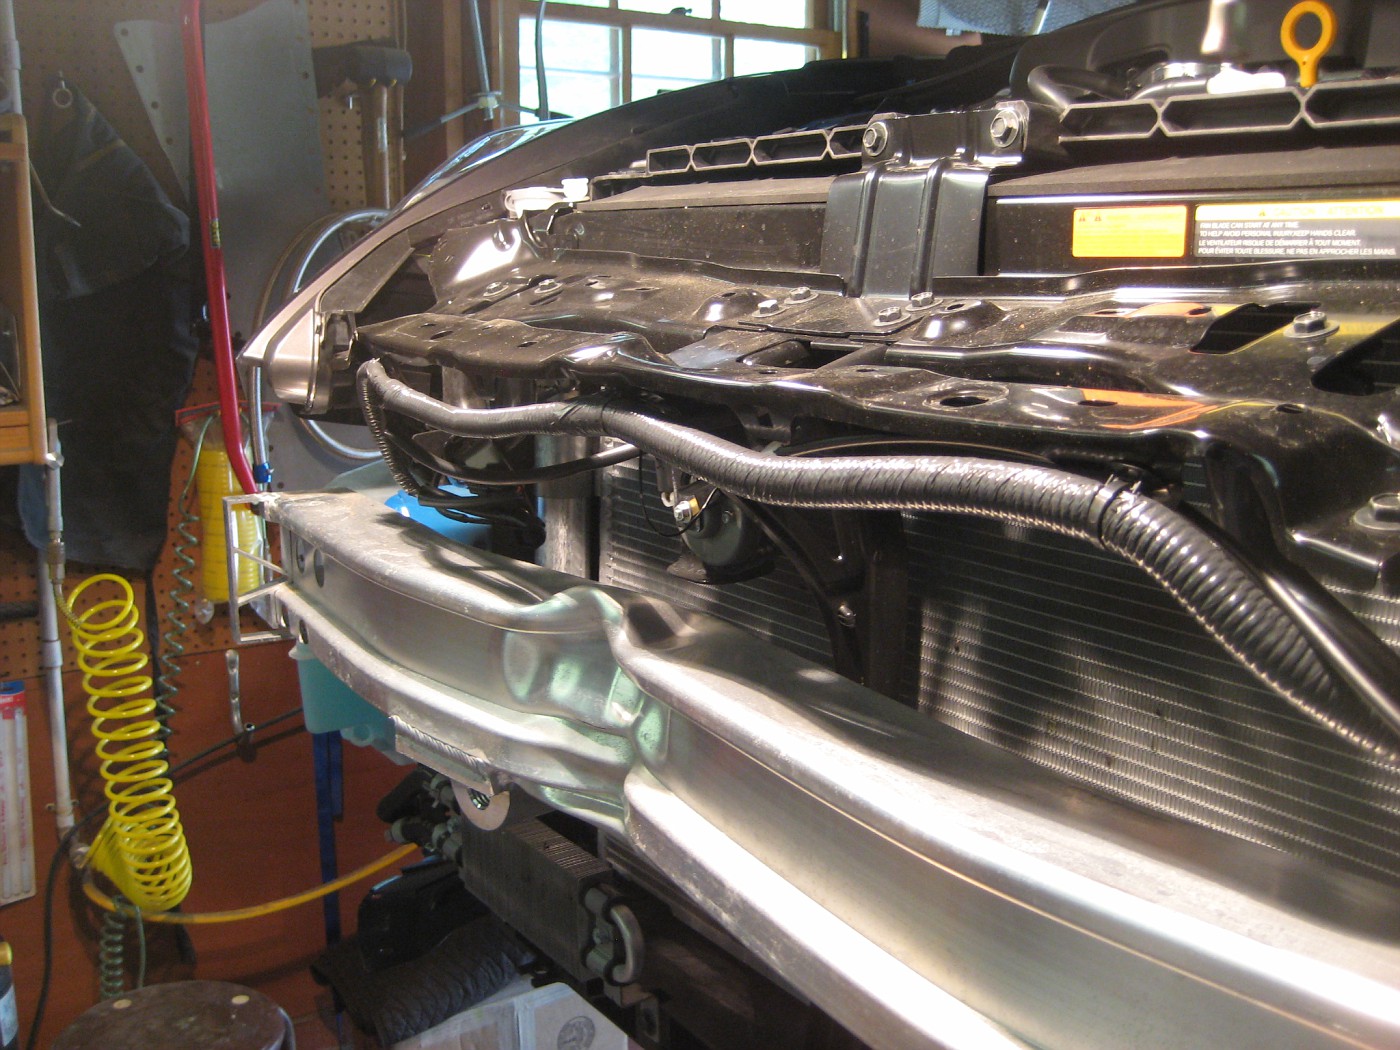 Next up, mount the 20mm thread Mocal sandwich plate. Just screw the adapter onto the existing Oil filter threaded nipple: 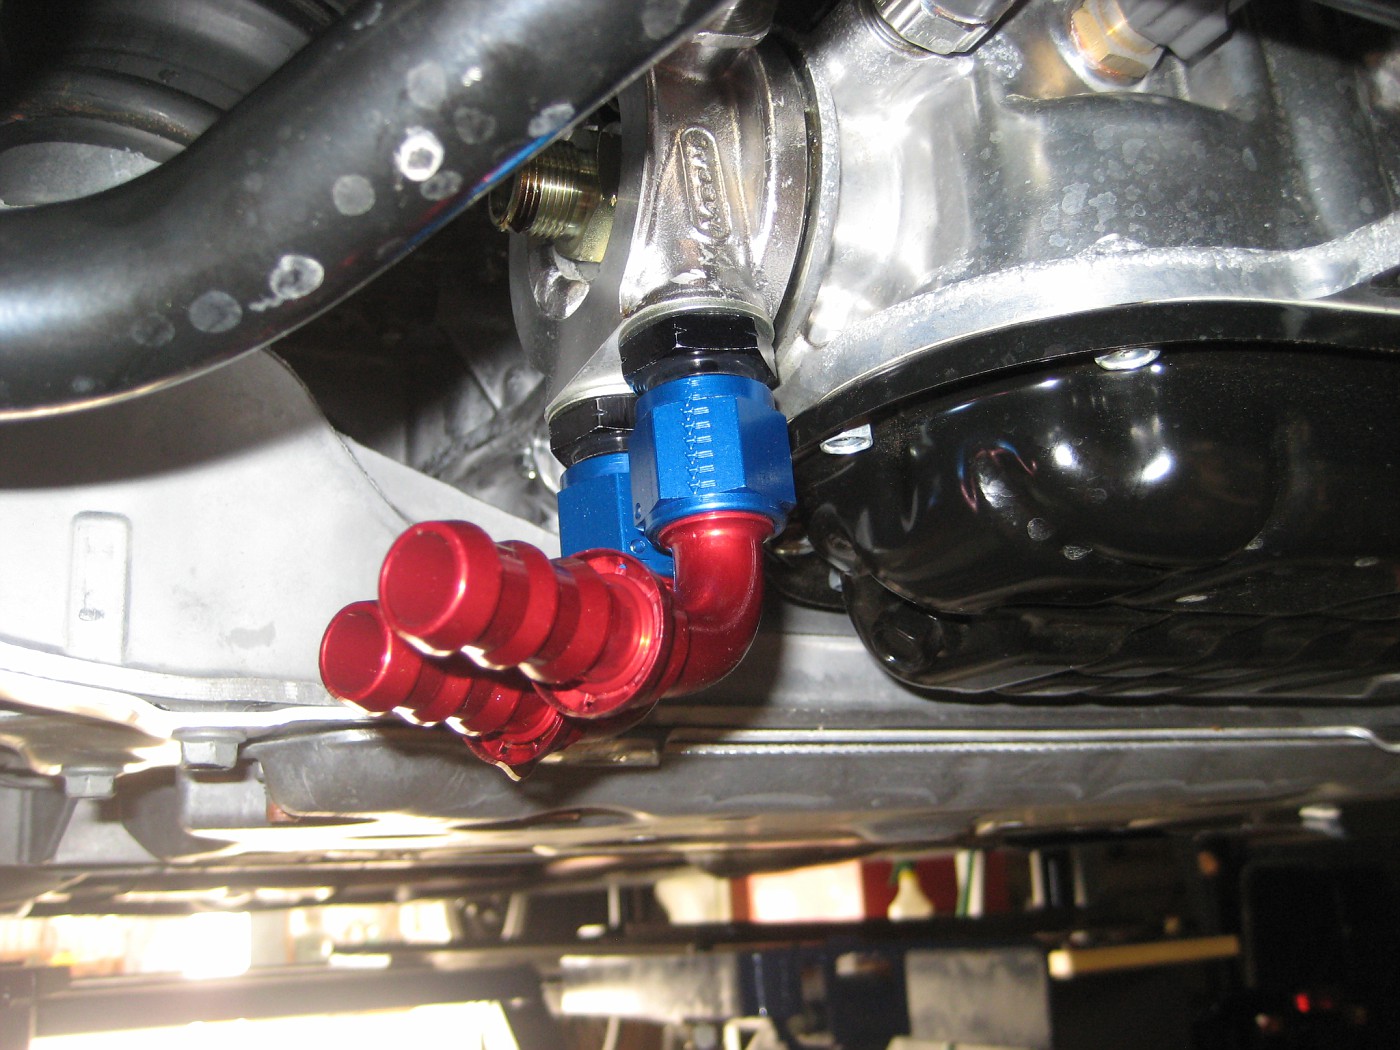 and decide where you want to route the lines. AN10 lines are pretty big and will need good radius clearances 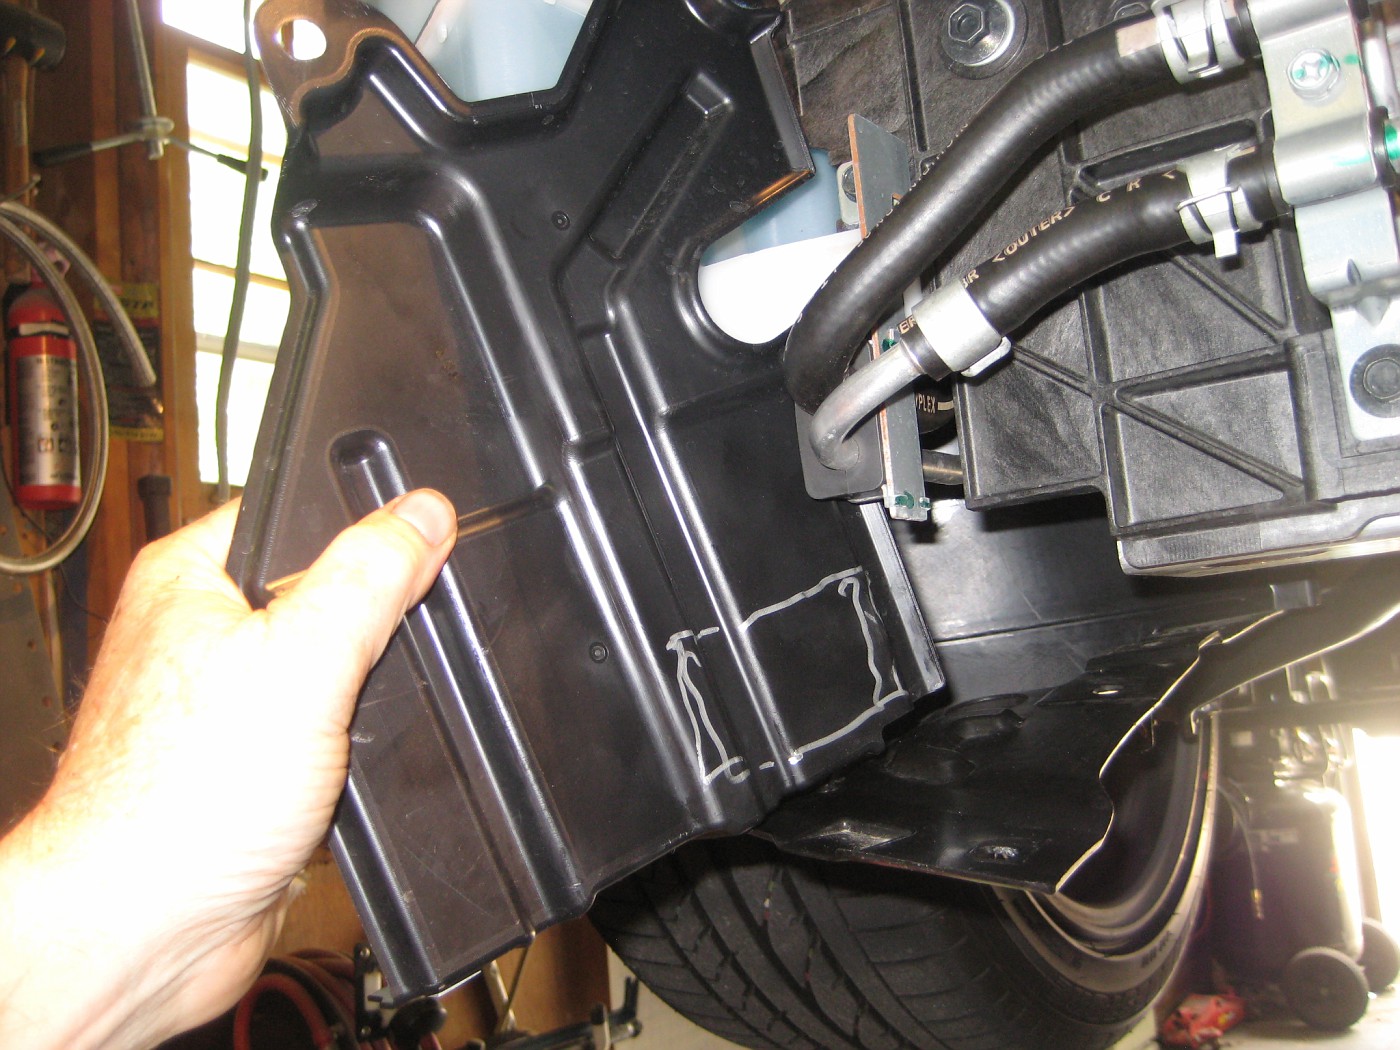 Cut the Hose holes in the rear: 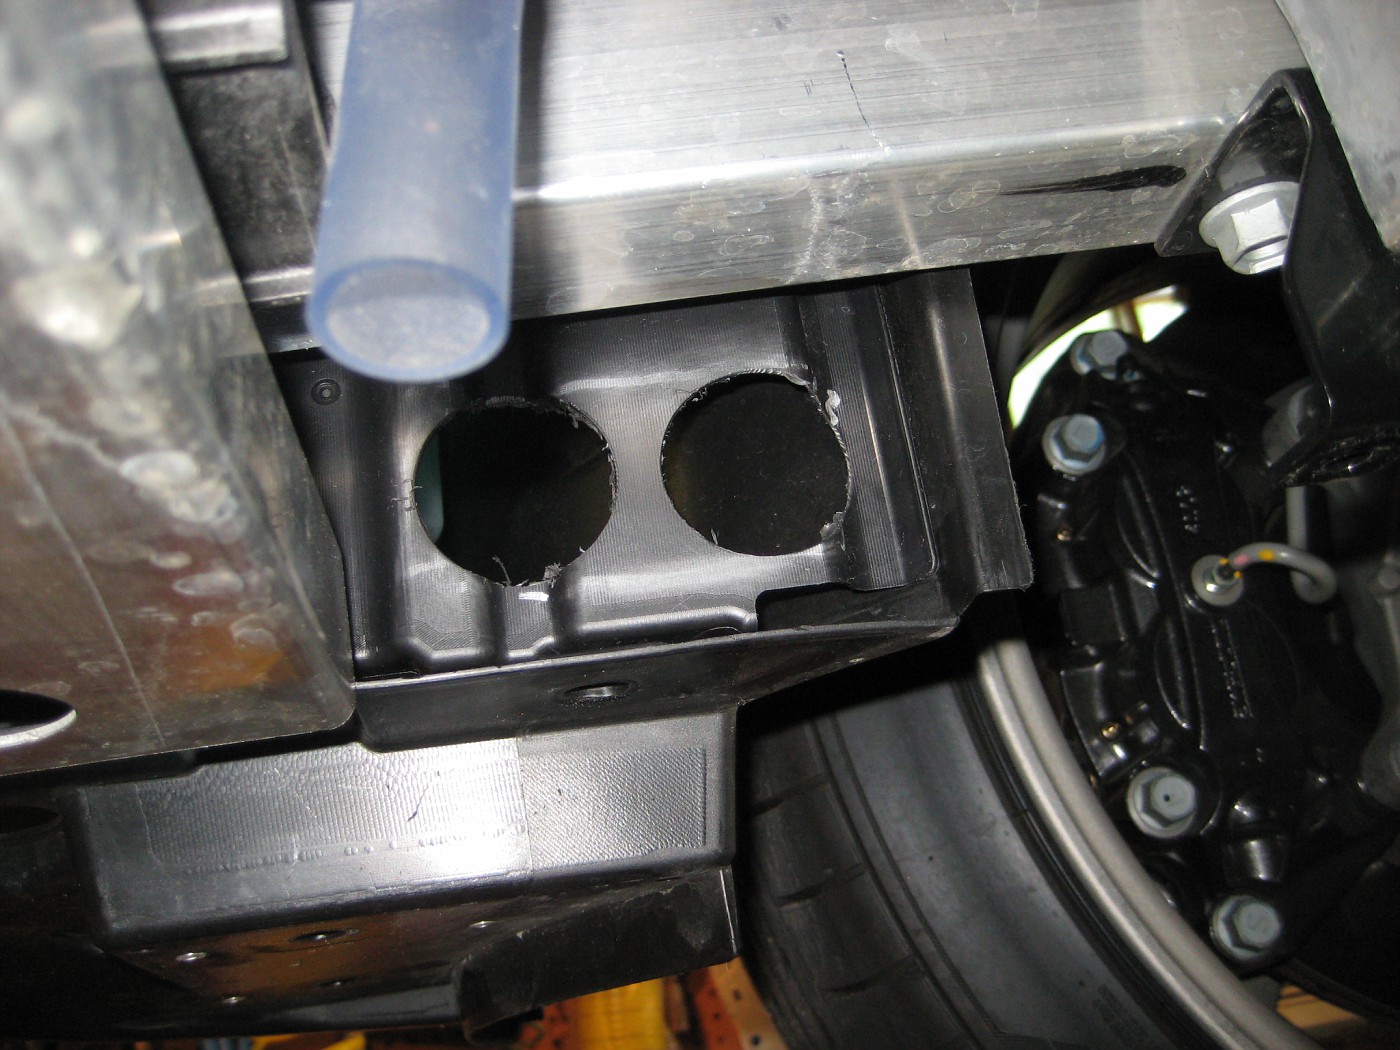 and the front. These panels are held in place with the plastic push pins or slide in tabs and remove easily. 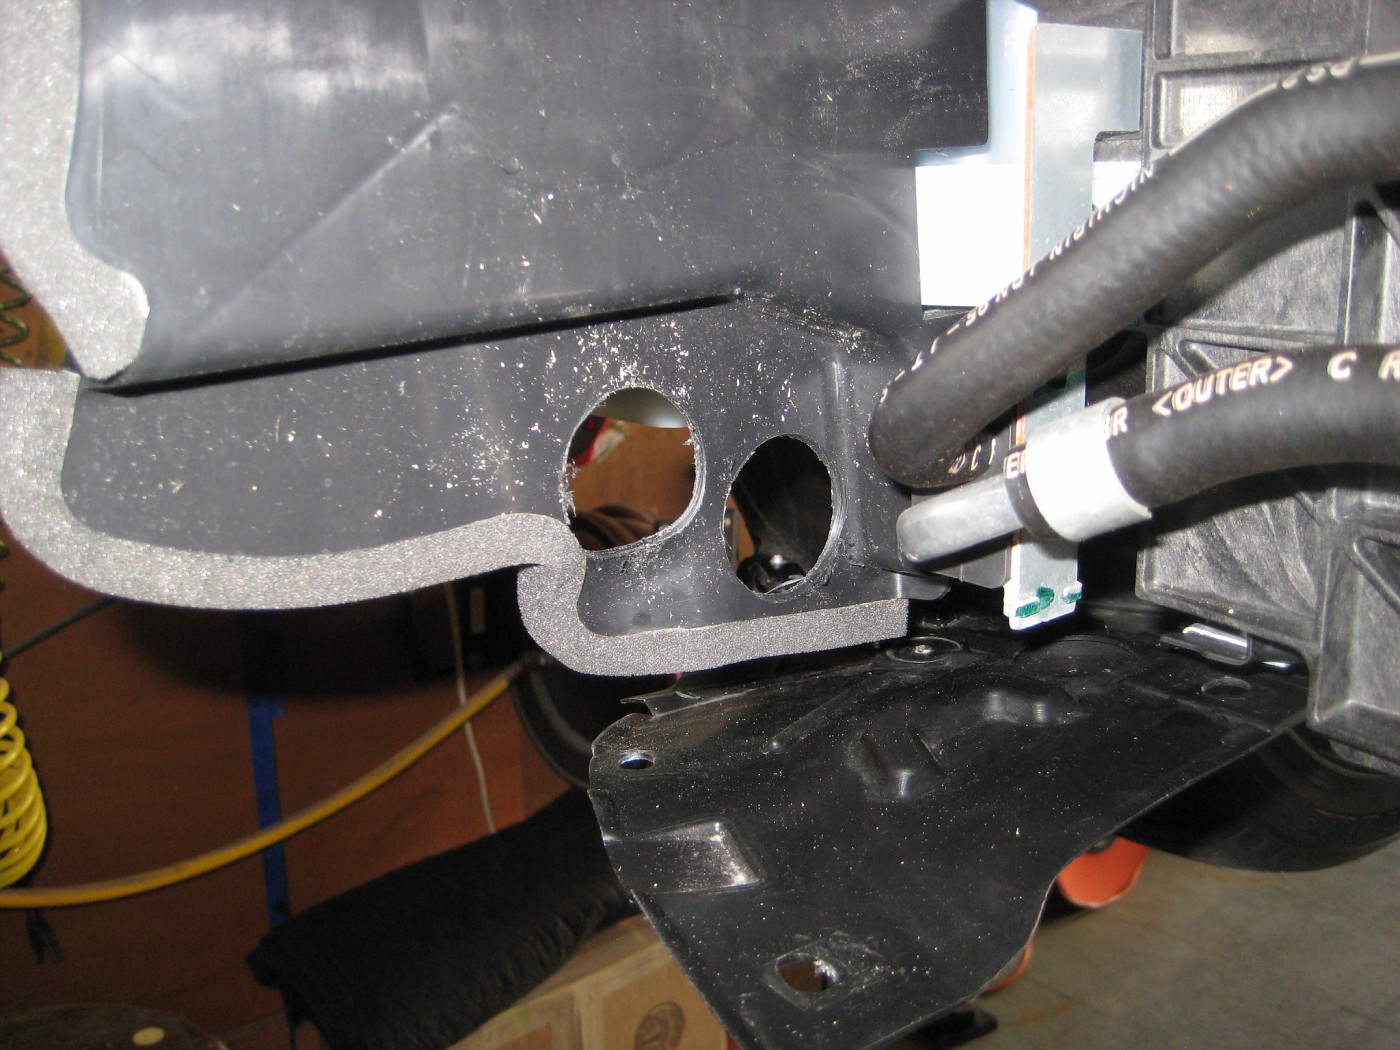 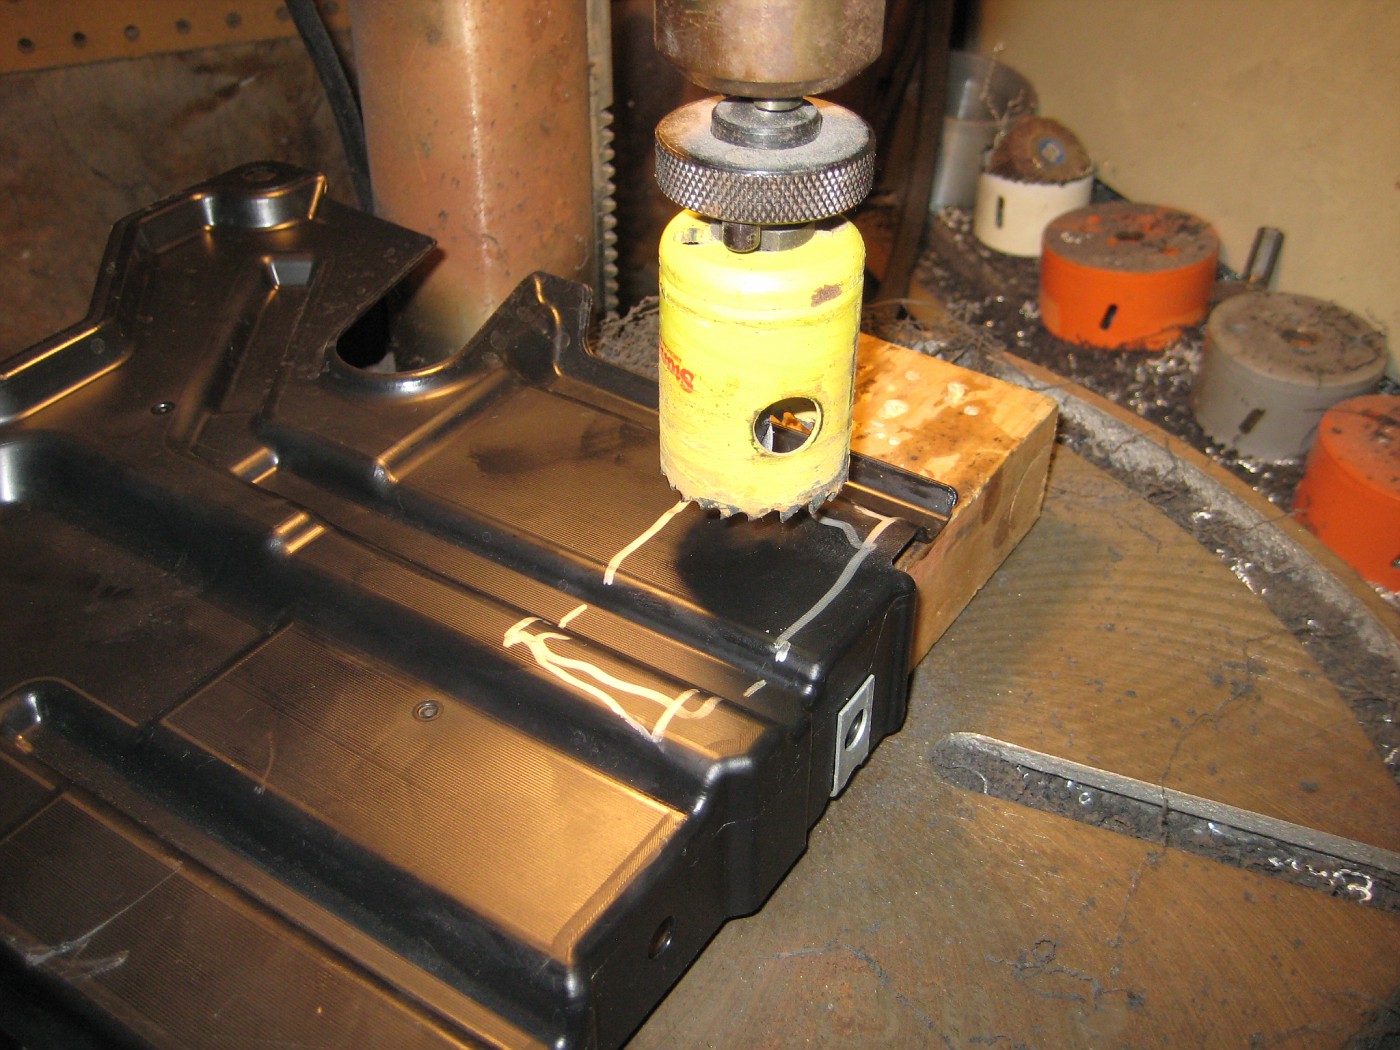 Mock up a bracket for the cooler: 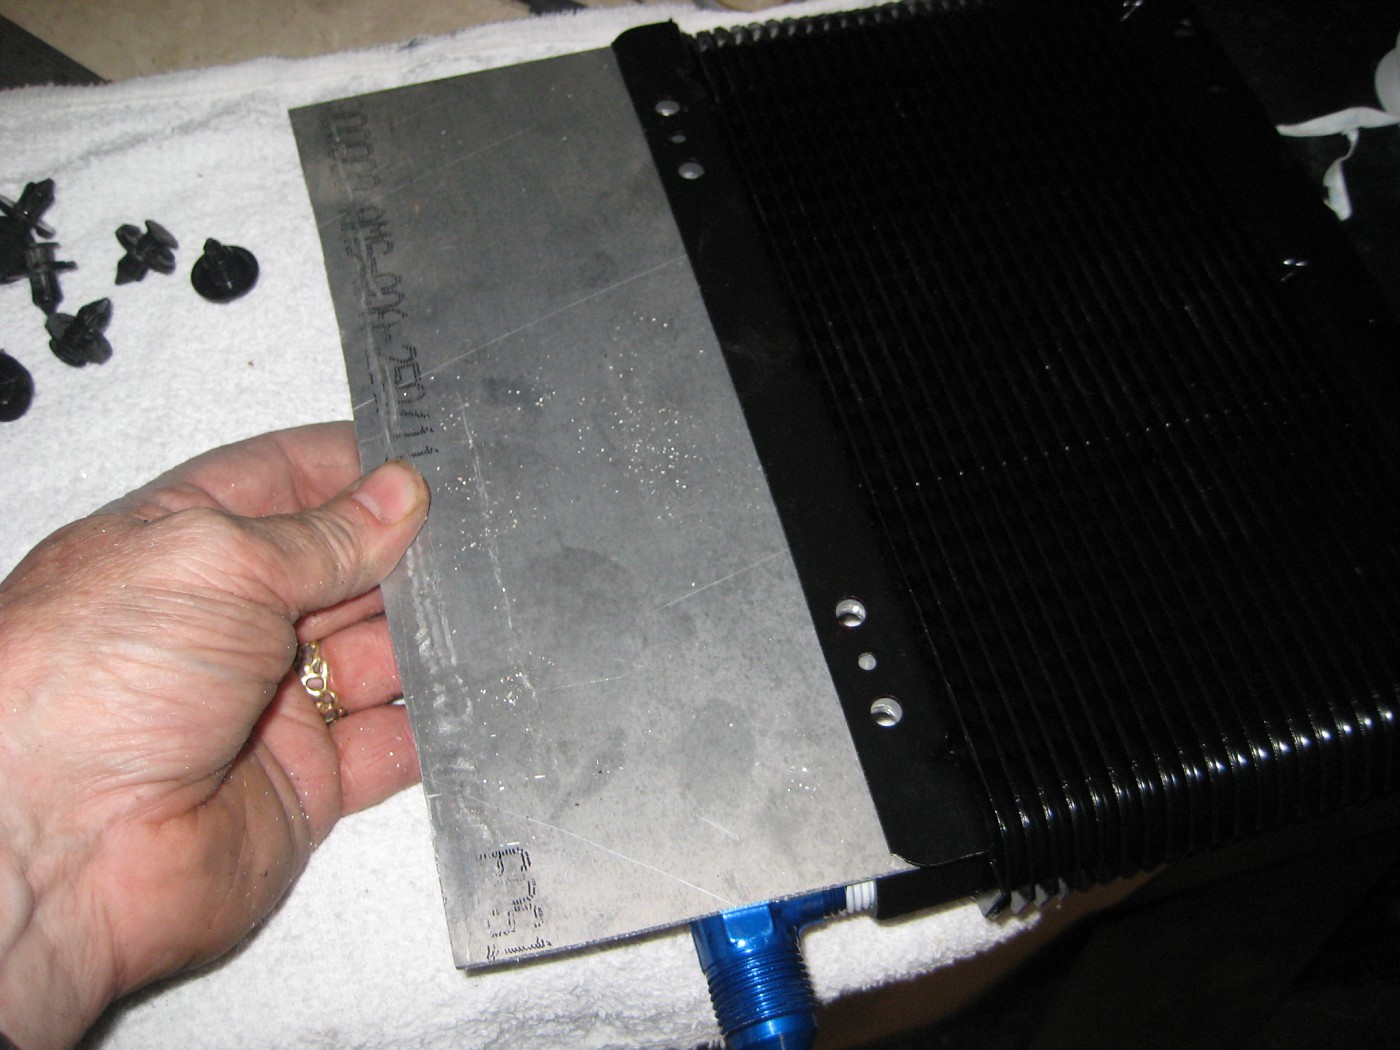 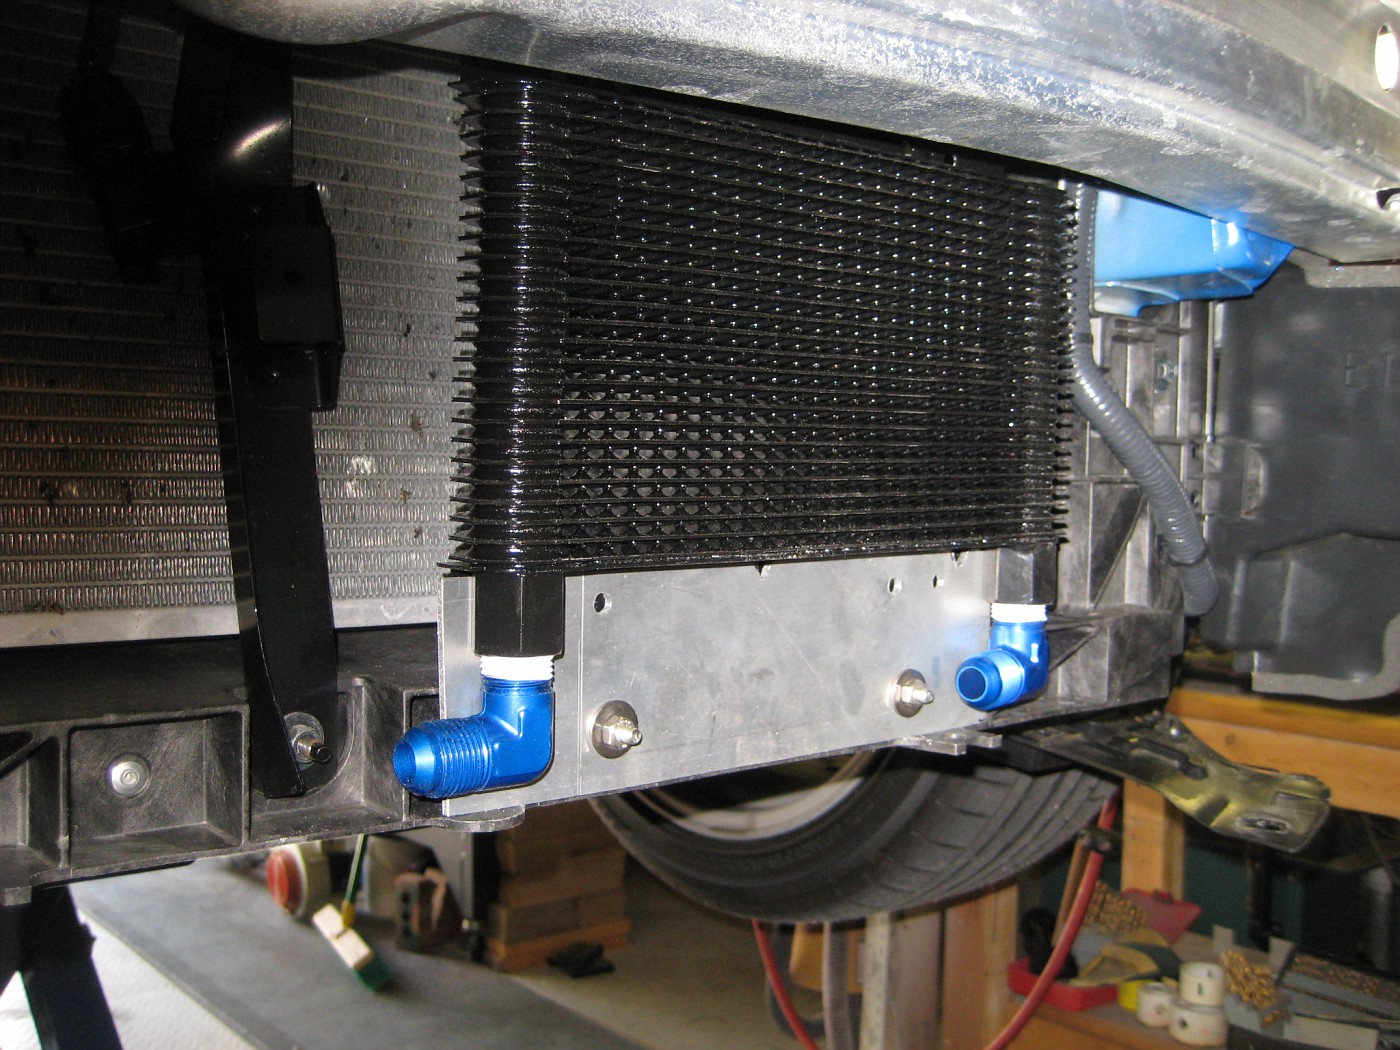 Powdercoat it (what I did) or paint to make it stealthy. Mount it with stainless M6 bolts and Nylock hardware using existing holes on the lower composit radiator support.: 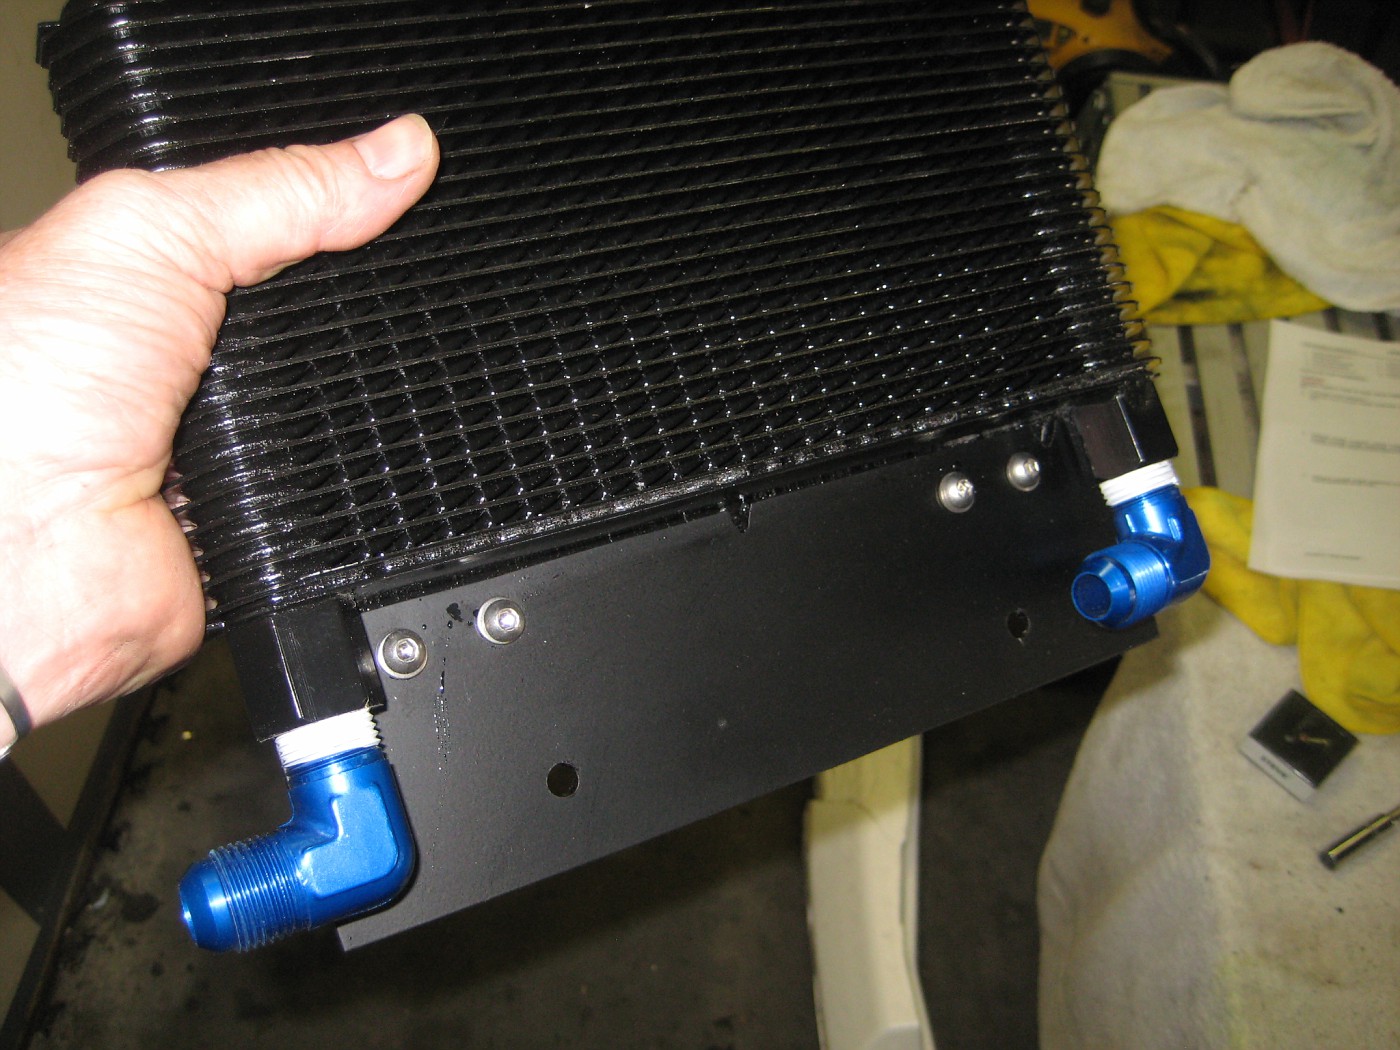 Measure and lay-out hoses. You'll need to buy 10 feet:  Install ends...The socketless Aeroquipt lines make this a piece of cake. They just push on and are good to 250 psi, kinda like a Chinese finger handcuff :-) You'll need a 49" and a 63" hose (actual hose length, not including fittings): Click here and scroll to the bottom for hose assembly instructions: http://64.202.180.37/files/phosend.pdf For information and pictures on the socketed style Stainless hose and fittings, see page 13, post 189 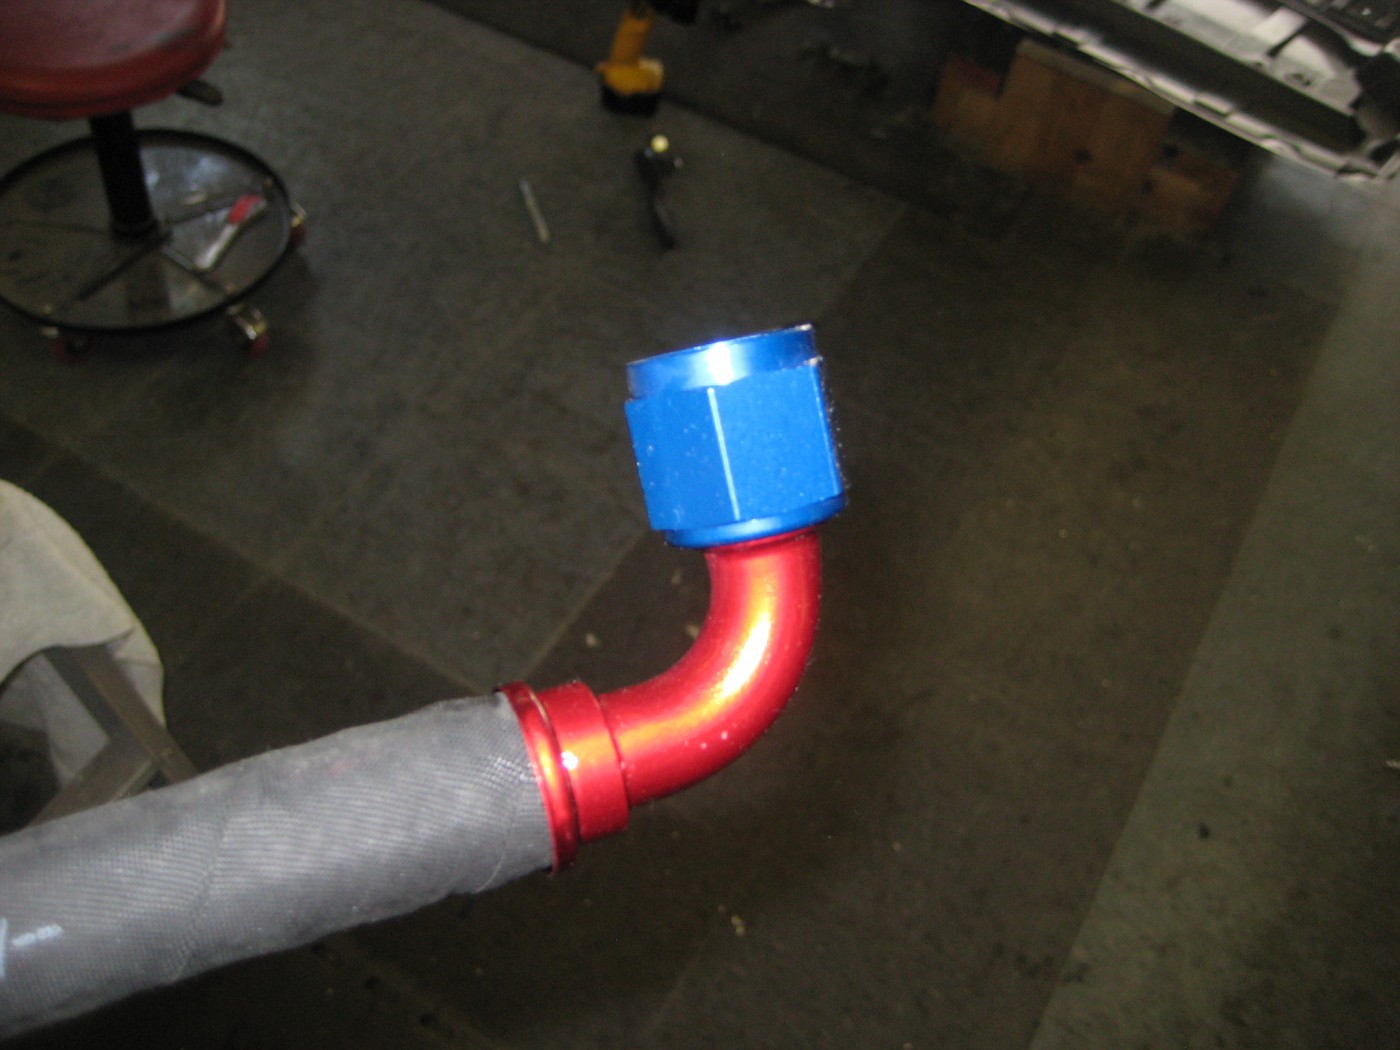 While your at it, upgrade your filter. See this thread http://myg37.com/forums/engine-drive...otsa-pics.html 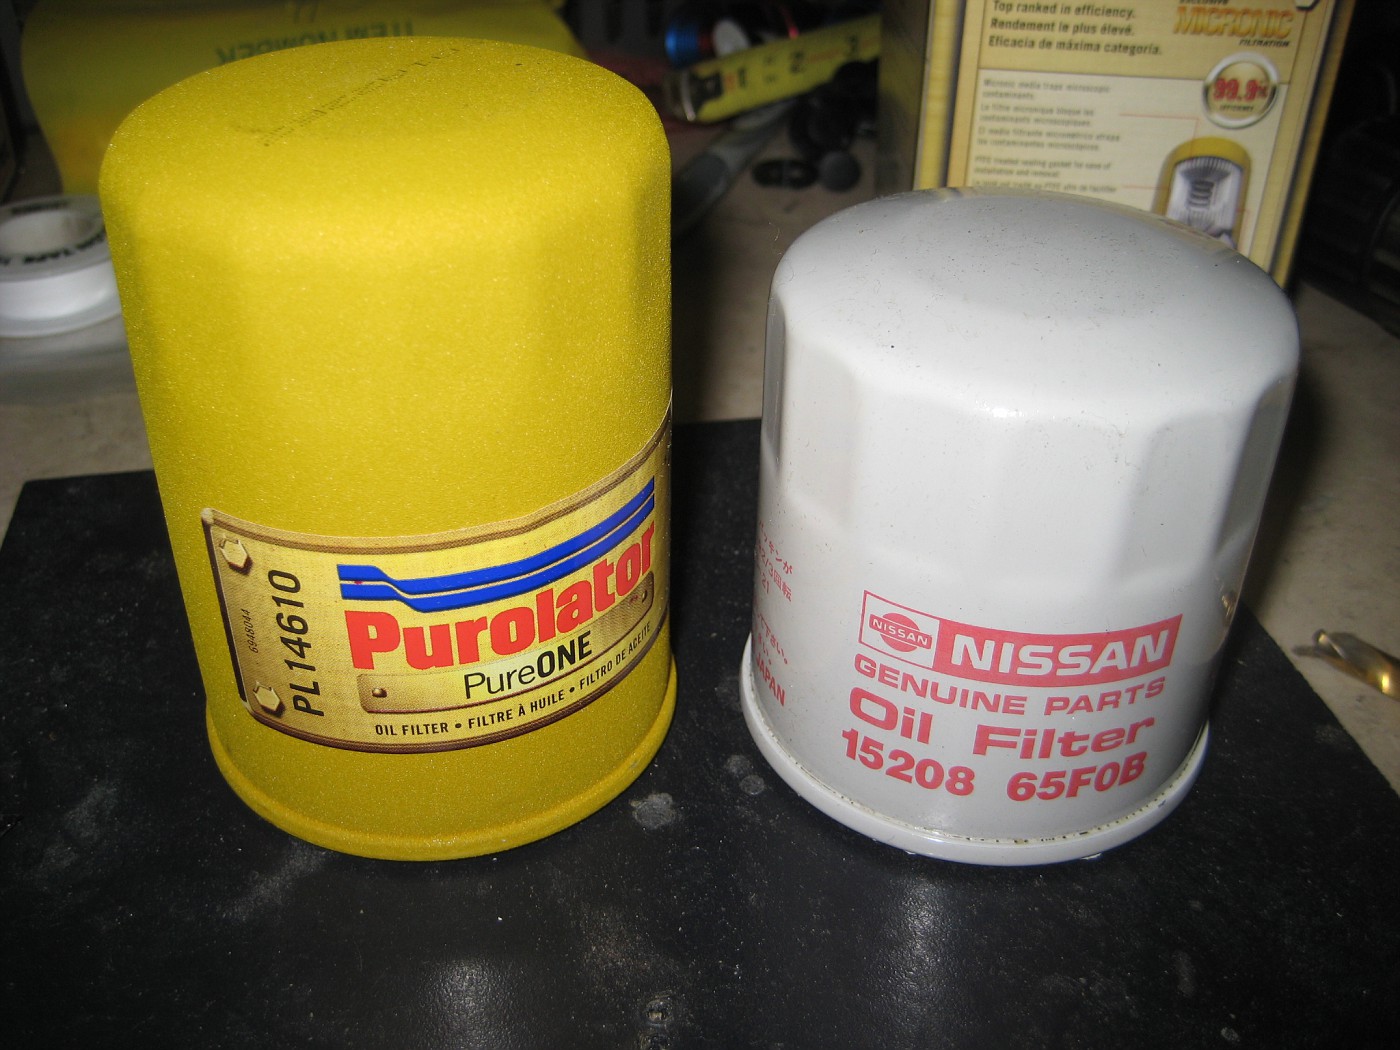 Hook up fittings and route lines: 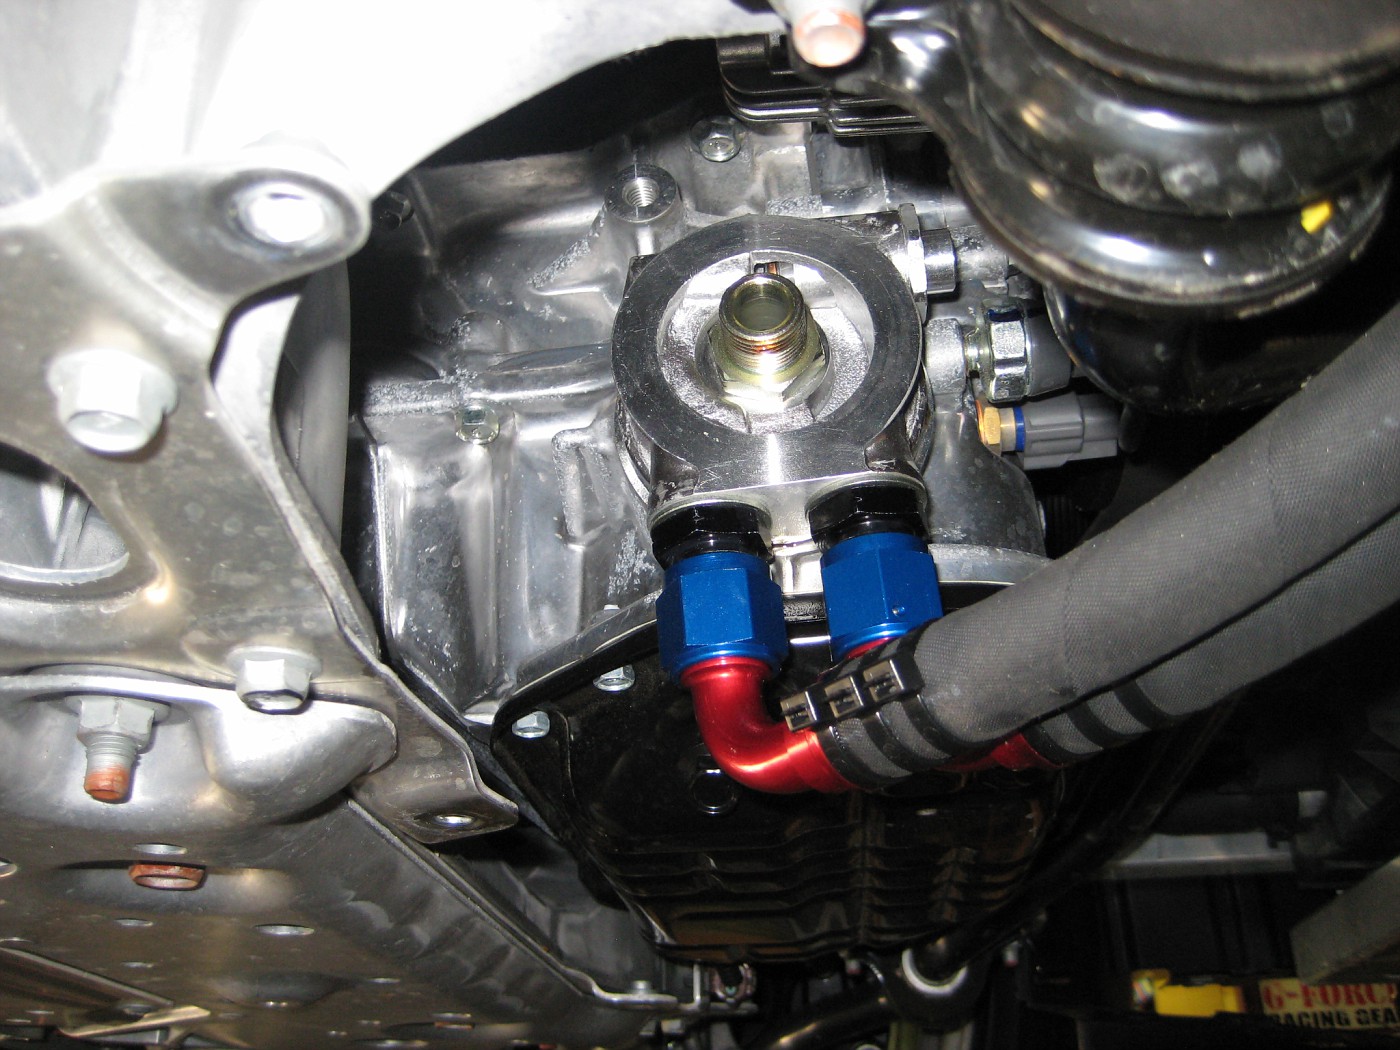 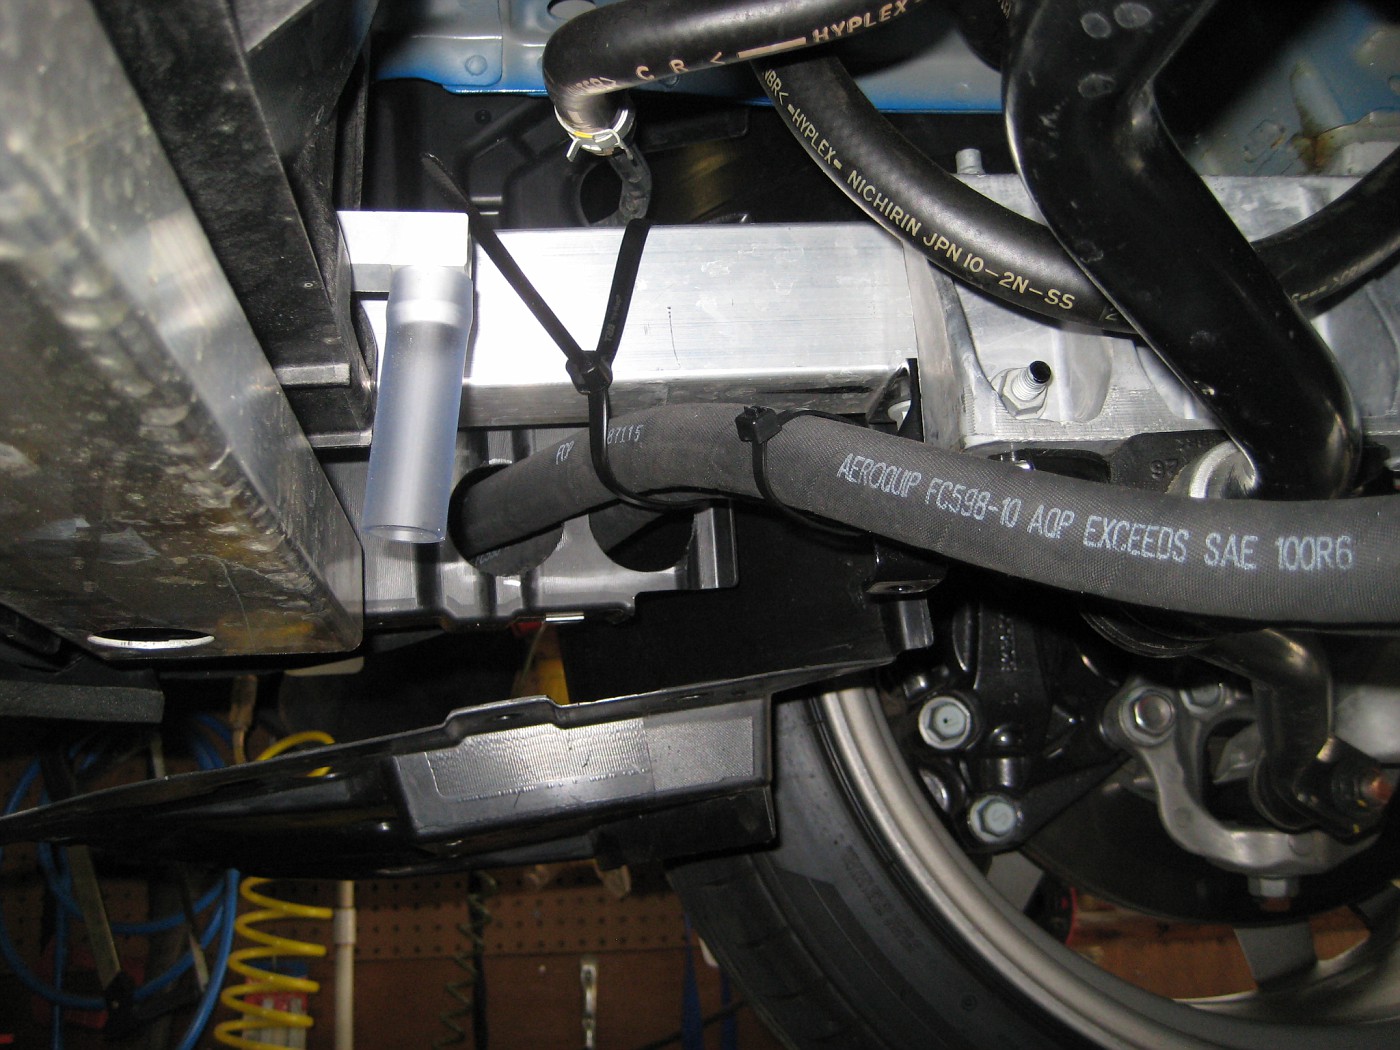 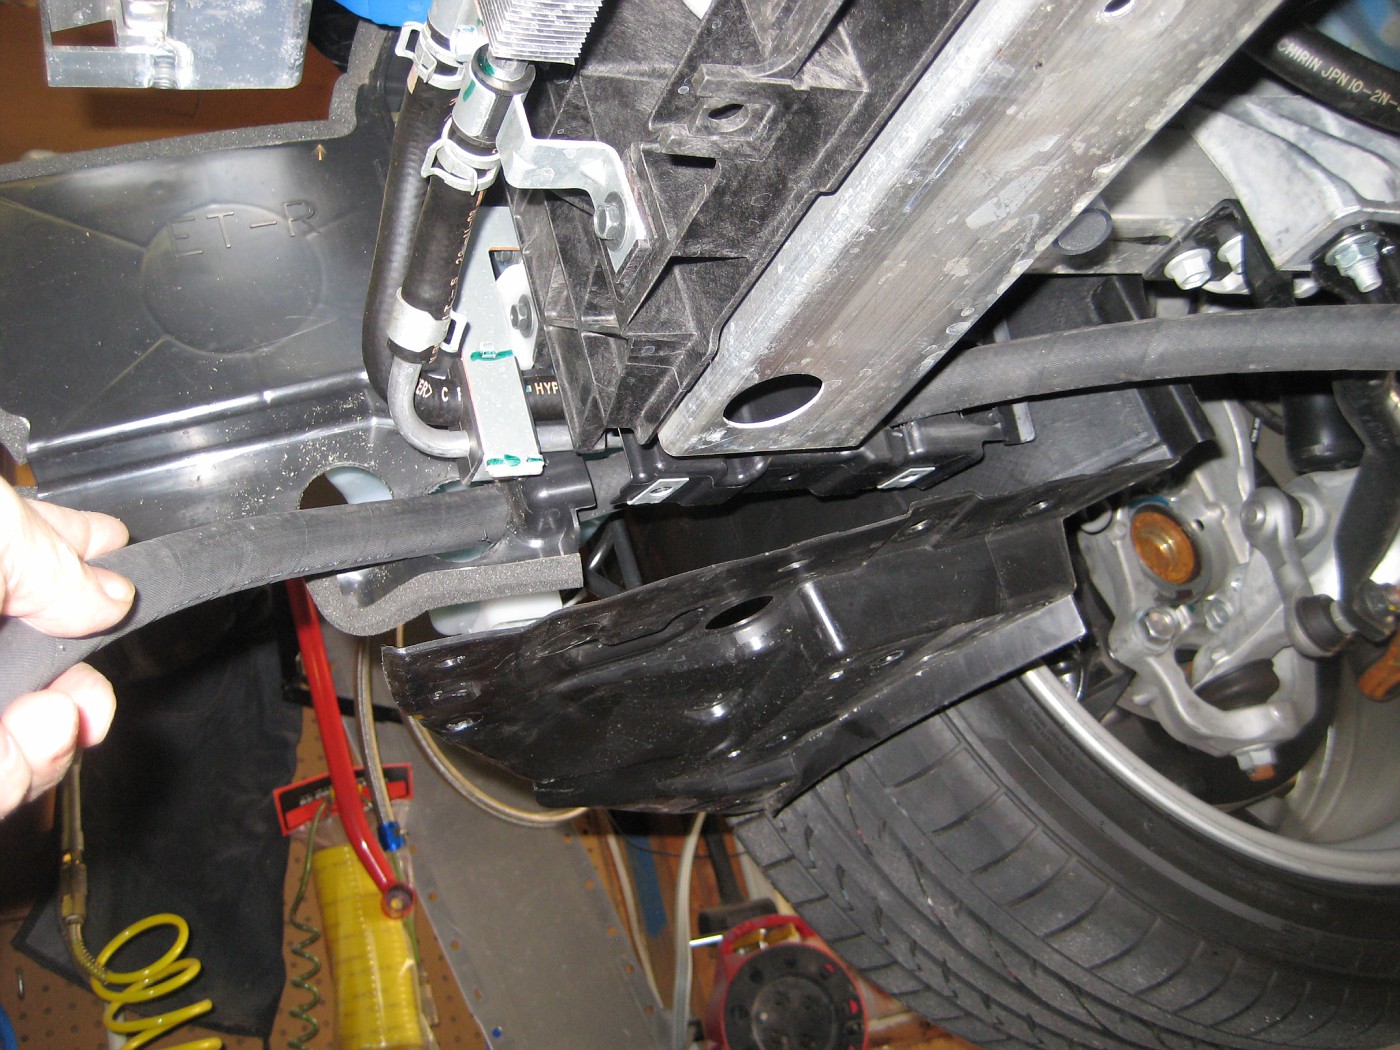 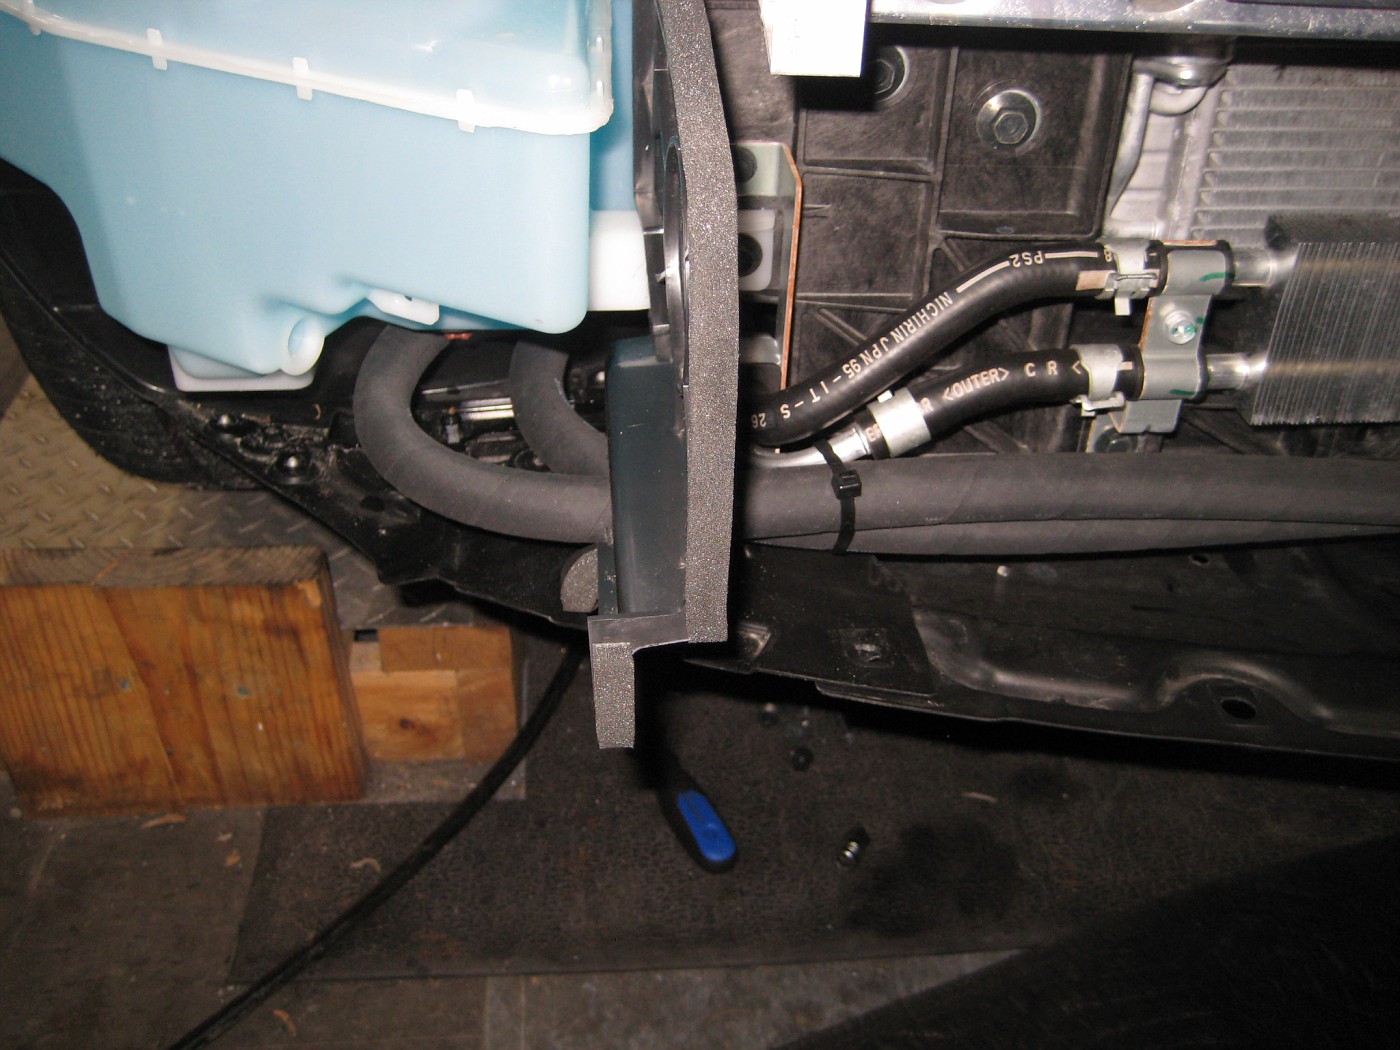 Check everything carefully and fix hoses in place to avoid chafing and t maintain your radius bends: 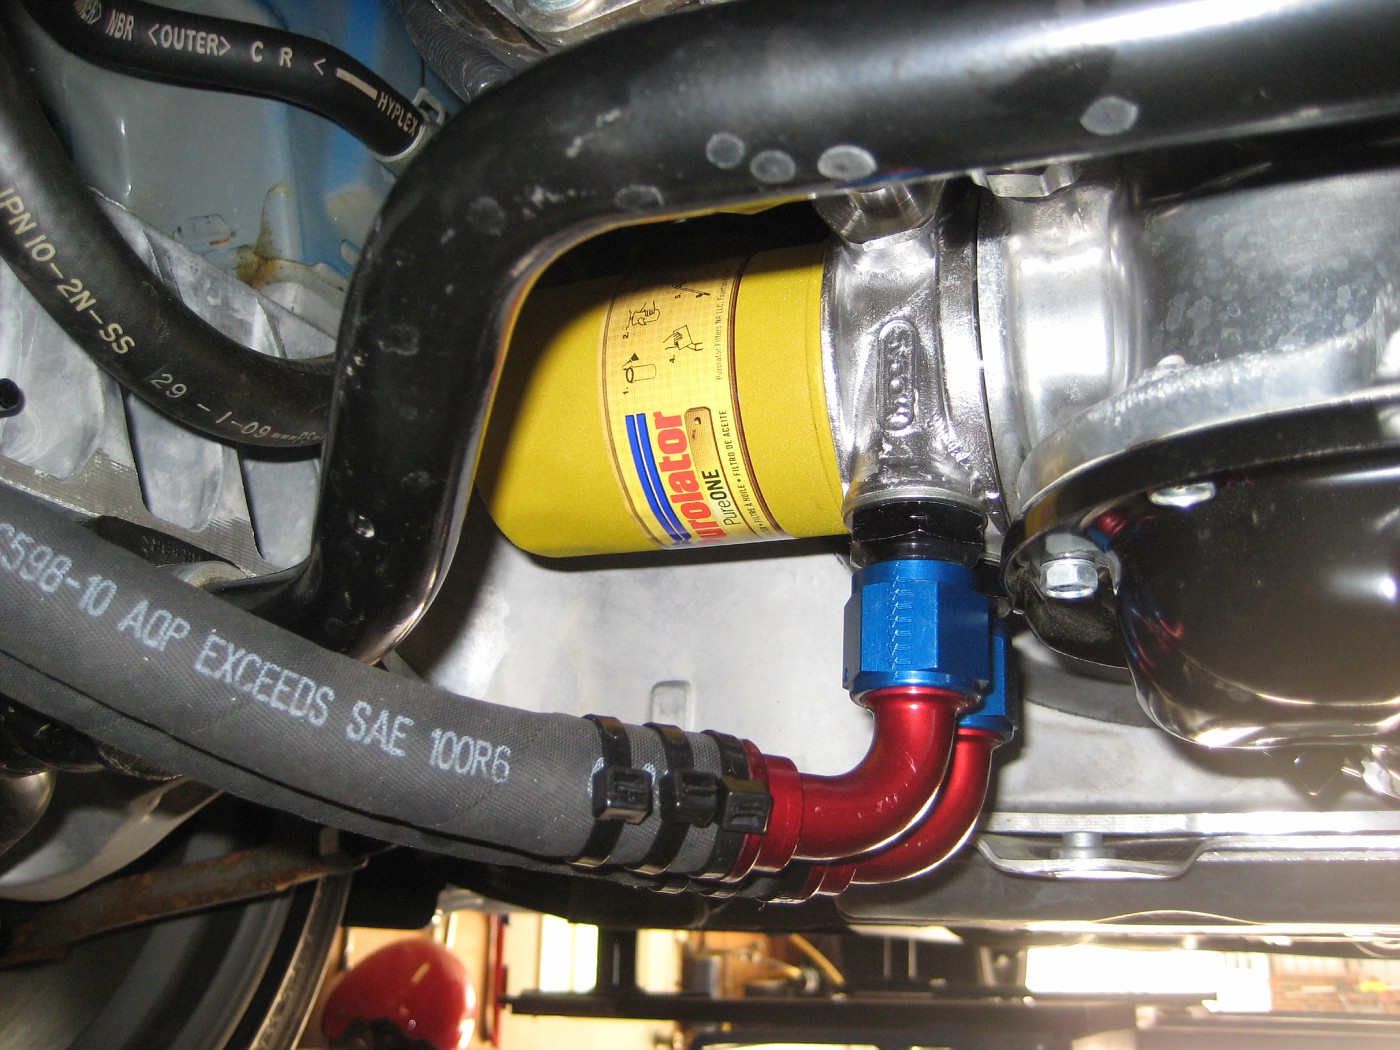 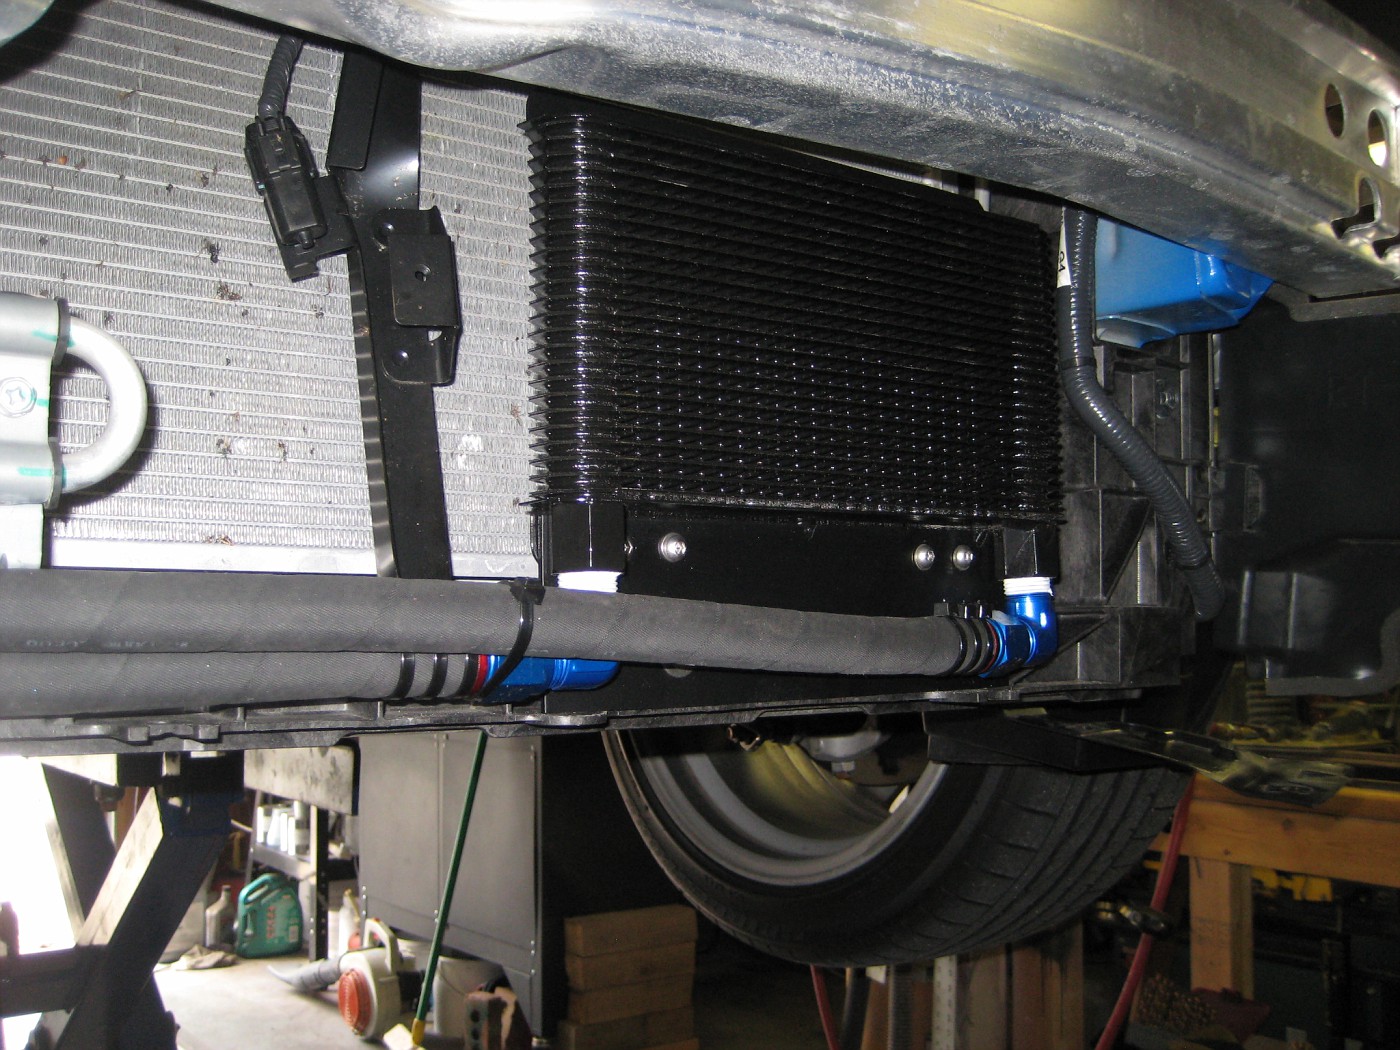 Nice clean install, Have a beer, admire your work. All done: 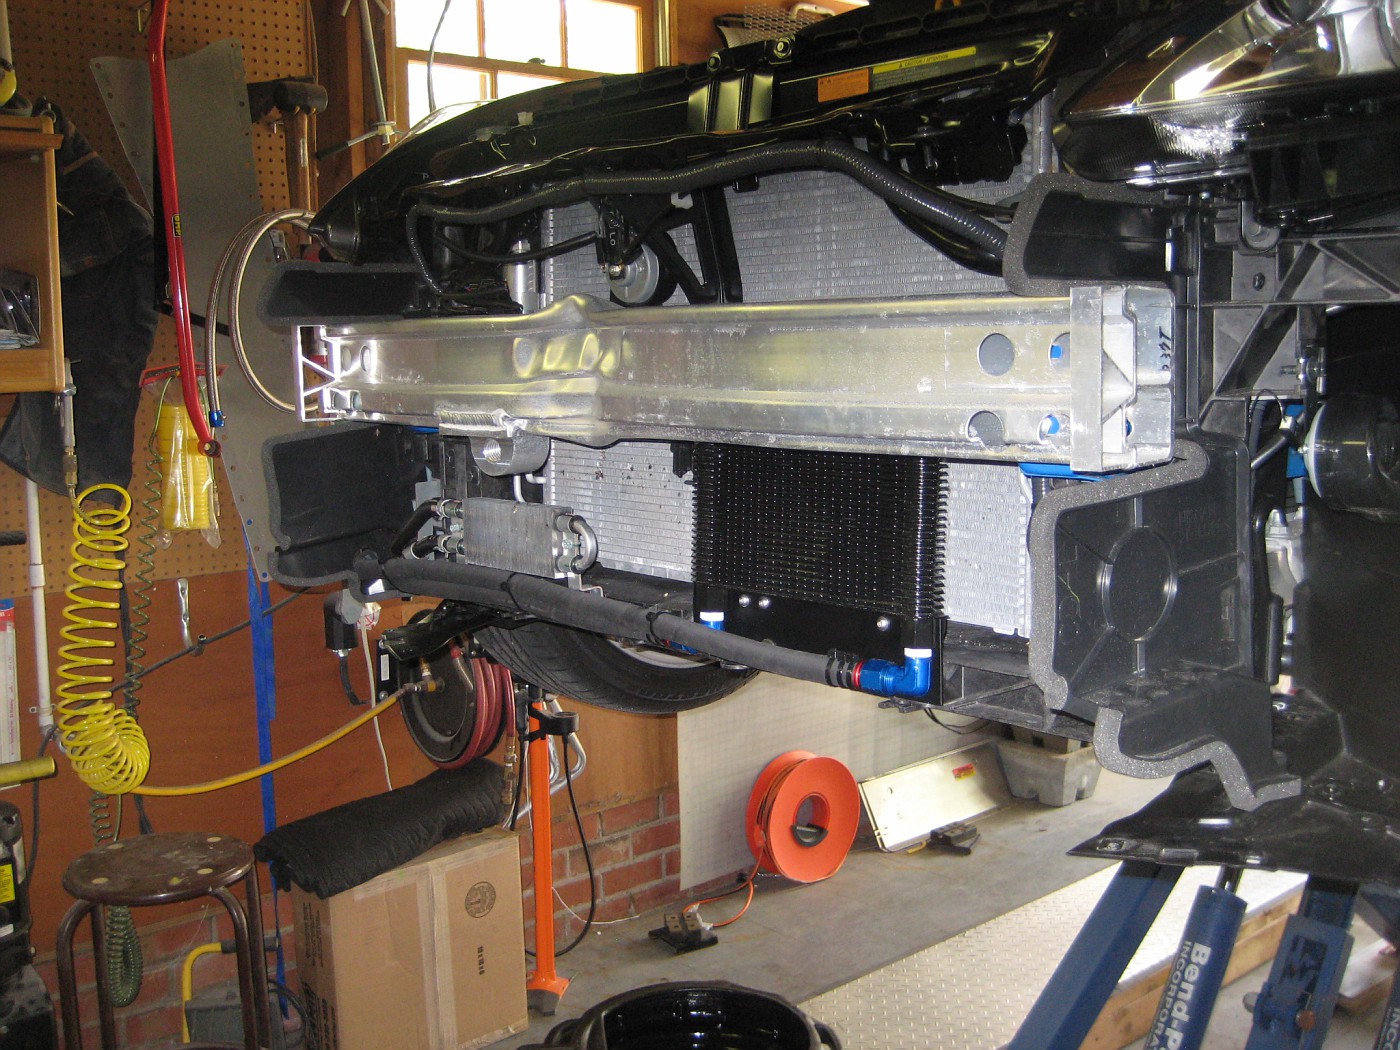 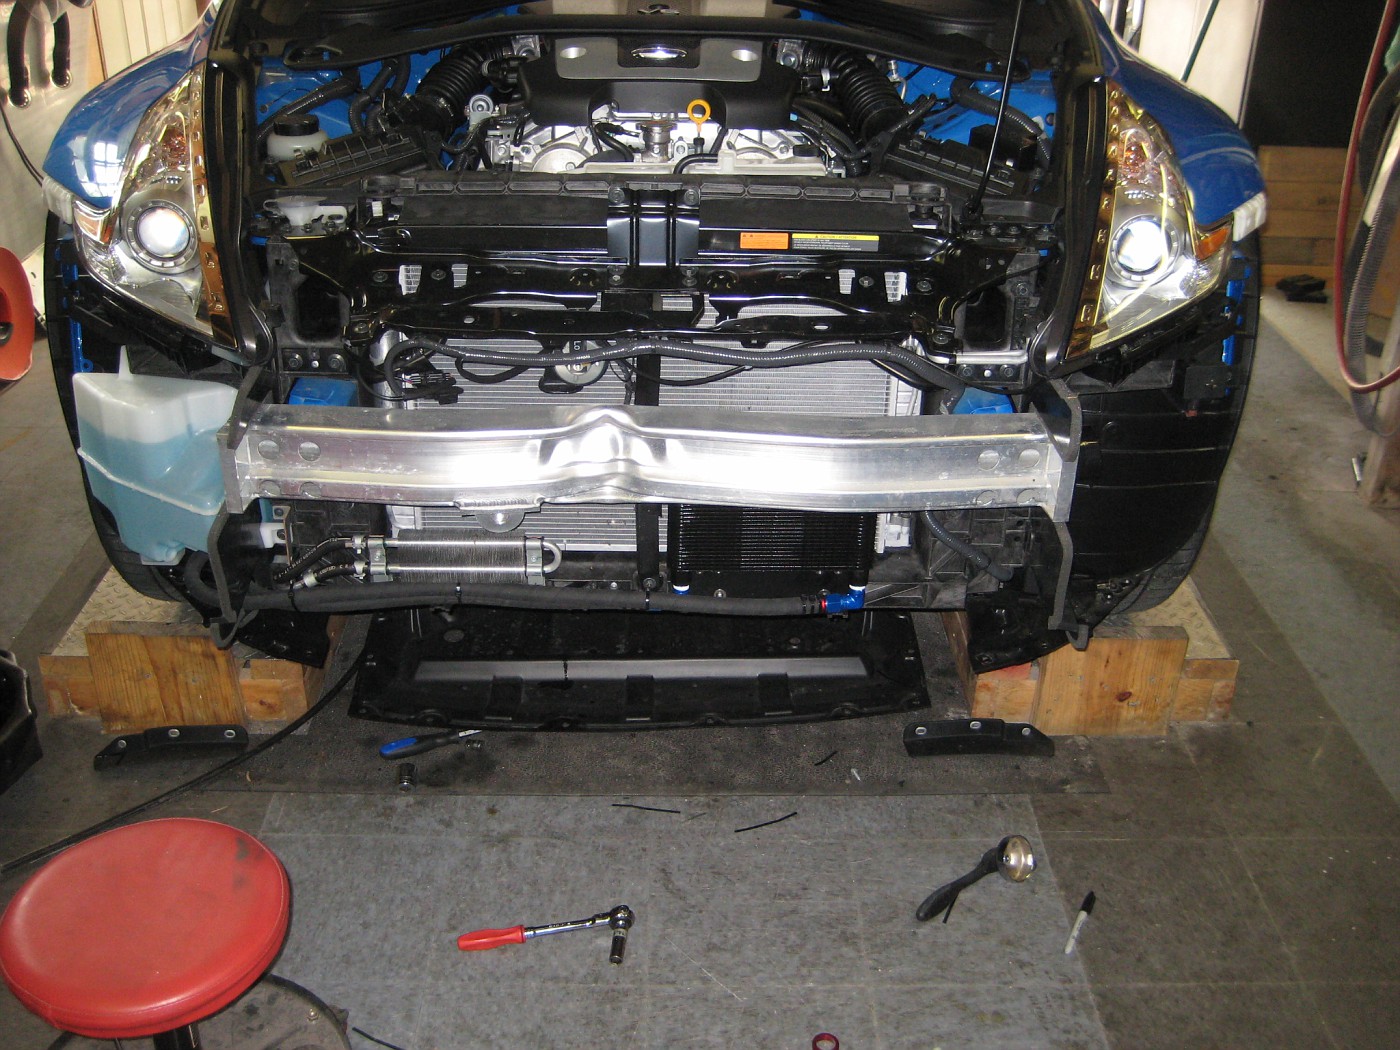 Cooler with new Fang Vents mounted: 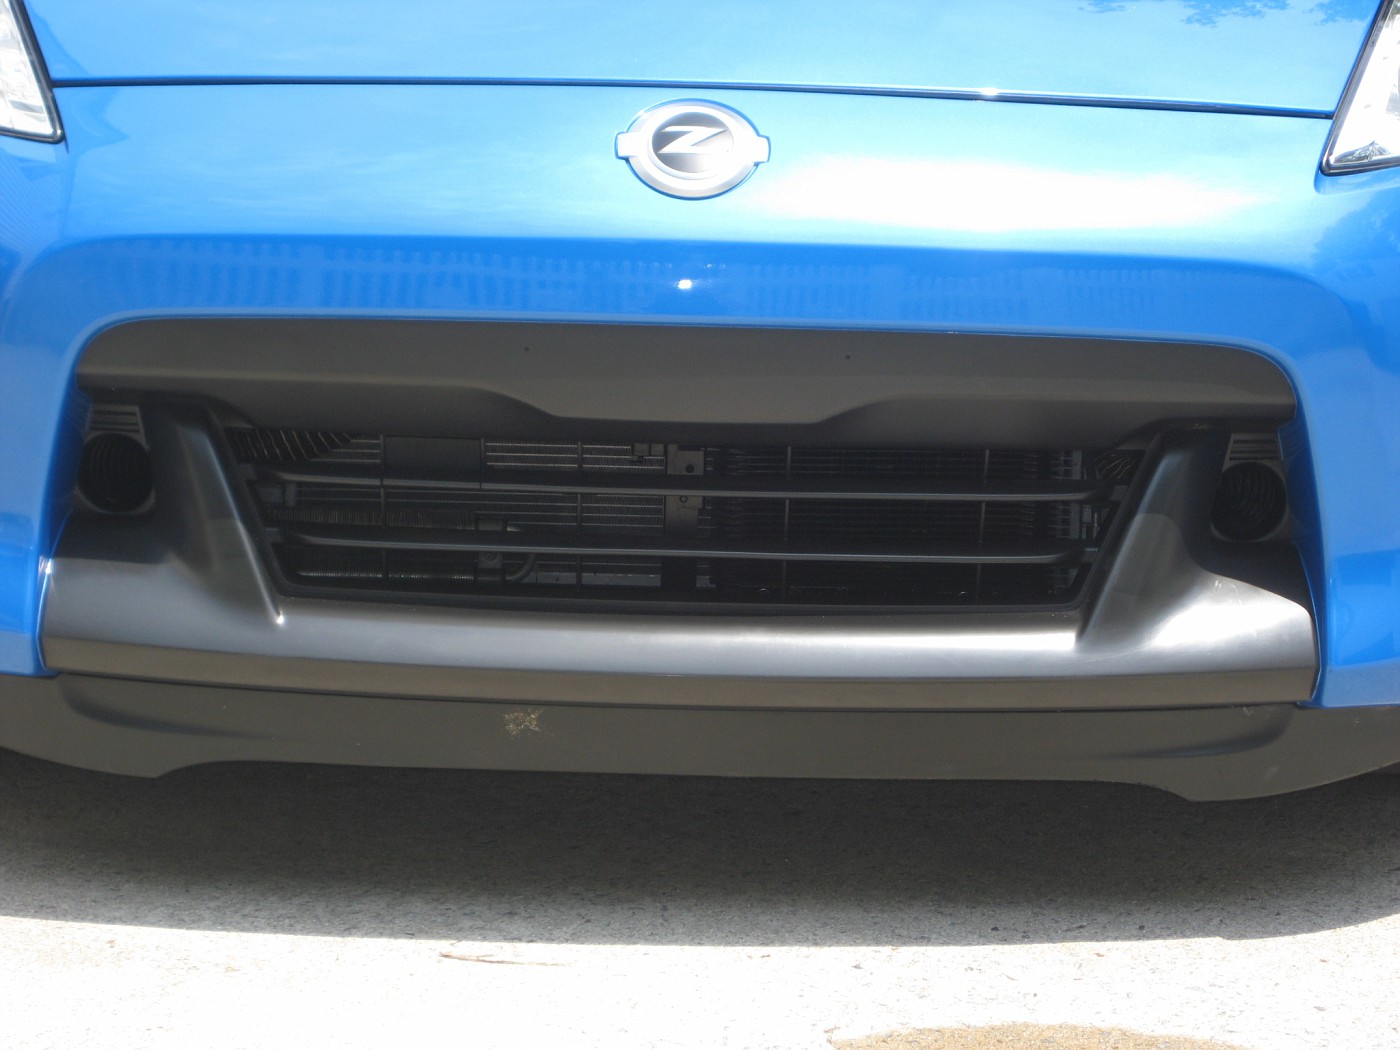 Upon start up there were Zero leaks. Took the temps up to about 185 on the lift with no issues at all.. I have not road tested yet as I need to get the nose back on. I'm looking for about a 20 degree reduction in temps and will report back once road tested. Road Test Update: went out in the country today and thrashed the car about for 45 minutes or so. Ambient temps 75 degrees, average coolant temps 184, Average oil temps 190. I had to work hard to get it to 200 degrees and it would not get hotter than that. I'm seeing a 20-25 degree average reduction from what I would expect to see without the cooler under similar drive conditions... 5/19: Another drive today to run some errands. 56 degrees ambient, Oil stayed between 190-195. Very close to paralleling the water temps.. 5/20: Ambient temps 80 degress. Pushed it a bit but only saw temps in the 195-210 range. 6/25: Ambient temps are a little hotter these days (85-90) and the oil temps seem to be holding in the same range. 400 miles since install. Day to day around town 195-200. Hotrodding around out on the country roads 200-215 9/8: Several months and 2000 miles since the install (3500 miles total)l. Daily temps continue to average 190-195. Pushing the car, maybe 210. I have yet to see temps over 225 on Pennsoil dino oil. Full synthetic to be added at the next change at 4K. Some notes: This is not a difficult install, even when rolling your own with a Bag 'O parts. If you are at all squeamish about building a bracket, or putting hoses together, then by all means buy a pre-fabbed kit from Stillen, GTM or DDM. You can save a few bucks going the route I went, upgrade some components and have the satisfaction of a solid DIY. A thermostatic plate should be considered a necessity for anyone living in the Northern climes or anyone considering a larger cooler. None of the pre-packaged cooler kits for more money (except the GTM) seem to include this. Buyer beware. The only difference with this install is you have to fab up a bracket and assemble your own hoses. Both these tasks are very easy. Total cost was $270 including shipping for the component parts. Time involved was about 4 hours taking my time and a few beer breaks. You'll now need just over 6 quarts for a complete fill which, in itself, will aid in cooling due to the new +1 quart capacity. Any questions, feel free to ask, and go to my photo album here Oil Cooler fabrication and install album | Ttschwing | Fotki.com for more info, parts list, sources and pics. If you found this helpful, shoot me some REP points too!....Stay cool....  WINTER UPDATE: Since this install the weather has gotten cooler. Due to the way the Mocal Thermostatic plate works, the cooler is always in the system and receives flow no matter what the temp. It does not magically open at 180 degrees for a variety of reasons. See the Over-Cooling discussion here: Over-Cooling Solutions From Mocal: Quote:
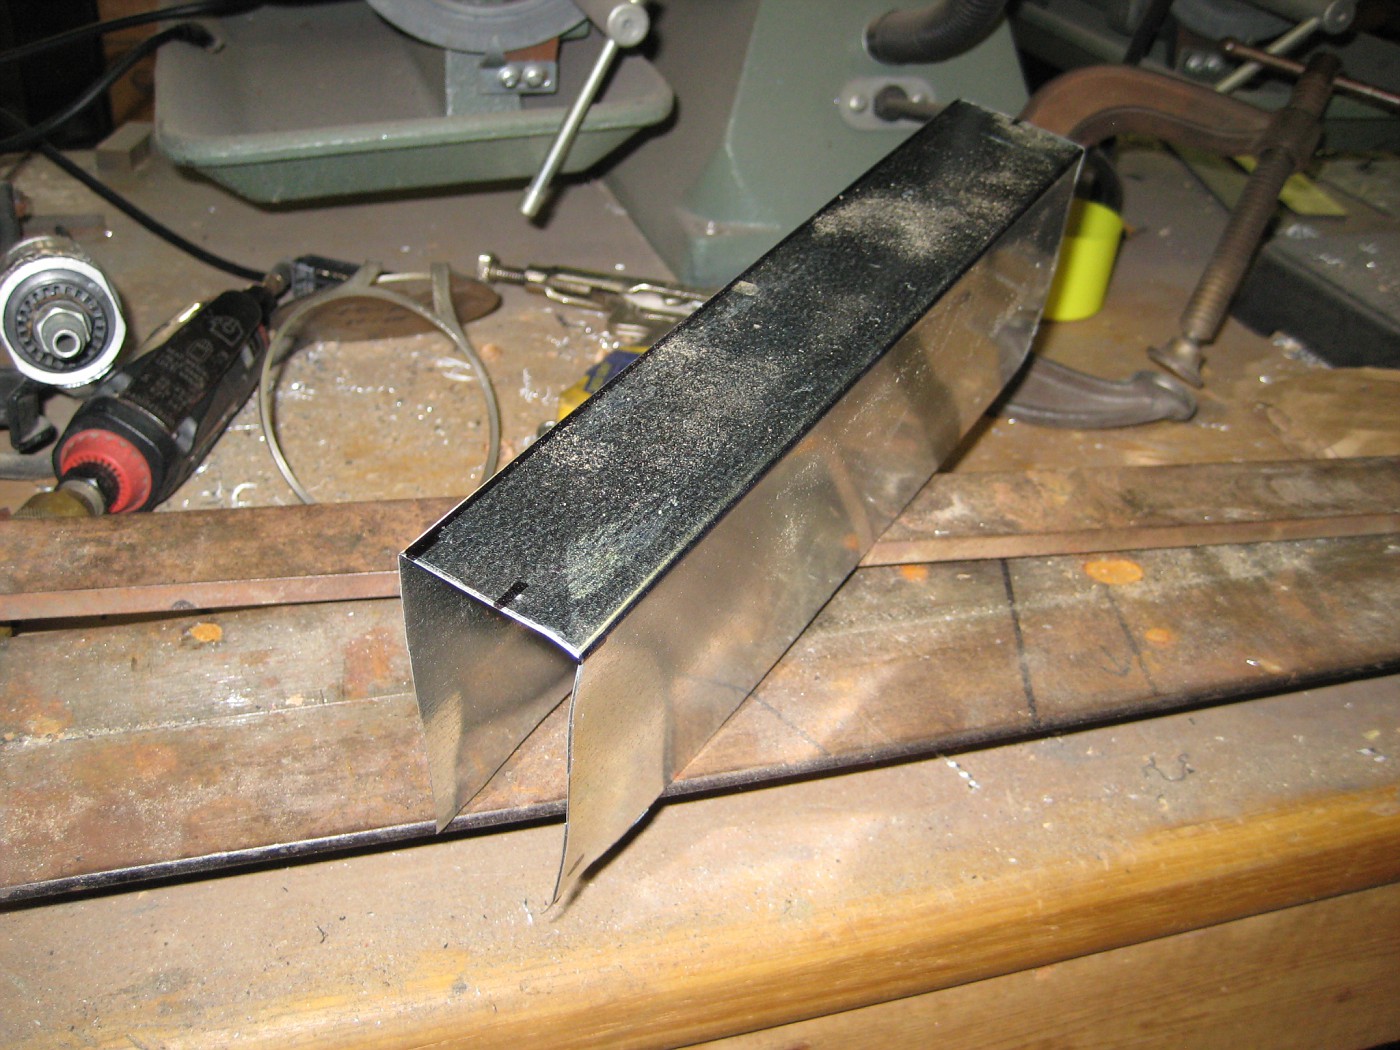 Adjust the size of the cover depending on the winter temps in your area.. 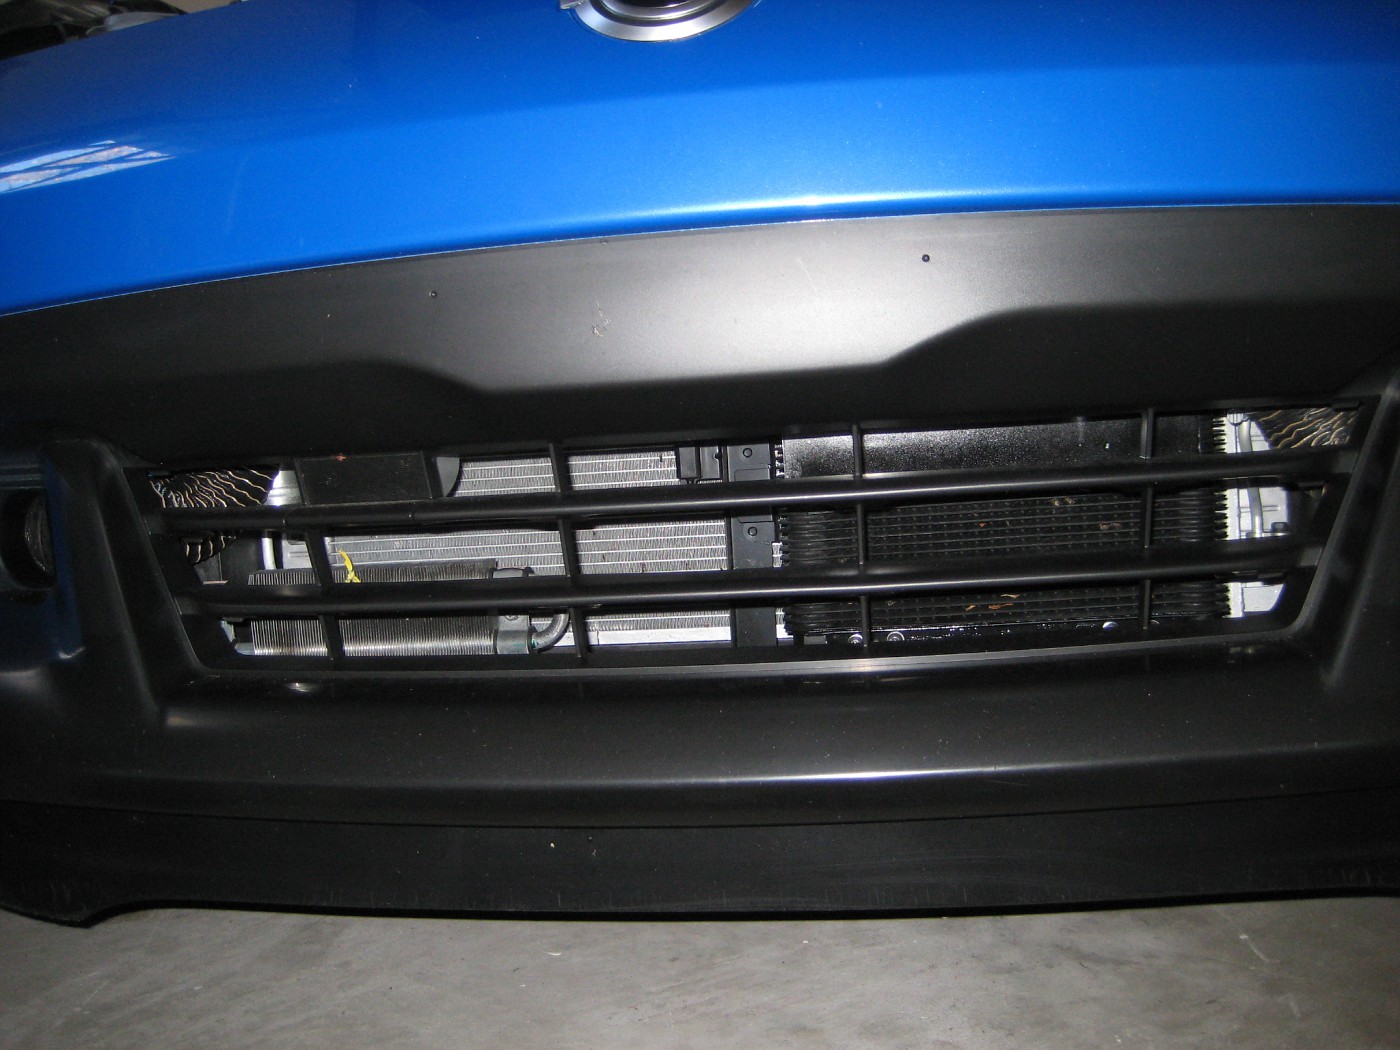
Last edited by Modshack; 03-30-2010 at 11:41 AM. |
|

|

|
|
05-16-2009, 02:51 PM
|
#2 (permalink) |
|
A True Z Fanatic
 Join Date: Mar 2009
Location: Houston, TX
Posts: 4,024
Drives: too slow
Rep Power: 3596 |
Nice work. One thing - you mounted the cooler connections on the bottom instead of the top, which seems atypical compared to the other installs we've seen pics of here. There was some debate about this earlier, the upside of your arrangement being that you can drain the oil on changes easier, and the advantage of the 'connections up' method being that it retains oil to get things flowing faster on cold start. I'm guessing it's because of the thermo sandwich plate that that's no longer an issue in your setup, hence going for the 'better drain on oil changes' route?
|
|
|
|
|
05-16-2009, 03:04 PM
|
#3 (permalink) | |
|
A True Z Fanatic
Join Date: Mar 2009
Location: Greenville NC
Posts: 2,883
Drives: 370Z Sport
Rep Power: 978 |
Quote:
Thanks.....Yes, it's easy to crack the AN fittings at the cooler or the plate for a complete drain. All the other installs I've done have been with fittings down and no issues. The thermo plate does isolate the cooler and prevent drainback as it's routed through the filter (the Purolator has a more robust anti-drainback system as well). Another advantage to the cooler is the oil capacity is now up to just over 6 quarts which, in and of itself, helps with cooling..Without the ability to drain the cooler, you're left with 1+ quarts of dirty oil after a sump drain. Last edited by Modshack; 05-17-2009 at 10:24 AM. |
|
|
|
|
|
05-16-2009, 03:20 PM
|
#4 (permalink) |
|
A True Z Fanatic
Join Date: Mar 2009
Location: Naples, FL
Posts: 4,117
Drives: to work
Rep Power: 1858  |
Do you have to do any special purge when you first start the engine after the install? Or does the system pressurize and fill itself without any need for other intervention?
|
|
|
|
|
05-16-2009, 03:24 PM
|
#5 (permalink) | |
|
A True Z Fanatic
Join Date: Mar 2009
Location: Greenville NC
Posts: 2,883
Drives: 370Z Sport
Rep Power: 978 |
Quote:
Last edited by Modshack; 05-16-2009 at 04:10 PM. |
|
|
|
|
|
05-16-2009, 05:21 PM
|
#6 (permalink) |
|
A True Z Fanatic
Join Date: Jan 2009
Location: Zeeland
Posts: 1,046
Drives: 2016 370z Auto-Grey
Rep Power: 7588 |
Excellent thread - Thank you.
Can you provide specs of the parts for people who want to copy you, prices and suppliers, or am I being cheeky?
__________________
.  '03 Grey >>> '06 Black >>>'10 Silver >>> '16 Grey ^ |
|
|
|
|
05-16-2009, 05:31 PM
|
#7 (permalink) | |
|
A True Z Fanatic
Join Date: Mar 2009
Location: Greenville NC
Posts: 2,883
Drives: 370Z Sport
Rep Power: 978 |
Quote:
Rather than take up more bandwidth (this has already been posted several times in other threads), just hit my link and go to the Cooler install album. All the info and prices are there.. |
|
|
|
|
|
05-16-2009, 05:57 PM
|
#9 (permalink) | |
|
A True Z Fanatic
Join Date: Mar 2009
Location: Greenville NC
Posts: 2,883
Drives: 370Z Sport
Rep Power: 978 |
Quote:
They're made with 2x stock. Simple to build. Here's a shot that sorta shows you how it all works: 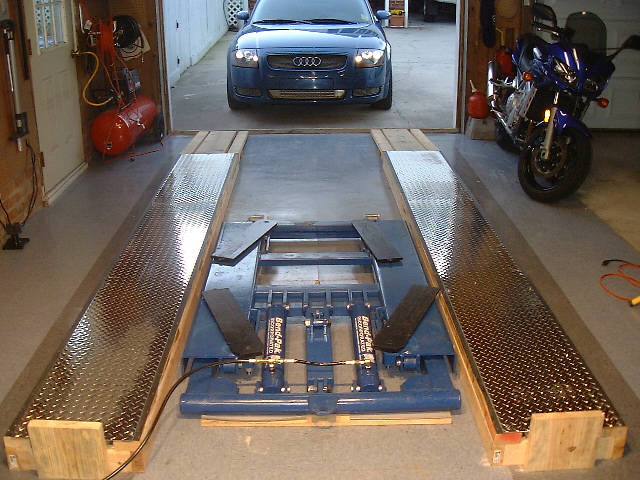
Last edited by Modshack; 05-16-2009 at 06:03 PM. |
|
|
|
|
|
05-16-2009, 06:12 PM
|
#10 (permalink) |
|
Enthusiast Member
Join Date: Apr 2009
Location: Radcliff, KY
Age: 44
Posts: 409
Drives: 2003 Cobra
Rep Power: 18 |
Do you think there will be any difference in longevity and quality between your setup and say a Stillen?
__________________
I will miss my Z. I hope she goes to a good home. |
|
|
|
|
05-16-2009, 06:18 PM
|
#11 (permalink) | |
|
A True Z Fanatic
Join Date: Mar 2009
Location: Greenville NC
Posts: 2,883
Drives: 370Z Sport
Rep Power: 978 |
Quote:
Last edited by Modshack; 05-18-2009 at 01:02 PM. |
|
|
|
|
|
05-16-2009, 06:36 PM
|
#13 (permalink) | |
|
A True Z Fanatic
Join Date: Mar 2009
Location: Greenville NC
Posts: 2,883
Drives: 370Z Sport
Rep Power: 978 |
Quote:
On my old (non-regulated) system on my TT I found that oil temps took quite a while to get up to the desired 180 minimum on really cold days.. (But I'm in North Carolina so they were few and far between) |
|
|
|
|
|
05-16-2009, 07:32 PM
|
#14 (permalink) |
|
Enthusiast Member
Join Date: Apr 2009
Location: Radcliff, KY
Age: 44
Posts: 409
Drives: 2003 Cobra
Rep Power: 18 |
Thank you. I am thinking about doing this mod myself, but it wont be until after I move.
__________________
I will miss my Z. I hope she goes to a good home. |
|
|
|
|
| Bookmarks |
|
|
 Similar Threads
|
||||
| Thread | Thread Starter | Forum | Replies | Last Post |
| DIY: Stillen 19 Row Oil Cooler Install - driver side (stock PS cooler unmoved) | djpathfinder | DIY Section (Do-It-Yourself) | 21 | 11-30-2015 05:47 AM |
| Real Auto Dynamics built and R/T tuned built motor TT | Mr.Squeeze | Forced Induction | 132 | 04-18-2014 06:09 PM |
| Anyone done a DIY for a 34r cooler install? | bigdog1250 | DIY Section (Do-It-Yourself) | 7 | 07-05-2012 10:38 AM |
| Oil Cooler Install | Zedx | Engine & Drivetrain | 10 | 05-19-2011 02:35 AM |
| install oil cooler? | Mt Tam I am | Nissan 370Z General Discussions | 5 | 08-25-2010 09:08 AM |


 17Likes


 Linear Mode


