
|
I've read through all the rear foglight threads here and on other sites. I don't know if I'm looking for an impossible function or just an undesired one, but this
|
|||||||
 |
|
|
LinkBack | Thread Tools | Display Modes |
|
|
 08-02-2012, 03:37 PM
|
#1 (permalink) |
|
Base Member
 Join Date: Jan 2012
Location: St Louis
Posts: 73
Drives: '12 370z PW M6
Rep Power: 15  |
I've read through all the rear foglight threads here and on other sites. I don't know if I'm looking for an impossible function or just an undesired one, but this is how I want to wire it up.
Scenario 1 - Daytime/No lights on - foglight off, except while braking Scenario 2 - Nighttime/Tail-lights on - foglight on while lights on - foglight brighter when braking. No switch up front, just activated by brake/tail-lights. It looks like the harnesses from Z1 will allow me to do both with their "long" harness, but it also comes on with the turn signal, which I do not want. Ok. I just called Z1. It's EITHER brake/turn signal OR running lights, not both. JDM Fairlady Z Reverse Fog Light Is there a way to make this work? Thanks. Last edited by mbowler; 08-02-2012 at 04:14 PM. Reason: adding infomation |

|

|
|
08-02-2012, 04:35 PM
|
#2 (permalink) |
|
A True Z Fanatic
Join Date: Jul 2012
Location: I 80 Biz U.S. 50
Posts: 1,710
Drives: Platinum Z
Rep Power: 1618  |
Ive looked myself and nothing. This is exactly how I want this to work also. I dont want that fog switch or the stalk switch. You hit it right on the money is there a way anybody?
|
|
|
|
|
08-02-2012, 04:49 PM
|
#3 (permalink) |
|
Base Member
Join Date: Jan 2012
Location: St Louis
Posts: 73
Drives: '12 370z PW M6
Rep Power: 15 |
I actually think I just found the answer buried in one of the long threads. Here is the link to the very post.
DIY: of complete FOG LAMP install The key it seems is that we have to replace the 7440 socket with a 7443 socket. I just ordered my fog light. I'll figure it out. |
|
|
|
|
08-02-2012, 10:36 PM
|
#6 (permalink) | |
|
A True Z Fanatic
Join Date: Jul 2012
Location: I 80 Biz U.S. 50
Posts: 1,710
Drives: Platinum Z
Rep Power: 1618 |
Quote:
It says plug and play with no messy external wiring and it works just like the thread starter stated. Is this the case? $450.00 for the led one is expensive. Any idea how much the regular one is? It’s not listed. Last edited by 1st; 08-02-2012 at 10:46 PM. |
|
|
|
|
|
08-02-2012, 10:22 PM
|
#7 (permalink) |
|
Base Member
Join Date: Nov 2010
Location: Irvine, CA
Posts: 201
Drives: on marshmallows
Rep Power: 16 |
I bought a 7443 socket on ebay and modded the JDM rear fog. Dremel and some cutting but nothing major. 7443 bulbs are readily available at any autoparts store. I followed the DIY. I eventually want to run a switch to the wiring to cut it off completely but I like it a lot! The subtle light when the headlights are on(w/o brakes) matches perfectly with the rest of the tail lights.
__________________
// nismo // Berk // PW JDM // WORK Meister S1 3pc // TOYO PROXES // POWERTRIX // |
|
|
|
|
08-20-2012, 01:35 PM
|
#9 (permalink) |
|
Base Member
Join Date: Jan 2012
Location: St Louis
Posts: 73
Drives: '12 370z PW M6
Rep Power: 15 |
Ok, well, I got it working. I'll do a quick write-up of how I pieced it together. My goal was to retrofit a 3-wire 7443 socket into the existing hole of the rear foglight without modifying the foglight (ie. the expensive part).
First, I purchased a couple of 7443 sockets from HERE (Scroll down until you see the actual socket, which looks like THIS) As of this writing, it is located 2nd from the bottom of the page. You only need one to make this work, but I bought an extra in case I messed up or needed to experiment. I purchased the OEM rear foglight assembly as well. Choose your vendor as you will. I ordered from the Z Store. The foglight assembly comes with a 7440 socket (2 wire). Let's get started. Here is a picture of the 7440 socket (gray) next to the new 7443 socket (tan).  and another shot straight on  the key to the locking mechanism on the OEM socket is the triangle engagement area (outlined in green)  and here is the opening in the lamp assembly.  Basically you insert the socket and the blocking tab is at position A. You then turn the socket about 1/6 of a turn until the blocking tab hits the 'wall' at position B. This causes the tips of the triangle engagement area to be under the flat pieces of the triangle in the foglight assembly...in other words, its locked in place and not falling out.  So now we have to replicate this locking action with our 7443 socket. What are the problems we have? 1) The gasket that comes with the 7443 socket is too large to fit the hole of the foglight assembly. SOLUTION: Use the gasket from the OEM 7440 socket. 2) There is no triangle engagement area on the 7443 socket, only 2 sets of 2 different types of tabs. SOLUTION: Dremel or file the tabs on the 7443 socket, see below. 3) The diameter of the 7443 socket is too large to allow it to recess into the foglight assembly. SOLUTION: Dremel or file the outer ring on the 7443 socket, see below. 4) There is no blocking tab to keep the 7443 socket from spinning all the way around in the foglight assembly due to vibration and falling out SOLUTION: You guessed it, Dremel or file, see below. Here is a top view of your new 7443 socket.  The diameter of the 7443 socket is too large to fit into the round recess in green  This is actually a good thing! By removing the extra material, we have an opportunity to create a blocking tab, but first, we need to address the tabs which will take the place of the engagement triangle. Here we see one type of tab (of which there are two, one each on opposing sides).  And here is the other type (again, two tabs, one each on opposing sides)  Now lets orient our workpiece. I just put it on a piece of paper and used a permanent marker to write on the socket and the paper so I didn't get confused. When looking at the top of the socket, you will see two 'wings' across from each other. I have drawn an arrow to one of them (they are oriented at 9 and 3). At 12 there is a smaller 'wing' with an arrow in front which you can just barely see to the left of the wires. At 6 there is no wing, just a little arrow which you cannot see because I drew an X over it.  You are going to cut/file/shave/Dremel the tabs at the positions indicated with "cut". (at 3 and 6). You are NOT going to touch the other two tabs at 9 and 12. You will then end up with something like this (ignore the writing on the paper, it is not relevant to the picture)  Congratulations! You have created an engagement area that will lock the socket in the foglight assembly when twisted. Now let's focus on issues #3 and #4. We need to reduce the diameter of the socket and we need to add a blocking tab. Well, remember the arrow from this picture? That arrow is pointing to the wing which becomes our new blocking tab. What you will want to do is slowly reduce the diameter of your socket, EXCEPT FOR THE PIECE THAT THE ARROW IS POINTING AT. Be sure to do this a little at a time and test for fitment in the foglight assembly often. What you will end up with is a piece that looks like this  Now we are in the final stretch. Discard the gasket that came with your 7443 socket and place the OEM gasket from the 7440 socket on your modified 7443 socket. Place your new masterpiece in the foglamp assembly (pay attention to the location of the blocking tab)  Then turn it until the blocking tab hits the 'wall'.  Give it a tug to make sure the engagement tabs are locking the socket in place. All done. Good job. Now you need to go wire it up. There are numerous guides on how to access the power wires for this so I will leave that out. One additional graphic I will add to this is the one created by forum member Mr_Z. This tells you specifically how to wire up the 7443 socket. His graphic shows the addition of a flashing module, but if you don't want that like myself, just draw a line straight through it. 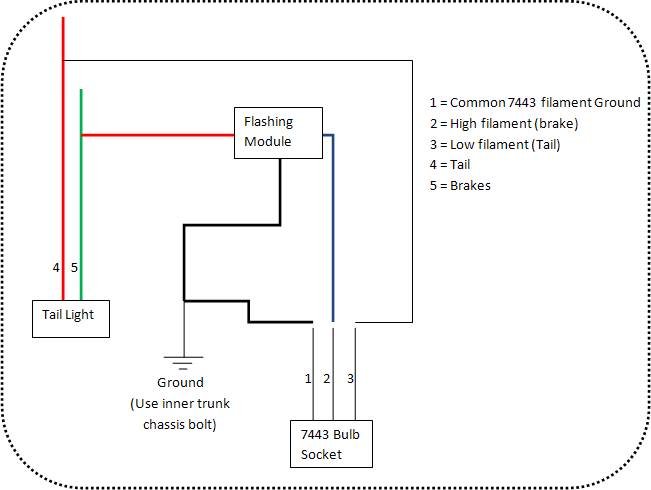 For those who want to experiment, you 'might' be able to get away with only shaving 1 tab off which would provide even more locking action. Also, I apologize for this, but I cannot recall which of the wires on the 7443 socket was for high/low filament. I already have everything heat shrinked, in split-loom, and taped. Hopefully this is helpful to some people. UPDATE 8/21/12 Well, I drove the car last night for the first time. As soon as it got dark enough for the lights to come on, all engine power was cut back. The engine ran, but it was behaving as if the car's tires were sliding and ABS was pulling throttle response. The ABS light was on as well as the tire slipping light. I did some investigation and determined that I had wired up the 7443 socket wrong, so here is what the colors are (NOTE: I have no idea if this is universal or unique to the ones I got from this vendor). Green w/yellow = Ground (labeled "A" on back of the socket) Black w/white = Low filament (tail light) (labeled "B" on back of the socket) Red w/blue = High filament (brake light) (labeled "C" on back of the socket) I have edited the excellent graphic by Mr_Z as you will see below so you can see how the socket pigtails connect to the wires in the brake light harness. As you can see, this is not intuitive, however, that is no excuse. My testing should have been more thorough initially. 
Last edited by mbowler; 08-21-2012 at 03:53 PM. Reason: Add additional detail to prevent problems for others |
|
|
|
|
08-20-2012, 10:37 PM
|
#10 (permalink) | |
|
A True Z Fanatic
Join Date: Oct 2011
Location: Camarillo, CA
Posts: 1,063
Drives: 2011 PW/Grey T/S 7AT
Rep Power: 2808 |
Great write up mbowler! Rep point your way
 Quote:

__________________
Semper Fi  Μολὼν λαβέ |
|
|
|
|
|
12-02-2012, 05:16 PM
|
#11 (permalink) | |
|
A True Z Fanatic
Join Date: Aug 2010
Location: Lawrenceville,Ga
Posts: 4,293
Drives: My foot up your azz
Rep Power: 31 |
Quote:
It still has the same shape as the OE one no grinding
__________________
2013 ZL1 754 rwhp 747 rwtq 
|
|
|
|
|
|
12-05-2012, 03:35 PM
|
#12 (permalink) | |
|
Base Member
Join Date: May 2009
Location: IL
Posts: 11
Drives: 2010 White & Wine
Rep Power: 18 |
Quote:
|
|
|
|
|
|
12-05-2012, 03:41 PM
|
#13 (permalink) | |
|
A True Z Fanatic
Join Date: Aug 2010
Location: Lawrenceville,Ga
Posts: 4,293
Drives: My foot up your azz
Rep Power: 31 |
Quote:
__________________
2013 ZL1 754 rwhp 747 rwtq
|
|
|
|
|
|
| Bookmarks |
|
|
 Similar Threads
|
||||
| Thread | Thread Starter | Forum | Replies | Last Post |
| Have a problem brake light and traction light comes on | martin82 | Brakes & Suspension | 11 | 11-22-2016 09:40 PM |
| wiring rear fog light as brake light | Parrotguy | Nissan 370Z Roadster (Convertible) | 12 | 09-03-2015 10:34 AM |
| Anyone installed the rear fog light as a brake light on a roadster? | Lee123 | DIY Section (Do-It-Yourself) | 4 | 05-01-2010 07:53 PM |
| Rear center-low brake light | getawaydriver | Exterior & Interior | 1 | 02-16-2010 08:12 AM |
| The little plastic square on rear bumper above fog/brake light..... | LattimerII | Exterior & Interior | 3 | 09-23-2009 06:48 PM |


 1Likes


 Hybrid Mode


