
|
It seems like more and more of these are failing. I figure more and more will be failing too and I didn't see a DIY for one yet. So I
|
|||||||
|
|
LinkBack | Thread Tools | Display Modes |
 10-19-2013, 04:30 PM
|
#1 (permalink) |
|
Base Member
Join Date: Jun 2010
Location: Deltona, FL
Posts: 144
Drives: 10 NismoTT MB M6
Rep Power: 18   |
It seems like more and more of these are failing. I figure more and more will be failing too and I didn't see a DIY for one yet. So I thought I'd be nice and take a few pictures and list out what to do to save people a few bucks. This was done on a friend's car. I may be doing mine shortly, so if anyone has any questions or wants any different pics let me know and I can add it to this.
It is not as hard as it sounds, and you can easily get it done in half a day with the right tools. Tools needed: Assorted sockets and wrenches 10-19mm (need 2 of a few of the wrenches) Breaker bar Hammer Transmission jack (could always beast it out and in I suppose) Drill and bits Sawzall (or one of those all-thread/pipe puller deals and a large socket) Step 1: Blow your stock differential bushing and leak fluid all over your shiny exhaust  Step 2: Go in to get it replaced under warranty and be given a quote for ~1600 bucks Step 3: Order some Whiteline differential bushings for like 99 bucks Please be advised: Now would also be a great time to replace your rear sway bar, change your rear-end fluid, get a finned diff cover, do a gear change, etc Ok onto the DIY for real. Raise the car up and support it. I went with the lower control arms for the jack stands. Remove your rear exhaust. You can either pull the rubber piece off the hanger. Those things are always a PITA so I usually go with simply removing the hangar with the three bolts in the rear. You can get the diff off with only removing the rear section. But removing the mid section will make it a lot easier. It all depends on your exhaust and how big of a pain aligning the mid section is. Next, remove the brace (6 bolts). Then undo the nuts for the sway bar on the end link. These may spin and require you to put an open end on the back. They were also on very tight so we used an impact gun to get them off. You can pick whichever one is easier for you. We chose the bottom ones. Then, remove the sway bar mounts. Remove the sway bar and set it aside. Things should be getting a lot clearer underneath. Go ahead and tie up your axle shafts so that when you disconnect the diff they don't fall down. Disconnect the two sensors on the differential and move them out of the way. Then use two 17mm wrenches to undo the drive shaft bolts. We placed a rag under the heat shield to support the drive shaft and not bend the heat shield once it was loose. Then we un-did the axle shafts. Feel free to mark the drive shaft and axle shafts to re-install in the exact position. Next, break all three differential bolts loose, but do not remove. The rear bolt for the leaky bushing needed a 1/2" breaker bar to budge. Once the bolts are loose, position and secure your transmission jack. You will need to pull the differential towards the front of the car to get the bolt out of the rear bushing, then lower. Disconnect the vent tube. If you left the mid section of your exhaust in place, you will need to angle the front up to get the differential out.  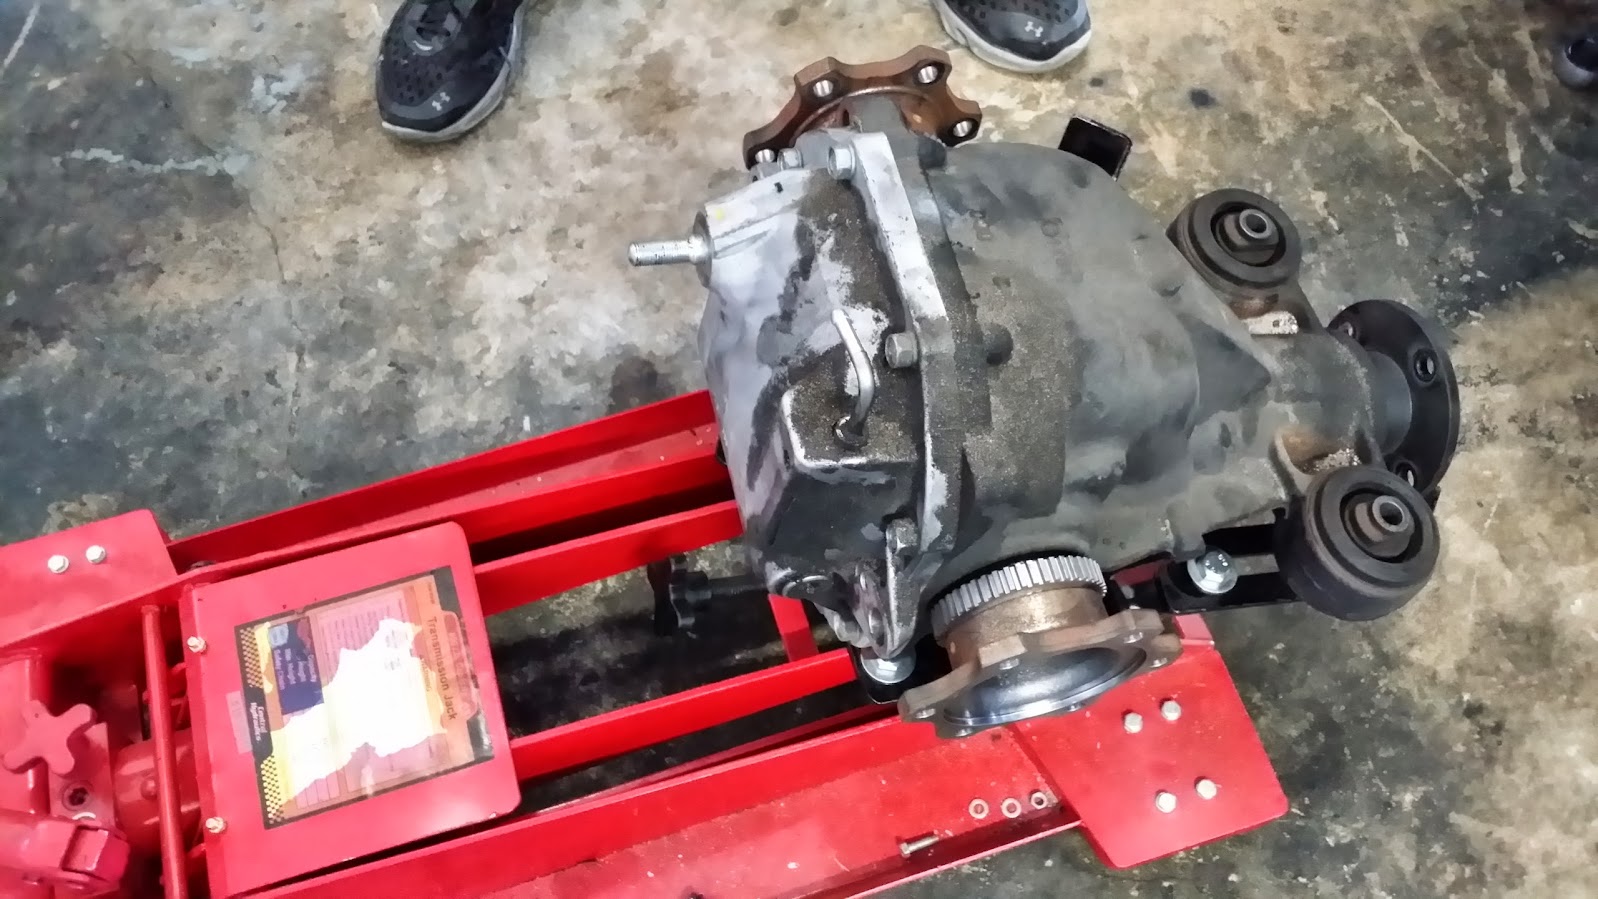 Put some tubing on the vent tube, bend it over and the zip tie it closed to prevent fluid from leaking out. Turn the diff over and place it on some wood. You can then use a large socket to bang the bushings out. You could also sawzall through the bushings. I'd go with the hammer and socket. Grease and install the new whiteline bushings. Reuse the metal top collars on reinstall. The bushings go in very easily. 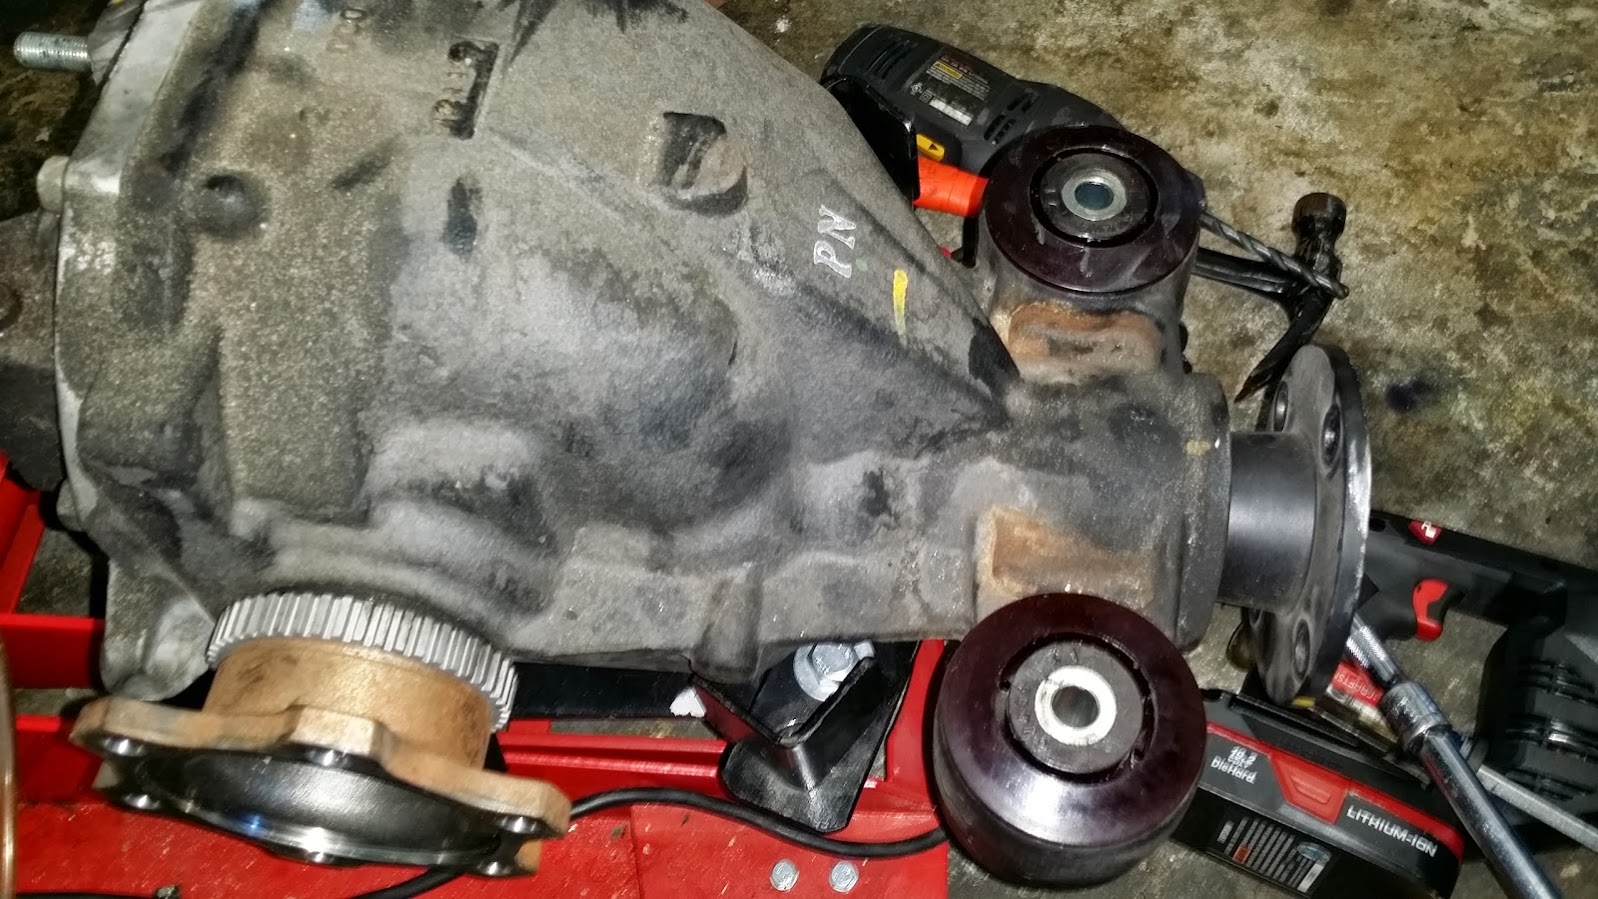 There are several methods to remove the center differential bushing. We drilled holes into the top and bottom bladders. Drill out enough of the rubber to get the sawzall blade into the bushing.  Cut through the outer metal ring. Make sure you cut all the way through. We cut from both sides and kept trying to hammer it out. There was a small piece in the middle still connected. Once that was cut, it came right out.  You're now ready for re-install Grease up the center differential bushing. We installed the bushing from the rear of the vehicle. We used the bottom collars from the front bushings and a bolt I had laying around and a piece of scrap metal to pull the bushing into the hole. We then maneuvered the differential back into place. Jacked it up, reconnected the vent tube, moved the diff backwards to get the bolt into the rear diff bushing. Then we put the rear nut on, put the top hats back onto the front bushings and installed the front diff bolts. Tightened all three. Reconnect the sensors. Reconnect the drive shaft, reconnect the axle shafts. Disconnect whatever you used to support the axles. (Old speaker wire in our case). Reconnect the sway bar, will need to hold the back nut with an open end to tighten. Reconnect the brace, reattach your exhaust, lower the car, profit.  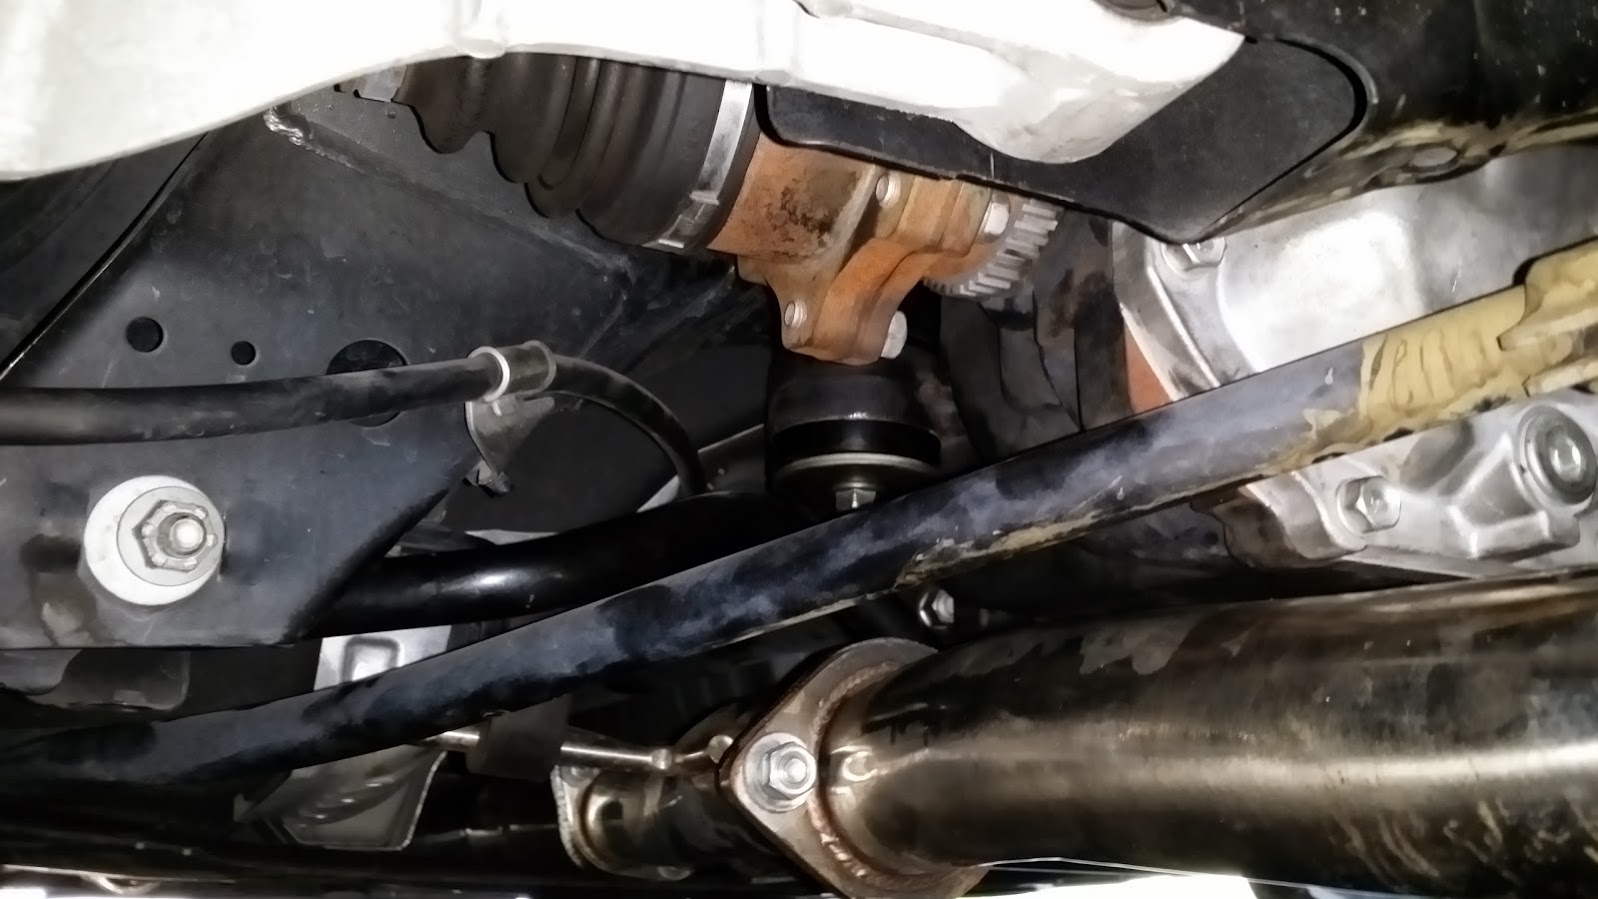 All in all, it took about 6hrs with a lunch break and going out to the store to get new blades. If we had it to do over again, we could probably get it down to ~4hrs. The biggest pain was the center differential bushing and once we got it cut all the way through it was easy. (The right blade also helps a lot) Getting the center differential bushing back in was probably the second hardest part. Again, a long bolt with thread all the way combined with the collar from the front bushing and piece of scrap metal worked very well for us. We put the bushing in from the rear, on the other side put the bolt through the collar and the scrap metal so that it wouldn't go through the hole. Put the nut on, and tightened it to pull the bushing into the hole.
__________________
GTM TT, OS Giken GT clutch, Greddy Ti-C, Z1 test pipes, Hawk HP+ pads, steel braided brake lines, ZSpeed CSC, 34r oil cooler, CSF radiator, HKS EVC 6 boost controller, Whiteline sways, Swift Springs, Kinetix adj camber package, Osiris UPrev tune |

|

|
| Bookmarks |
|
|
 Similar Threads
|
||||
| Thread | Thread Starter | Forum | Replies | Last Post |
| Z1 Motorsports: Full Differential Upgrade Kit/Whiteline Diff Bushings | John@Z1 | Drivetrain/Engine | 39 | 06-12-2017 09:46 AM |
| TSM l Whiteline Differential Bushings | Rob@TSM | Drivetrain/Engine | 41 | 10-01-2015 09:55 PM |
| [FOR SALE] SPL Differential Bushings. NEW!! | V8Killer | Parts for sale (Private Classifieds) | 25 | 06-13-2012 11:50 AM |
| Differential Bushings | V8Killer | Brakes & Suspension | 0 | 10-12-2011 09:25 AM |
| Aluminum Differential Bushings | 1slow370 | Engine & Drivetrain | 24 | 07-10-2011 12:38 PM |


 28Likes


 Threaded Mode

