
|
Hey folks, Here's a DIY on replacing your flywheel, PP, clutch disc, and CSC. I remember looking for a DIY and not seeing one back when I first went through
|
|||||||
|
|
LinkBack | Thread Tools | Display Modes |
 09-14-2013, 01:52 AM
|
#1 (permalink) |
|
Track Member
 Join Date: Jun 2012
Location: Lexington, SC
Posts: 932
Drives: 2012 Nismo TT
Rep Power: 3399   |
Hey folks,
Here's a DIY on replacing your flywheel, PP, clutch disc, and CSC. I remember looking for a DIY and not seeing one back when I first went through this. So I thought I would try to capture it all in hopes it helps someone out in the future. This will obviously include pulling the trans as well, so hopefully you guys find it useful. After putting this together, I REALLY appreciate all the other DIYs out there. It takes a lot of time to get these all written up. One note. I upgraded to the Zspeed HD CSC in this walkthrough, but the procedure is largely the same if you're going back with an OEM CSC. I've included pics whenever possible. As always, I wish I had taken more after the fact, but I've included snips from the FSM to fill in the gaps (hopefully). I varied the steps slightly from the FSM, as access was easier to certain fasteners in this order. This probably took around 5 hours with myself and a friend. That includes taking a break for lunch and screwing around half the time as well. Tools you'll need are pretty normal for the procedure. 3/8" & 1/2" sockets & wrenches. Metric Wrenches. Long 1/2" extensions & u-joints. Transmission Jack Needle nose or channel locks Blue or red Loktite (if you prefer). Transmission plug/stop-off tool. Brake Fluid of choice Trans Fluid of choice (if you dont have a trans plug) The only real specialty tools that come in very helpful are a flywheel holder, and a pilot bearing puller. You can complete it without these, but if there's an autozone near you, save yourself the headache and borrow these. Here's an example image of the flywheel tool I used. http://image.streetrodderweb.com/f/2...rning_tool.jpg This is MUCH easier with a lift, especially given the size of the tranny & relatively cramped conditions, but it's doable if you need to do it on jack stands. At a high level, the procedure can be outlined as:
So...let's get started! First things first, move your other project off the lift and get the car in the air. Once you get the car in position on the lift, disconnect the negative battery terminal. 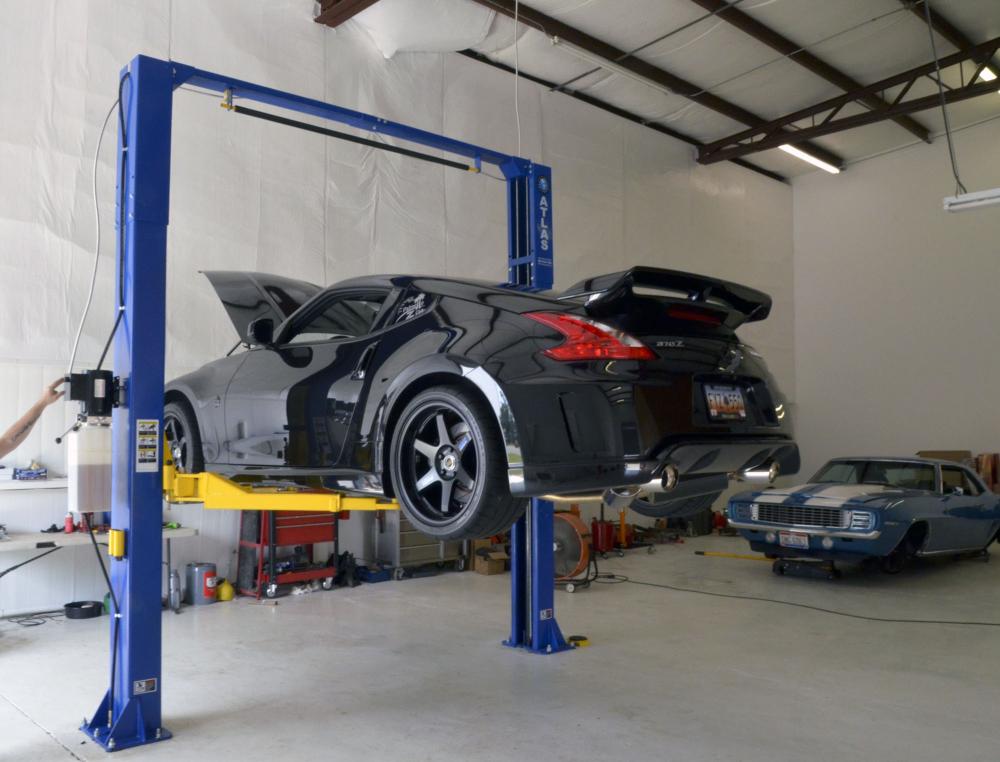 ...and admire the machine! Remove Exhaust: Next remove the exhaust from the HFC to the rear axle. This may just be a midpipe depending on the exhaust. In my case (FI TDX) I had to remove the front tubes and the X-pipe. Procedure will vary from exhaust to exhaust, but it should be fairly straight forward. Make sure you keep your gaskets & nuts/bolts organized. Note: I always use hand tools on the exhaust fasteners as I don't want to chance damaging the o2 sensors. 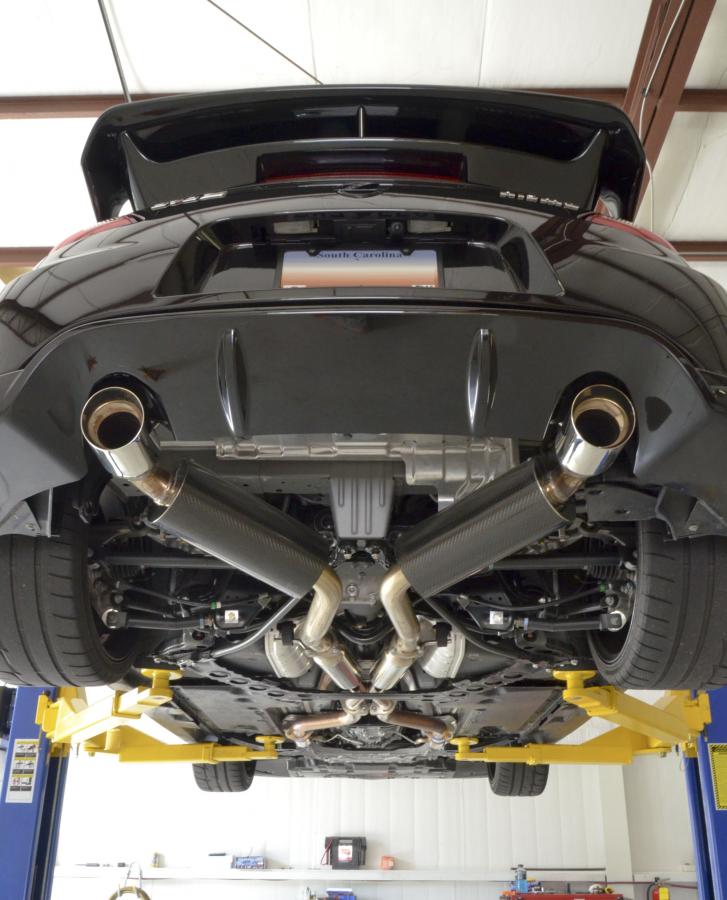 Remove Driveshaft: Next major step is to remove the driveshaft. In order to remove the driveshaft without forcing it, you'll need to remove a heat shield that's in the way.Perfect world, I would have had a pic with the exhaust removed, but I forgot, so I've doctored up this one. The shield is outlined in blue. You'll need to remove the nuts/bolts outlined in red to get the heat shield out. Remove those 6 nuts/bolts, then slide the heat shield forward and it drops out. Set the shield aside. 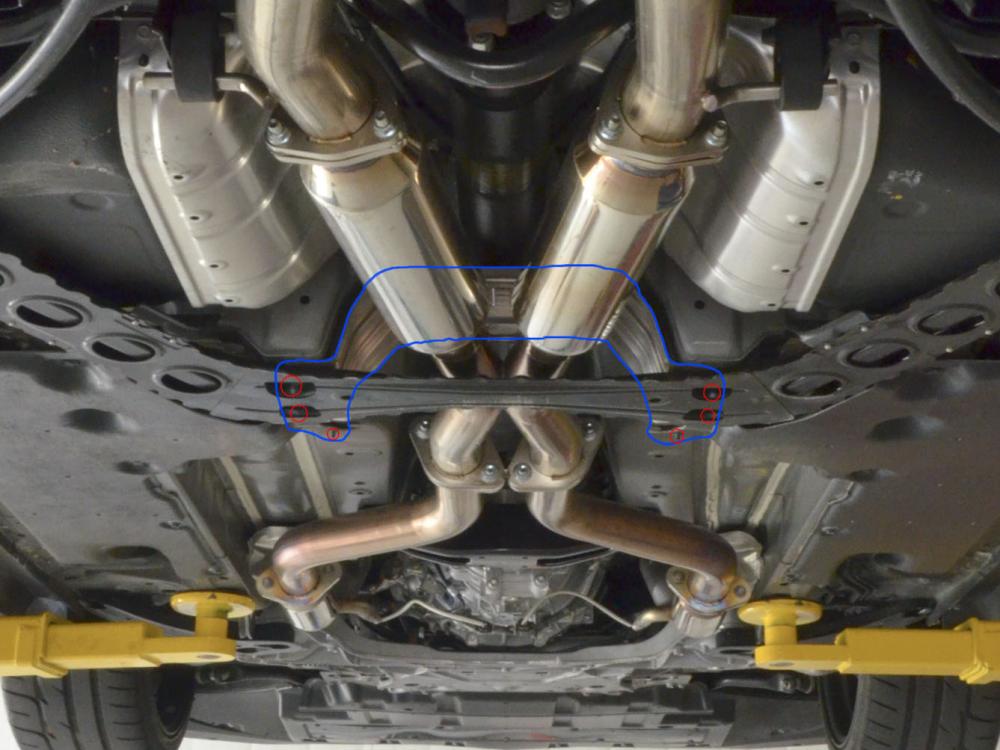 Once the shield is out, its time to pull the driveshaft. Remove the 4 bolts where the driveshaft bolts to the diff, then drop the rear of the driveshaft downward, and slide rearward out of the transmission. At this point you will likely have some transmission fluid leak out of the rear of the trans. Either plug it with a suitable plug, or let it drain into a pan. Remove Shifter: Next, you'll remove the shifter. Most of this is done from inside the car, but before you lower it/get inside, there's one bolt to remove that connects the shifter to the linkage. Remove the rubber boot from the linkage, and remove the single bolt. This should be at the very rear of the transmission housing. Below is a good illustration from the FSM. 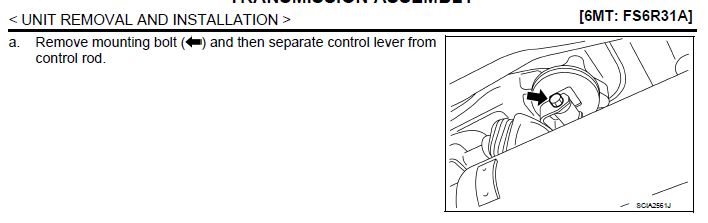 Next, get inside the car. Pull the shift boot finisher up to reveal the shifter. There are 4 bolts to remove from the cover plate. Once removed, lift that, which will reveal 3 bolts which hold the guide plate down. Note: hold the shifter down when removing the last bolt, as the shifter is spring loaded. Once those 3 bolts are removed, lift the shifter and spring out of the housing and set aside. Below is another snip from the FSM outlining these steps.  Remove transmission This is the most time consuming step by far. Open a beer before starting this one. Start by disconnecting all of the sensors from the trans. Remove all the brackets connecting the harness to the trans. The harness wraps all the way around the rear of the trans. Once all have been disconnected, you should be able to move the harness aside and tuck it away. Now get your trans jack situated and snug against the bottom of the transmission. If you're doing this alone make sure to secure with straps. Once in place, remove the 4 bolts, and 2 nuts from the rear transmission mount. The FSM refers to this as the "rear engine mounting member." Remove and set aside. You could probably leave this attached to the trans, but removing it is simple and makes access much easier. I've attached a snip from the FSM below. I'm referring to #5. And here's a pic of the trans jack in place with the driveshaft and rear trans mount removed. There's also an arrow to the the shift linkage where the bolt was removed, allowing the shifter to be extracted. You can also see the harness (and all it's brackets) completely disconnected and tucked over the right cat. Next, using needle nose or channel locks, remove the lock plate where the clutch tube going into the trans joins the soft line. Get your ziplock bag or drain pain ready, then disconnect the soft line from the hard line. Some fluid will leak out at this point. I just stuff a paper towel into a ziplock bag, then zip tie the baggy around the end of the line. If you have a suitable plug...well good for you  Finally, loosen the bracket holding the clutch tube to the trans, back out the nut joining the clutch tube to the CSC, and remove the tube completely. Set aside. Note: if you are going with the Zspeed HD CSC, you will not need this again. If you are replacing with an OEM CSC, you will. Below is a diagram from the FSM of the clutch line, tube, and lock plate. 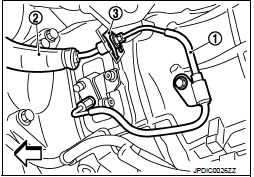 Before we unbolt and pull the trans, you'll need to remove a few other things, beginning with the starter and the crankshaft position sensor. The starter is actually held by two of the transmission housing bolts. See the picture below for reference. The two bolts are removed from the trans side, and the starter is loose once removed. Slide the starter towards the front of the car and out tuck it out of the way. Next up, the crankshaft position sensor. This is a bit of a pain in the *** to get to; but it is held by a single bolt, which you'll have to remove blind after removing the connector. It's located on the top, passenger side of the block, just forward of the trans. Below is an illustration from the FSM, and a picture to help you locate and remove. Part #3 in the illustration. Ilustration... 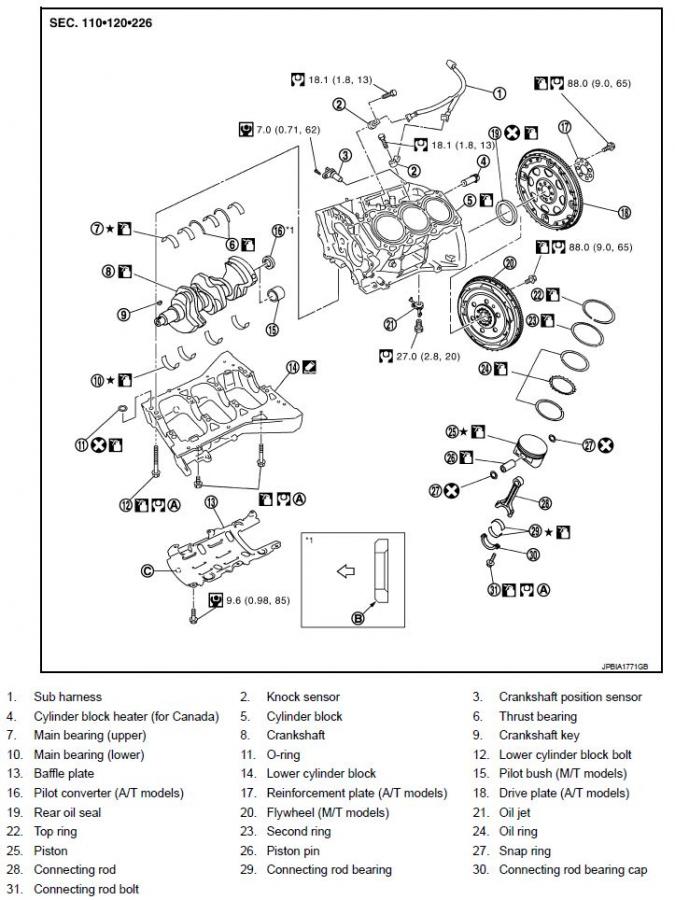 ...and picture. It is located behind/above the heat shield with the arrow. 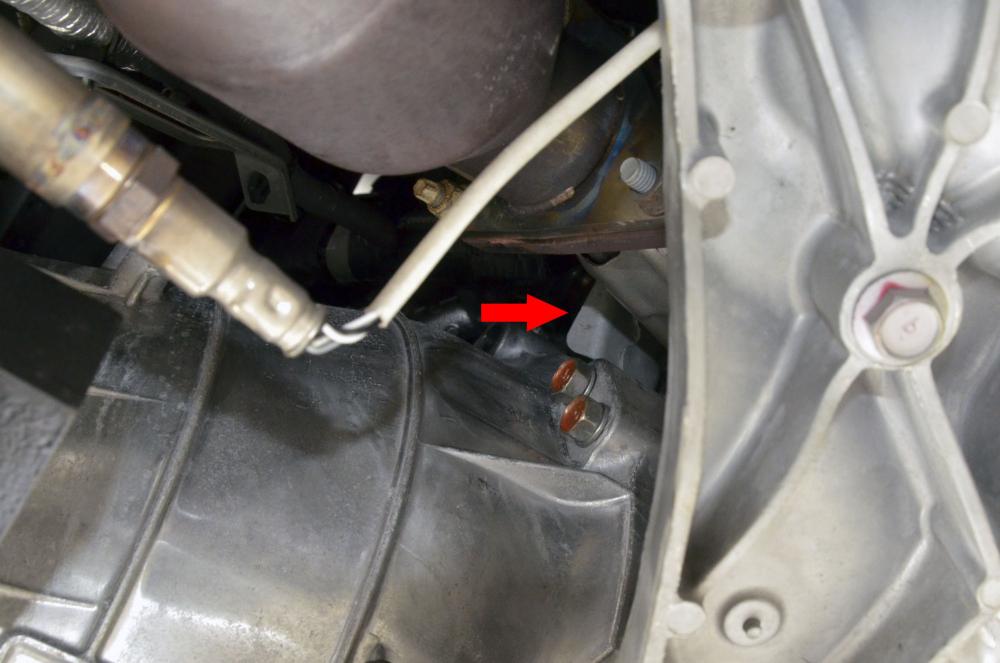 Almost there....all that's left is to remove two things to get access to the bolts. The front suspension member stay is basically a big aluminum plate, just in front of the transmission. Here's a snip from the FSM. Part #2. Remove and set aside. 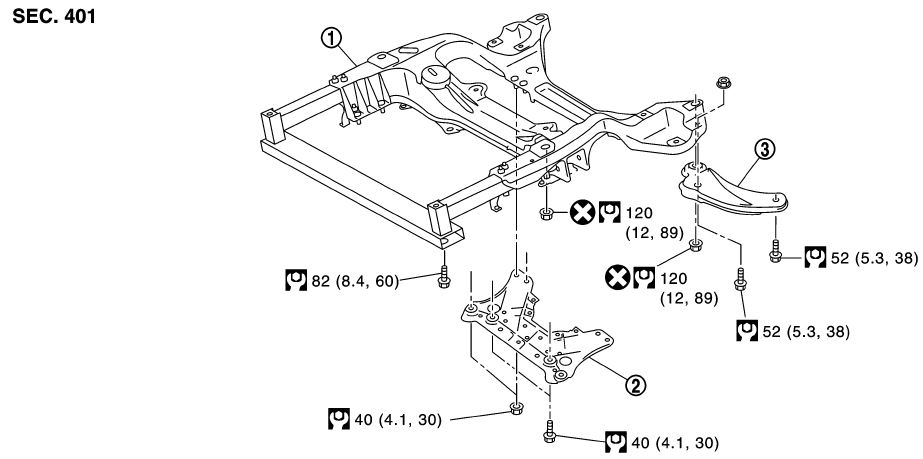 Last, remove the "rear plate cover" which is...exactly what it's named. A small plate at the very rear of the block that covers the trans housing. Part #18 in this illustration. 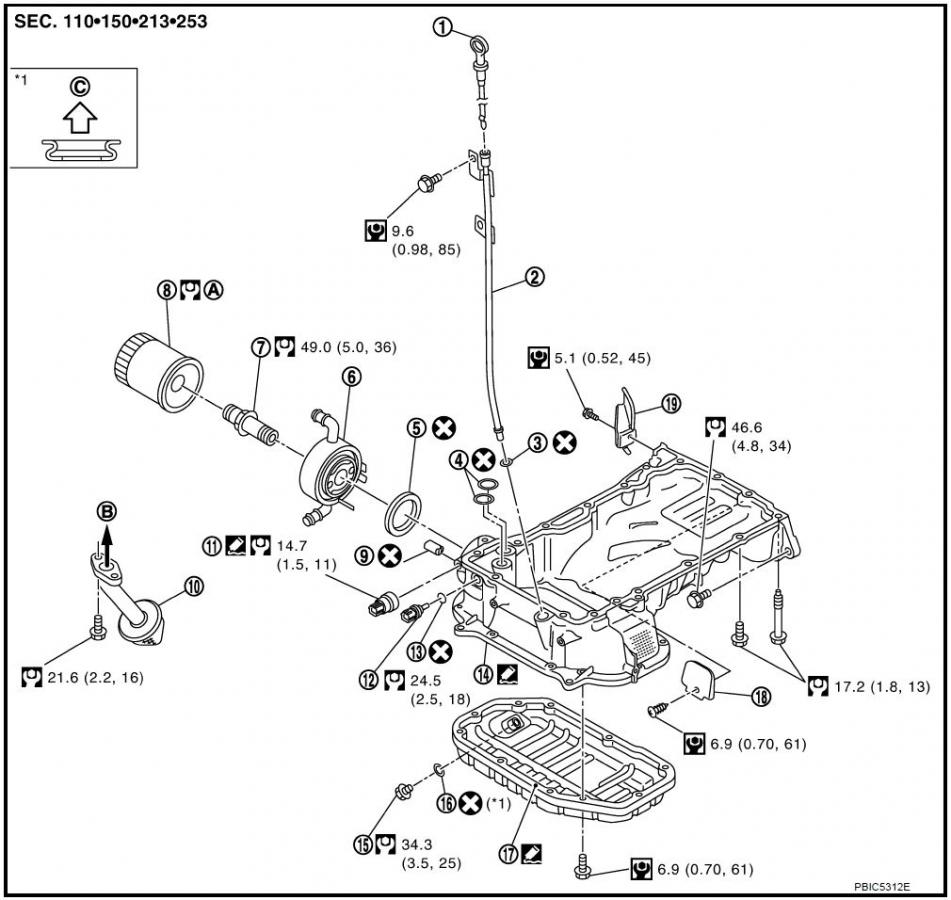 Now you can FINALLY get to business removing the trans. There are 12 bolts. 8 longer bolts which insert from the transmission side, and 4 shorter ones which insert from the engine side. This snip from the FSM shows them well. Note: the torque specs are here too. The 4 short ones are accessible from the space where the front suspension member stay was removed. The other 8 are accessed from the rear. The only bolts where access is difficult/tricky are the two on the top. Break out the long extension and u-joints and they'll come out. Note: remove the top right (when facing forward) first. This holds a breather tube, which you don't want to be fiddling with on the last bolt. Once all the bolts are removed, the trans should slide rearward and out with a little wiggling. Remove and set it somewhere safe off of the jack. Success! Have a beer! Removing the old Pressure Plate, Clutch disc, and Flywheel First things first. Insert your clutch alignment tool to hold the disc in place when you remove the pressure plate. Then, following the order shown in the diagram below, remove the bolts holding the pressure plate to the flywheel. These bolts... 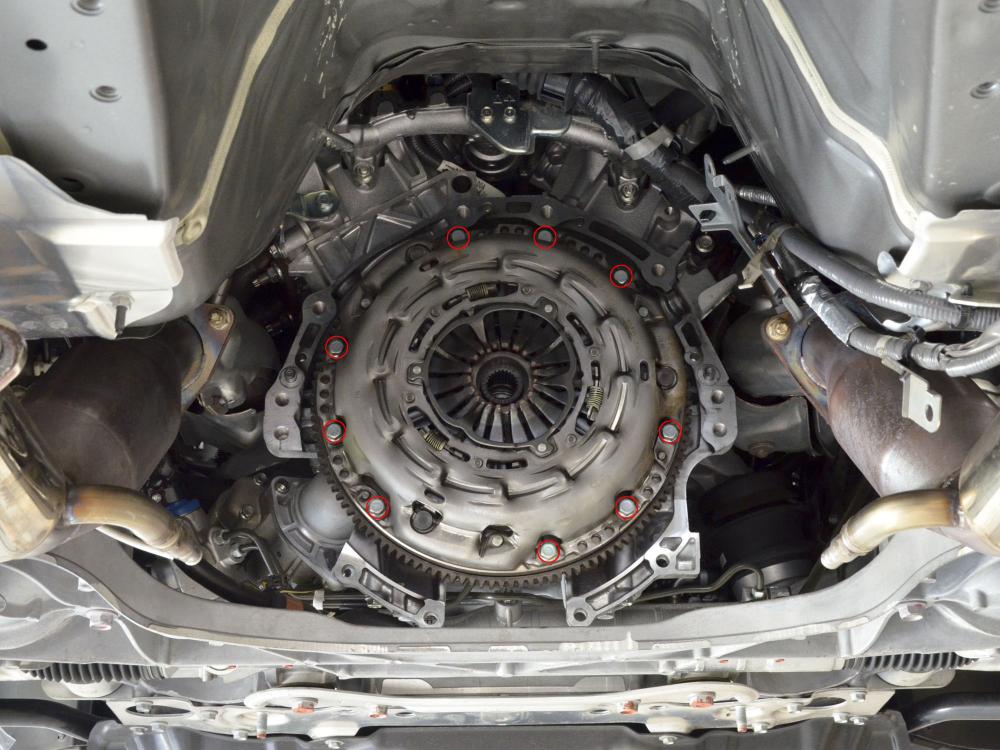 ...in this order. 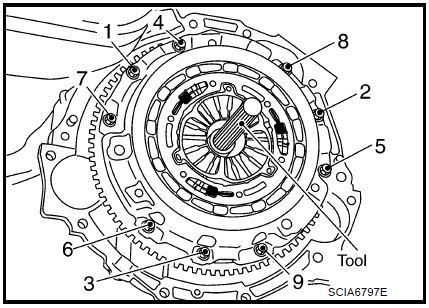 Remove the pressure plate and set aside. Remove the clutch disc and set aside. Next, remove the flywheel bolts. There are large torx bolts. Using a breaker or impact should remove these easily. Remove the flywheel and set aside. Next remove the pilot bushing from the crank using a puller. If you don't have a puller, you can use an old trick. Pack the hole with grease, insert the clutch alignment tool, and tap the tool with a rubber mallet. The grease will push the bushing out. Not ideal, but works in a pinch. Personally, I borrowed a puller from a local parts store. Done with that. Why not have a beer? Install new flywheel, clutch disc, and pressure plate Now we can start the fun stuff. Upgrades! First install the pilot bushing using the alignment tool, and (gently!) tap home. Next grab your flywheel. It may or may not have come with a reinforcement plate. Mine did. If so, grab that too. Position the flywheel back on the crank. It should only fit in one position, as there is a little dowel pin extending out from the crank. This inserts into the small hole in the flywheel. Insert the flywheel bolts. Hand tighten, then torque to 65ft-lbs in an opposing pattern as you would a wheel (1,5,2,6,3,7,4,8). This is where that flywheel holder I mentioned earlier comes in. Next, insert the alignment tool into the new clutch disc, and use the alignment tool to properly position the disc against the flywheel. Finally, grab new the pressure plate and the new hardware supplied with it (or the old bolts/washers if not). Position the pressure plate against the flywheel. Again, this should only fit in one orientation as there are stubs to ensure correct alignment. Insert and hand-tighten the PP bolts/washers. Then, following the order in the picture above, tighten the PP bolts in two passes. First pass: 11 ft-lbs Second pass: 29 ft-lbs Illustration from FSM if you need it:  Done! Have a beer. Replacing the CSC Now, stagger around and find the transmission you left somewhere... Before you can remove the CSC, you need to remove the CSC tube. This unclips from the CSC as shown in the picture below (red arrow). Once unclipped, remove you can unbolt it's bracket and remove. Next, remove the two bolts holding the CSC to the trans. Again, shown in the pic below (blue arrows) Slide the CSC off the input shaft, scoff at Nissan for putting plastic parts INSIDE the trans housing, and toss it. 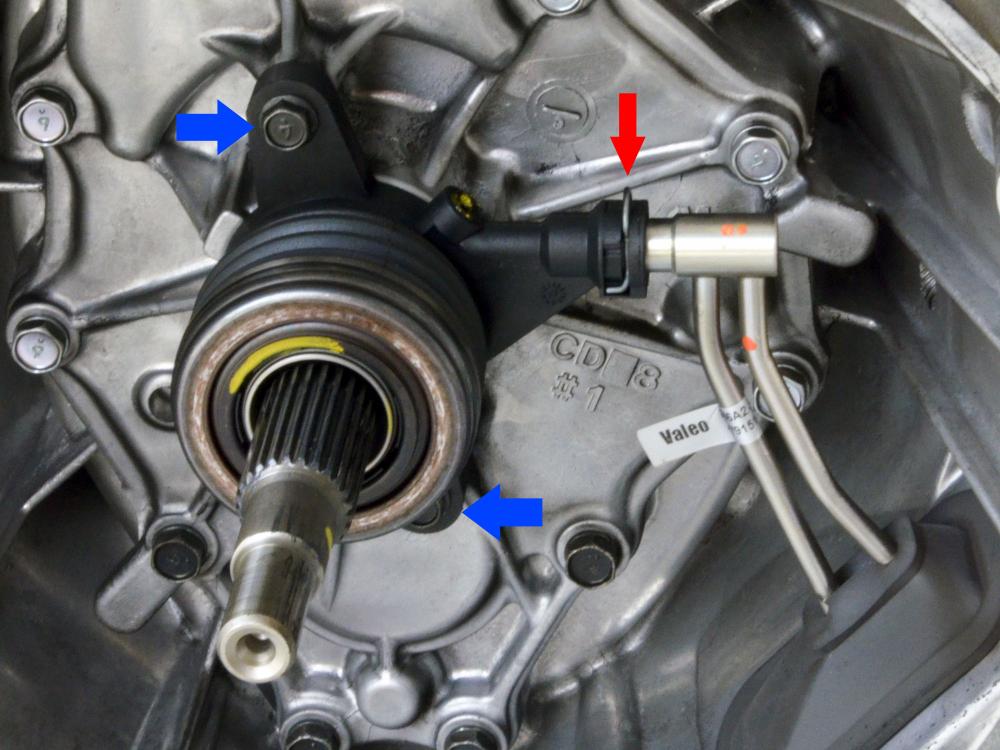 Now grab the new CSC. You'll notice it has two long braided hoses. Thread those through and out the rubber boot in the trans housing. Slide the new CSC over the input shaft, position as shown below, and secure using the provided hardware. If you're not too drunk, it will look like so... Shiny! Beer?! 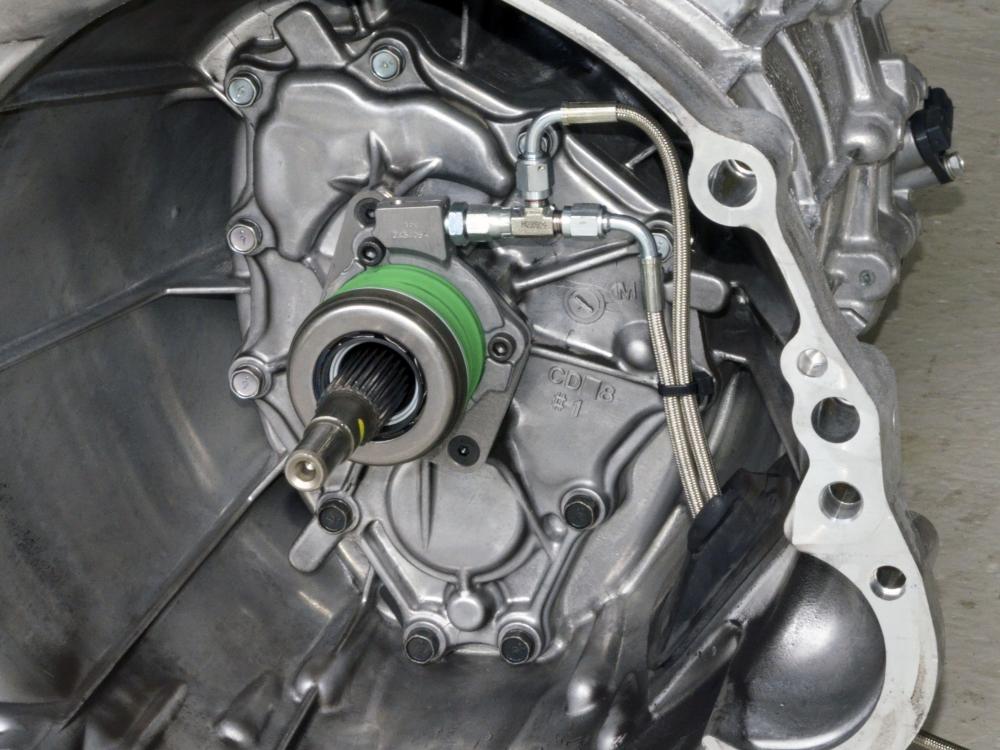 Reassembly On the home stretch now... Set the trans back on the jack. Be sure not to kink or pinch the braided hoses from the CSC. Before you slide the trans home, apply some lithium-based grease to the input shaft, and the center of the clutch disc where the input shaft will locate. DONT get any grease on the disc itself, the flywheel, or the PP. Don't go crazy, just make sure its covered. Now position the trans back into position and gently wiggle it home. Having two people makes this muuuuch easier. Once it's properly mated, you can start bolting it back into place and reassembling everything. Torque specs for the trans bolts are in the diagram above. Short bolts: 34 ft-lbs Long bolts: 55 ft-lbs Remember two of those bolts secure the starter. From this point on its pretty much the reverse of what you've done so far. Take your time and be sure you've got everything reconnected, properly positioned, etc. Don't forget the crank position sensor! ...and the battery helps. Bleeding the system Once you've got everything reassembled, the only step left is to bleed the system. Top off the reservoir, and loosen the bleed nipple on the CSC and let it gravity drain for 5 minutes or so. Be sure to keep it topped off. After its gravity bled for a while, close the bleed nipple. One person stay under the car, and one person hop in. With the nipple closed, pump the clutch (slowly) several times. You'll have to manually pull the pedal up at first. Don't worry. Open the bleed nipple, expelling any pressurized fluid/air. Close the nipple. Pump several more times, bleed. Rinse a repeat this until you have a firm pedal, and no air if being bled from the system. Be sure to keep an eye on the reservoir. It's very small and empties quickly. The last thing you want is to spend 10 minutes bleeding, just to let the reservoir get empty and introduce air into the system all over again. Once you're done bleeding the system...your done! Have a beer!! Well that's it guys. If anyone sees any corrections that need to be made, please let me know and I'll make the appropriate changes. Also, please rep if you find this helpful 
__________________
DJTodd's Build Thread
 Fast Intentions Volk Stoptech Carbotech SPL Southbend OS Giken RJM Sparco RobiSpec AIM Driver Mod Last edited by djtodd; 11-25-2013 at 11:13 AM. |

|

|
| Bookmarks |
|
|
 Similar Threads
|
||||
| Thread | Thread Starter | Forum | Replies | Last Post |
| [FOR SALE] OEM Flywheel, Pressure Plate, and Clutch | SPOHN | Parts for sale (Private Classifieds) | 4 | 01-26-2013 10:52 AM |
| [FOR SALE] 370z clutch, flywheel & pressure plate | 40flash | Parts for sale (Private Classifieds) | 2 | 06-11-2012 08:10 AM |
| [FOR SALE] Stock clutch & pressure plate - 12kmiles | Ron | Parts for sale (Private Classifieds) | 0 | 04-04-2012 03:25 PM |
| 370Z flywheel, pressure plate & Clutch disc | 40flash | Parts for sale (Private Classifieds) | 2 | 07-23-2010 07:03 AM |


 77Likes


 Threaded Mode

