
|
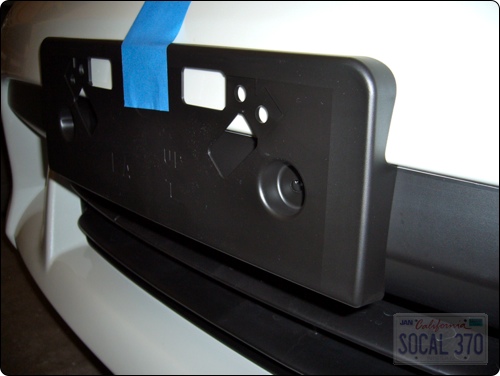
This photo it looks like it goes into that black thing. Do you have holes in the body it self?
|
|||||||
 |
|
|
LinkBack | Thread Tools | Display Modes |
 02-07-2009, 02:10 PM
|
#16 (permalink) |
|
Grand Prix of Endurance
 
Join Date: Nov 2008
Location: Tennessee
Posts: 3,476
Drives: Mulsanne Straight
Rep Power: 27   |

This photo it looks like it goes into that black thing.
Do you have holes in the body it self?
__________________
 We can do without any article of luxury we have never had; but once obtained, it is not in human nature to surrender it voluntary. |

|

|
|
02-07-2009, 02:12 PM
|
#17 (permalink) | |
|
A True Z Fanatic

Join Date: Nov 2008
Location: Eugene, OR
Posts: 2,875
Drives: E63 AMG
Rep Power: 229 |
Quote:
|
|
|
|
|
|
02-07-2009, 02:21 PM
|
#18 (permalink) | |
|
A True Z Fanatic

Join Date: Feb 2009
Location: US of A
Posts: 2,842
Drives: Answers
Rep Power: 35 |
Quote:
Last edited by SoCal 370Z; 02-07-2009 at 03:10 PM. Reason: Added pics |
|
|
|
|
|
02-07-2009, 02:27 PM
|
#19 (permalink) | ||
|
Grand Prix of Endurance
Join Date: Nov 2008
Location: Tennessee
Posts: 3,476
Drives: Mulsanne Straight
Rep Power: 27 |
Quote:
Quote:
Don't over tighten---it will strip!
__________________
We can do without any article of luxury we have never had; but once obtained, it is not in human nature to surrender it voluntary. |
||
|
|
|
|
02-07-2009, 03:13 PM
|
#21 (permalink) | ||
|
A True Z Fanatic
Join Date: Feb 2009
Location: US of A
Posts: 2,842
Drives: Answers
Rep Power: 35 |

Quote:
Quote:
Last edited by SoCal 370Z; 02-07-2009 at 03:23 PM. |
||
|
|
|
|
02-07-2009, 04:23 PM
|
#22 (permalink) |
|
A True Z Fanatic
Join Date: Nov 2008
Location: Eugene, OR
Posts: 2,875
Drives: E63 AMG
Rep Power: 229 |
Okay well I just failed miserably. I found the correct size bit, drilled it out, put the clips on the plastic piece that the actual plate attaches to, and inserted the white plastic anchors. But they would not take the screws, they just spun freely. So I tried to pull the white plastic anchors out with needle nose pliers and they both broke into several pieces with the "nut" broken off inside the bumper with not way to get it out.
I guess this very difficult DIY is too much for me, so I'll just take it to the dealer and have them install it properly when I get my first oil change. Thanks again for the help. |
|
|
|
|
02-08-2009, 07:56 PM
|
#23 (permalink) |
|
A True Z Fanatic
Join Date: Feb 2009
Location: US of A
Posts: 2,842
Drives: Answers
Rep Power: 35 |
 Sorry to hear that...
Pushing Tin,
I am sorry to hear matters did not transpire as they should have. Was the drill bit you used sharp as a dull bit typically oblongs the hole? No matter, as we have no intention of using our front license plate, and if you want our white anchors I will send them to you—free from charge, whereby we can get your project finished with Nissan parts. Let me know in a private PM (this offer only holds for Pushing Tin, I ask that others do not PM me about the rest of the license plate holder parts as they will be tucked away should we sell the vehicle). I will also, ever so slightly, take off just enough material forming two sides so that you can hold it with an adjustable wrench to get matters started and cinch the back of the toggle where it needs to be. |
|
|
|
|
02-08-2009, 08:18 PM
|
#24 (permalink) |
|
Grand Prix of Endurance
Join Date: Nov 2008
Location: Tennessee
Posts: 3,476
Drives: Mulsanne Straight
Rep Power: 27 |
Use the following steps to mount the license
plate: Before mounting the license plate, confirm that the following parts are enclosed in the plastic bag. . License plate bracket . J-nut 6 2 . Screw 6 2 . Screw grommet 6 2 1. Park the vehicle on flat, level ground. Locate the two dents*A on the front bumper. Carefully drill two pilot holes using a 0.39 in (10 mm) drill bit. (Be sure that the drill only goes through the bumper fascia.) 2. Insert grommets into the hole on the bumper fascia. 3. Insert a flat-blade screwdriver into the grommet hole to add 90 turn onto the part *B . 4. Make sure the side end surface of the license plate bracket is aligned with the bumper*C . 5. Insert a J-nut into the license plate bracket before placing the license plate bracket on the fascia I believe no.3 is why the white things turned , when the screw was inserted! I can't get the picture to copy from the manual!!!!
__________________
We can do without any article of luxury we have never had; but once obtained, it is not in human nature to surrender it voluntary. |
|
|
|
|
02-08-2009, 08:28 PM
|
#25 (permalink) | |
|
A True Z Fanatic
Join Date: Feb 2009
Location: US of A
Posts: 2,842
Drives: Answers
Rep Power: 35 |
Quote:
|
|
|
|
|
|
02-08-2009, 08:34 PM
|
#26 (permalink) | |
|
Grand Prix of Endurance
Join Date: Nov 2008
Location: Tennessee
Posts: 3,476
Drives: Mulsanne Straight
Rep Power: 27 |
Quote:
Real nice offer you made for him.rep point
__________________
We can do without any article of luxury we have never had; but once obtained, it is not in human nature to surrender it voluntary. |
|
|
|
|
|
02-08-2009, 09:06 PM
|
#27 (permalink) | |
|
A True Z Fanatic
Join Date: Nov 2008
Location: Eugene, OR
Posts: 2,875
Drives: E63 AMG
Rep Power: 229 |
Quote:
Again thanks for your time and help, and dad too! 
|
|
|
|
|
|
02-08-2009, 09:13 PM
|
#29 (permalink) | |
|
A True Z Fanatic

Join Date: Nov 2008
Location: nowhere
Posts: 5,478
Drives: 06' Nismo Frontier
Rep Power: 30 |
Quote:
I seriously winced when I read this and saw the picture of the bit. I'm sorry Pushing_Tin, That sucks |
|
|
|
|
|
02-08-2009, 09:28 PM
|
#30 (permalink) | |
|
A True Z Fanatic
Join Date: Nov 2008
Location: Eugene, OR
Posts: 2,875
Drives: E63 AMG
Rep Power: 229 |
Quote:

|
|
|
|
|
|
| Bookmarks |
|
|




 Linear Mode


