
|
Installed the iJDMTOY rear tail/brake/reverse lights in my 2016 roadster this weekend. I opted for the smoked lens version. Just personal preference over the red. There are plenty of other
|
|||||||
|
|
LinkBack | Thread Tools | Display Modes |
 06-11-2017, 09:25 PM
|
#21 (permalink) |
|
Base Member
Join Date: Jan 2017
Location: Chicago. IL
Age: 75
Posts: 42
Drives: 16 Rdstr TS M6 Blue
Rep Power: 6739   |
 Roadster Fog Light Replacement
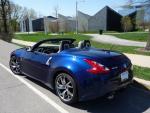
Installed the iJDMTOY rear tail/brake/reverse lights in my 2016 roadster this weekend. I opted for the smoked lens version. Just personal preference over the red. There are plenty of other posts on this forum with pics and videos on this install which were very helpful to look at before I started. I also felt no need to duplicate that effort, so I didn’t take my own pics of the process. And please, SOLDER ALL CONNECTIONS! The two minutes of your life it takes to do it right can save you hours of grief later. First things I did were to add a small bead of silicone sealer around the seam where the body of the unit attaches to the lens. This was based solely on other posters mentioning condensation problems. At the same time, I soaked the bolts of the original dummy reflector with Liquid Wrench to get past Loctite overuse from the factory. Let both of these sit for 48 hours. Then, I got started.
I’m not sure if anyone else has put one of these into a Roadster, but there are some minor differences which makes this somewhat unique. The side panels in the trunk are different, but the removal/reinstallation process is the same, so no big deal there. The one challenge I ran into was the fact that since this is a fully enclosed trunk, there is the required glow-in-the-dark manual trunk release handle on the inside rear trunk panel. (Never mind how anyone could possibly get stuffed into that trunk!) This made removing that panel more difficult. There is a plastic mounting plate under the handle that snaps into place over the panel, and there is no way to release those snaps with the panel in place. I managed to muscle the panel off without damaging anything, but there was no way it was going back together the same way. With the panel removed and the handle and release cable removed from the mounting plate, I was able to get a pair of long-nosed pliers under the metal frame piece that the plate is mounted on. I was then able to squeeze the tabs to release the snaps and remove the plate. (I really apologize for not taking pics of this.) I could then reassemble the release cable, handle and mounting plate and snap it back into place after the rear panel was reinstalled. This little snafu added about 1.5 hours to my installation time. Also, I wish iJDMTOY would run the sheath over the wires farther up the bundle. I was about done with the install before I realized how much loose wire would be dangling without that additional protection. I wasn’t about to undo it all to wrap it higher up at that point. So with 20/20 hindsight, here’s what I would have done differently: 1) Sheath the wire bundle with heat-shrink tubing or electrical tape to within a few inches of the wire ends. 2) Loosen, but not remove, the rear interior trunk panel. 3) Tap into the right side tail light assembly rather than the left. Since the trunk release handle is on the left side, this would allow more wiggle room to work with a loosened rear panel. There are also better opportunities to secure the wire bundle on the right underside with other parts of the wiring harness on that side. Here are some post-install pics, although I now realize pics of the release cable/handle/mounting plate would have been more useful. |

|

|
| Bookmarks |
|
|
 Similar Threads
|
||||
| Thread | Thread Starter | Forum | Replies | Last Post |
| iJDMTOY Exclusive Nissan 370Z 3-in-1 LED Tail light, Brake light, Reverse Light | iJDMTOY | Body Interior/Exterior | 84 | 10-04-2016 06:24 AM |
| iJDMTOY: Smoked Lens LED Rear Fog Light | Brake Tail Reverse Light | Exclusive! | iJDMTOY | Body Interior/Exterior | 22 | 07-12-2016 03:12 PM |
| Rear Foglight - Running light AND brake light | mbowler | Exterior & Interior | 26 | 08-12-2014 06:37 PM |
| VDC off light / VDC slip light constant on with parking brake light acting slip light | ZeN | Nissan 370Z Warranty / Scheduled Maintenance / Servicing / Repairs | 0 | 08-27-2012 10:04 AM |


 10Likes


 Threaded Mode

