
|
Originally Posted by semtex Even if it was from ramping the throttle in, why would it show a loss? The throttle had to be ramped in the last time as
|
|||||||
 |
|
|
LinkBack | Thread Tools | Display Modes |
 04-22-2009, 04:14 PM
|
#31 (permalink) | |||
|
A True Z Fanatic
 Join Date: Mar 2009
Location: Houston, TX
Posts: 4,024
Drives: too slow
Rep Power: 3596   |
Quote:
Quote:
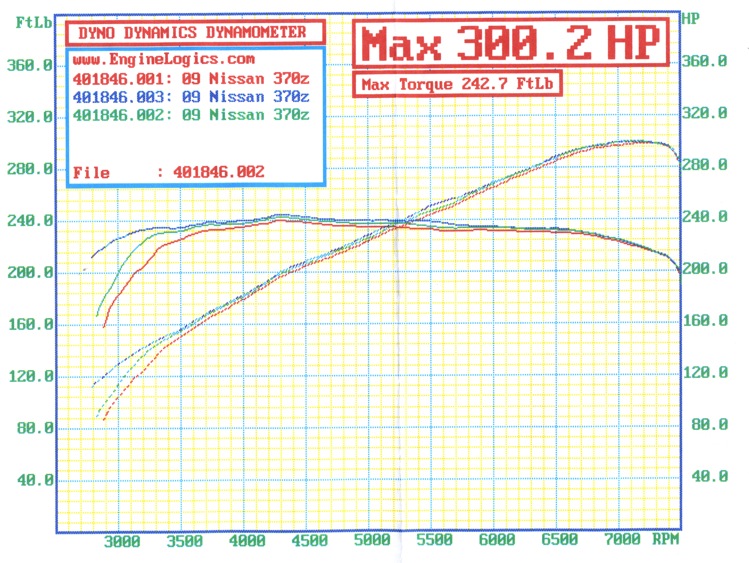 The low torque before hitting the peak at 4250 can either be low-rpm torque loss from headers, or it again could be throttle input issues near the start of the run, I'm not really sure. I'm pretty sure everything before 3500 is from lack of WOT though. Quote:
I actually like the sound of my full setup most of the time. The only thing that still bugs me (and that the headers undoubtedly exacerbate) is the extreme rasp around the 2500-3000 range even at light throttle. I wish I knew how to fix that with some kind of rubber damper (like the two that are already on there from the stock setup). Last edited by wstar; 04-22-2009 at 04:17 PM. |
|||

|

|
|
04-22-2009, 04:18 PM
|
#32 (permalink) | |
|
A True Z Fanatic
Join Date: Jan 2009
Location: Behind enemy lines
Age: 55
Posts: 5,995
Drives: People to drink
Rep Power: 34 |
Quote:
__________________
"There are no small accidents on this circuit." -- Ayrton Senna 316.8whp & 248 ft/lbs (Dyno Dynamics) | 319whp & 256 ft/lbs (DynoJet) (04/23/10) Stillen G3 CAI, CBE, Pulley / F.I. LTH / GTSpec Ladder Brace / Setrab Oil Cooler / UpRev-tuned by Forged Perf. |
|
|
|
|
|
04-22-2009, 04:52 PM
|
#35 (permalink) |
|
A True Z Fanatic
Join Date: Jan 2009
Location: Behind enemy lines
Age: 55
Posts: 5,995
Drives: People to drink
Rep Power: 34 |
You know what, guys? The loss of low-end torque isn't really as bad as it looks on that graph. Keep in mind that the units on that graph are in Newton Meters (Nm). The gap wouldn't look that bad if it were in ft-lbs. (Sharif said he had an issue with the last firmware upgrade from DD in Australia.)
__________________
"There are no small accidents on this circuit." -- Ayrton Senna 316.8whp & 248 ft/lbs (Dyno Dynamics) | 319whp & 256 ft/lbs (DynoJet) (04/23/10) Stillen G3 CAI, CBE, Pulley / F.I. LTH / GTSpec Ladder Brace / Setrab Oil Cooler / UpRev-tuned by Forged Perf. |
|
|
|
|
04-22-2009, 05:12 PM
|
#36 (permalink) | |
|
A True Z Fanatic
Join Date: Mar 2009
Location: Houston, TX
Posts: 4,024
Drives: too slow
Rep Power: 3596 |
Quote:
|
|
|
|
|
|
04-22-2009, 05:21 PM
|
#38 (permalink) | |
|
A True Z Fanatic
Join Date: Mar 2009
Location: Houston, TX
Posts: 4,024
Drives: too slow
Rep Power: 3596 |
Quote:
|
|
|
|
|
|
04-22-2009, 05:21 PM
|
#39 (permalink) | |
|
A True Z Fanatic
Join Date: Jan 2009
Location: Behind enemy lines
Age: 55
Posts: 5,995
Drives: People to drink
Rep Power: 34 |
Quote:
Btw, I'm about to post a video of the dyno.
__________________
"There are no small accidents on this circuit." -- Ayrton Senna 316.8whp & 248 ft/lbs (Dyno Dynamics) | 319whp & 256 ft/lbs (DynoJet) (04/23/10) Stillen G3 CAI, CBE, Pulley / F.I. LTH / GTSpec Ladder Brace / Setrab Oil Cooler / UpRev-tuned by Forged Perf. |
|
|
|
|
|
04-22-2009, 05:25 PM
|
#40 (permalink) |
|
A True Z Fanatic
Join Date: Nov 2008
Location: Miami
Posts: 6,403
Drives: '09 370Z
Rep Power: 1120  |
Move down here. 305 > ATL
on a more serious note.... I e-mailed Josh about what I was thinking, waiting for a reply. Oh and good that it isn't gone. If the gains I can expect from having a full STILLEN setup are the ones advertised on their site. (14.5whp and 10+tq) then I will install... may have to look into wrapping them too. Keeping heat in the headers makes the turbo spool faster!.....err...I switched cars...no longer applies...though it may help with flow. Last edited by RCZ; 04-22-2009 at 05:27 PM. |
|
|
|
|
04-22-2009, 05:39 PM
|
#41 (permalink) | |
|
A True Z Fanatic
Join Date: Jan 2009
Location: Behind enemy lines
Age: 55
Posts: 5,995
Drives: People to drink
Rep Power: 34 |
Quote:
__________________
"There are no small accidents on this circuit." -- Ayrton Senna 316.8whp & 248 ft/lbs (Dyno Dynamics) | 319whp & 256 ft/lbs (DynoJet) (04/23/10) Stillen G3 CAI, CBE, Pulley / F.I. LTH / GTSpec Ladder Brace / Setrab Oil Cooler / UpRev-tuned by Forged Perf. |
|
|
|
|
|
04-22-2009, 05:43 PM
|
#42 (permalink) |
|
A True Z Fanatic
Join Date: Jan 2009
Location: Behind enemy lines
Age: 55
Posts: 5,995
Drives: People to drink
Rep Power: 34 |
Alright, here's the video. (I'd better get some rep pts, tvfreakazoid!
 I wasn't going to bother doing this until you asked.) I wasn't going to bother doing this until you asked.)
__________________
"There are no small accidents on this circuit." -- Ayrton Senna 316.8whp & 248 ft/lbs (Dyno Dynamics) | 319whp & 256 ft/lbs (DynoJet) (04/23/10) Stillen G3 CAI, CBE, Pulley / F.I. LTH / GTSpec Ladder Brace / Setrab Oil Cooler / UpRev-tuned by Forged Perf. |
|
|
|
|
04-22-2009, 06:02 PM
|
#43 (permalink) |
|
Base Member
Join Date: Nov 2008
Location: COS, CO
Posts: 137
Drives: 18 Golf R
Rep Power: 18 |
Thanks for the external vids, Semtex! That second graph was about as linear as it gets for whp. Even though the headers aren't quite where you wanted them, what is your impression of your setup as it stands?
S.
__________________
~S.M. "Don't look back. Someone might be gaining on you." -Satchel Paige |
|
|
|
|
| Bookmarks |
| Thread Tools | |
| Display Modes | |
|
|
 Similar Threads
|
||||
| Thread | Thread Starter | Forum | Replies | Last Post |
| STILLEN Longtube G3 Intakes. Review, Dyno and Impressions. | RCZ | Intake/Exhaust | 270 | 06-03-2015 02:25 PM |
| Stillen Exhaust, headers, and CAI | midgetcricket | Engine & Drivetrain | 8 | 10-18-2010 08:49 AM |
| Stillen Headers + Berk HFCs self-install report | wstar | Intake/Exhaust | 84 | 04-14-2009 12:09 PM |
| Question about Stillen headers... | marcussoori | Intake/Exhaust | 10 | 04-08-2009 02:44 PM |
| Stillen Headers on 370z | Funky370z | Intake/Exhaust | 72 | 04-07-2009 10:38 AM |


 4Likes


 Linear Mode


