
|
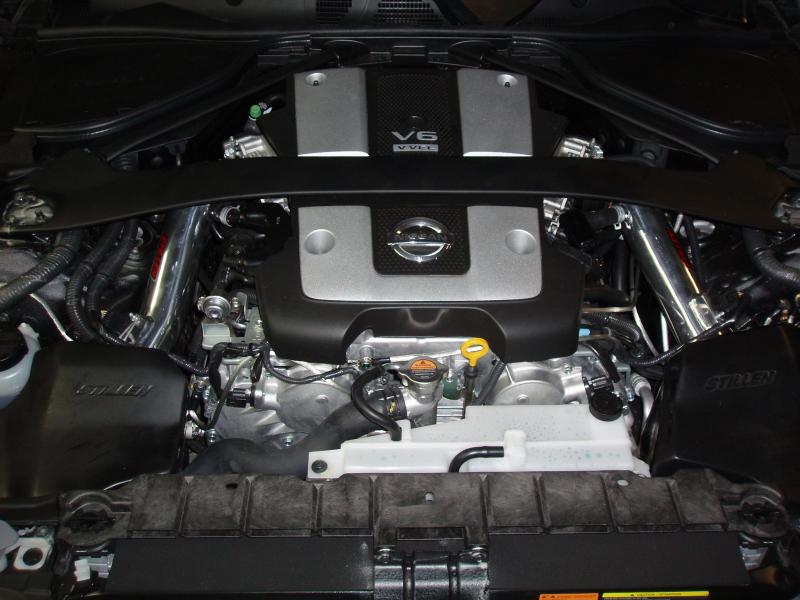
I noticed something peculiar when I was looking at engine photos and whatnot. Before 2012 it seems, the overflow bottle has only one radiator cap, whereas my 2012 MY has
|
|||||||
 |
|
|
LinkBack | Thread Tools | Display Modes |
 01-22-2012, 11:31 AM
|
#1 (permalink) |
|
Track Member
 Join Date: Oct 2011
Location: South Florida
Posts: 882
Drives: 12 PW 370z 6MT Sport
Rep Power: 16   |
I noticed something peculiar when I was looking at engine photos and whatnot.
Before 2012 it seems, the overflow bottle has only one radiator cap, whereas my 2012 MY has two: 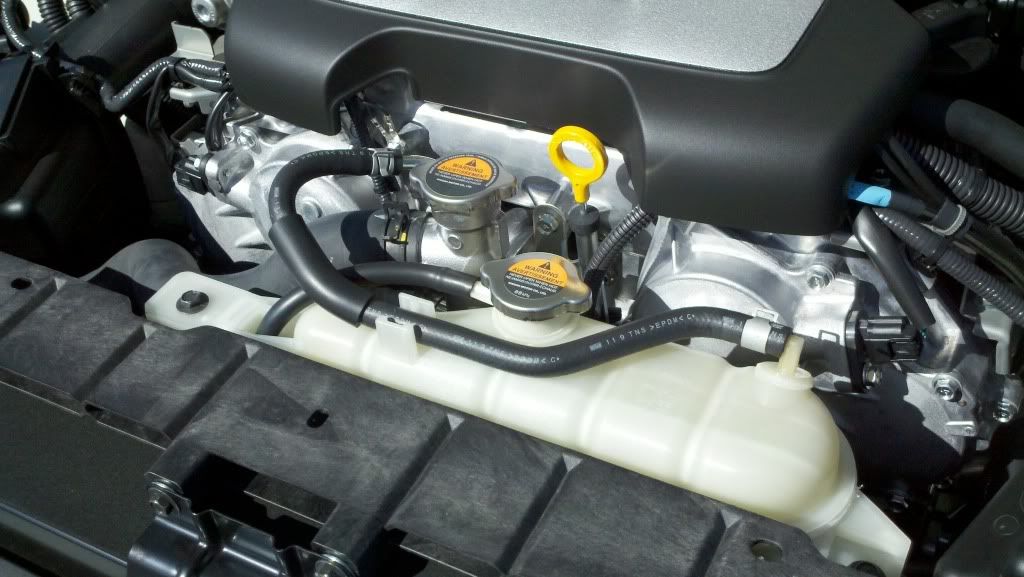 Only one of them is a pressurized radiator cap, however. The other one seems to just be a cap. 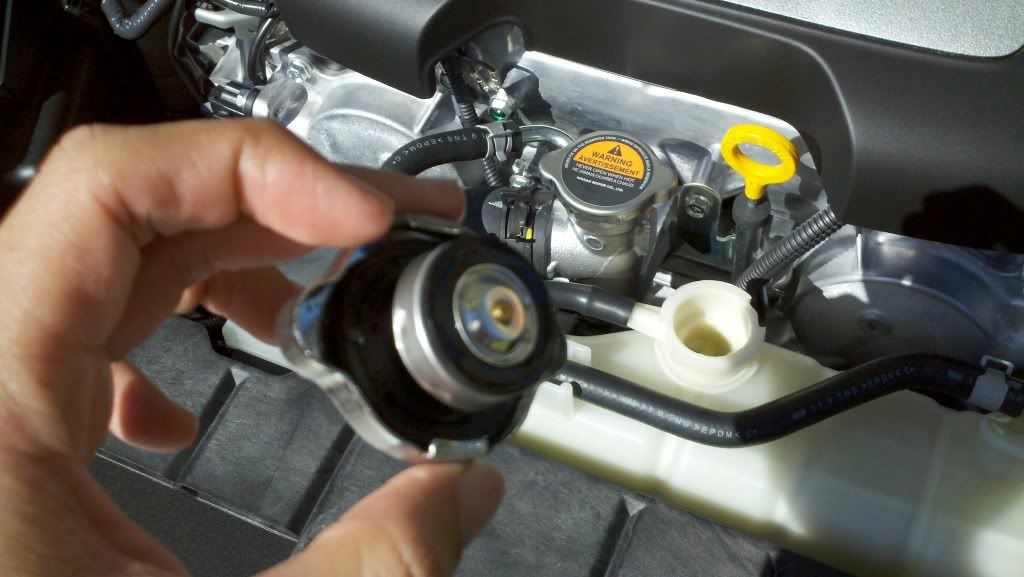 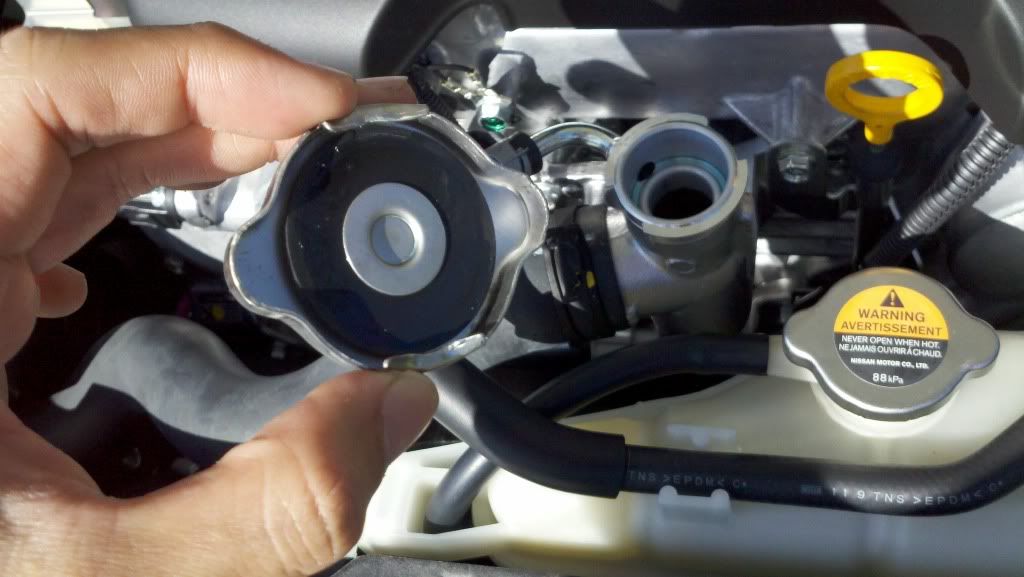 Any thoughts on why the change?  I figured because of the oil to water cooler, but whatever. Don't really understand the reasoning why. I figured because of the oil to water cooler, but whatever. Don't really understand the reasoning why.
|

|

|
|
01-22-2012, 11:39 AM
|
#2 (permalink) |
|
A True Z Fanatic
Join Date: Sep 2009
Location: Mod Capital of Canada
Age: 59
Posts: 7,354
Drives: cars. lots of cars.
Rep Power: 40183 |
That is indeed very different...
__________________
 H&R / Stillen / Berk / HKS / Swift / Michelin / UpRev / SPC / Amuse Rep / Seibon / Fringe XVO / TWM / more... My Journal |
|
|
|
|
01-22-2012, 12:41 PM
|
#4 (permalink) | |
|
A True Z Fanatic
Join Date: Feb 2011
Location: Sterling, VA
Posts: 1,922
Drives: Legit Racecar 370Z
Rep Power: 144 |
Quote:
 Though from the OP's images, I would think your caps are backwards. The overflow shouldn't be the one with the pressure cap. |
|
|
|
|
|
01-22-2012, 03:01 PM
|
#5 (permalink) |
|
A True Z Fanatic
Join Date: Aug 2009
Location: In the D
Posts: 3,732
Drives: v8 74 260z ;)
Rep Power: 7252 |
check owners manual will probably have it it very well could be the pressure cap is supposed to be on the reservoir to change the system to a fully sealed one. that would explain the clamps on the overflow line and thicker plastic
__________________
ANSWER PRICE LIST Answers - - - - - - - - - - - - - - - - $0.75 Answers (requiring thought) - - - - $1.25 Answers (correct) - - - - - - - - - - $12.50 Last edited by 1slow370; 01-22-2012 at 03:04 PM. |
|
|
|
|
01-22-2012, 03:10 PM
|
#6 (permalink) | |
|
Track Member
Join Date: Oct 2011
Location: South Florida
Posts: 882
Drives: 12 PW 370z 6MT Sport
Rep Power: 16 |
Quote:
|
|
|
|
|
|
06-04-2012, 08:46 AM
|
#7 (permalink) |
|
A True Z Fanatic
Join Date: Mar 2009
Location: Houston, TX
Posts: 4,024
Drives: too slow
Rep Power: 3596 |
Just noticed this. Anyone picked up the newer tank + cap from Nissan and retro-fitted on an existing car 2009-2011 car? My 2009 overflow tank is cracking a bit at the bolt holes anyways (off and on too many times with a little too much torque I guess), and I almost always get a little spill-out from the plastic cap at the track too. Figure this is worth a shot as an upgrade.
|
|
|
|
|
06-04-2012, 10:34 AM
|
#8 (permalink) |
|
A True Z Fanatic
Join Date: Mar 2009
Location: North East
Posts: 6,203
Drives: 09 370Z Sport M6
Rep Power: 655 |
The plastic cap in the 2009-2011's sucked, always leaked out of the cap instead of out the overflow. This setup looks much better, would consider switching if I can get the parts for a reasonable price. Just going by a cursory glance at the pictures it looks like a bolt in replacement but hard to say for certain without a close comparison.
__________________
Hotchkis ARB | Stillen CAI | Art Pipes | Berk CBE | Stillen AP Racing Brakes | AE Performance Oil Cooler | BC Racing ER Coilovers | Doran Control Arms |
|
|
|
|
06-04-2012, 06:55 PM
|
#9 (permalink) |
|
Banned
Join Date: Jun 2010
Location: Ahnald, MO
Age: 48
Posts: 387
Drives: 09 K51 G C Bw/S 6MT
Rep Power: 0  |
*NOTE*
The following refers to 6M/T only. The 7A/T may differ on some part numbers. FAST shows the following main differences: 1) Three part numbers for '09-'10, '11 and '12 radiators. 2) Two part numbers for '09-'11 and '12 cylindrical tank assy on radiator. 3) Radiator fan/motor assy has different part numbers for '09-'10 and '11-'12, BUT '11-'12 part number can be used on '09-'10 according to FAST. Part numbers for upgrading to '12 parts: 21710-JK90B - '12 reservoir tank assy (hoses and possibly reservoir cap included) 21430-C991A - '12 radiator cap 21430-7995A - '12 reservoir cap 92131-JK20A - '12 cylindrical tank assy (maybe not needed?) 21481-JK600 - '12 radiator fan/motor assy (maybe not needed?) |
|
|
|
|
06-05-2012, 12:30 AM
|
#10 (permalink) |
|
Track Member
Join Date: Mar 2011
Location: St. Louis, MO
Posts: 517
Drives: with 6 TB's
Rep Power: 377 |
I would assume the change is due to the new engine coolant based oil cooler. Just an idea.
__________________
Changes come. Keep your dignity. Take the high road. Take it like a man. Momma Sed Like the rain. Like a kidney stone. Its just a broken heart, son. This pain will pass away. |
|
|
|
|
06-10-2014, 03:57 PM
|
#11 (permalink) |
|
Enthusiast Member
Join Date: Apr 2011
Location: The 49th State
Posts: 296
Drives: NISMOSIS
Rep Power: 16 |
Sorry to bounce an old thread but I purchased the overflow reservoir to convert a 2011. The 2012+ bottle has a hose on the bottom.
Those that converted to this setup, what did you do with the bottom hose? 
|
|
|
|
|
06-10-2014, 04:15 PM
|
#12 (permalink) |
|
A True Z Fanatic
Join Date: Mar 2010
Location: LI, NY
Posts: 1,375
Drives: 40th TT
Rep Power: 20  |
you need to connect that bottom hose to the coolant hard pipe above the driver side manifold. I ran mine to a reducer and into the connection where the factory throttle body coolant lines returned (I deleted mine)
|
|
|
|
|
06-10-2014, 08:04 PM
|
#13 (permalink) | |
|
A True Z Fanatic
Join Date: Aug 2009
Location: San Diego
Posts: 1,235
Drives: 15 GT-R / 11 Prius
Rep Power: 27 |
Quote:
__________________
Car Sold! Pleasure being a part of the Z community.  New ride: 2015 GT-R - 647 WHP / 641 WTQ (e85) & 543 WHP / 519 WTQ (91) |
|
|
|
|
|
06-11-2014, 02:42 AM
|
#14 (permalink) | |
|
A True Z Fanatic
Join Date: Mar 2009
Location: Houston, TX
Posts: 4,024
Drives: too slow
Rep Power: 3596 |
The two systems (pre/post- 2012) work quite differently. You can see the differences pretty clearly in the Service Manuals (which are on the forums here in PDF, somewhere).
Basically, the earlier model has a non-pressurized overflow tank with a plastic screw-on cap, a metal pressure-relief cap on the water outlet (with just two thin hoses; waterneck -> tank -> ground). On these earlier models the outlet pipe on the driver's side of the engine (hard metal pipes with coolant hoses attached, can't miss em - Service Manual calls it the Heater Pipe) has only 3 connections on it: two fatter ones for the bypass flow to the rear water outlet and for the heater circuit, and a thin one poking out the top for the throttle body coolant lines. In the new design, the non-pressurized overflow tank is replaced with a pressurized expansion tank (which is a much better design in many ways). The water-outlet cap is now a fixed cap (only remove for filling the system), and the pressure-relief cap is on the new expansion tank. The expansion tank has one more connection to it than the old overflow tank - the line from the bottom which goes to a new connector on an updated version of that metal Heater Pipe assembly on the driver's side of the engine (so if you want to convert factory-style, you need to update that Heater Pipe as well). The updated Heater Pipe, in turn, also has another new connection which goes to the new oil cooler down at the oil filter - so if you just wanted to update the expansion tank setup + pipe but not add the 2012 oil cooler, you'd want to block off that 4th connection. If you did want to add the cooler, then you'd also need to sort out the connector pipe for the other side of it, which is another separate piece. esfourteen's connection to the TB coolant connector is probably the easiest route to take, assuming you don't need the TB lines (don't live/drive in a cold climate). Quote:
Keep in mind if you run that connection to the TB coolant connector to route the line low - if you let it arc up in the air higher than the tank, bubbles won't make it to the tank as well (because the hose rather than the tank is the high point). Last edited by wstar; 06-11-2014 at 02:44 AM. |
|
|
|
|
|
06-11-2014, 02:54 AM
|
#15 (permalink) | ||
|
A True Z Fanatic
Join Date: May 2010
Location: nirvana
Posts: 6,394
Drives: 2023 NATM
Rep Power: 420 |
Quote:
Quote:
__________________
Enjoy it. Destroy it. Last edited by Jordo!; 06-11-2014 at 02:57 AM. |
||
|
|
|
|
| Bookmarks |
|
|
 Similar Threads
|
||||
| Thread | Thread Starter | Forum | Replies | Last Post |
| UA Motorsports OverFlow Tank GB! | bullitt5897 | Group Buys | 15 | 11-27-2011 09:41 PM |
| Somebody put a glass bottle under my tire... | Slade | Nissan 370Z General Discussions | 28 | 07-18-2011 04:47 PM |
| Nitrous Bottle Warmer - $30 | ThoriumHotdog | Parts for sale (Private Classifieds) | 0 | 10-16-2010 12:30 PM |
| My custom overflow tank... :D SIMOTA1 | simota1 | Exterior & Interior | 18 | 09-29-2010 01:30 AM |


 1Likes


 Linear Mode


