
|
After having to wait over two months for a broken wrist to heal, I've finally been able to get my halo install done! I'm running the Starry Night RGB+Chasing kit
|
|||||||
 |
|
|
LinkBack | Thread Tools | Display Modes |
 05-31-2017, 08:40 PM
|
#647 (permalink) | |
|
Premium Member
 Join Date: May 2013
Location: St. Pete, FL
Posts: 3,848
Drives: 520whp Fire Breather
Rep Power: 86953   |
Well, I finally caught a good deal on a used pair of headlights... Leaning towards just painting them but also considering demon eyes and possibly halos.
Any good DIY on the demon eyes on here (or link elsewhere)? There is some info in this thread but not as comprehensive as halos... Also, is there a reasonably prices set of halos out there that I can be confident wont suffer from burn outs? I really don't want to have to do this mod twice. Thanks guys! Edit: Reread the whole thread.. think I have a handle on how to do Demon eyes... How well do the new Morimoto XBT halos fit in the shroud? Those Starry Night halos also look pretty amazing.
__________________
2013 Gun Metallic Sport - Gamma V3 Twin Turbogized DIY Gamma V3 TT Install * Jayhovah's Gamma V3 TT Install Pic'Z and Vid'Z * DIY: Washer Reservoir for the Boosted Quote:
Last edited by Jayhovah; 06-03-2017 at 12:24 AM. |
|

|

|
|
06-27-2017, 04:51 PM
|
#648 (permalink) | |
|
Base Member
Join Date: Oct 2016
Location: Pickerington, OH
Posts: 101
Drives: 2015 370Z NISMO
Rep Power: 3365 |
Quote:
|
|
|
|
|
|
07-27-2017, 03:15 AM
|
#649 (permalink) | |
|
Base Member
Join Date: Jun 2015
Location: qatar
Posts: 3
Drives: 370Z
Rep Power: 12 |
Quote:
Nice DIY guide bro , one question , can you share more detailed wiring guide . I'm doing dual halos and demon eye RGB from morimoto but still planning the wiring |
|
|
|
|
|
11-24-2017, 08:20 PM
|
#650 (permalink) |
|
Base Member
Join Date: Jul 2017
Location: Pittsburgh
Posts: 32
Drives: 09 Z34 Black M
Rep Power: 10 |
Just got a few things off The Retrofit store during this thanksgiving deal stuff; got 25% off on my order. I just hope i got most of the right stuff, any feedback for what i might be missing component wise would be great.
RGB CONTROLLER: MORIMOTO XBT BLUETOOTH RGB Controller: Morimoto XBT Bluetooth RGB CONTROLLER: MORIMOTO XBT (4 WIRE - UNIVERSAL STANDARD): HALOS: PROFILE PRISM (RGB) Halos: Profile Prism (RGB) x2 90MM PROFILE PRISM HALO W/ DRIVER (RGB): $75.00 HALOS: PROFILE PRISM (RGB) Halos: Profile Prism (RGB) x2 70MM: PROFILE PRISM HALO W/ DRIVER (RGB): $65.00 HALO INSTALLATION KIT Halo Installation Kit DEMON EYES: PROFILE PRISM (RGB) Demon Eyes: Profile Prism (RGB) x2 Not sure if ill need any extra adapters, but the Morimoto controller said it is capable of handling up to 3 sets of lights, i.e. x2 demon eyes, x2 Halos A, x2 Halos B, which is what im running. |
|
|
|
|
01-09-2018, 12:37 PM
|
#651 (permalink) | |
|
Base Member
Join Date: Jul 2017
Location: Pittsburgh
Posts: 32
Drives: 09 Z34 Black M
Rep Power: 10 |
Quote:
Im about to finish my set, ill upload pictures of what i did with the demon eyes. Not actually sure if they are going to work well untill i test once i figure out where i want to run my wires. |
|
|
|
|
|
01-18-2018, 09:22 AM
|
#652 (permalink) |
|
Base Member
Join Date: Jul 2017
Location: Pittsburgh
Posts: 32
Drives: 09 Z34 Black M
Rep Power: 10 |
I figure I try and show a few things they may not have been covered here earlier and try to provide some images where I can.
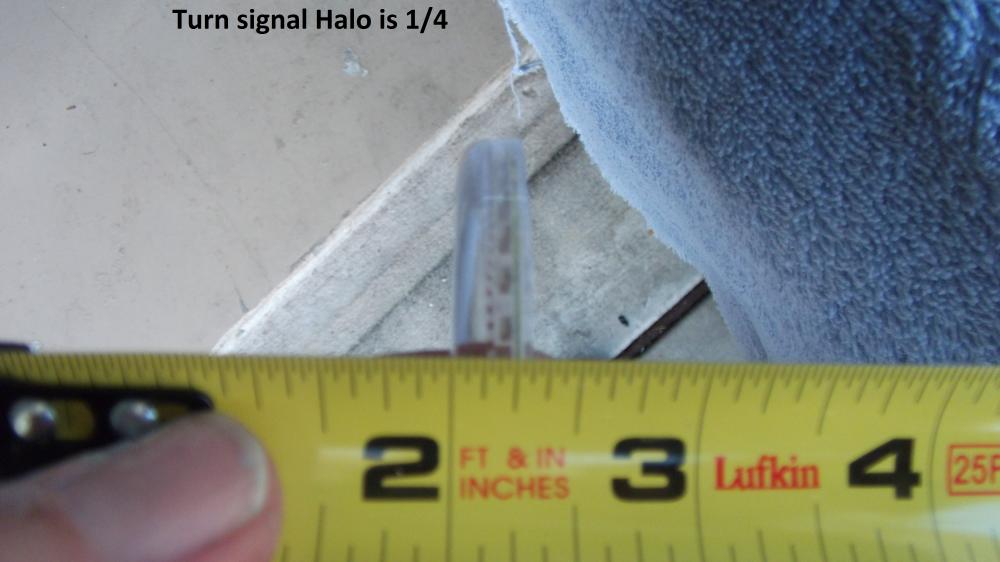
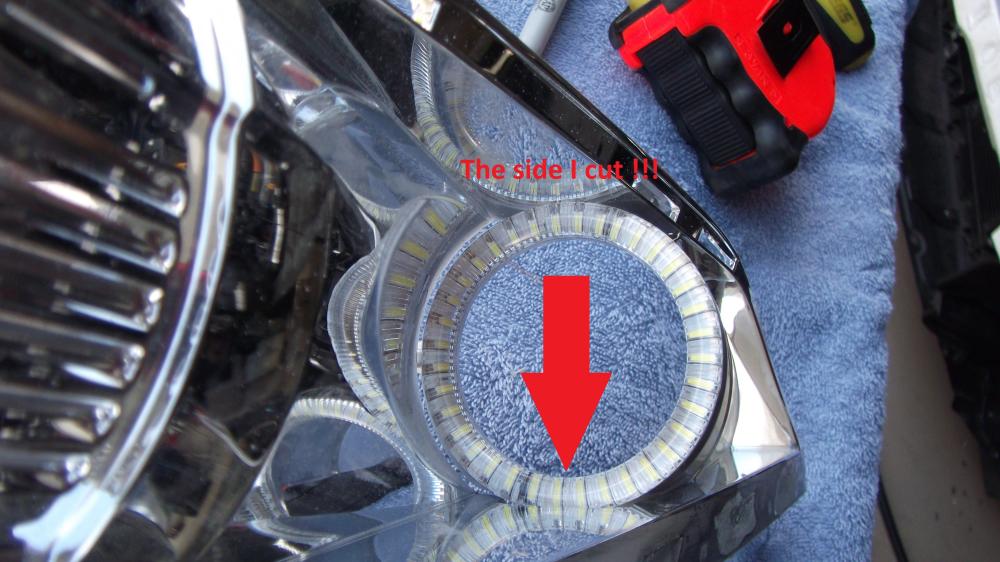
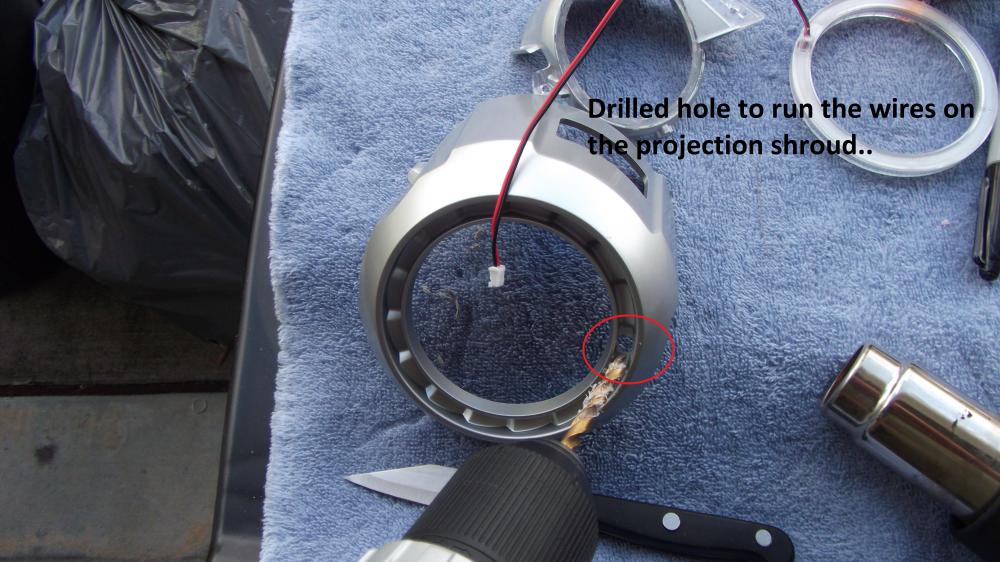
Hole drilled in main light fixture fir halo wires.  Demon eye: Drilled two holes, one for the bolt and another safety wire to hold it in place. (This did not work for me because I did not position it far enough forward, if there was even enough space, where I was trying to shine the light into the small opening in the projector shroud.    Never the less, try it and maybe you can get it to work. Here is how I had things wired,  I wired into the car harness at each plug, GREEN=(+)Turn signal & RED=(+)HID on R/H light. The L/H light is different, I honestly dont remember but compare the plug to R/H and the wire positions are the same, looking at the end of the plug with the clip on top the bottom middle THICK wire is (+)HID and top left is the signal.  I was going to use the quick splicers, those blue things, but decided to just strip some of the wiring away and solder leads right onto the harness, more secure that way. Now I wired the (+)Lead from the Morimot BT controller into the harness at the battery bay, should be the wire bundle most outboard going through the battery wall FWD. I removed some of the tape and what not and found a thick red wire that belongs to the radiator fan that has constant power once the car is on.  Connected with a fused line to BT controller.  I ran all the wires upfront and "mounted" them to the front bumper, only place I found to have enough space to store all this ****, controller, and the six ballasts for the halos and demon eyes. There is room on each side above the black plastic flapper looking things.  I used 3M tape that sticks to its self and a couple zip-ties to secure them, and a bunch more zip-ties to hold all the wiring in place. An as you can see, I wrapped the whole damn thing in plastic to protect it as much as I can from water and debris, taped each end. I modded the pumper a little to accommodate the zip-ties and plastic stuff, just for away some of the ridged that would sit inside the metal bumper's valley. An I also used the horns mount as my ground for the DEMON EYES.  Not sure if the images will shot, using google drive as my source, so ill fix it when i get a chance. Should still be able to copy the link and view the images. If I can round up some more images or I made mistake, please let me know, Ill add more as I find it and get time.   Heres the link to the folder with images if the previous links did show: https://drive.google.com/open?id=1ni...dev3YE1Mqlv-a_ Hope this helps anyone in any way. Last edited by Genosphere; 01-23-2018 at 06:57 PM. Reason: Adding INFO |
|
|
|
|
01-18-2018, 11:08 AM
|
#653 (permalink) | ||
|
Premium Member
Join Date: May 2013
Location: St. Pete, FL
Posts: 3,848
Drives: 520whp Fire Breather
Rep Power: 86953 |
Quote:
This forum itself will host your pics for you.. You can either create an album (quicklinks->Pictures&albums if browsing on the web) or attach the pictures directly to your post and insert them in. Lots of good info here, would be even better laid out the way you intended! =) I haven't seen a lot of good writeups on demon eyes for our lights so I am particularly interested in that!
__________________
2013 Gun Metallic Sport - Gamma V3 Twin Turbogized DIY Gamma V3 TT Install * Jayhovah's Gamma V3 TT Install Pic'Z and Vid'Z * DIY: Washer Reservoir for the Boosted Quote:
|
||
|
|
|
|
01-23-2018, 06:33 PM
|
#654 (permalink) | |
|
Base Member
Join Date: Jul 2017
Location: Pittsburgh
Posts: 32
Drives: 09 Z34 Black M
Rep Power: 10 |
Quote:
I was worried about using the epoxy with the heat from the projector but when I take it apart I'll try it out. Over all, the Morimoto BT controller works great, for what it is; and the halos are supper bright too. Will update further on quality as time passes. I'll sort those images out this week for you if I get the time; I drive back and forth from Pittsburgh to Cincinnati for work and class. Also, sorry for the tons of typos too, using my phone to type tends to be messy and I forget to check. :P  Try this link for the photos, think I fixed it...: https://drive.google.com/open?id=1ni...dev3YE1Mqlv-a_ Last edited by Genosphere; 01-31-2018 at 08:10 AM. Reason: Adding link. |
|
|
|
|
|
01-31-2018, 08:18 AM
|
#655 (permalink) |
|
Base Member
Join Date: Jul 2017
Location: Pittsburgh
Posts: 32
Drives: 09 Z34 Black M
Rep Power: 10 |
I figure I try and show a few things they may not have been covered here earlier and try to provide some images where I can.
For some reason every time I try to add photos, the post dosent go through. So I added a new link at bottom with images. Sorry. Hole drilled in main light fixture fir halo wires. Demon eye: Drilled two holes, one for the bolt and another safety wire to hold it in place. (This did not work for me because I did not position it far enough forward, if there was even enough space, where I was trying to shine the light into the small opening in the projector shroud. Never the less, try it and maybe you can get it to work. Here is how I had things wired, I wired into the car harness at each plug, GREEN=(+)Turn signal & RED=(+)HID on R/H light. The L/H light is different, I honestly dont remember but compare the plug to R/H and the wire positions are the same, looking at the end of the plug with the clip on top the bottom middle THICK wire is (+)HID and top left is the signal. I was going to use the quick splicers, those blue things, but decided to just strip some of the wiring away and solder leads right onto the harness, more secure that way. Now I wired the (+)Lead from the Morimot BT controller into the harness at the battery bay, should be the wire bundle most outboard going through the battery wall FWD. I removed some of the tape and what not and found a thick red wire that belongs to the radiator fan that has constant power once the car is on. I ran all the wires upfront and "mounted" them to the front bumper, only place I found to have enough space to store all this ****, controller, and the six ballasts for the halos and demon eyes. There is room on each side above the black plastic flapper looking things. I used 3M tape that sticks to its self and a couple zip-ties to secure them, and a bunch more zip-ties to hold all the wiring in place. An as you can see, I wrapped the whole damn thing in plastic to protect it as much as I can from water and debris, taped each end. I modded the pumper a little to accommodate the zip-ties and plastic stuff, just for away some of the ridged that would sit inside the metal bumper's valley. An I also used the horns mount as my ground for the DEMON EYES. Not sure if the images will shot, using google drive as my source, so ill fix it when i get a chance. Should still be able to copy the link and view the images. If I can round up some more images or I made mistake, please let me know, Ill add more as I find it and get time. Heres the link to the folder with images if the previous links did show: https://drive.google.com/open?id=1ni...dev3YE1Mqlv-a_ Hope this helps anyone in any way. |
|
|
|
|
02-01-2018, 11:17 PM
|
#656 (permalink) |
|
Base Member
Join Date: Nov 2017
Location: Edmonton, AB, Canada
Posts: 19
Drives: Nissan 370z 2017
Rep Power: 9 |
hey bro,
Resizing your picture would help a lot the reading check out that website : resizeimage.net Good tutorial thanks for everything.
__________________
2017 370z |
|
|
|
|
06-08-2018, 07:28 AM
|
#659 (permalink) | |
|
Base Member
Join Date: Jul 2017
Location: Pittsburgh
Posts: 32
Drives: 09 Z34 Black M
Rep Power: 10 |
Quote:
Put a picture of some wiring I did in the attachment. |
|
|
|
|
|
06-08-2018, 07:37 AM
|
#660 (permalink) | |
|
Base Member
Join Date: Jul 2017
Location: Pittsburgh
Posts: 32
Drives: 09 Z34 Black M
Rep Power: 10 |
Quote:
|
|
|
|
|
|
| Bookmarks |
|
|
 Similar Threads
|
||||
| Thread | Thread Starter | Forum | Replies | Last Post |
| Halo kit | rikkiphan1506 | Exterior & Interior | 3 | 01-31-2013 11:31 PM |
| Halo 4 | The Dimer | The Lounge (Off Topic) | 6 | 03-05-2012 03:41 PM |
| Z elininator drag Video's | Z eliminator | Canada | 0 | 08-15-2010 03:41 PM |
| How To detailing video's | Kyle@STILLEN | Detailing / Washing / Waxing / Cosmetic Maintenance and Repair | 2 | 03-02-2010 12:07 AM |
| Video's of the new arrival? | Shortbus | Nissan 370Z General Discussions | 1 | 01-04-2009 05:14 PM |


 492Likes


 .
.


 Linear Mode


