
|
Amazing DIY and the results are fantastic. One question, as a sanity check: For the main projector halos, is that 90mm? Haven't taken mine apart to measure, so wanted to
|
|||||||
 |
|
|
LinkBack | Thread Tools | Display Modes |
|
|
 10-12-2012, 11:18 AM
|
#1 (permalink) |
|
Track Member
Join Date: Jun 2012
Location: Lexington, SC
Posts: 932
Drives: 2012 Nismo TT
Rep Power: 3400   |

Amazing DIY and the results are fantastic.
One question, as a sanity check: For the main projector halos, is that 90mm? Haven't taken mine apart to measure, so wanted to be sure. Thanks again! |

|

|
|
05-16-2013, 12:34 PM
|
#2 (permalink) |
|
Base Member
Join Date: Jul 2012
Location: Montreal
Age: 40
Posts: 10
Drives: 370z 40th Edition
Rep Power: 15 |
Hello Nut_N_Much!
First off thank you very much for taking the time to write up on these DIYs  I'm sure everyone appreciates it at this forum~ I'm sure everyone appreciates it at this forum~I have a few questions to ask you as I'm a complete newbie when it comes to angel eyes/orb rings etc lol I wanted to ask you if I'm painting my headlight housing and wanted to add the sexy Single Orb Rings, do I have to purchase the parts that you used? 1. G35 Clear Lenses size 2 5/8 – TRS (THERETROFITSOURCE.COM) 2. Halo 90mm from (THERETROFITSOURCE.COM) I'm not too sure why you had to buy the G35 Clear lenses....would the Halo 90mm not fit the stock lights? Also, wouldn't it be alot simpler if you just purchased the product at Nissan 370Z (2008+) Headlight LED ORB RING 5000K PURE WHITE halo angel eyes - LuceProdukt.com Thank you for your time! |
|
|
|
|
05-16-2013, 12:35 PM
|
#3 (permalink) |
|
Base Member
Join Date: Jul 2012
Location: Montreal
Age: 40
Posts: 10
Drives: 370z 40th Edition
Rep Power: 15 |
Hello Nut_N_Much!
First off thank you very much for taking the time to write up on these DIYs I'm sure everyone appreciates it at this forum~ I have a few questions to ask you as I'm a complete newbie when it comes to angel eyes/orb rings etc lol I wanted to ask you if I'm painting my headlight housing and wanted to add the sexy Single Orb Rings, do I have to purchase the parts that you used? 1. G35 Clear Lenses size 2 5/8 – TRS (THERETROFITSOURCE.COM) 2. Halo 90mm from (THERETROFITSOURCE.COM) I'm not too sure why you had to buy the G35 Clear lenses....would the Halo 90mm not fit the stock lights? Also, wouldn't it be alot simpler if you just purchased the product at Nissan 370Z (2008+) Headlight LED ORB RING 5000K PURE WHITE halo angel eyes - LuceProdukt.com Thank you for your time! |
|
|
|
|
05-16-2013, 01:45 PM
|
#4 (permalink) | |
|
A True Z Fanatic

Join Date: Dec 2011
Location: Pensacola Florida
Posts: 1,696
Drives: Awesome Car
Rep Power: 28 |
Quote:
 That pair they sell you will have a warranty and already has 12V resisters attached to it. Like VDC said, don't order the G35 lens, also order some sealant. I thinks its at the bottom of the accessories area. Last thing you want is moisture in your lights after there all closed up. Guys will tell you that all you need to do is push the factory sealant back into the grove with a knife or something. It works, but not all the time, the money you spend on the sealant is worth it!!! 
__________________
Did new cool science stuff to the car !!!
http://www.the370z.com/mazoc/99606-z...y-14-17-a.html http://www.the370z.com/diy-section-d...-w-videos.html |
|
|
|
|
|
07-07-2012, 02:15 PM
|
#5 (permalink) |
|
Track Member

Join Date: May 2011
Location: Walhalla/Clemson, SC
Posts: 874
Drives: 09 BS 370z
Rep Power: 17 |
Can't wait!!!
__________________
 Avant Garde M310 gloss black/ Nitto Invo/ black fangs and rear diffuser/ gloss black roof/ tinted tail lights/ GT-R start button |
|
|
|
|
07-07-2012, 03:02 PM
|
#7 (permalink) |
|
Base Member
Join Date: Feb 2012
Location: port hueneme ca
Posts: 70
Drives: 2011 Silver 370Z
Rep Power: 15 |
Looking good.
Are you blacking everything out or going with a different color sceam? My Z is silver also so it'll be great to see what it looks like.
__________________
Eric Z. Myers 2011 370Z, Silver, Sport, K&N short ram intake, Fast Intentions Exhaust, Pioneer AVIC, ORACLE Lighting LED Halo Kit, Tinted. |
|
|
|
|
07-07-2012, 09:45 PM
|
#8 (permalink) | |
|
A True Z Fanatic
Join Date: Dec 2011
Location: Pensacola Florida
Posts: 1,696
Drives: Awesome Car
Rep Power: 28 |
Quote:
If you have some basic tools you can do this mod. Not to difficult at least until I wire it up.
__________________
Did new cool science stuff to the car !!!
http://www.the370z.com/mazoc/99606-z...y-14-17-a.html http://www.the370z.com/diy-section-d...-w-videos.html |
|
|
|
|
|
07-07-2012, 05:08 PM
|
#9 (permalink) |
|
Track Member

Join Date: May 2012
Location: Unknown
Posts: 538
Drives: PG 09 Nissan 370z
Rep Power: 16 |
Thread jack. Nice knife man, is that a folder or fixed? looks real good.
__________________
очень быстро ...
Stillen Gen 3 CAI// Stillen CBE// B&M SS with PWJDM Shift Knob// Custom OCC// Drilled/Slotted Rotors//Halo/painted Headlights// Under-hood dress up |
|
|
|
|
07-07-2012, 06:59 PM
|
#10 (permalink) | |
|
A True Z Fanatic
Join Date: Dec 2011
Location: Pensacola Florida
Posts: 1,696
Drives: Awesome Car
Rep Power: 28 |
Quote:
__________________
Did new cool science stuff to the car !!!
http://www.the370z.com/mazoc/99606-z...y-14-17-a.html http://www.the370z.com/diy-section-d...-w-videos.html |
|
|
|
|
|
07-07-2012, 07:16 PM
|
#11 (permalink) |
|
A True Z Fanatic
Join Date: Dec 2011
Location: Pensacola Florida
Posts: 1,696
Drives: Awesome Car
Rep Power: 28 |
Update
I saw the box used on youtube. Some guy in a fab shop did it with 2 heat guns.
Sorry I don't know how to quote yet!! Okay, A picture tells a thousand words, so here it goes. To fill the dimples just use body filler, I use Lizard Skin body filler. It works great. Make sure when you fill the dimples you leave enough to sand down flush. As the stuff dries it sinks into the dimple, moisture leaving the filler.  This is the piece that needs to be cut, be careful and take your time!!  You need to cut it as close to the grey as you can with out damaging it. You need to cut it as close to the grey as you can with out damaging it. 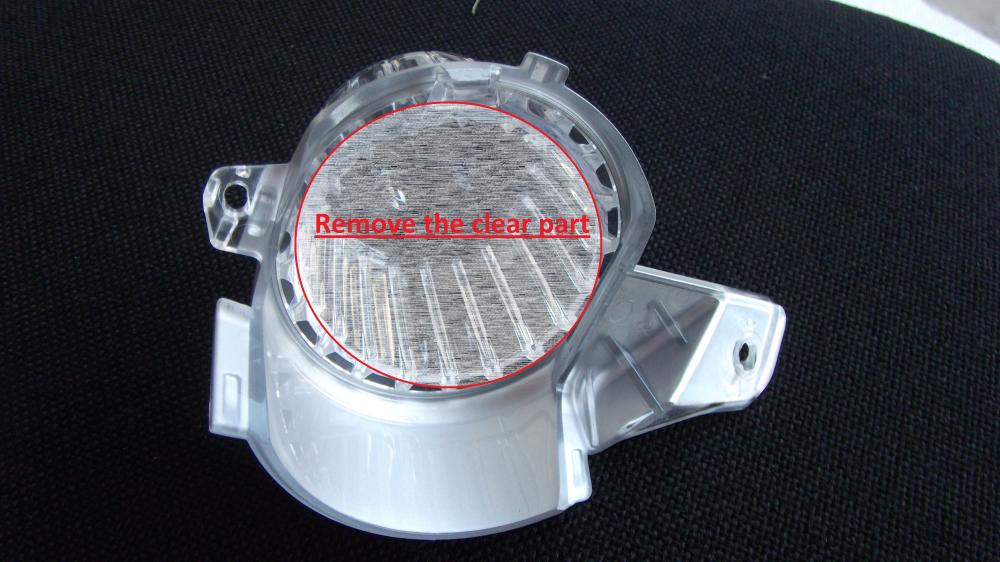  To remove the clear plastic I settled on using this: 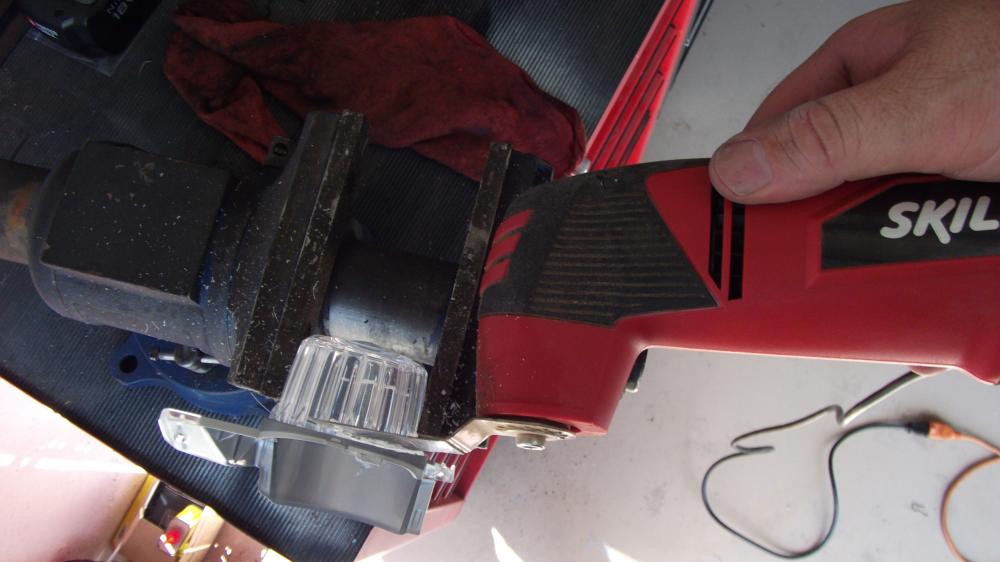 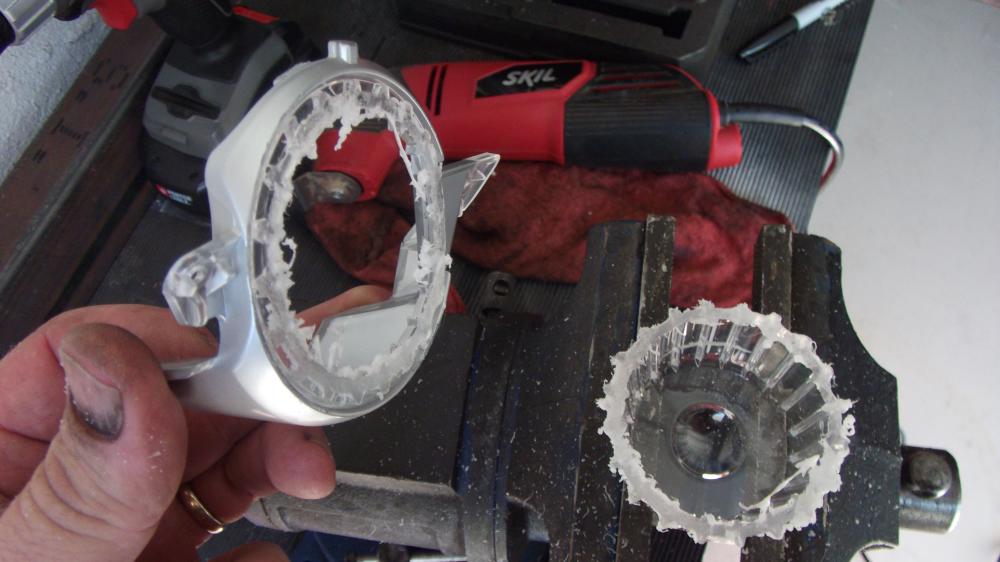 You want to leave an 1/8 of an inch lip around the bezel all the way around. 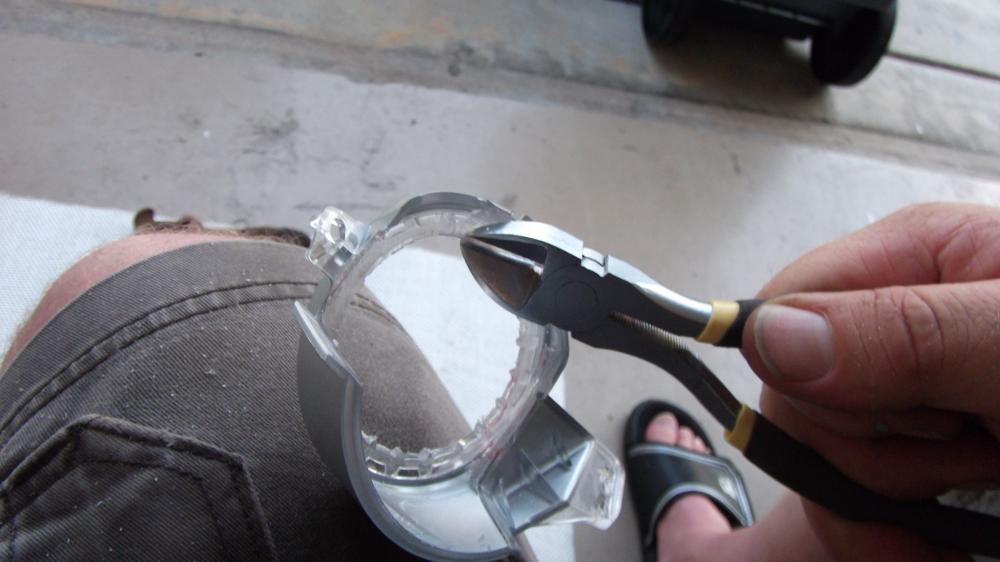 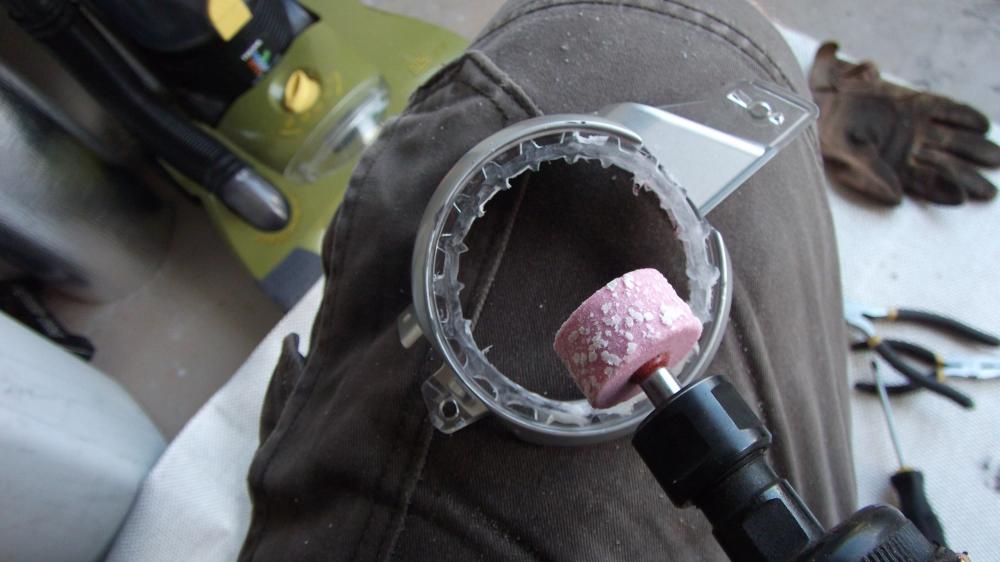 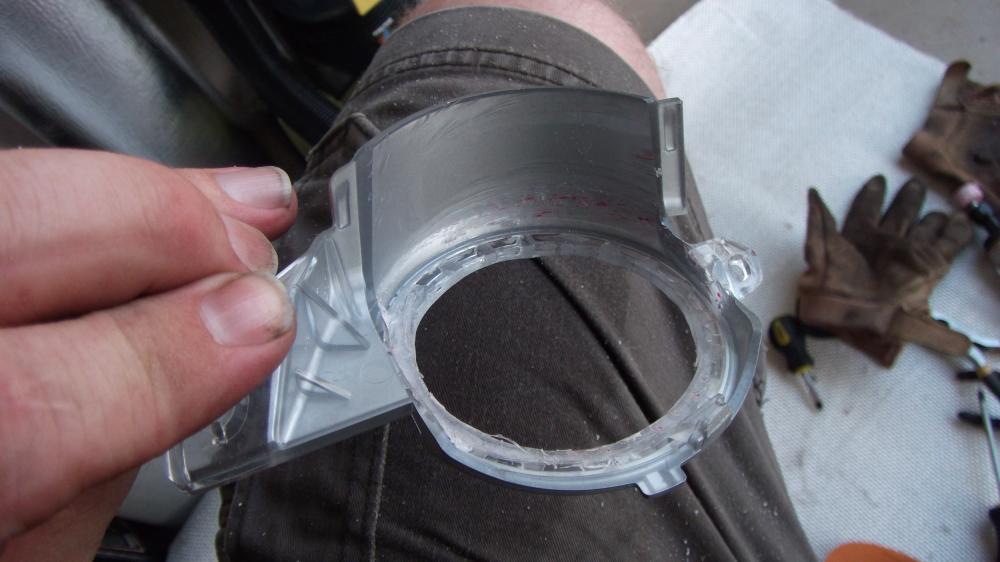 The front side just needs to be flush. That's the side you will use to epoxy the halo on.. Currently there is no way to recede the halo. It will just be attached on the outside of the plastic. Making the plastic smooth will give you a cleaner look at the seam.  When you think your close try a test fit.. You DO NOT want the lens to sit flush on the bezel, there needs to be a 3/16th gap between the bezel and the lens. That gap will allow the halo to sit flush when you mount it later to the front of the bezel. The gap keeps the lens from push the halo out. The halo wont sit flush on the plastic if you try to flush mount the G35 Lens. There will be a gap between the lens and the plastic; its okay. Will discuss mounting it all when I do it, I'll take lots of pictures.  This looks good, now I'll move to the the halo clearances. 
__________________
Did new cool science stuff to the car !!!
http://www.the370z.com/mazoc/99606-z...y-14-17-a.html http://www.the370z.com/diy-section-d...-w-videos.html Last edited by Nut_N_Much; 05-03-2013 at 08:27 AM. |
|
|
|
|
07-07-2012, 07:36 PM
|
#12 (permalink) |
|
A True Z Fanatic
Join Date: Dec 2011
Location: Pensacola Florida
Posts: 1,696
Drives: Awesome Car
Rep Power: 28 |
Update
After your test fit you can clean it up and smooth it out repaint it if needed. Remember the grey is all that will be seen.. When you glue the lens on its goop is clear but try to avoid getting it all over the lens.
I measured the halo, its 1/4 inch width then I measured the gap between the Light Shroud and The Turn Signal Shroud we just modified. It looks like the halo wont fit with out modifying the Light Shroud. So I need to cut 1/4 out of the housing. I have to figure out how to do it, if I cut the wrong side I ruin the hole thing. So when you mark it check it twice before cutting. 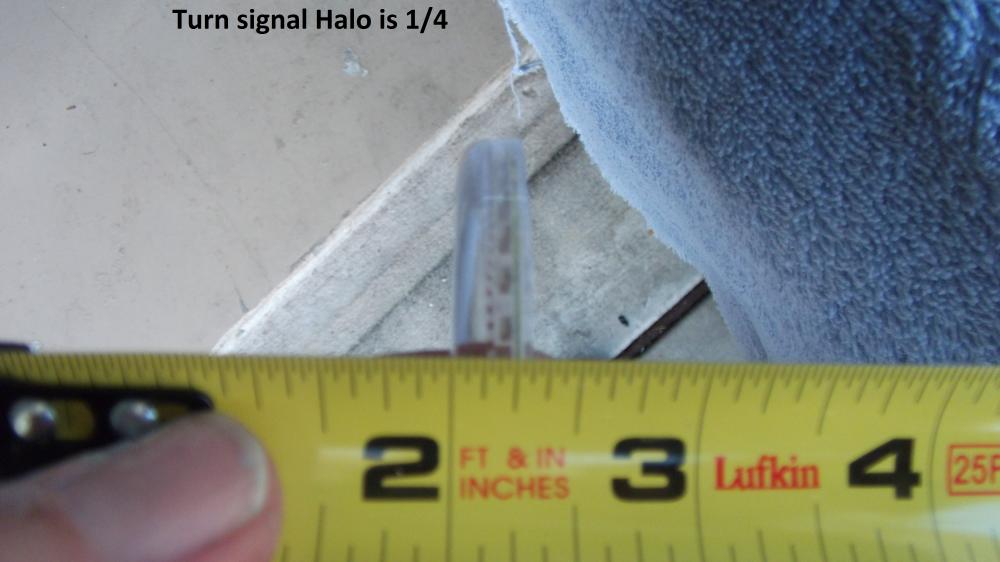  Mounted the modded turn signal shroud and slide the halo in front of it. This will show you which side you need to cut. Once cut it will allow the halo to sit centered on the shroud. Once you figure out what you need to cut off the light shroud you can go ahead and glue the halo on the turn signal shroud you modified. I marked were i needed to cut with a marker and used the air grinder to grind it out slowly and get a good tight fit. Check it as you go you don't want a huge gap. You should be able to slide the turn signal shroud (with everything mounted to it) in and out freely. If you grind to much don't worry, once the lights are painted its not very visiable unless guys like us are looking for it.  My cut worked perfectly see the pic. Also gave me a good location to run the wires to the control box.  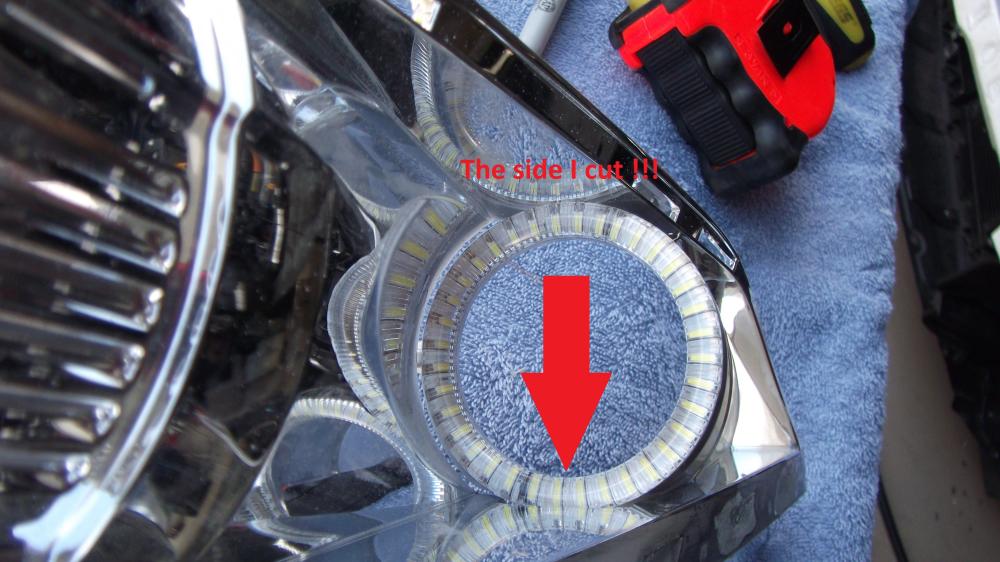 The hard part over is now over, just remember what you did and do it again to the other light. Next I figured out how I wanted my 90mm halo wire to run so I drilled a small hole in the projection light shroud. Now I have done a lot of lights I recommend running wires through the top of the shroud, if you run them at the bottom or on the side they will be visible once they are put back together. The picture is old and shows the hole being on the side, drill at the top not the side. The retrofitsource.com XB halo's fit snugly in the valley of the shroud. This halo ring from LitWurkz (Angel Eye Kit) will not sit in the valley. They are glued to the outside. This DIY I used the lightwurks kit and also ordered LED Turn Signals. ****You will want to replace the stock turn signal light bulb**** The stock bulb gives off a lot of heat, that heat will transfer to the G35 Lens we installed, That lens will get hot enough to cause your paint to bubble up over time. 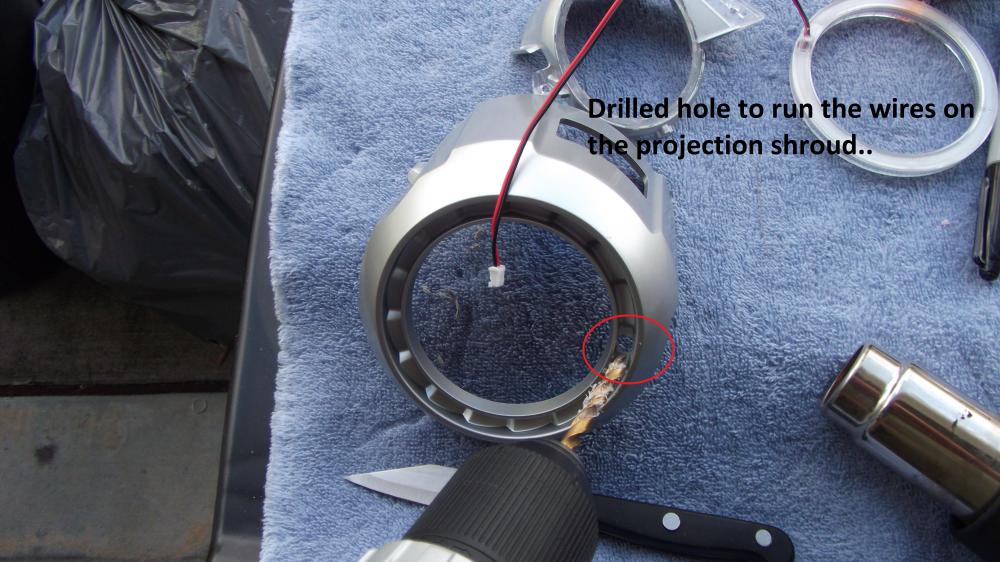 I hate wrapping, I tried to do it with one piece. NOT going to happen with me at the helm. I did what I could..   Came out okay just worried about the heat. I have seen a few forum members wrap the inside of the lights but not on the shroud itself. I guess we will find out. The worst that can happen is I take it off and paint it some crazy color  . .The wife says to stop and eat, I have been at it all day and it started to rain. Good timing. Please REP +! and LIKE if you like the progress or this build helps you do your own.. Thanks for lookin !
__________________
Did new cool science stuff to the car !!!
http://www.the370z.com/mazoc/99606-z...y-14-17-a.html http://www.the370z.com/diy-section-d...-w-videos.html Last edited by Nut_N_Much; 05-03-2013 at 09:06 AM. |
|
|
|
|
07-08-2012, 07:31 AM
|
#13 (permalink) | |
|
A True Z Fanatic
Join Date: Apr 2010
Location: Naples, FL
Posts: 2,659
Drives: 40th
Rep Power: 23 |
Quote:
Yours should have the tabs on them too... Mine don't 
__________________
2010 40th Anniversary 370Z  |
|
|
|
|
|
07-27-2017, 03:15 AM
|
#14 (permalink) | |
|
Base Member
Join Date: Jun 2015
Location: qatar
Posts: 3
Drives: 370Z
Rep Power: 12 |
Wiring guide
Quote:
Nice DIY guide bro , one question , can you share more detailed wiring guide . I'm doing dual halos and demon eye RGB from morimoto but still planning the wiring |
|
|
|
|
|
02-04-2015, 10:04 PM
|
#15 (permalink) |
|
Track Member

Join Date: Dec 2013
Location: Central Jersey
Posts: 637
Drives: 09 370z 6MT/B+Sport
Rep Power: 15 |
I'm confused. All of the videos you showed wiring them up to the circuit board and leaving them inside the actual headlight but in the thread you wrote to wire them outside of the headlight incase you run into problems and it's a lot easier to fix. Are the video's your newer procedure?
__________________
BC - SSR - Evo-R - ViS - SPC - ZSpeed - Beluga - Blox - 35% Tint - Clutch Spring - Fang Forced Air Ducting
|
|
|
|
|
| Bookmarks |
|
|
 Similar Threads
|
||||
| Thread | Thread Starter | Forum | Replies | Last Post |
| Halo kit | rikkiphan1506 | Exterior & Interior | 3 | 01-31-2013 11:31 PM |
| Halo 4 | The Dimer | The Lounge (Off Topic) | 6 | 03-05-2012 03:41 PM |
| Z elininator drag Video's | Z eliminator | Canada | 0 | 08-15-2010 03:41 PM |
| How To detailing video's | Kyle@STILLEN | Detailing / Washing / Waxing / Cosmetic Maintenance and Repair | 2 | 03-02-2010 12:07 AM |
| Video's of the new arrival? | Shortbus | Nissan 370Z General Discussions | 1 | 01-04-2009 05:14 PM |


 492Likes


 Hybrid Mode


