Nissan 370Z Forum  

DIY: Battery Relo

Guys quick question, after you install the battery, is it possible to put the spares and other junk back on!! Cause that stuff weighs like 55 pounds and the battery

Go Back   Nissan 370Z Forum > Nissan 370Z Tech Area > DIY Section (Do-It-Yourself)


Like Tree8Likes

Reply
 
LinkBack Thread Tools Display Modes
Old 09-20-2009, 06:27 PM   #31 (permalink)
Base Member
 
Join Date: Jul 2009
Location: California
Posts: 159
Drives: 09 Black 370z
Rep Power: 15
370zForever is on a distinguished road
Default

Guys quick question, after you install the battery, is it possible to put the spares and other junk back on!! Cause that stuff weighs like 55 pounds and the battery only weighs 14 pounds...Doesn't that worsen the weight distribution and also I am going to use the car as a track day car, but I also need the trunk once in a while for daily driving...So can you put the excess weight from the trunk back in?
370zForever is offline   Reply With Quote
Old 09-20-2009, 06:32 PM   #32 (permalink)
Retired admin
 
frost's Avatar
 
Join Date: Dec 2008
Location: Winterfell
Posts: 106,613
Drives: Your Wife Crazy
Rep Power: 0
frost frost frost frost frost frost frost frost frost frost frost
Default

Hey Travis, what shop did you use? (PM me if you want to keep it out of the thread). Thanks mate.
frost is offline   Reply With Quote
Old 09-20-2009, 06:55 PM   #33 (permalink)
A True Z Fanatic
 
travisjb's Avatar
 
Join Date: Jan 2009
Location: GSO
Posts: 2,803
Drives: VIR
Rep Power: 188
travisjb has a reputation beyond reputetravisjb has a reputation beyond reputetravisjb has a reputation beyond reputetravisjb has a reputation beyond reputetravisjb has a reputation beyond reputetravisjb has a reputation beyond reputetravisjb has a reputation beyond reputetravisjb has a reputation beyond reputetravisjb has a reputation beyond reputetravisjb has a reputation beyond reputetravisjb has a reputation beyond repute
Default

Vivid racing... any shop can do it
__________________
2009 370Z #104
*For Sale*
travisjb is offline   Reply With Quote
Old 09-20-2009, 07:17 PM   #34 (permalink)
Retired admin
 
frost's Avatar
 
Join Date: Dec 2008
Location: Winterfell
Posts: 106,613
Drives: Your Wife Crazy
Rep Power: 0
frost frost frost frost frost frost frost frost frost frost frost
Default

Quote:
Originally Posted by travisjb View Post
Vivid racing... any shop can do it
Yeah, I know most can do it. I just wondered who you trusted with your car.
frost is offline   Reply With Quote
Old 09-20-2009, 08:20 PM   #35 (permalink)
A True Z Fanatic
 
travisjb's Avatar
 
Join Date: Jan 2009
Location: GSO
Posts: 2,803
Drives: VIR
Rep Power: 188
travisjb has a reputation beyond reputetravisjb has a reputation beyond reputetravisjb has a reputation beyond reputetravisjb has a reputation beyond reputetravisjb has a reputation beyond reputetravisjb has a reputation beyond reputetravisjb has a reputation beyond reputetravisjb has a reputation beyond reputetravisjb has a reputation beyond reputetravisjb has a reputation beyond reputetravisjb has a reputation beyond repute
Default

Redline Motorsports in Tempe, AZ
SRD Performance
UMS Tuning
DIY
__________________
2009 370Z #104
*For Sale*
travisjb is offline   Reply With Quote
Old 09-24-2009, 12:25 PM   #36 (permalink)
A True Z Fanatic
 
wstar's Avatar
 
Join Date: Mar 2009
Location: Houston, TX
Posts: 4,024
Drives: too slow
Rep Power: 3594
wstar has a reputation beyond reputewstar has a reputation beyond reputewstar has a reputation beyond reputewstar has a reputation beyond reputewstar has a reputation beyond reputewstar has a reputation beyond reputewstar has a reputation beyond reputewstar has a reputation beyond reputewstar has a reputation beyond reputewstar has a reputation beyond reputewstar has a reputation beyond repute
Default

Quote:
Originally Posted by 370zForever View Post
Guys quick question, after you install the battery, is it possible to put the spares and other junk back on!! Cause that stuff weighs like 55 pounds and the battery only weighs 14 pounds...Doesn't that worsen the weight distribution and also I am going to use the car as a track day car, but I also need the trunk once in a while for daily driving...So can you put the excess weight from the trunk back in?
Actually, according to the weight reduction thread, the stock battery is 35 lbs, the stock spare is 35 lbs, and the stock subwoofer is 8 lbs. So by removing all 3 and adding a 14 lb battery in the trunk, your net change is a total drop of 64 lbs, 35 removed from the front and only 29 removed from the rear, which if anything is a slight shift in the "good" direction. (note this doesn't consider the weight of the battery holder or the wiring, but the battery holder is like 1lb or less extra in the rear, and the wiring runs all along the car).

I ended up just leaving the styrofoam junk in the rear, as well as the plastics, and then put the stock cover board and carpets over it all. So basically my trunk is configured exactly like stock, except the sub and spare are missing and the battery is back there. This leaves the trunk functional, although the floor is a bit "unsupported" since there's a hollow round hole underneath the carpet + board. Honestly though, there aren't many things I would throw in my trunk heavy enough to cause an issue with that anyways.
__________________
7AT Track Car!
Journal thread / Car setup details
wstar is offline   Reply With Quote
Old 10-21-2010, 04:24 PM   #37 (permalink)
A True Z Fanatic
 
Join Date: Nov 2009
Location: 90090
Posts: 1,851
Drives: Force Fed Nismo
Rep Power: 183
wishihadnav has a reputation beyond reputewishihadnav has a reputation beyond reputewishihadnav has a reputation beyond reputewishihadnav has a reputation beyond reputewishihadnav has a reputation beyond reputewishihadnav has a reputation beyond reputewishihadnav has a reputation beyond reputewishihadnav has a reputation beyond reputewishihadnav has a reputation beyond reputewishihadnav has a reputation beyond reputewishihadnav has a reputation beyond repute
Default

nice write up!..+1 rep
wishihadnav is offline   Reply With Quote
Old 10-21-2010, 05:32 PM   #38 (permalink)
Administrator
 
Trips's Avatar
 
Join Date: May 2009
Location: Disneyland, Ca
Posts: 8,728
Drives: 🔰
Rep Power: 10
Trips has a reputation beyond reputeTrips has a reputation beyond reputeTrips has a reputation beyond reputeTrips has a reputation beyond reputeTrips has a reputation beyond reputeTrips has a reputation beyond reputeTrips has a reputation beyond reputeTrips has a reputation beyond reputeTrips has a reputation beyond reputeTrips has a reputation beyond reputeTrips has a reputation beyond repute
Default

Nice write up, and long overdue Monster rep.
__________________


http://www.the370z.com/payments.php
Trips is offline   Reply With Quote
Old 10-21-2010, 11:09 PM   #39 (permalink)
A True Z Fanatic
 
travisjb's Avatar
 
Join Date: Jan 2009
Location: GSO
Posts: 2,803
Drives: VIR
Rep Power: 188
travisjb has a reputation beyond reputetravisjb has a reputation beyond reputetravisjb has a reputation beyond reputetravisjb has a reputation beyond reputetravisjb has a reputation beyond reputetravisjb has a reputation beyond reputetravisjb has a reputation beyond reputetravisjb has a reputation beyond reputetravisjb has a reputation beyond reputetravisjb has a reputation beyond reputetravisjb has a reputation beyond repute
Default

thanks trips.... good to see old threads are still of some use
__________________
2009 370Z #104
*For Sale*
travisjb is offline   Reply With Quote
Old 10-22-2010, 01:36 PM   #40 (permalink)
A True Z Fanatic
 
Join Date: Nov 2009
Location: 90090
Posts: 1,851
Drives: Force Fed Nismo
Rep Power: 183
wishihadnav has a reputation beyond reputewishihadnav has a reputation beyond reputewishihadnav has a reputation beyond reputewishihadnav has a reputation beyond reputewishihadnav has a reputation beyond reputewishihadnav has a reputation beyond reputewishihadnav has a reputation beyond reputewishihadnav has a reputation beyond reputewishihadnav has a reputation beyond reputewishihadnav has a reputation beyond reputewishihadnav has a reputation beyond repute
Default

Quote:
Originally Posted by travisjb View Post
thanks trips.... good to see old threads are still of some use
+1 rep sent to you as well
wishihadnav is offline   Reply With Quote
Old 10-21-2011, 01:19 PM   #41 (permalink)
A True Z Fanatic
 
wstar's Avatar
 
Join Date: Mar 2009
Location: Houston, TX
Posts: 4,024
Drives: too slow
Rep Power: 3594
wstar has a reputation beyond reputewstar has a reputation beyond reputewstar has a reputation beyond reputewstar has a reputation beyond reputewstar has a reputation beyond reputewstar has a reputation beyond reputewstar has a reputation beyond reputewstar has a reputation beyond reputewstar has a reputation beyond reputewstar has a reputation beyond reputewstar has a reputation beyond repute
Default

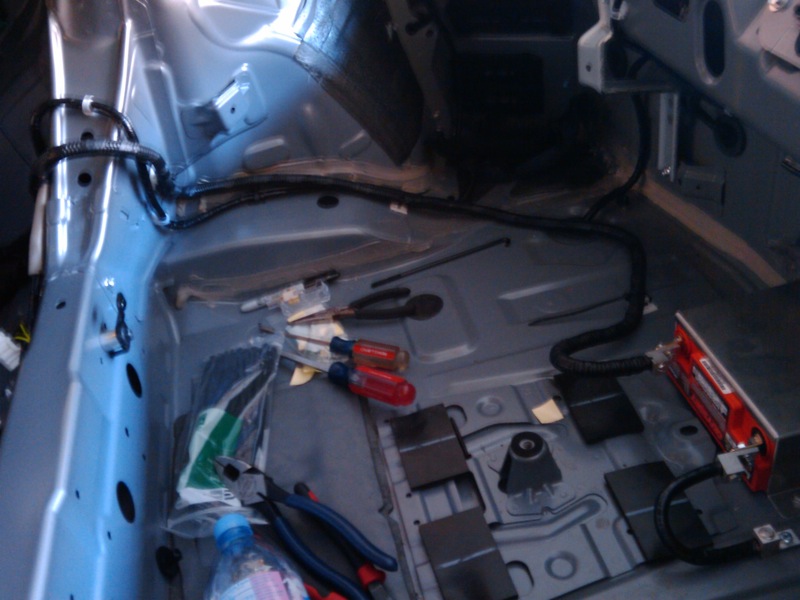
My PC680 finally started giving out a bit. It was possible to charge it and use it for a few days, but it was giving out too quickly between charges. So it made it a bit over 2 years of abuse, which isn't bad. I had been wanting to re-work my old battery relocate job anyways, so I took the opportunity to kill two birds with one stone and both replace and re-relocate my battery.

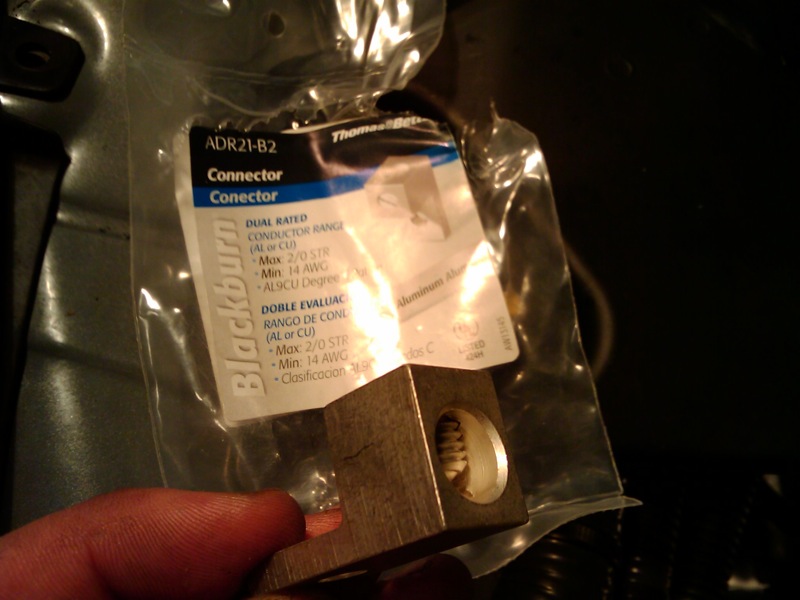
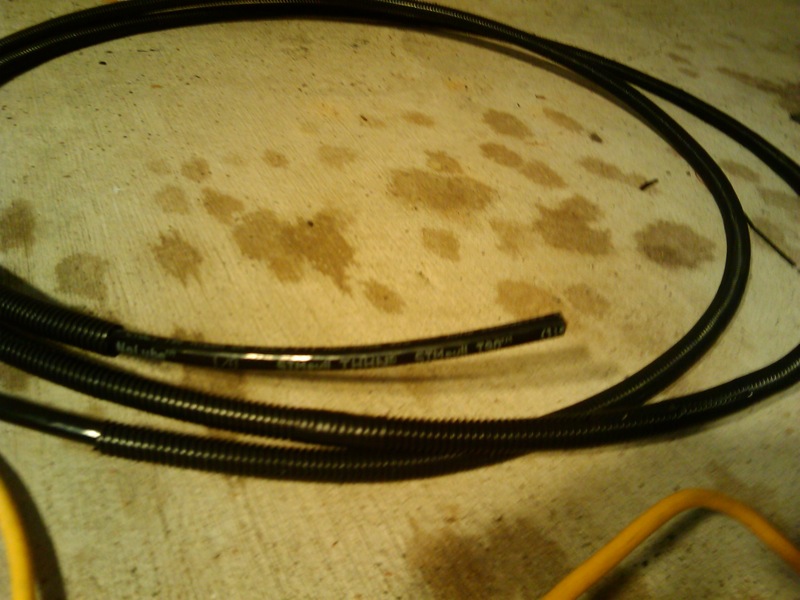
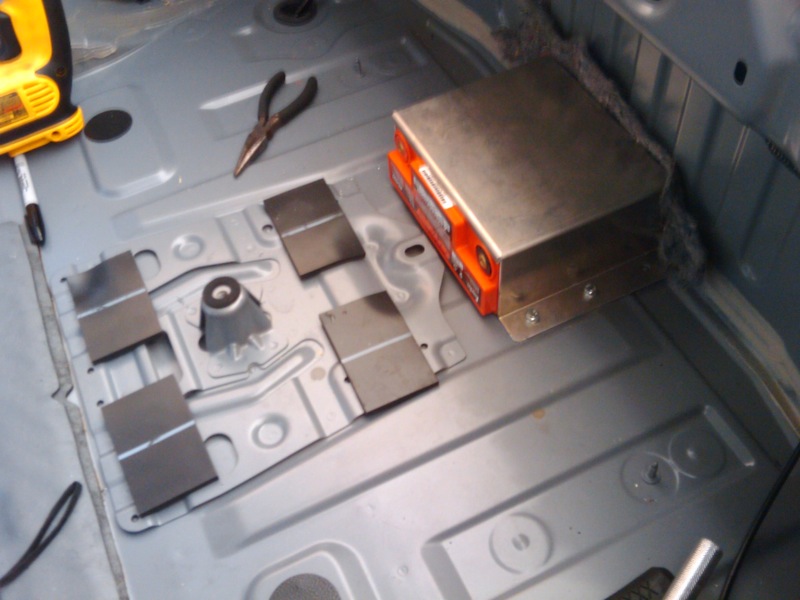
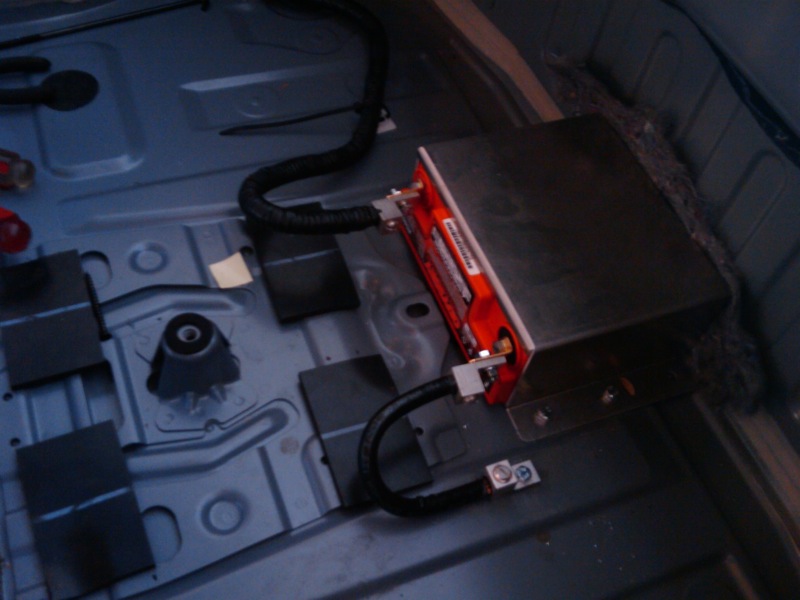
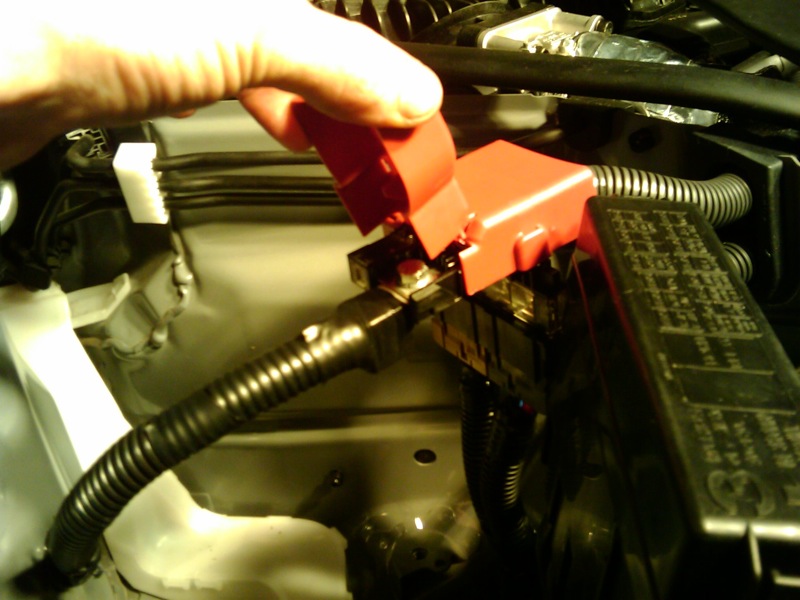
My old relocation (pictured earlier in this thread) had two things going for it that I don't like anymore:

(1) The far rear location was more ideal for weight distribution for me, because I was placing a heavy tool/emergency bag in the forward part of the trunk on the street that outweighed the battery significantly, and that left room for it.

(2) After removing all the other crap in the trunk (subwoofer, spare, etc) there was a fair amount of vibrational noise coming through the trunk floor, so I had Dynamatted most of the trunk to make up for it.

Now that the car is increasingly becoming more track-ish (where the tool bag is not an issue, and the noise level isn't either), I've moved the battery forward to the same rough location as travisjb's install (but using the solid aluminum box I used before). Technically this is also safer in the event I get rear-ended. I also stripped out the Dynamat (leaving some ugly tar residue I may go after someday with some degreaser).

I also got rid of all the hokey hardware store connections I made before (they worked, but probably more resistance than necessary) and soldered on proper terminals and connections this time around, and reduced the overall positive cable run length.

I'll start with basic pics of the new install. These two pics are the overview of the new install. Notice the ugly tar residue from trying to remove Dynamat. All cabling is still solid copper 1/0 gauge stuff. The battery terminals and the ground lug are soldered to the cables using solder slugs, and the terminals got color-coded heat-shrink wrap and rubber covers. The battery itself now has Odyssey's own add-on standard SAE brass terminals to fit regular ring-style battery terminal connectors.


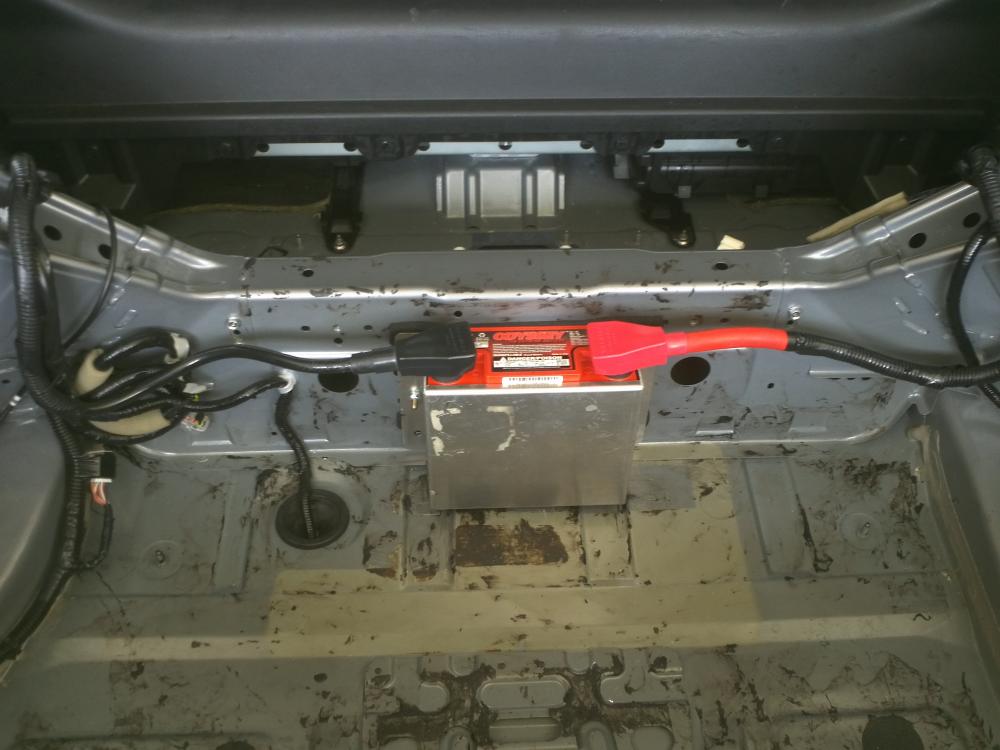
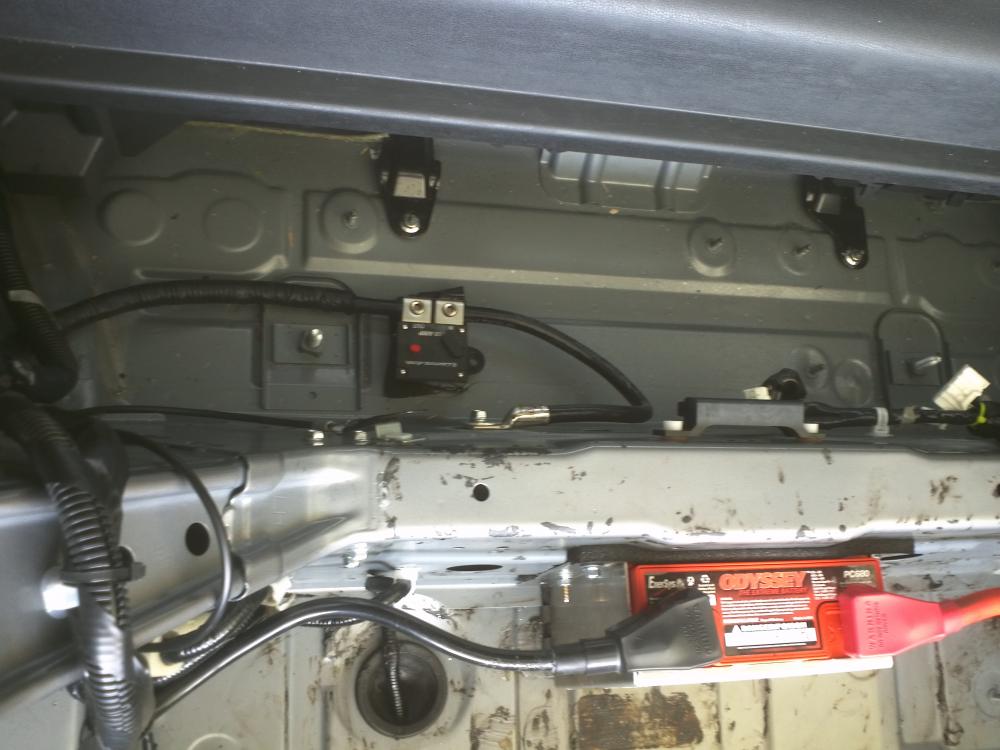
Getting this box with its large flat edges mounted in this position turned out to be pretty tough. The metal surface of the car here isn't at all flat, and there's no easy way to reach the "inside" of that channel to put nuts on bolts. My compromise solution was:

(1) Using the larger circular holes the car comes with, it's possible to barely reach the spot of the center bolt holes of my box. I drilled these, taped the M6 bolts (with large washers) to my fingertips, and managed to delicately put the bolts in from the rear. So at least the center hole on each side of the box has a good solid bolted connection.

(2) For the outer 4 holes that can't be reached by fingertip, I used self-drilling sheetmetal screws, 1/4" wide by 1" long. These are tricky and I don't trust them as much for holding power, but they do in a pinch. The tricky part is it's easy to overshoot the drilling phase and strip the hole so that the bolt won't hold. You have to be very careful and try to back off the drill before it fully sinks the bolt, and then switch to a wrench. I got 3/4 of the holes done right, and the lower left one I stripped, so it's empty in the pics. I'll go back to this later with a slightly larger diameter (5/16") regular sheet metal screw to fix it.

(3) To get the box to hold flat as it's compressed into place by the 6 screws, and to reduce any bouncing or vibration, I added some closed cell foam weatherstrip onto the metal of the car before mounting the battery. I bought a couple different thicknesses (3/8" and 1/2"), and basically put it underneath the battery and in the "low spots" on the wall. It's obvious when you're doing it in person.

As for the ground lug on the other side of the channel: I re-used an existing factory threaded hole and the matching bolt, which originally held an audio amplifier bracket, and sanded off the paint in the vicinity for a good connection.

Pics of this stuff up close:


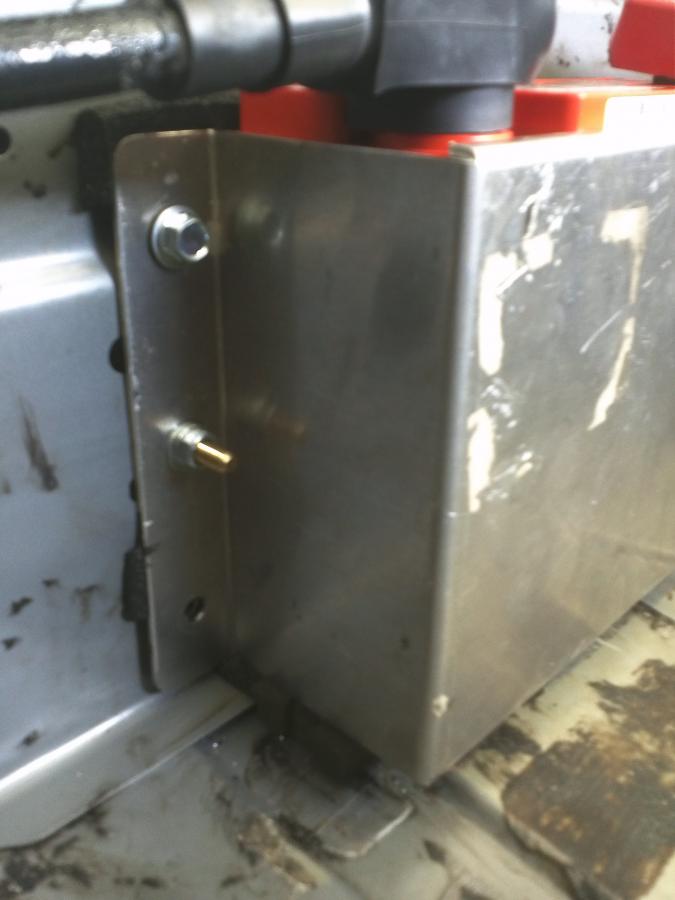
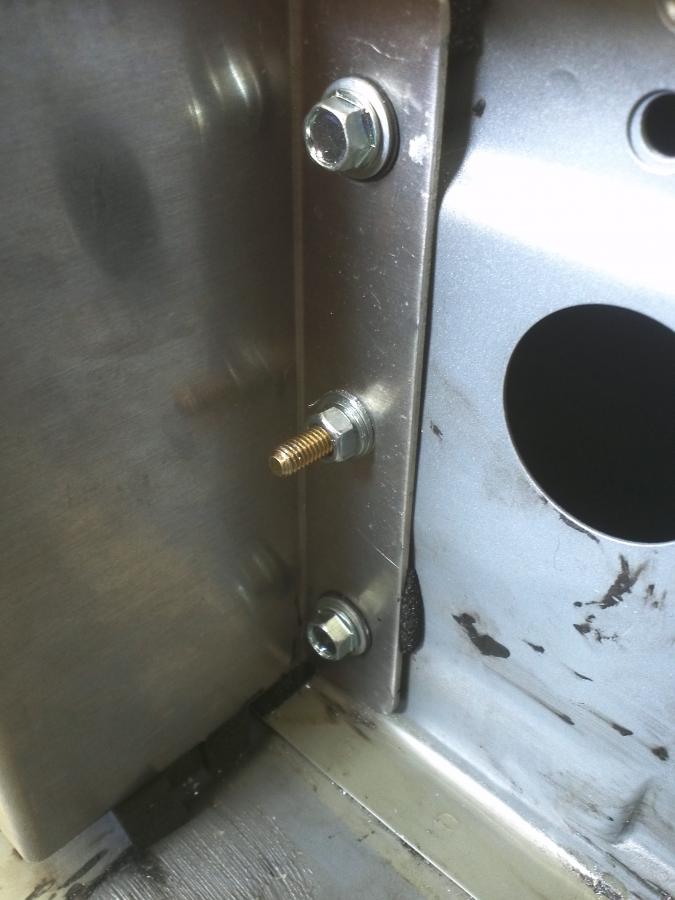
Parts lists from my various parts orders for this:

From Del City:

(the extra negative terminal stuff was to make a charging cable: the big 25-amp charger instructions say you need one on the negative side for a little resistance when using it).

Code:
Qty        Item                                               Price       Item Total
------------------------------------------------------------------------------------

1          8920      Liquid Flux, 2 oz No Clean (1 MIN)       $5.05       $5.05
4          900935    Battery Terminal Solder Slug, 1/0 Ga, Bla$0.83       $3.32
1          901715    Straight Terminal Insulators, 2 & 1/0 Ga,$0.75       $0.75
2          901725    Straight Terminal Insulators, 2 & 1/0 Ga,$0.75       $1.50
1          907445    3/8" Heavy-Duty Copper Lug, 1/0 Ga (1 MIN$1.91       $1.91
1          909145    Straight Barrel Battery Terminal, 1/0 Ga,$3.13       $3.13
2          909155    Straight Barrel Battery Terminal, 1/0 Ga,$3.13       $6.26
1          980735    6" Red Triple Wall Heat Shrink, 2 - 4/0 G$1.88       $1.88
1          980745    6" Black Triple Wall Heat Shrink, 2 - 4/0$1.88       $1.88
------------------------------------------------------------------------------------
And from Amazon, the SAE terminal adapters for the PC680: Amazon.com: Brass SAE Automotive Battery Terminal Set for Hawker Odyssey Batteries: Electronics

And of course the closed-cell rubber weatherstrip stuff, the self-drilling screws, and various regular M6-sized machine screw hardware all came from a local hardware store (Ace, in this case).

Also, if you've never soldered battery terminals to cables before: the solder slugs make it much easier, and you need a torch (a handheld propane torch is fine) to heat it all up. There's some youtube videos of the process you can google up.
__________________
7AT Track Car!
Journal thread / Car setup details

Last edited by wstar; 10-21-2011 at 01:24 PM.
wstar is offline   Reply With Quote
Old 09-29-2012, 12:41 PM   #42 (permalink)
Enthusiast Member
 
mwhit02's Avatar
 
Join Date: Sep 2012
Location: St. Louis
Posts: 358
Drives: '15 Audi Allroad
Rep Power: 12
mwhit02 is on a distinguished road
Default

how hard is it to remove the glove box and a/c thingy? Is the wire run along the passenger side near the door or under where your feet are?
mwhit02 is offline   Reply With Quote
Old 09-29-2012, 02:06 PM   #43 (permalink)
A True Z Fanatic
 
wstar's Avatar
 
Join Date: Mar 2009
Location: Houston, TX
Posts: 4,024
Drives: too slow
Rep Power: 3594
wstar has a reputation beyond reputewstar has a reputation beyond reputewstar has a reputation beyond reputewstar has a reputation beyond reputewstar has a reputation beyond reputewstar has a reputation beyond reputewstar has a reputation beyond reputewstar has a reputation beyond reputewstar has a reputation beyond reputewstar has a reputation beyond reputewstar has a reputation beyond repute
Default

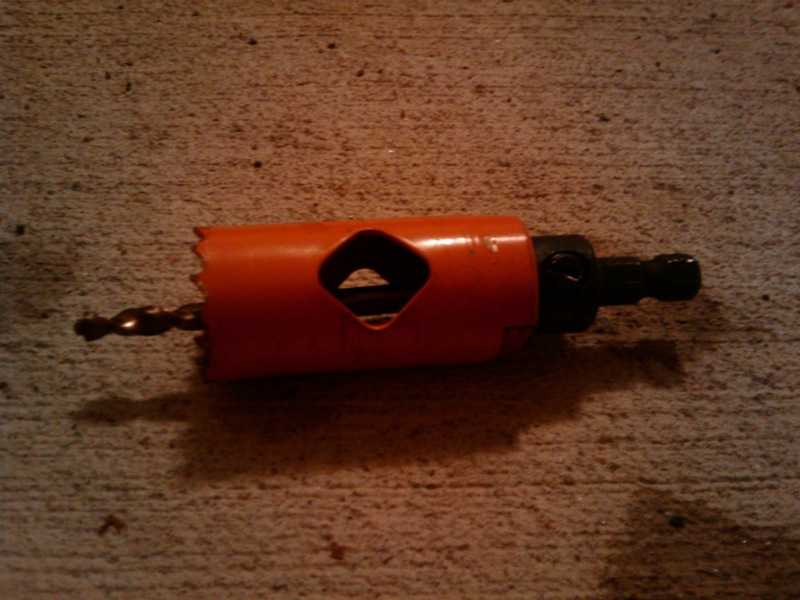
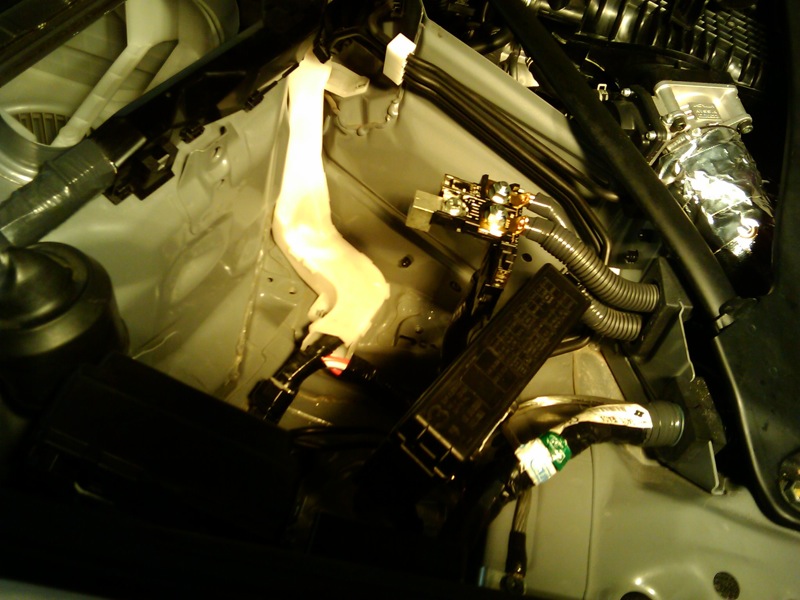
Removing the AC blower is a little tricky. Putting it back in is a total PITA. I ran my cable on the outside by the door, just under the carpet alongside where the existing wire loom runs. Also, while I drilled through for mine, another option I've seen people use is just to go through the big rubber grommet you can't miss in the upper passenger corner of the engine bay that carries a ton of small ECU-bound wires through (assuming your cable is flexible enough for that route).
__________________
7AT Track Car!
Journal thread / Car setup details
wstar is offline   Reply With Quote
Old 01-16-2013, 03:15 PM   #44 (permalink)
O&G
A True Z Fanatic
 
O&G's Avatar
 
Join Date: Nov 2010
Location: Lone Star State
Age: 41
Posts: 1,212
Drives: 40th Anv.
Rep Power: 22
O&G has a reputation beyond reputeO&G has a reputation beyond reputeO&G has a reputation beyond reputeO&G has a reputation beyond reputeO&G has a reputation beyond reputeO&G has a reputation beyond reputeO&G has a reputation beyond reputeO&G has a reputation beyond reputeO&G has a reputation beyond reputeO&G has a reputation beyond reputeO&G has a reputation beyond repute
Default

reped guys, awesome thread. I'll be doing this very soon. Great write up WSTAR. I'll PM you when I start this little project, maybe you can swing by the shop and coach! Looking forward to getting the Z on the track this year!
__________________
O&G's Build/Journal <---(1st lowmount single turbo treeseventy)
Built Engine Thread
2011 F-250 Build/Journal
O&G is offline   Reply With Quote
Old 10-22-2013, 12:18 PM   #45 (permalink)
Base Member
 
markthomas69's Avatar
 
Join Date: Oct 2012
Location: Little Elm, TX
Posts: 66
Drives: 2010 370Z Red, auto
Rep Power: 12
markthomas69 is on a distinguished road
Default

Quote:
Originally Posted by wstar View Post
Adding to travisjb's pics/info with my own. Keep in mind I've never done a battery relocate project before, so I'm not saying my way is the best. I just kinda guessed my way through the process and it seems to have worked out, and hopefully will provide more data points / ideas for others.

Standard disclaimer: I accept no responsibility for you destroying your car and everything around it in the process. Don't attempt this if you don't have at least some rudimentary understanding of how batteries and electricity work. I've glossed over some finer points like how to use a freaking screwdriver, and how to not short out your battery and/or electrocute yourself like a moron. If you have any doubts, have a professional do it.


Tools (other than the obvious normal stuff like sockets and screwdrivers):

Electric drill with 1" hole-saw bit:

Any chance of taking a picture of exactly where you drilled the 1" hole? I am pondering doing this and just wanted a good reference point to start.
Big-*** wire cutters and pliers for working with large cable.


Parts:

PC680 Battery + Bracket from DDM

Everything else below was found at Home Depot:
An assortment of M6 x 1.0 thread pitch hex cap screws, in various lengths (I found 16 and 20 mm lengths the most useful, I think all total I used about 8 screws, mostly 16s). Also lots of lock washers and nuts to match, 2 lock washers and a nut per screw.
Cable connection blocks. These ones I picked up at the hardware store are little blocks of Aluminum that can hold a 1/0 gauge wire on one side, and be screwed to something else with the M6 screws on the other side. I used 4 of them all total (each end of my positive and negative battery cables).


16+ ft of 1/0 Gauge 19-strand copper wire. This is really thick stuff and it's hard to work with because it will have a natural coil to it and it's very difficult to bend it into the shape you want. From a pure "Can it handle the amps without melting" standpoint, this wire gauge is overkill for this application. However, by going oversized, we further reduce the resistance of the long positive-side cable run, which reduces voltage drop, which will make it less likely for you to have a starting or charging problem down the road.

Also some 1/2" corrugated plastic sheathing, to help protect the wire's jacket from getting nicked or rubbed during install (or later when driving). I bought enough (in 7ft sections) to cover the whole cable, and put it on the cable first before I started the job. It will be slit, so wrap with electric tape to keep everything in place (doesn't need to be 100% coverage, can use a wide diagonal angle with lots of space between tape stripes).


You'll also want a 1" grommet for the hole being cut later.

Also grab some some anti-oxidant, it's a liquid in a little tube you'll find near the connectors/cable, which you apply to the ends of the big cables when you put them in the connectors, to reduce rusting of the cable ends in the long term.

Procedure:

First remove everything from your trunk. All of the plastics and tools and styrofoam chunks, etc. It should be bare metal throughout.

Then find a location to mount the battery and mount it. There's a lot of personal preference here. Since I'm not planning to put my spare or sub back, I mounted in the center rear, with the battery laying down flat:


Finding a good spot is tougher than it seems. On the trunk surface, you have to find a spot where the bracket will lay flat given all the ridges and bumps and whatnot. Additionally, look on the underside of the car and make sure you can reach where your bolts will come through, so that you can put nuts on them and tighten it down. At my chosen location, the nuts come through above the heat shield which is above the muffler. I had to loosen that heat shield and push it away a little while drilling the holes and screwing down the mount.

My next step was to go to the other end of the car and prep that side of things. Remove the existing factory battery, disconnecting the negative cable first, then the positive, then remove the bracket and battery (it weighs a freaking ton and has no handle by the way, it's kinda annoying lifting it out of there).

You can completely remove the factory negative battery cable, it simply runs to the body nearby and attaches there with two screws. On the factory positive side, remove the red cover, unscrew the round post-mount from the rest of the fuse assembly, and replace it with one of our new connector blocks using some of your M6 screw hardware.

The result should look something like this:


Now it's time to route your main length of cable. This is going to be your positive battery line, running all the way from the PC680 in the trunk to that lug we just attached to the inline fuses up in the engine bay. It will be annoying because the cable is so thick and resistant to bending.

Basically you want to pop off all the paneling along the passenger side of the interior of the vehicle, and remove the glove box and the A/C blower from the passenger footwell area. Then route it along the passenger edge of the car coming up into the footwell area.

Find an appropriate place in the upper footwell area (the other side of this metal is the rear wall of the original battery area), and drill a 1" hole here using your hole saw. Put a 1" OD grommet in this hole to keep the sharp edges from scraping your cable run.

Once you have the cable routed end to end (and trimmed down to the correct length at both ends), go ahead and connect the positive cable at both sides. On the battery side, I used the supplied 90 degree copper "posts" from the PC680, screwed to one of our hardware store aluminum connector blocks.

Once that's done, you want to drill one more hole in the trunk floor at any convenient location (well, close to the battery is better), and mount your last connector block there. Sand off the paint under where the block will mount to get a better connection. Then use some of the leftover cable from your positive-side run to make the short run from the negative battery terminal to this new ground lug.

Note that when you make this final ground connection, there will be a spark, and your electric system will come back to life.

Things should look something like this, at this point:


Finishing Up

Now, before you go reinstalling all of that interior, etc, test-fire the car. Start the car and let it run for a while. If it fails to start, obviously you've got a bad connection somewhere. Keep an eye on your connectors, etc at both sides during the first run, and watch your voltage gauge.

Assuming that all went well, you might want to do some final sealing of the positive cable ends (I wrapped up both connector/lug areas with electric tape to reduce chances of a short) and reassemble the interior of your car.

I also went back later with some Black Silicone RTV-type stuff and filled in my grommet on that front hole, to provide better cable protection and to weather-seal between the engine bay and passenger compartment.

Of course, by using screw-down lugs everywhere, I've got no easy way to disconnect my battery now. My next step on this project is to add a kill switch to the negative battery cable in the trunk, so that the battery can be disconnected when necessary, but I haven't located or ordered one yet.
__________________
Beluga catback exhaust and Y-Pipe. Sport brakes upgrade. 24 row oil cooler. Battery relocated to the trunk.
markthomas69 is offline   Reply With Quote
Reply

Bookmarks

Thread Tools
Display Modes

Posting Rules
You may not post new threads
You may not post replies
You may not post attachments
You may not edit your posts

BB code is On
Smilies are On
[IMG] code is On
HTML code is Off
Trackbacks are On
Pingbacks are On
Refbacks are On


Similar Threads
Thread Thread Starter Forum Replies Last Post
Break in miles? Reset battery,computer? help AceSpade77 Nissan 370Z General Discussions 2 04-26-2009 01:07 AM


All times are GMT -5. The time now is 06:23 PM.


Powered by vBulletin® Version 3.8.4
Copyright ©2000 - 2024, Jelsoft Enterprises Ltd.
Search Engine Optimization by vBSEO 3.6.0 PL2