Nissan 370Z Forum  

DIY OEM Shift Boot Install on Automatic

I used one that was listed for a 350Z and it's the same. Fit perfect

Go Back   Nissan 370Z Forum > Nissan 370Z Tech Area > DIY Section (Do-It-Yourself)


Like Tree59Likes

Reply
 
LinkBack Thread Tools Display Modes
Old 03-28-2014, 02:07 PM   #226 (permalink)
A True Z Fanatic
 
pfdaxe's Avatar
 
Join Date: Aug 2012
Location: Phoenix, AZ
Posts: 1,060
Drives: 09 Touring AT Sport
Rep Power: 15
pfdaxe is a splendid one to beholdpfdaxe is a splendid one to beholdpfdaxe is a splendid one to beholdpfdaxe is a splendid one to beholdpfdaxe is a splendid one to beholdpfdaxe is a splendid one to beholdpfdaxe is a splendid one to behold
Default

I used one that was listed for a 350Z and it's the same. Fit perfect
Bullit79 likes this.
pfdaxe is offline   Reply With Quote
Old 05-01-2014, 06:53 AM   #227 (permalink)
Base Member
 
qickdraw's Avatar
 
Join Date: Jun 2012
Location: australia
Posts: 76
Drives: '12 370z
Rep Power: 12
qickdraw is a jewel in the roughqickdraw is a jewel in the roughqickdraw is a jewel in the rough
Default

Just scrolled through all pages of this thread - great DIY guys! I'll be doing this real soon, hopefully in conjunction with a sweet red C/F surround from CF Element...!


Sent from my iPad using Tapatalk
qickdraw is offline   Reply With Quote
Old 05-01-2014, 11:51 AM   #228 (permalink)
A True Z Fanatic
 
Jordo!'s Avatar
 
Join Date: May 2010
Location: nirvana
Posts: 6,394
Drives: 2023 NATM
Rep Power: 417
Jordo! has a reputation beyond reputeJordo! has a reputation beyond reputeJordo! has a reputation beyond reputeJordo! has a reputation beyond reputeJordo! has a reputation beyond reputeJordo! has a reputation beyond reputeJordo! has a reputation beyond reputeJordo! has a reputation beyond reputeJordo! has a reputation beyond reputeJordo! has a reputation beyond reputeJordo! has a reputation beyond repute
Default

Quote:
Originally Posted by qickdraw View Post
Just scrolled through all pages of this thread - great DIY guys! I'll be doing this real soon, hopefully in conjunction with a sweet red C/F surround from CF Element...!


Sent from my iPad using Tapatalk
Finding a boot/knob you like, plus rewiring the shifter so up is downshift and pulling back is upshift is really, really sweet -- I use that now as much or more than the paddles when playing around.

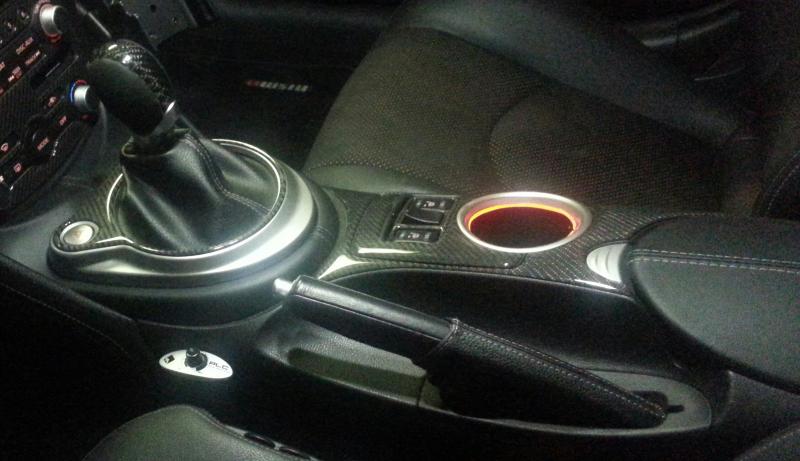
The last version of mine where I emplyed double sided 3M tape to really keep the boot and bezel clamped down has been the most successful and least likely to be dislodged
qickdraw likes this.
__________________
Enjoy it. Destroy it.
Jordo! is offline   Reply With Quote
Old 05-14-2014, 03:04 AM   #229 (permalink)
A True Z Fanatic
 
Jordo!'s Avatar
 
Join Date: May 2010
Location: nirvana
Posts: 6,394
Drives: 2023 NATM
Rep Power: 417
Jordo! has a reputation beyond reputeJordo! has a reputation beyond reputeJordo! has a reputation beyond reputeJordo! has a reputation beyond reputeJordo! has a reputation beyond reputeJordo! has a reputation beyond reputeJordo! has a reputation beyond reputeJordo! has a reputation beyond reputeJordo! has a reputation beyond reputeJordo! has a reputation beyond reputeJordo! has a reputation beyond repute
Default

Quote:
Originally Posted by pL4tiNumfi5t View Post
Picked up the perforated M45 knob, matches the steering wheel nicely and sits a little lower. The auto shifter ring keeps popping up, so I got the manual ring as well. Hopefully I'll get around to installing everything in the next week or two, but I attached the knob in the meantime.
In case anyone is interested, the M45 knob finisher is available as a stand alone part.
34929-EG000
34126-EG000 (Zip tie can probably substitute)


EDIT: After a bunch of dremel work & test fitting, I installed the OEM manual boot console. Also took the gamble of picking up a Murano hazard button to match the black of the aux power cap from my 7AT Aux Power Outlet Relocate DIY.
Unfortunately it wasn't quite the same size as the OEM silver one and the button insert in the console had to be sanded a bit wider to accommodate. Even though it snaps into place, the button is oriented 90° differently..the hazard symbol is more driver centric I suppose

Oh, sweet -- I may just order that finisher part too -- thanks!
pL4tiNumfi5t likes this.
__________________
Enjoy it. Destroy it.
Jordo! is offline   Reply With Quote
Old 05-19-2014, 06:14 PM   #230 (permalink)
Track Member
 
Silly Rabbit's Avatar
 
Join Date: Sep 2013
Location: Brookston, IN
Age: 54
Posts: 683
Drives: '12 PW Touring Sport
Rep Power: 618
Silly Rabbit has a reputation beyond reputeSilly Rabbit has a reputation beyond reputeSilly Rabbit has a reputation beyond reputeSilly Rabbit has a reputation beyond reputeSilly Rabbit has a reputation beyond reputeSilly Rabbit has a reputation beyond reputeSilly Rabbit has a reputation beyond reputeSilly Rabbit has a reputation beyond reputeSilly Rabbit has a reputation beyond reputeSilly Rabbit has a reputation beyond reputeSilly Rabbit has a reputation beyond repute
Default

How much double sided tape are you using? I put 4 pieces, about 1/2-3/4" long each around the trim, but the silver ring won't stay in the socket. The leather keeps the silver ring from being able to go down far enough to secure it. With the leather boot installed, the ring can only go in about 1/8". One touch of the shifter and the ring pops up.

Edit:

Took another look and the little velvet strip had all rolled to the inside and were not doing anything. I adjusted them and the ring isn't popping out, but doesn't feel very secure. When you put the double sided tape, did you just replace the velvet strips with the tape? I originally put the tape on the inside of the leather lip and it didn't do anything.

Liking the look so far. Waiting on the m45 knob and finisher to arrive.

Last edited by Silly Rabbit; 05-19-2014 at 06:53 PM.
Silly Rabbit is offline   Reply With Quote
Old 05-20-2014, 05:25 AM   #231 (permalink)
A True Z Fanatic
 
Jordo!'s Avatar
 
Join Date: May 2010
Location: nirvana
Posts: 6,394
Drives: 2023 NATM
Rep Power: 417
Jordo! has a reputation beyond reputeJordo! has a reputation beyond reputeJordo! has a reputation beyond reputeJordo! has a reputation beyond reputeJordo! has a reputation beyond reputeJordo! has a reputation beyond reputeJordo! has a reputation beyond reputeJordo! has a reputation beyond reputeJordo! has a reputation beyond reputeJordo! has a reputation beyond reputeJordo! has a reputation beyond repute
Default

Quote:
Originally Posted by Silly Rabbit View Post
How much double sided tape are you using? I put 4 pieces, about 1/2-3/4" long each around the trim, but the silver ring won't stay in the socket. The leather keeps the silver ring from being able to go down far enough to secure it. With the leather boot installed, the ring can only go in about 1/8". One touch of the shifter and the ring pops up.

Edit:

Took another look and the little velvet strip had all rolled to the inside and were not doing anything. I adjusted them and the ring isn't popping out, but doesn't feel very secure. When you put the double sided tape, did you just replace the velvet strips with the tape? I originally put the tape on the inside of the leather lip and it didn't do anything.

Liking the look so far. Waiting on the m45 knob and finisher to arrive.
Yep. I put the double sided tape in lieu of the velvet strips, and it seems to work very well.
__________________
Enjoy it. Destroy it.
Jordo! is offline   Reply With Quote
Old 05-27-2014, 03:05 PM   #232 (permalink)
A True Z Fanatic
 
Jordo!'s Avatar
 
Join Date: May 2010
Location: nirvana
Posts: 6,394
Drives: 2023 NATM
Rep Power: 417
Jordo! has a reputation beyond reputeJordo! has a reputation beyond reputeJordo! has a reputation beyond reputeJordo! has a reputation beyond reputeJordo! has a reputation beyond reputeJordo! has a reputation beyond reputeJordo! has a reputation beyond reputeJordo! has a reputation beyond reputeJordo! has a reputation beyond reputeJordo! has a reputation beyond reputeJordo! has a reputation beyond repute
Default

Hmm, I just bought the finisher and little stay thing, and I actually prefer the look of my shifter without it -- go figure.

Anyone want to buy it off of me? Essentially unused (other than a test fit) -- shoot me a PM if you want it.
__________________
Enjoy it. Destroy it.
Jordo! is offline   Reply With Quote
Old 06-27-2014, 04:06 PM   #233 (permalink)
Track Member
 
Silly Rabbit's Avatar
 
Join Date: Sep 2013
Location: Brookston, IN
Age: 54
Posts: 683
Drives: '12 PW Touring Sport
Rep Power: 618
Silly Rabbit has a reputation beyond reputeSilly Rabbit has a reputation beyond reputeSilly Rabbit has a reputation beyond reputeSilly Rabbit has a reputation beyond reputeSilly Rabbit has a reputation beyond reputeSilly Rabbit has a reputation beyond reputeSilly Rabbit has a reputation beyond reputeSilly Rabbit has a reputation beyond reputeSilly Rabbit has a reputation beyond reputeSilly Rabbit has a reputation beyond reputeSilly Rabbit has a reputation beyond repute
Default

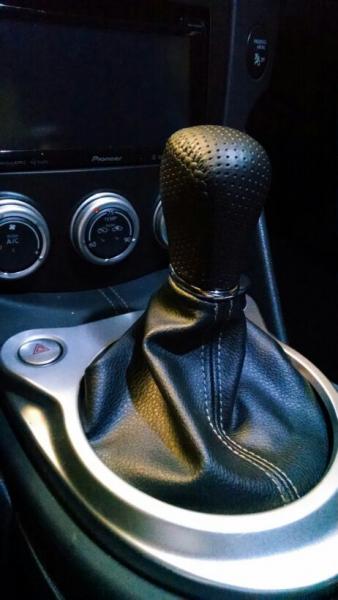
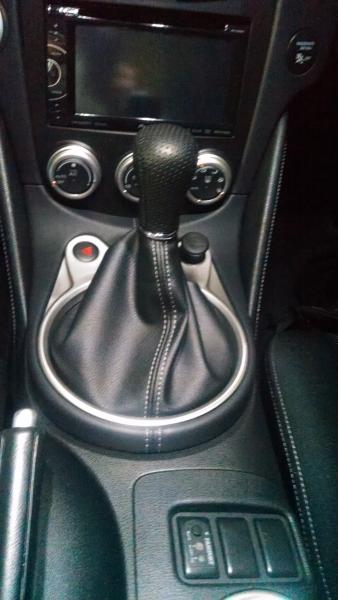
Double sided tape works decent, but I wanted a better fit. It seemed to me that the issue was the bezel fits so close to the gear indicator that there isn't enough room for the leather boot. If you look at the bezel, you will see a small trim ring around the opening about 1/8" thick. I sanded the lip off so there is room for the leather boot. Now the bezel fits firmly back in it's original position. Very minimal modification to make it work. Not as slick looking as the manual bezel, but I didn't have to hack up my car.
Jordo! and Moon like this.
Silly Rabbit is offline   Reply With Quote
Old 06-27-2014, 04:43 PM   #234 (permalink)
Track Member
 
Silly Rabbit's Avatar
 
Join Date: Sep 2013
Location: Brookston, IN
Age: 54
Posts: 683
Drives: '12 PW Touring Sport
Rep Power: 618
Silly Rabbit has a reputation beyond reputeSilly Rabbit has a reputation beyond reputeSilly Rabbit has a reputation beyond reputeSilly Rabbit has a reputation beyond reputeSilly Rabbit has a reputation beyond reputeSilly Rabbit has a reputation beyond reputeSilly Rabbit has a reputation beyond reputeSilly Rabbit has a reputation beyond reputeSilly Rabbit has a reputation beyond reputeSilly Rabbit has a reputation beyond reputeSilly Rabbit has a reputation beyond repute
Default

Decided to paint the bezel black. The flash makes the black look a different shade, but in person it isn't as drastic.

Silly Rabbit is offline   Reply With Quote
Old 06-27-2014, 04:53 PM   #235 (permalink)
Track Member
 
Silly Rabbit's Avatar
 
Join Date: Sep 2013
Location: Brookston, IN
Age: 54
Posts: 683
Drives: '12 PW Touring Sport
Rep Power: 618
Silly Rabbit has a reputation beyond reputeSilly Rabbit has a reputation beyond reputeSilly Rabbit has a reputation beyond reputeSilly Rabbit has a reputation beyond reputeSilly Rabbit has a reputation beyond reputeSilly Rabbit has a reputation beyond reputeSilly Rabbit has a reputation beyond reputeSilly Rabbit has a reputation beyond reputeSilly Rabbit has a reputation beyond reputeSilly Rabbit has a reputation beyond reputeSilly Rabbit has a reputation beyond repute
Default

Some pics without the flash


pL4tiNumfi5t likes this.
Silly Rabbit is offline   Reply With Quote
Old 06-28-2014, 01:24 AM   #236 (permalink)
A True Z Fanatic
 
Jordo!'s Avatar
 
Join Date: May 2010
Location: nirvana
Posts: 6,394
Drives: 2023 NATM
Rep Power: 417
Jordo! has a reputation beyond reputeJordo! has a reputation beyond reputeJordo! has a reputation beyond reputeJordo! has a reputation beyond reputeJordo! has a reputation beyond reputeJordo! has a reputation beyond reputeJordo! has a reputation beyond reputeJordo! has a reputation beyond reputeJordo! has a reputation beyond reputeJordo! has a reputation beyond reputeJordo! has a reputation beyond repute
Default

^^^ Nice!

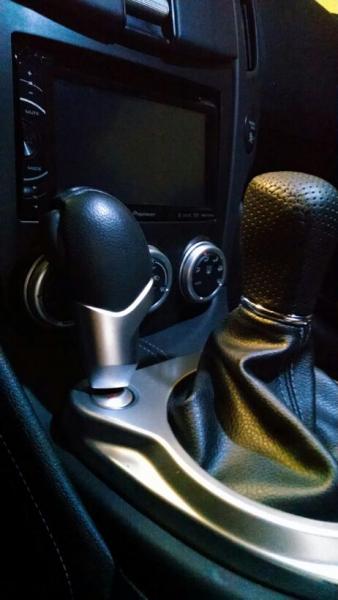
BTW, if you do decide to ever swap the up/down shifting like I did, another nice thing about adding the boot is that the "+" and "-" symbols don't need to be ignored or somehow swapped -- they are covered up completely by the boot.
__________________
Enjoy it. Destroy it.
Jordo! is offline   Reply With Quote
Old 07-18-2014, 01:59 PM   #237 (permalink)
Base Member
 
Join Date: Feb 2013
Location: TX
Posts: 139
Drives: '12 370Z GM 7AT
Rep Power: 12
Bullit79 is on a distinguished road
Default

A little off topic, but how do I install a boot for the e-brake? Do I have to remove the center console or does that trim around the e-brake pop off?
Bullit79 is offline   Reply With Quote
Old 07-18-2014, 02:53 PM   #238 (permalink)
A True Z Fanatic
 
pfdaxe's Avatar
 
Join Date: Aug 2012
Location: Phoenix, AZ
Posts: 1,060
Drives: 09 Touring AT Sport
Rep Power: 15
pfdaxe is a splendid one to beholdpfdaxe is a splendid one to beholdpfdaxe is a splendid one to beholdpfdaxe is a splendid one to beholdpfdaxe is a splendid one to beholdpfdaxe is a splendid one to beholdpfdaxe is a splendid one to behold
Default

Quote:
Originally Posted by Bullit79 View Post
A little off topic, but how do I install a boot for the e-brake? Do I have to remove the center console or does that trim around the e-brake pop off?
I just slipped mine over and tucked it in. Done in about a minute.

KaienZ34, Bullit79 and janglez like this.
pfdaxe is offline   Reply With Quote
Old 07-18-2014, 03:39 PM   #239 (permalink)
Enthusiast Member
 
janglez's Avatar
 
Join Date: Sep 2013
Location: 44130
Posts: 330
Drives: 2017 Infiniti Q60
Rep Power: 14
janglez has a reputation beyond reputejanglez has a reputation beyond reputejanglez has a reputation beyond reputejanglez has a reputation beyond reputejanglez has a reputation beyond reputejanglez has a reputation beyond reputejanglez has a reputation beyond reputejanglez has a reputation beyond reputejanglez has a reputation beyond reputejanglez has a reputation beyond reputejanglez has a reputation beyond repute
Default

Quote:
Originally Posted by pfdaxe View Post
I just slipped mine over and tucked it in. Done in about a minute.

very nice set-up
__________________
>>> 2017 INFINITI Q60 3.0 TWIN TURBO V6 AWD PREMIUM
janglez is offline   Reply With Quote
Old 07-19-2014, 10:00 AM   #240 (permalink)
Enthusiast Member
 
janglez's Avatar
 
Join Date: Sep 2013
Location: 44130
Posts: 330
Drives: 2017 Infiniti Q60
Rep Power: 14
janglez has a reputation beyond reputejanglez has a reputation beyond reputejanglez has a reputation beyond reputejanglez has a reputation beyond reputejanglez has a reputation beyond reputejanglez has a reputation beyond reputejanglez has a reputation beyond reputejanglez has a reputation beyond reputejanglez has a reputation beyond reputejanglez has a reputation beyond reputejanglez has a reputation beyond repute
Default

Quote:
Originally Posted by pfdaxe View Post
I just slipped mine over and tucked it in. Done in about a minute.

where did you get the lit-up ring around the cup holder...thanks!
__________________
>>> 2017 INFINITI Q60 3.0 TWIN TURBO V6 AWD PREMIUM
janglez is offline   Reply With Quote
Reply

Bookmarks


Posting Rules
You may not post new threads
You may not post replies
You may not post attachments
You may not edit your posts

BB code is On
Smilies are On
[IMG] code is On
HTML code is Off
Trackbacks are On
Pingbacks are On
Refbacks are On


Similar Threads
Thread Thread Starter Forum Replies Last Post
DIY Shift Boot Install E-Licious DIY Section (Do-It-Yourself) 8 10-06-2020 11:36 AM
7AT Shift Boot!!! CharleyGFX Exterior & Interior 92 11-12-2015 10:44 PM
shift boot dangen1980 Exterior & Interior 5 09-15-2011 02:43 PM
New shift boot help theDreamer Exterior & Interior 4 01-29-2010 05:24 PM
WTB OEM Shift Boot. Rps13.jw Parts for sale (Private Classifieds) 0 10-09-2009 05:43 PM


All times are GMT -5. The time now is 07:53 PM.


Powered by vBulletin® Version 3.8.4
Copyright ©2000 - 2024, Jelsoft Enterprises Ltd.
Search Engine Optimization by vBSEO 3.6.0 PL2