Nissan 370Z Forum  

DIY - Parking/Running Light LED replacement

Tools Used: 1)Flat Head Screwdriver 2)Pliars (not needed if you have extreme grip with your index finger and thumb) Step 1: Turn the wheels to allow for most room. Driver

Go Back   Nissan 370Z Forum > Nissan 370Z Tech Area > DIY Section (Do-It-Yourself)


Like Tree8Likes
  • 2 Post By TARDCORE
  • 1 Post By 1Sweet Z
  • 2 Post By 1Sweet Z
  • 1 Post By haitech
  • 1 Post By 370Zsteve
  • 1 Post By pfdaxe

Reply
 
LinkBack Thread Tools Display Modes
Old 02-01-2010, 10:39 PM   #1 (permalink)
Enthusiast Member
 
TARDCORE's Avatar
 
Join Date: Jul 2009
Location: San Diego
Posts: 410
Drives: 2010 Solid Red 370Z
Rep Power: 15
TARDCORE is on a distinguished road
Default DIY - Parking/Running Light LED replacement

Tools Used: 1)Flat Head Screwdriver
2)Pliars (not needed if you have extreme grip with your index finger and thumb)

Step 1: Turn the wheels to allow for most room. Driver side turn wheel all the way to the rght and passenger side turn all the way to the left.

Step 2: Use flat head screw driver and carefully slide it under the middle cap and rotate it clockwise and counter clockwise to gently pry it up. Remove the clip and then where the front brumper cover meets the fender there is an opening to pull back the inner fender cover. You don't need to pull it all the way out and I posted a pic of what I did with a flashlight and towell.


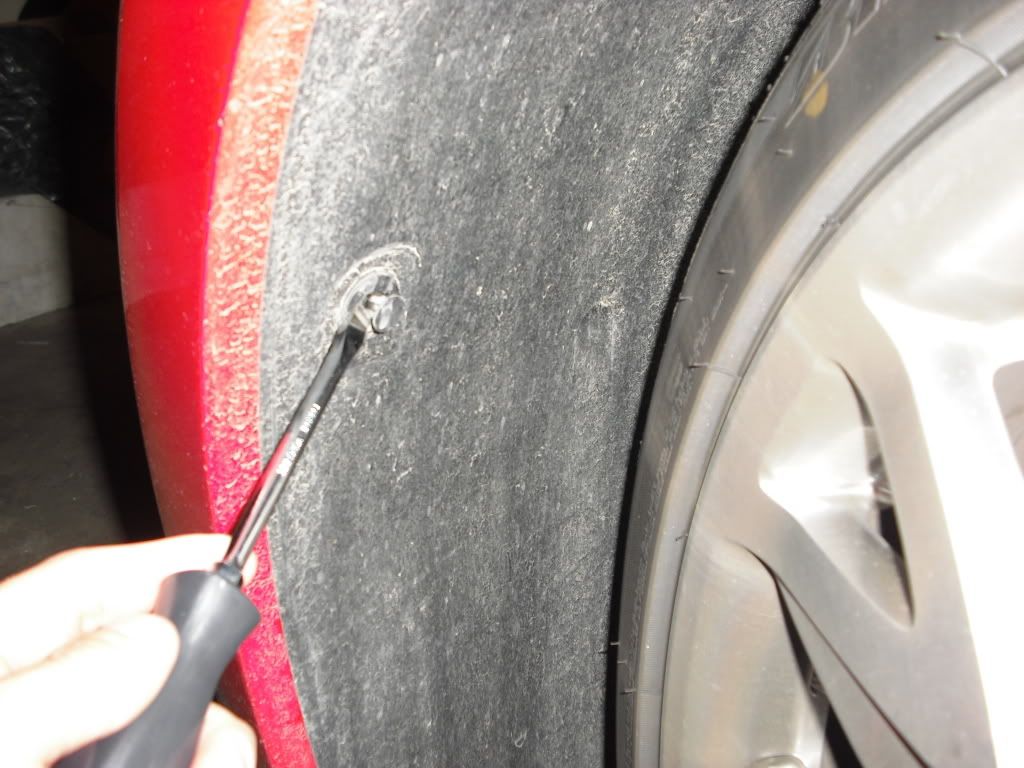
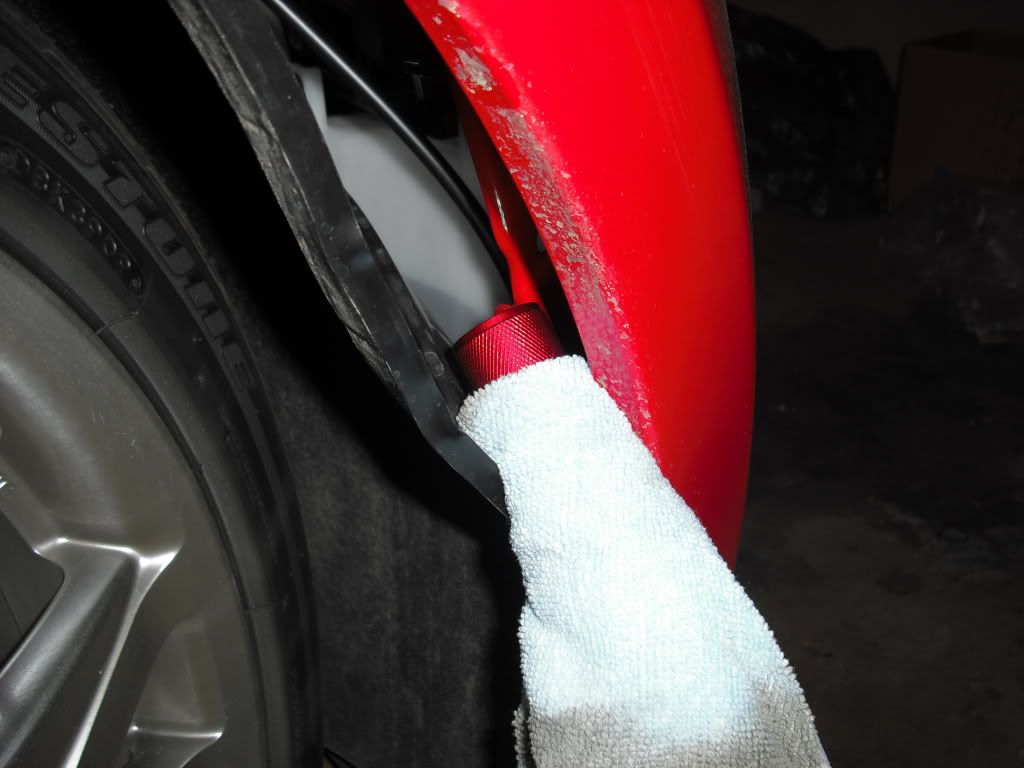
Step 3: The base indicated in the picture needs to be turned counter clockwise ON BOTH SIDES. It is a pain in the... PITA. I used pliars and electrical taped the end of them so they didnt scratch it too bad. Twist counter clockwise and pull out.


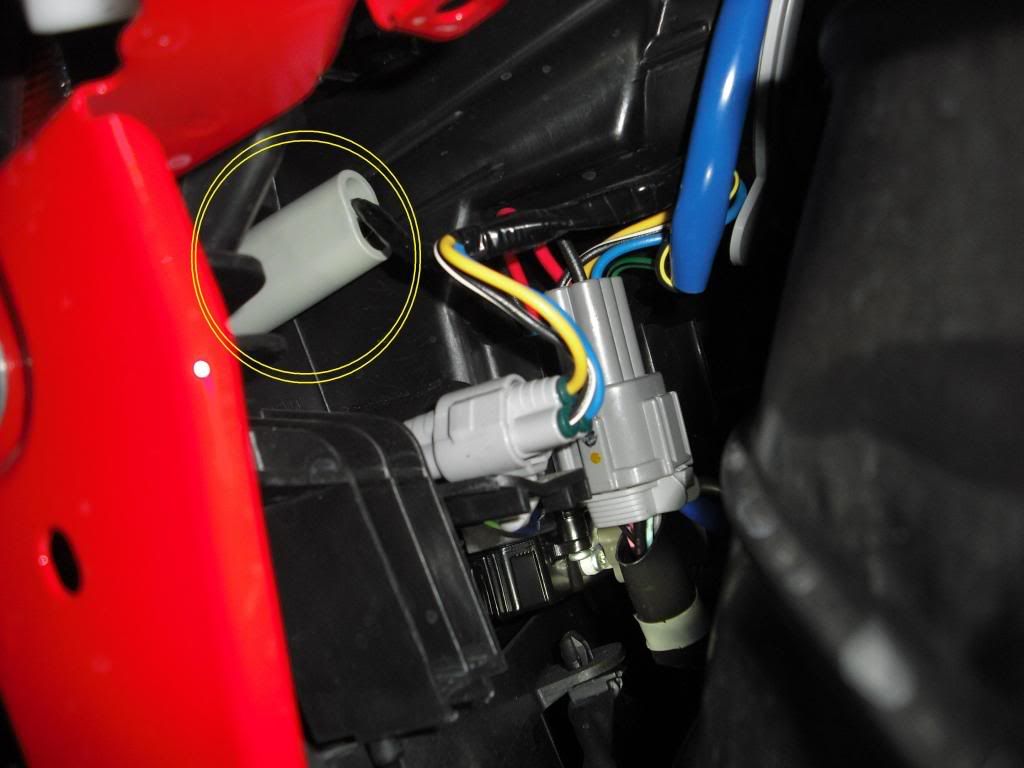
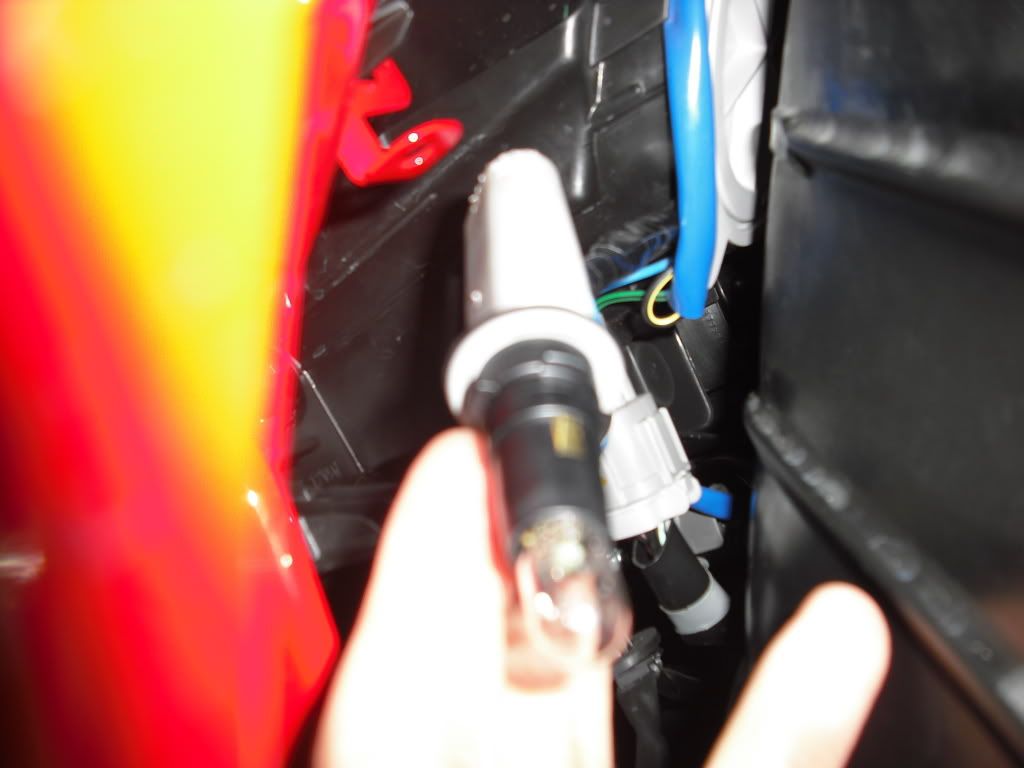
Step 4: Pull out the stock bulb and put in the LED. Before reinserting the lamp turn on the Runninbg Lights to make sure the LED lights up. If not, rotate the bulb. Put the lamp back and rotate clockwise.
370Zsteve and 370zBoyz like this.
__________________
XBL:EVENTYDE
TARDCORE is offline   Reply With Quote
Old 02-01-2010, 11:09 PM   #2 (permalink)
Track Member
 
Rogue Z's Avatar
 
Join Date: May 2009
Location: Los Angeles
Posts: 559
Drives: 2009 Silver MT 370Z
Rep Power: 17
Rogue Z has much to be proud ofRogue Z has much to be proud ofRogue Z has much to be proud ofRogue Z has much to be proud ofRogue Z has much to be proud ofRogue Z has much to be proud ofRogue Z has much to be proud ofRogue Z has much to be proud ofRogue Z has much to be proud ofRogue Z has much to be proud of
Default

NICE DIY....what number are the running lights?
__________________
Rogue Z is offline   Reply With Quote
Old 02-01-2010, 11:22 PM   #3 (permalink)
Enthusiast Member
 
TARDCORE's Avatar
 
Join Date: Jul 2009
Location: San Diego
Posts: 410
Drives: 2010 Solid Red 370Z
Rep Power: 15
TARDCORE is on a distinguished road
Default

168/194
__________________
XBL:EVENTYDE
TARDCORE is offline   Reply With Quote
Old 02-02-2010, 08:34 AM   #4 (permalink)
A True Z Fanatic
 
vipor's Avatar
 
Join Date: Aug 2009
Location: Euless, TX [ DFW ]
Age: 41
Posts: 13,531
Drives: Nismo 09-0183 QAB
Rep Power: 48
vipor has a reputation beyond reputevipor has a reputation beyond reputevipor has a reputation beyond reputevipor has a reputation beyond reputevipor has a reputation beyond reputevipor has a reputation beyond reputevipor has a reputation beyond reputevipor has a reputation beyond reputevipor has a reputation beyond reputevipor has a reputation beyond reputevipor has a reputation beyond repute
Default

Most of the "accessory" lights on the Z use the 194 type. I just replaced my map/hatch/LP lights last night and they were all the same.
__________________

2009 NISMO # 0193 | QAB | Albums! | 05.04.10 (Dynojet) 291.94hp/248.28tq
Oil Cooler (DIY) | Custom Headlights | GTSPEC Braces | F.I. Long Tube Headers
vipor is offline   Reply With Quote
Old 02-24-2011, 08:55 AM   #5 (permalink)
Base Member
 
1Sweet Z's Avatar
 
Join Date: Jan 2011
Location: Ontario, Canada
Posts: 185
Drives: 11 GM 370Z A7 Spt/Nv
Rep Power: 14
1Sweet Z is on a distinguished road
Default

Quote:
Originally Posted by TARDCORE View Post
168/194
I tried replacing my bulbs last night and had some serious issues. What year is your car?
I have a 2011 and I have a lower cowling bolted to the front fascia right in front of the tire. I un-bolted the trim pc to loosen the lower edge of the fasica. No help.

Did you remove this trim pc. I have attached a pic

I wasn't able to seperate the wheel liner from the fascia. I know the opening you are referring to where the fascia and the front qtr panel meet. But could only get it to seperate enough to put my finger in there.

I will try to the towel / rag trick to avoid scratching the fascia.
Attached Images
File Type: jpg IMG_7344-1[1].jpg (35.4 KB, 191 views)
370zBoyz likes this.
__________________
V-LED : ILLUM KICK PLATES : VENTURE SHIELD : H & R : K & N : GOODRIDGE SS BRAKE LINES : NISMO CBE
1Sweet Z is offline   Reply With Quote
Old 03-07-2011, 10:47 PM   #6 (permalink)
Base Member
 
Join Date: Apr 2010
Location: Las Vegas
Posts: 237
Drives: Nissan 370z
Rep Power: 15
rli2bcz is on a distinguished road
Default

cool i will try this when i get my bulbs
rli2bcz is offline   Reply With Quote
Old 05-25-2011, 04:09 AM   #7 (permalink)
Base Member
 
Maila87's Avatar
 
Join Date: Apr 2011
Location: Prague
Age: 36
Posts: 138
Drives: 370Z
Rep Power: 14
Maila87 is on a distinguished road
Send a message via ICQ to Maila87
Default

What LEDs did you use? Are them bright enough to use them as DRL?

BTW: Nice DIY!
Maila87 is offline   Reply With Quote
Old 11-23-2011, 09:11 AM   #8 (permalink)
A True Z Fanatic
 
dAvenue's Avatar
 
Join Date: Aug 2010
Location: present
Posts: 1,971
Drives: angry
Rep Power: 48
dAvenue has a reputation beyond reputedAvenue has a reputation beyond reputedAvenue has a reputation beyond reputedAvenue has a reputation beyond reputedAvenue has a reputation beyond reputedAvenue has a reputation beyond reputedAvenue has a reputation beyond reputedAvenue has a reputation beyond reputedAvenue has a reputation beyond reputedAvenue has a reputation beyond reputedAvenue has a reputation beyond repute
Default

Quote:
Originally Posted by 1Sweet Z View Post
I tried replacing my bulbs last night and had some serious issues. What year is your car?
I have a 2011 and I have a lower cowling bolted to the front fascia right in front of the tire. I un-bolted the trim pc to loosen the lower edge of the fasica. No help.

Did you remove this trim pc. I have attached a pic

I wasn't able to seperate the wheel liner from the fascia. I know the opening you are referring to where the fascia and the front qtr panel meet. But could only get it to seperate enough to put my finger in there.

I will try to the towel / rag trick to avoid scratching the fascia.
I'm faced with the same problem. How did the second attempt go for you?
__________________
Takeda | Stillen | Z1 | Invidia | Mishimoto | CSF | Megan Racing | Koni | Eibach | SPC | Forgestar | Seibon
dAvenue is offline   Reply With Quote
Old 11-25-2011, 11:25 AM   #9 (permalink)
Base Member
 
1Sweet Z's Avatar
 
Join Date: Jan 2011
Location: Ontario, Canada
Posts: 185
Drives: 11 GM 370Z A7 Spt/Nv
Rep Power: 14
1Sweet Z is on a distinguished road
Default

Quote:
Originally Posted by dAvenue View Post
I'm faced with the same problem. How did the second attempt go for you?
Second attempt was successful. Instead of going from bottom of the wheeliner, you need to start of the top of the wheeliner. There are some push pin that you need to remove and peel the wheeliner. You'll have to pull hard to seperate it from the front fascia. After that it's a breeze.

If you are really struggling, you can remove the wheel for more working room

Trick - what the direction you turn the bulb, it's only a 1/4 turn to have the bulb come out. Don't force if it's not coming, you'll probably turning the wrong direction.
370Zsteve and 370zBoyz like this.
__________________
V-LED : ILLUM KICK PLATES : VENTURE SHIELD : H & R : K & N : GOODRIDGE SS BRAKE LINES : NISMO CBE
1Sweet Z is offline   Reply With Quote
Old 11-25-2011, 03:43 PM   #10 (permalink)
Track Member
 
haitech's Avatar
 
Join Date: Sep 2011
Location: Austin/Dallas
Posts: 922
Drives: 11' 370z Magnetic M6
Rep Power: 14
haitech is on a distinguished road
Default

It's easier to start from the top middle where the two liners meet and peel back from there
370Zsteve likes this.
haitech is offline   Reply With Quote
Old 11-27-2011, 07:45 PM   #11 (permalink)
Base Member
 
Proshop01's Avatar
 
Join Date: May 2011
Location: Ohio
Posts: 56
Drives: 2011 370Z Roadster
Rep Power: 13
Proshop01 is on a distinguished road
Default

When I was trying to install the first one (driver's side), I knocked it out of the socket and it fell into the headlight housing. I have no idea how to get it out, so I guess I will leave it. It took me forever to find it. I hoped it dropped somewhere in the engine area, but a couple of days later I saw a corner of it in the housing. Oh well. I don't really feel like buying another set for $20.
__________________
2011 Roadster, Gun Metallic, Sport Package, Touring Package, Stillen G3 Cold Air Intake, Fast Intentions SS 18" Resonators CBE, H&R 20mm spacers, Stubby antenna, Z1 Hood Struts, Smart TOP.
Proshop01 is offline   Reply With Quote
Old 03-13-2012, 04:39 PM   #12 (permalink)
A True Z Fanatic
 
370Zsteve's Avatar
 
Join Date: Sep 2009
Location: Gold Coast CT
Posts: 10,599
Drives: 2019 Corvette G.S.
Rep Power: 42
370Zsteve has a reputation beyond repute370Zsteve has a reputation beyond repute370Zsteve has a reputation beyond repute370Zsteve has a reputation beyond repute370Zsteve has a reputation beyond repute370Zsteve has a reputation beyond repute370Zsteve has a reputation beyond repute370Zsteve has a reputation beyond repute370Zsteve has a reputation beyond repute370Zsteve has a reputation beyond repute370Zsteve has a reputation beyond repute
Default

Well, just did this in 10 minutes. A couple of things to add to a great DIY:

Wash the area of the front fascia you'll be working around to prevent scratches.

You really don't have to rotate the fastener. Just work the screwdriver under the plastic and gently move it around. Then use the screwdriver to carefully pry up the center portion. A rather narrow screwdriver works best here. Once the center portion pops up a bit, you can easily remove the fastener with your fingers.

I had no trouble at all turning the bulb housing with my fingers, not sure why others did.

As noted, the bulb only works when inserted correctly. Don't go putting everything back before turning on the lights. If the bulb doesn't come on, rotate it 180 degrees.

Careful putting the bulb housing back into the slot. As noted by Proshop01, above, it could be easy to knock the bulb out when re-inserting the housing. And it only goes in one way. A good idea might be to mark the bottom of the housing with a sharpie before you remove it, so you know which way to re-insert it.
370zBoyz likes this.
__________________
SOLD MY Z MARCH 2018 - another Core OG moves on - new ride 2019 Z Corvette Grand Sport - no mods necessary but already have eyes on HFC and intakes LOL IT NEVER ENDS.

Last edited by 370Zsteve; 03-13-2012 at 04:45 PM.
370Zsteve is offline   Reply With Quote
Old 03-15-2012, 11:11 PM   #13 (permalink)
Track Member
 
Huan'z's Avatar
 
Join Date: Apr 2010
Location: houston,texas
Posts: 641
Drives: black 370z 7/AT.
Rep Power: 16
Huan'z is on a distinguished road
Default

anyone here know where i can locate the fuse for this bulb? mine was bad and doesnt work after i plug a bad led! please help!
Huan'z is offline   Reply With Quote
Old 08-31-2012, 10:11 AM   #14 (permalink)
A True Z Fanatic
 
pfdaxe's Avatar
 
Join Date: Aug 2012
Location: Phoenix, AZ
Posts: 1,060
Drives: 09 Touring AT Sport
Rep Power: 15
pfdaxe is a splendid one to beholdpfdaxe is a splendid one to beholdpfdaxe is a splendid one to beholdpfdaxe is a splendid one to beholdpfdaxe is a splendid one to beholdpfdaxe is a splendid one to beholdpfdaxe is a splendid one to behold
Default

Besides replacing the parking light with an LED, I also did a amber bulb delete. Looks much cleaner.
370Zsteve likes this.
pfdaxe is offline   Reply With Quote
Old 10-28-2013, 12:40 AM   #15 (permalink)
Base Member
 
Join Date: Oct 2013
Location: Driver seat
Posts: 207
Drives: Nismo
Rep Power: 7213
370zBoyz has a reputation beyond repute370zBoyz has a reputation beyond repute370zBoyz has a reputation beyond repute370zBoyz has a reputation beyond repute370zBoyz has a reputation beyond repute370zBoyz has a reputation beyond repute370zBoyz has a reputation beyond repute370zBoyz has a reputation beyond repute370zBoyz has a reputation beyond repute370zBoyz has a reputation beyond repute370zBoyz has a reputation beyond repute
Default

Quote:
Originally Posted by 1Sweet Z View Post
I tried replacing my bulbs last night and had some serious issues. What year is your car?
I have a 2011 and I have a lower cowling bolted to the front fascia right in front of the tire. I un-bolted the trim pc to loosen the lower edge of the fasica. No help.
Kinda late her but yeah removing that lower cowling is pointless because it is bolted to the belly pan.
370zBoyz is offline   Reply With Quote
Reply

Bookmarks


Posting Rules
You may not post new threads
You may not post replies
You may not post attachments
You may not edit your posts

BB code is On
Smilies are On
[IMG] code is On
HTML code is Off
Trackbacks are On
Pingbacks are On
Refbacks are On


Similar Threads
Thread Thread Starter Forum Replies Last Post
Yourledshop.com Running/Parking Light LED replacements PIC HEAVY TARDCORE Exterior & Interior 11 02-22-2010 09:31 AM
Parking light replacement. tbonesteak Exterior & Interior 6 01-04-2010 10:47 PM
Trunk Light replacement? 2theextreme DIY Section (Do-It-Yourself) 14 10-21-2009 09:47 AM
Parking light LEDs, am I Retarded? junior_jam Exterior & Interior 5 10-18-2009 10:26 PM
Interior Map light ( replacement bulbs ) 355890 Exterior & Interior 26 04-23-2009 05:27 PM


All times are GMT -5. The time now is 11:30 AM.


Powered by vBulletin® Version 3.8.4
Copyright ©2000 - 2024, Jelsoft Enterprises Ltd.
Search Engine Optimization by vBSEO 3.6.0 PL2