Nissan 370Z Forum  

DIY: 370z Oil Galley

Hello All, This is a step by step Tutorial to check engine timing, and replace oil galley gaskets. parts need at a minimum (order from conceptzperfromance) HRTMNGCVR-KT - timing cover

Go Back   Nissan 370Z Forum > Nissan 370Z Tech Area > DIY Section (Do-It-Yourself)


Like Tree56Likes

Reply
 
LinkBack Thread Tools Display Modes
Old 03-04-2018, 03:26 PM   #1 (permalink)
Base Member
 
Join Date: Sep 2015
Location: CT
Posts: 179
Drives: Spirited
Rep Power: 234
jmroy6 has a reputation beyond reputejmroy6 has a reputation beyond reputejmroy6 has a reputation beyond reputejmroy6 has a reputation beyond reputejmroy6 has a reputation beyond reputejmroy6 has a reputation beyond reputejmroy6 has a reputation beyond reputejmroy6 has a reputation beyond reputejmroy6 has a reputation beyond reputejmroy6 has a reputation beyond reputejmroy6 has a reputation beyond repute
Default DIY: 370z Oil Galley

Hello All,

This is a step by step Tutorial to check engine timing, and replace oil galley gaskets.

parts need at a minimum (order from conceptzperfromance)

HRTMNGCVR-KT - timing cover rebuild kit
13533-VQ37VHR-KT - oil galley gasket kit
B-7991A26X14 - galley gasket upgraded fasteners
13070-EY00A - timing chain tensioner
OEM grade gasket maker or equivalent

* i started this DIY with core support and all engine accessories removed (idler pulley, ac condenser, power steering, rad etc). if you have trouble getting to this step, i would not proceed. FAILURE to take proper steps during disassembly/assembly to ensure proper timing may lead to engine failure.

NOTE i was able to replace both galley gasket without having to take the timing chain off, its up to you on how comfortable you are with with resetting timing correctly.


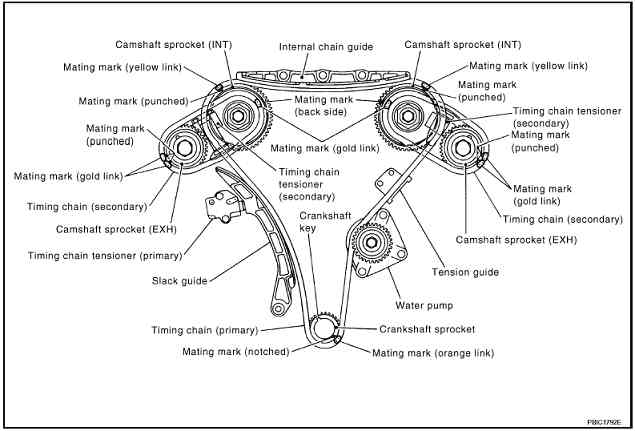
1. Remove all grounding connections off the top of the front timing cover and cam covers.

2. Remove the crank bolt & pulley (19mm), with the car in gear use a pneumatic impact gun with a high torque to crack the bolt loose. i recommend you heat the bolt first to make your life easier. use a gear puller to aid in removal.


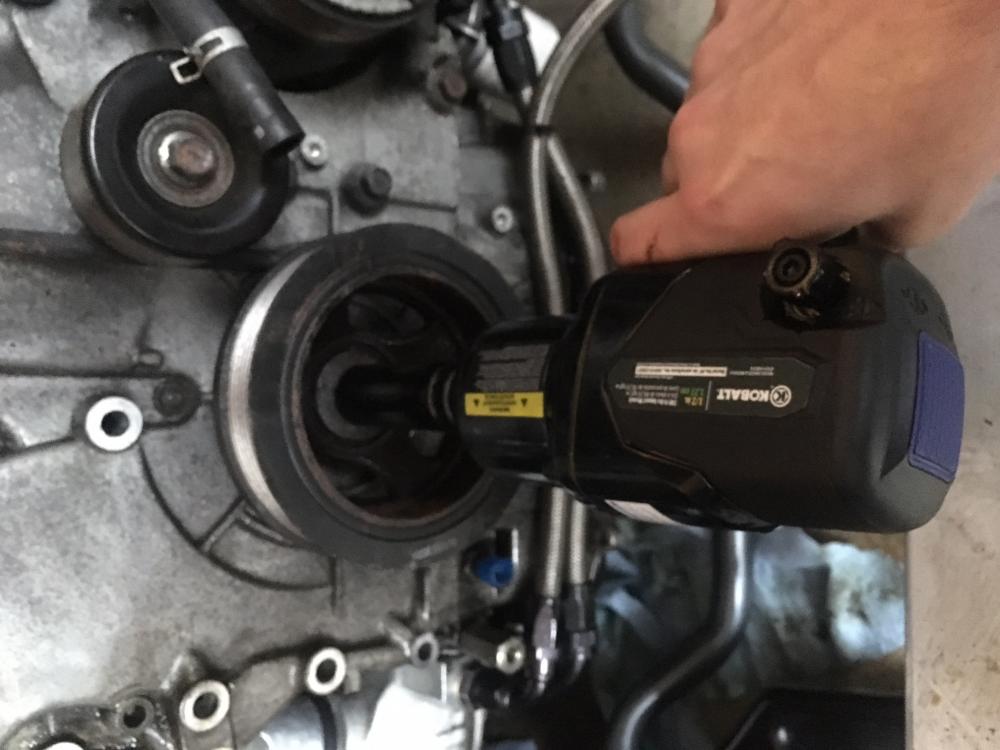
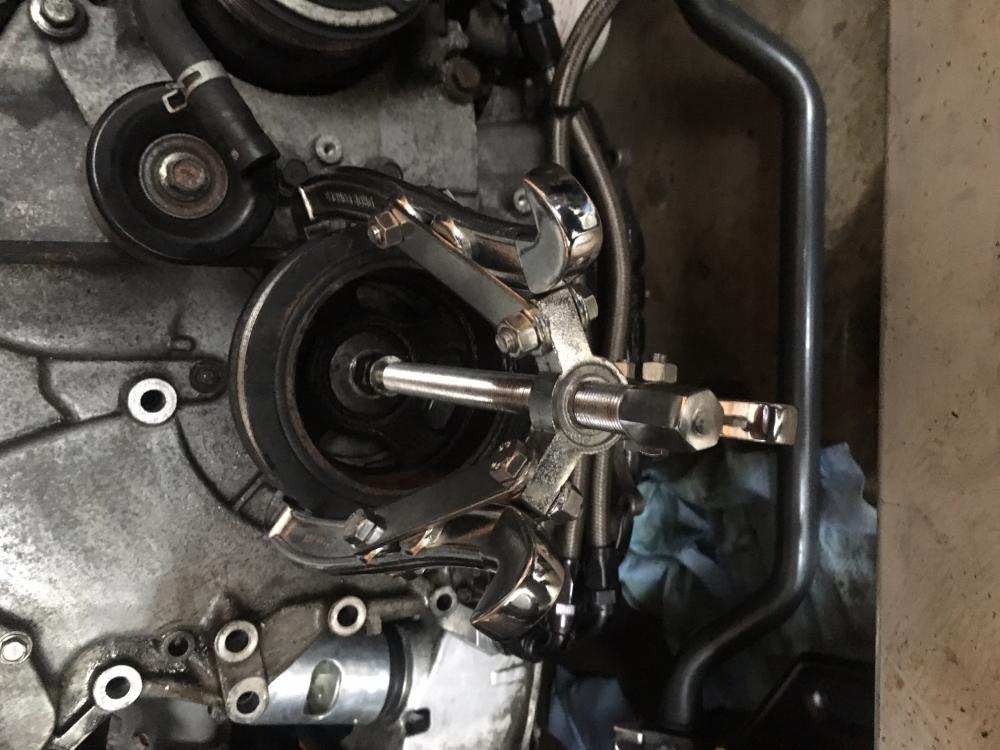
3. Next remove the lower oil pan so you can reach two 10mm bolts that hold the upper oil pan to the front timing cover.


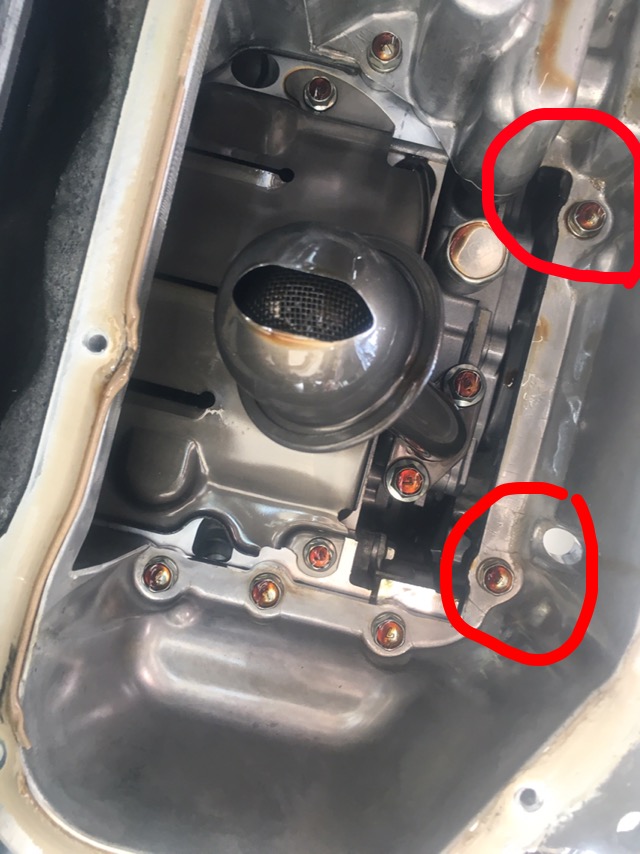
4. remove both cam phaser covers, then you can begin to remove all the timing cover bolts. they consist of 10mm and 14mm bolts.


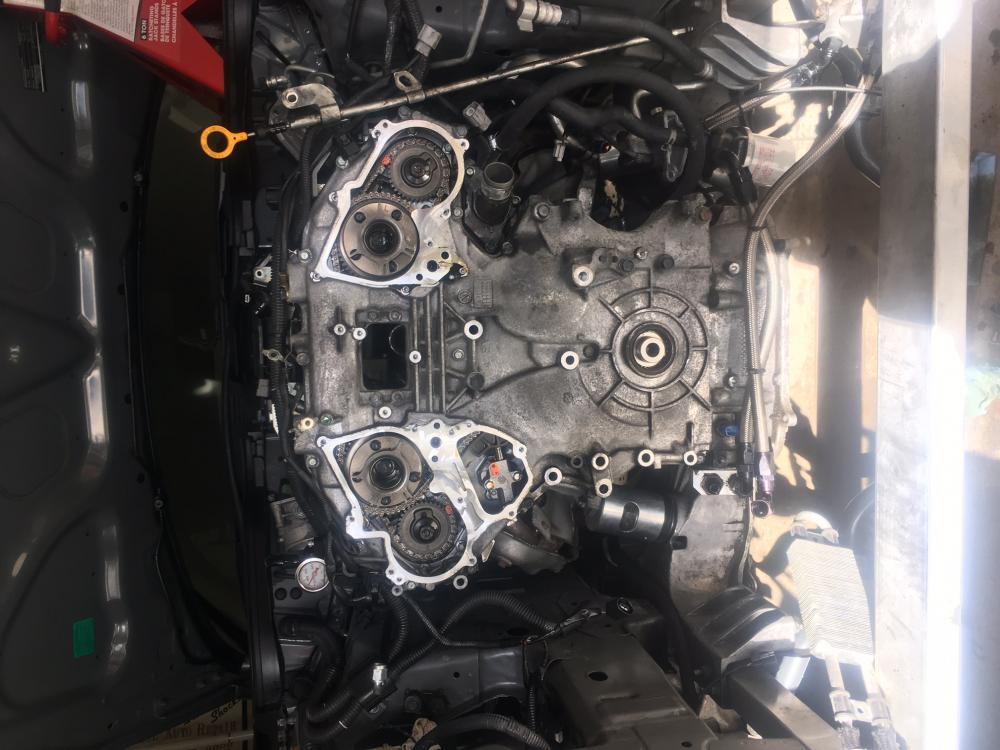
* helpful tip is to bag and label the bolts that are being removed to help with assembly.

5. now you are ready to remove the timing cover, using a razor blade slowly and carefully cut the sealant between the front and rear timing covers. there are key marks on the top of the cover for a flat head screw driver. carefully separate the two covers and work your way around the whole cover. Take your time, the cover is cast aluminum and is easy to crack.

6. with the cover removed, i would time the motor, there are few ways to do so. One way is crank the motor till the primary and secondary timing marks line up. for the secondary chain on bank 2, line up the two orange links with the dashed lines on the sprocket. On bank 1, line up the two dots on the sprocket with the two orange links. the yellow links line up with timing marks on the cam phasers.

You could also find TDC on cylinder 1 and make your own timing marks. if you are making your own marks, line up the crank sprocket key to the timing mark on the oil pump, this indicated cylinder 1 is TDC. you can also pull plug 1 and double check. with a white marker make timing marks on both cam phasers and crank sprockets. as a precaution i put steel wire around the chain to ensure the chain would not skip a tooth when chain tensioner was released.


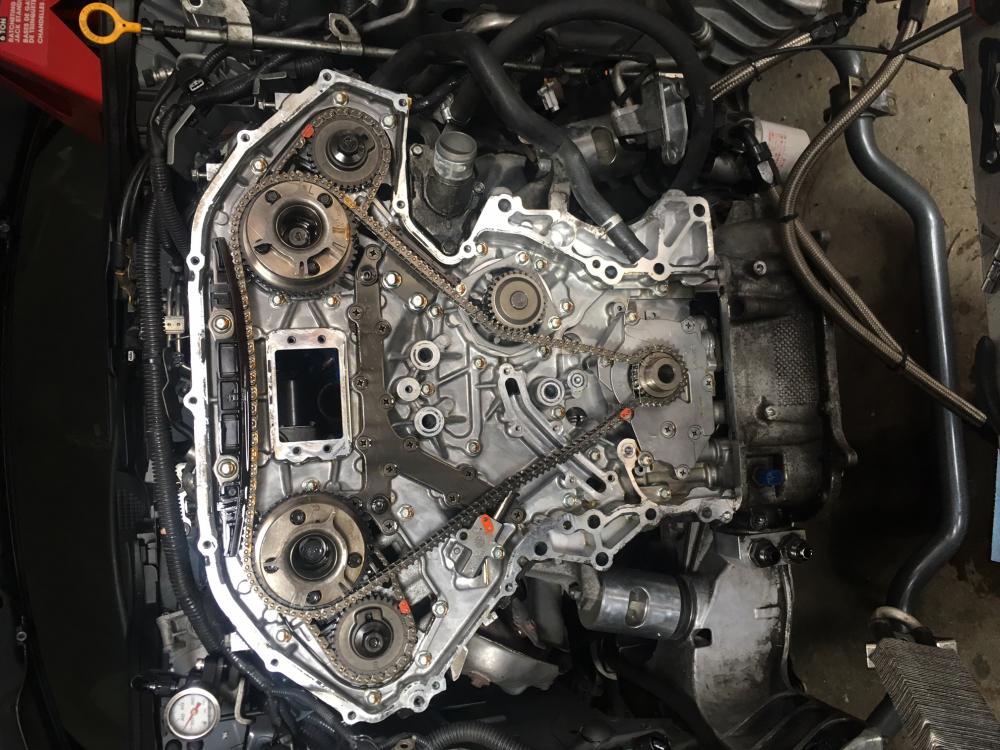
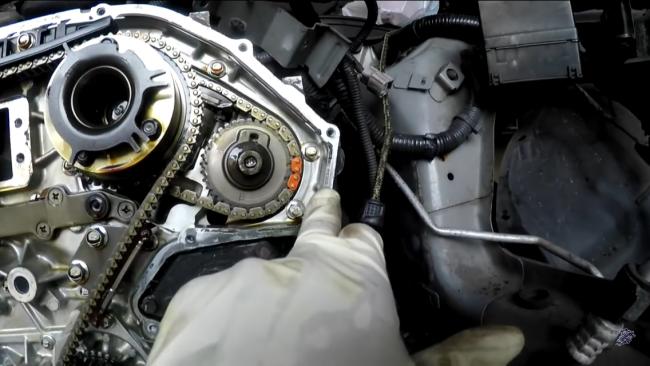
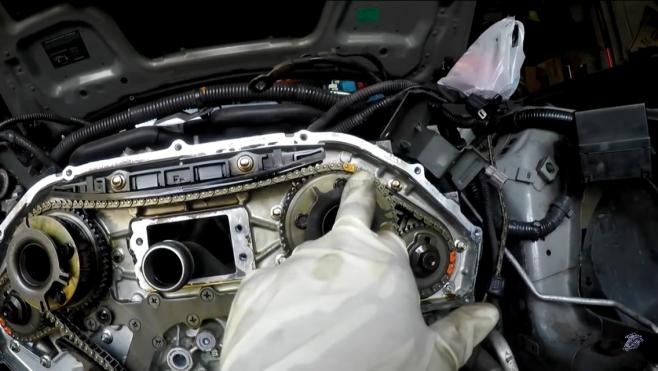
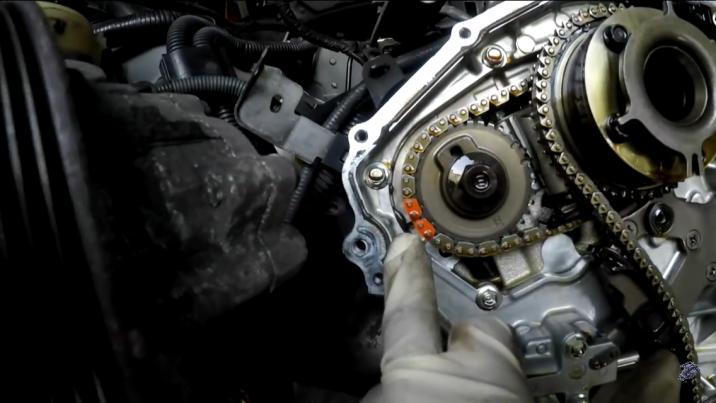
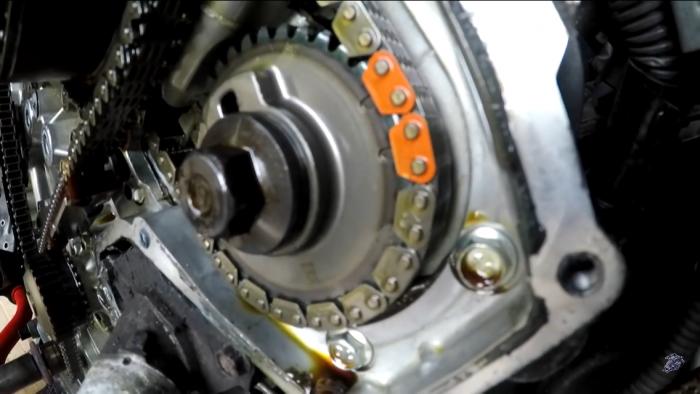
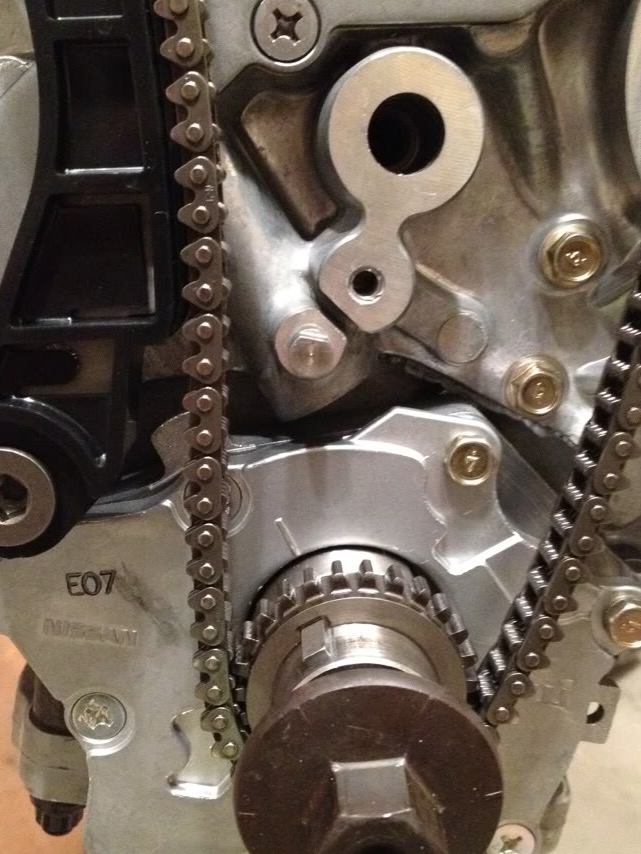
7. With your timing marks set, you can now remove the chain guide & tensioners. to lock the chain tensioner in place, push back on the chain guide till the orange link lines up with the hole on the tensioner. place a pin/thump tack inside to lock the tensioner in place. loosen both 10mm bolts and remove tensioner. using a 10mm hex remove the chain guide bolt.


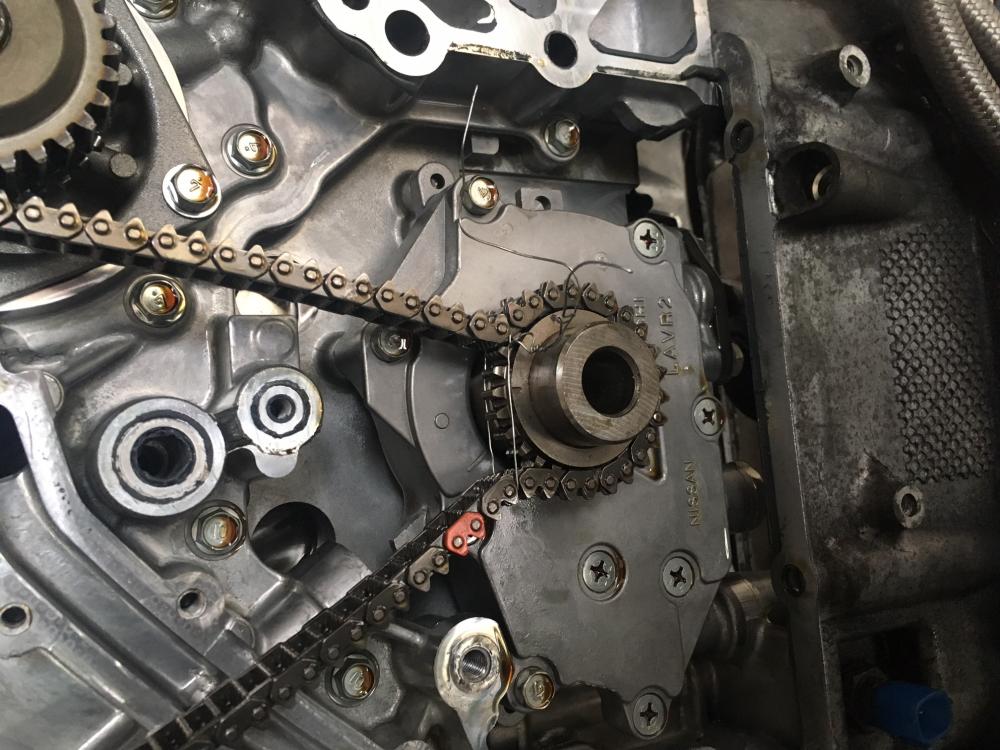
8. you should now have access to both galley gaskets. you should not have to complete remove the primary timing chain if done correctly. Using a philips head screw driver loosen each galley fasteners. NOTE use the correct philips screw driver, these fasteners are very easy to strip out.


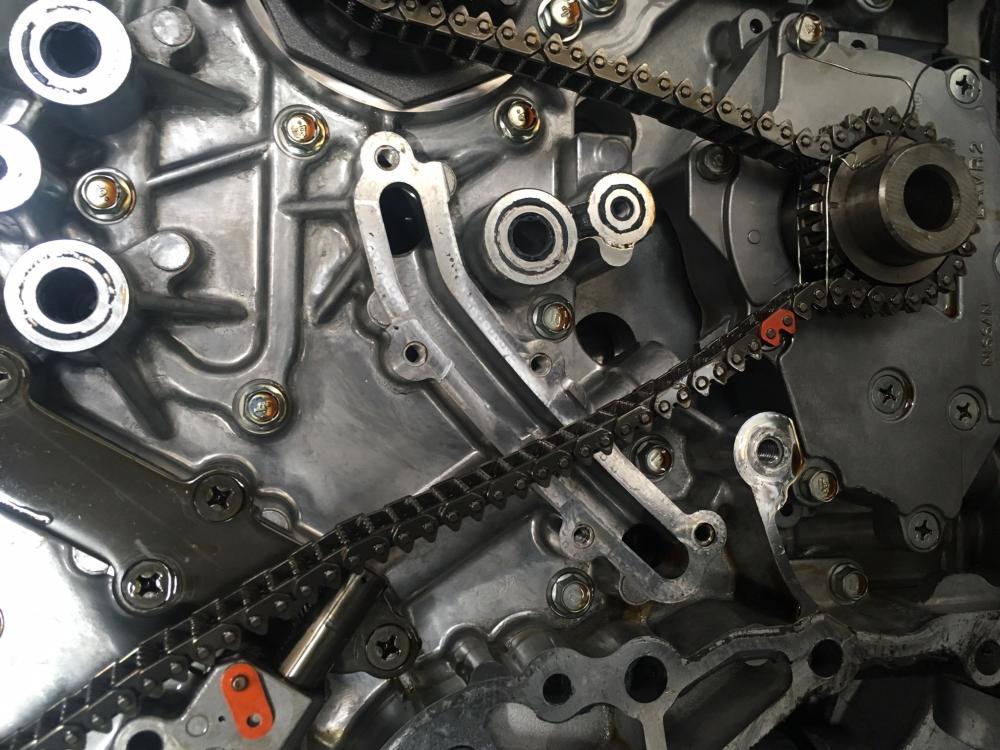
For the upper galley follow the same procedure, but in order to remove the fasteners behind the cam phaser sprocket you have to use a very small screw driver, or remove the secondary chain completely. using a small screw driver worked fine for me.


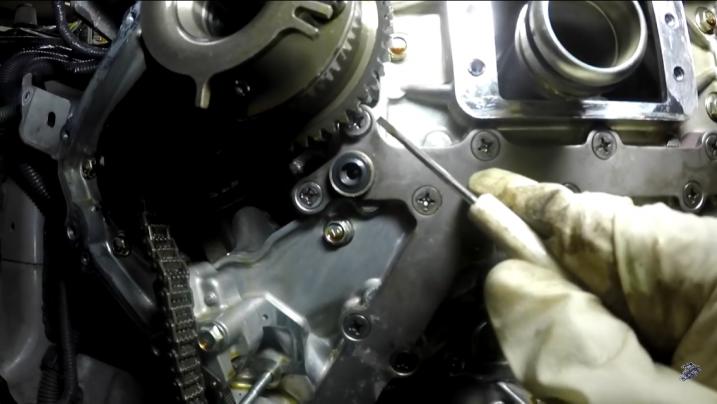
9. replace galley gaskets and fasteners Prt no. 13533-VQ37VHR-KT & B-7991A26X14. Using a 4mm hex torque new fasteners down to 12 ft-lbs with lock tight. the 4mm hex is small enough to get past the upper cam phaser sprocket.


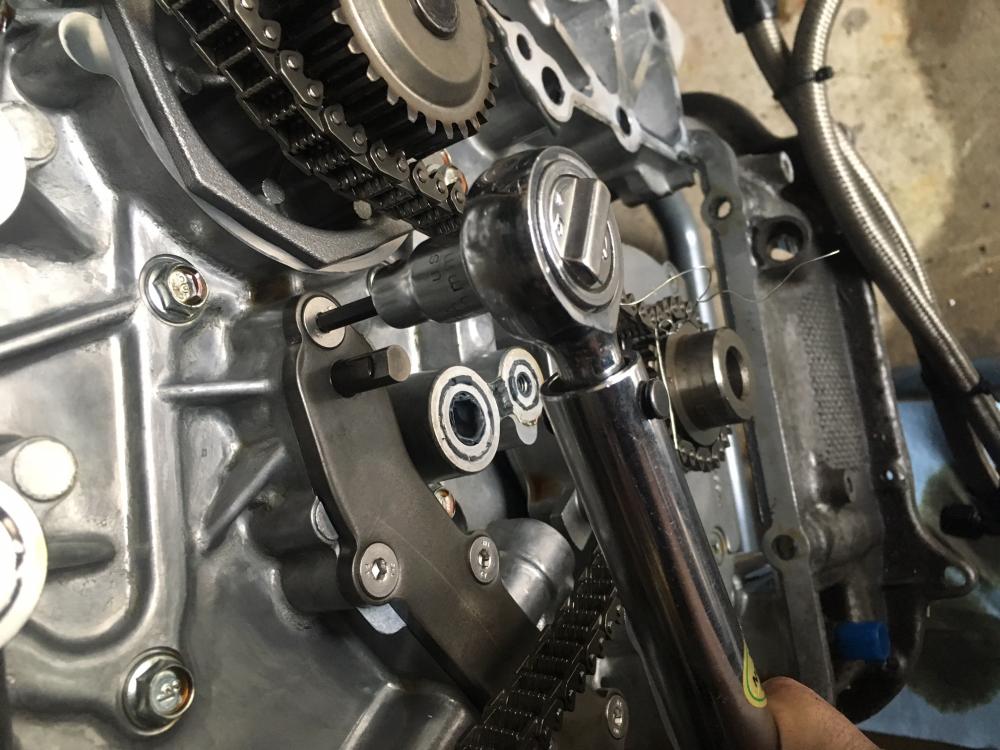
10. install new oil o-rings on the outside of the galley gasket. parts included in OEM timing cover gasket kit (part No HRTMNGCVR-KT)

11. If you completely removed the timing chain, line up the the timing marks you made with the marker on both cam and crank sprockets. Double check that cylinder 1 is at TDC and the crank marks still line up. ensure there is no slack on the water pump side.

12. reinstall the timing chain guide and tensioner. torque timing chain tensioner bolts to 10 ft-lbs. With everything is in place pull the pin locking the tensioner in place. ensure slack has been taken up by the tensioner.

13. Once your positive timing is correct, you are ready to reinstall the timing cover. Clean the sealing surface and remove residue from the the OEM RTV. install the new timing cover seal. place a thick bead of RTV on the timing cover, don't forget there are small passages that need RTV inside the cover. carefully mount the cover in place and reinstall timing cover bolts. torque 14mm bolts to 41 ft-lbs, and 10mm bolts to 10 ft-lbs.

14. install new cam cover gaskets, and torque to 10 ft-lbs.

15. Intall coolant hard pipe and dipstick. reconnect all electrical connection including the grounding wires on top of timing covers and cam phaser solenoids.

16. reinstall oil pan bolts, and any additional accessories.

if i missed anything let me know,

if you founds this helpful give a like and rep
JARblue, jae35, Knio and 18 others like this.
__________________
2012 370z GTM SC
jmroy6 is offline   Reply With Quote
Old 03-04-2018, 04:02 PM   #2 (permalink)
Track Member
 
Join Date: Oct 2016
Location: OKC
Posts: 723
Drives: 2010 touring
Rep Power: 4486
SG4247 has a reputation beyond reputeSG4247 has a reputation beyond reputeSG4247 has a reputation beyond reputeSG4247 has a reputation beyond reputeSG4247 has a reputation beyond reputeSG4247 has a reputation beyond reputeSG4247 has a reputation beyond reputeSG4247 has a reputation beyond reputeSG4247 has a reputation beyond reputeSG4247 has a reputation beyond reputeSG4247 has a reputation beyond repute
Default

Awesome write up!

Did you replace oil pump?

Did you replace the upper as well?

Was the idle pressure restored?

Last edited by SG4247; 03-04-2018 at 04:16 PM.
SG4247 is offline   Reply With Quote
Old 03-04-2018, 05:37 PM   #3 (permalink)
Base Member
 
Join Date: Sep 2015
Location: CT
Posts: 179
Drives: Spirited
Rep Power: 234
jmroy6 has a reputation beyond reputejmroy6 has a reputation beyond reputejmroy6 has a reputation beyond reputejmroy6 has a reputation beyond reputejmroy6 has a reputation beyond reputejmroy6 has a reputation beyond reputejmroy6 has a reputation beyond reputejmroy6 has a reputation beyond reputejmroy6 has a reputation beyond reputejmroy6 has a reputation beyond reputejmroy6 has a reputation beyond repute
Default

i replaced both lower and upper galley gaskets, chain guides and tensioner. unfortunately i haven't started the car yet, still waiting on a few parts. ill update my other thread once i do.

Low oil pressure!

Quote:
Originally Posted by SG4247 View Post
Awesome write up!

Did you replace oil pump?

Did you replace the upper as well?

Was the idle pressure restored?
__________________
2012 370z GTM SC
jmroy6 is offline   Reply With Quote
Old 03-04-2018, 07:08 PM   #4 (permalink)
Ronin Samurai - Assassin
 
Rusty's Avatar
 
Join Date: Dec 2011
Location: Fayettenam,Pennsyltucky
Age: 68
Posts: 34,850
Drives: 2011 Nismo GM 6M
Rep Power: 2684436
Rusty has a reputation beyond reputeRusty has a reputation beyond reputeRusty has a reputation beyond reputeRusty has a reputation beyond reputeRusty has a reputation beyond reputeRusty has a reputation beyond reputeRusty has a reputation beyond reputeRusty has a reputation beyond reputeRusty has a reputation beyond reputeRusty has a reputation beyond reputeRusty has a reputation beyond repute
Talking

Nice write up.

This is going to be my next winters project, along with a new oil pump. I got this thread bookmarked.
__________________

浪人 - 殺し屋
"The Difficult Anytime, The Impossible By Appointment Only"
http://www.the370z.com/members-370z-...o-journal.html
Rusty is offline   Reply With Quote
Old 03-04-2018, 07:16 PM   #5 (permalink)
Track Member
 
Join Date: Oct 2016
Location: OKC
Posts: 723
Drives: 2010 touring
Rep Power: 4486
SG4247 has a reputation beyond reputeSG4247 has a reputation beyond reputeSG4247 has a reputation beyond reputeSG4247 has a reputation beyond reputeSG4247 has a reputation beyond reputeSG4247 has a reputation beyond reputeSG4247 has a reputation beyond reputeSG4247 has a reputation beyond reputeSG4247 has a reputation beyond reputeSG4247 has a reputation beyond reputeSG4247 has a reputation beyond repute
Default

As do I!
SG4247 is offline   Reply With Quote
Old 03-04-2018, 07:34 PM   #6 (permalink)
Base Member
 
Join Date: Aug 2017
Location: Ohio
Posts: 13
Drives: 14 370z Touring 7AT
Rep Power: 7
V8Nissan is on a distinguished road
Default

Quote:
Originally Posted by jmroy6 View Post
i replaced both lower and upper galley gaskets, chain guides and tensioner. unfortunately i haven't started the car yet, still waiting on a few parts. ill update my other thread once i do.

Low oil pressure!
Awesome! How many miles??
V8Nissan is offline   Reply With Quote
Old 03-04-2018, 08:14 PM   #7 (permalink)
Base Member
 
Join Date: Sep 2015
Location: CT
Posts: 179
Drives: Spirited
Rep Power: 234
jmroy6 has a reputation beyond reputejmroy6 has a reputation beyond reputejmroy6 has a reputation beyond reputejmroy6 has a reputation beyond reputejmroy6 has a reputation beyond reputejmroy6 has a reputation beyond reputejmroy6 has a reputation beyond reputejmroy6 has a reputation beyond reputejmroy6 has a reputation beyond reputejmroy6 has a reputation beyond reputejmroy6 has a reputation beyond repute
Default

Quote:
Originally Posted by V8Nissan View Post
Awesome! How many miles??
57k on the odometer
__________________
2012 370z GTM SC
jmroy6 is offline   Reply With Quote
Old 03-04-2018, 08:28 PM   #8 (permalink)
A True Z Fanatic
 
Quicksilvers's Avatar
 
Join Date: May 2017
Location: Atlanta, GA
Posts: 2,039
Drives: 2017 370z
Rep Power: 25462
Quicksilvers has a reputation beyond reputeQuicksilvers has a reputation beyond reputeQuicksilvers has a reputation beyond reputeQuicksilvers has a reputation beyond reputeQuicksilvers has a reputation beyond reputeQuicksilvers has a reputation beyond reputeQuicksilvers has a reputation beyond reputeQuicksilvers has a reputation beyond reputeQuicksilvers has a reputation beyond reputeQuicksilvers has a reputation beyond reputeQuicksilvers has a reputation beyond repute
Default

Excellent write up great job thumbs up! I hope you replaced your oil pump.
Quicksilvers is offline   Reply With Quote
Old 03-04-2018, 08:56 PM   #9 (permalink)
A True Z Fanatic
 
Join Date: Jun 2014
Location: Ga
Posts: 13,502
Drives: 2013 Nismo 370z
Rep Power: 2684391
Spooler has a reputation beyond reputeSpooler has a reputation beyond reputeSpooler has a reputation beyond reputeSpooler has a reputation beyond reputeSpooler has a reputation beyond reputeSpooler has a reputation beyond reputeSpooler has a reputation beyond reputeSpooler has a reputation beyond reputeSpooler has a reputation beyond reputeSpooler has a reputation beyond reputeSpooler has a reputation beyond repute
Default

It is extremely important that you get it setup on TDC #1 before taking anything apart. If by chance the chain falls off, it won't be a big issue. This is the mistake I have seen happen the most dealing with engines with multiple timing chains and 4 cams.
Spooler is online now   Reply With Quote
Old 03-05-2018, 09:35 AM   #10 (permalink)
Premium Member
 
Jayhovah's Avatar
 
Join Date: May 2013
Location: St. Pete, FL
Posts: 3,848
Drives: 520whp Fire Breather
Rep Power: 86950
Jayhovah has a reputation beyond reputeJayhovah has a reputation beyond reputeJayhovah has a reputation beyond reputeJayhovah has a reputation beyond reputeJayhovah has a reputation beyond reputeJayhovah has a reputation beyond reputeJayhovah has a reputation beyond reputeJayhovah has a reputation beyond reputeJayhovah has a reputation beyond reputeJayhovah has a reputation beyond reputeJayhovah has a reputation beyond repute
Default

Faaaaaaaaaaaaaaaaaaaaaantastic DIY.
__________________
2013 Gun Metallic Sport - Gamma V3 Twin Turbogized
DIY Gamma V3 TT Install * Jayhovah's Gamma V3 TT Install Pic'Z and Vid'Z * DIY: Washer Reservoir for the Boosted
Quote:
Originally Posted by redondoaveb
You've got a twin turbo sound system, I think you met your audio goals.
Jayhovah is offline   Reply With Quote
Old 03-05-2018, 11:49 AM   #11 (permalink)
A True Z Fanatic
 
GaleForce's Avatar
 
Join Date: Aug 2011
Location: Ontario, Canada
Posts: 21,749
Drives: Varis Arising II
Rep Power: 51864
GaleForce has a reputation beyond reputeGaleForce has a reputation beyond reputeGaleForce has a reputation beyond reputeGaleForce has a reputation beyond reputeGaleForce has a reputation beyond reputeGaleForce has a reputation beyond reputeGaleForce has a reputation beyond reputeGaleForce has a reputation beyond reputeGaleForce has a reputation beyond reputeGaleForce has a reputation beyond reputeGaleForce has a reputation beyond repute
Default

Excellent job! Thanks for documenting and sharing the DIY. Rep’d.
__________________
GaleForce is offline   Reply With Quote
Old 03-05-2018, 12:05 PM   #12 (permalink)
A True Z Fanatic
 
Tractionless's Avatar
 
Join Date: Jan 2016
Location: Atlantic SE
Posts: 1,237
Drives: '10 K23 ST 7AT
Rep Power: 30525
Tractionless has a reputation beyond reputeTractionless has a reputation beyond reputeTractionless has a reputation beyond reputeTractionless has a reputation beyond reputeTractionless has a reputation beyond reputeTractionless has a reputation beyond reputeTractionless has a reputation beyond reputeTractionless has a reputation beyond reputeTractionless has a reputation beyond reputeTractionless has a reputation beyond reputeTractionless has a reputation beyond repute
Default

Is there any rhyme or reason to why your car had low air pressure at 57k and why others here with over 200k miles haven't had an issue.
__________________
Toys Not Tots

Last edited by Tractionless; 03-05-2018 at 12:07 PM.
Tractionless is offline   Reply With Quote
Old 03-05-2018, 12:17 PM   #13 (permalink)
Base Member
 
npdabest's Avatar
 
Join Date: Jul 2010
Location: delaware
Posts: 73
Drives: 09 MB 370z
Rep Power: 14
npdabest is on a distinguished road
Default

Quote:
Originally Posted by Tractionless View Post
Is there any rhyme or reason to why your car had low air pressure at 57k and why others here with over 200k miles haven't had an issue.
From what I understand, it is basically the fault of Nissan for using cheap parts in the earlier renditions of the Z.

It could happen to anyone at any time.
Tractionless likes this.
npdabest is offline   Reply With Quote
Old 03-05-2018, 03:43 PM   #14 (permalink)
Base Member
 
Join Date: Sep 2015
Location: CT
Posts: 179
Drives: Spirited
Rep Power: 234
jmroy6 has a reputation beyond reputejmroy6 has a reputation beyond reputejmroy6 has a reputation beyond reputejmroy6 has a reputation beyond reputejmroy6 has a reputation beyond reputejmroy6 has a reputation beyond reputejmroy6 has a reputation beyond reputejmroy6 has a reputation beyond reputejmroy6 has a reputation beyond reputejmroy6 has a reputation beyond reputejmroy6 has a reputation beyond repute
Default

Quote:
Originally Posted by Tractionless View Post
Is there any rhyme or reason to why your car had low air pressure at 57k and why others here with over 200k miles haven't had an issue.
i guess i had an unlucky car, im sure boost and outings at the drag dont help either, im just thankful i caught the issue with my defi gauge because the OEM oil pressure light never came on. this ultimately saved my motor.

Again.To be clear the gaskets did not fail, they were completely intact. The fasteners backed out causing drops in oil pressure, why did they back out? i can only speculate.
gbrettin, JARblue, Rusty and 1 others like this.
__________________
2012 370z GTM SC
jmroy6 is offline   Reply With Quote
Old 03-05-2018, 06:22 PM   #15 (permalink)
Administrator
 
Trips's Avatar
 
Join Date: May 2009
Location: Disneyland, Ca
Posts: 8,728
Drives: 🔰
Rep Power: 10
Trips has a reputation beyond reputeTrips has a reputation beyond reputeTrips has a reputation beyond reputeTrips has a reputation beyond reputeTrips has a reputation beyond reputeTrips has a reputation beyond reputeTrips has a reputation beyond reputeTrips has a reputation beyond reputeTrips has a reputation beyond reputeTrips has a reputation beyond reputeTrips has a reputation beyond repute
Default

Nice DiY!

It's been sticked and added to the DiY Index for members to find.
GaleForce, Rusty and wideglideleon like this.
__________________


http://www.the370z.com/payments.php
Trips is offline   Reply With Quote
Reply

Bookmarks

Thread Tools
Display Modes

Posting Rules
You may not post new threads
You may not post replies
You may not post attachments
You may not edit your posts

BB code is On
Smilies are On
[IMG] code is On
HTML code is Off
Trackbacks are On
Pingbacks are On
Refbacks are On


All times are GMT -5. The time now is 08:19 PM.


Powered by vBulletin® Version 3.8.4
Copyright ©2000 - 2024, Jelsoft Enterprises Ltd.
Search Engine Optimization by vBSEO 3.6.0 PL2