
|
Do this modification at your own risk!!!! You need to ensure car is properly on Jack Stands. I only show you what I did that worked for me, I have
|
|||||||
 14Likes
 |
|
|
LinkBack | Thread Tools | Display Modes |
 03-01-2015, 02:24 PM
|
#1 (permalink) |
|
A True Z Fanatic
 Join Date: Dec 2011
Location: Pensacola Florida
Posts: 1,696
Drives: Awesome Car
Rep Power: 28   |
Do this modification at your own risk!!!! You need to ensure car is properly on Jack Stands. I only show you what I did that worked for me, I have a ton of experience working with tools, fabrication and cars.
Other DIY you may want to look at as well: DIY: Whiteline rear differential bushings Tools you will need: 1 - 12mm open end wrench 2 - 17mm open end wrenches 1 - Deep 15mm Socket w/8 inch extension 1 - 14mm socket 1 - Breaker bar or piece of pipe that will fit over your ratchet 2lbs Hammer - short handle if you have it. Floor jack 3/8th drill bit Sawzall with 6inch metal cutting blade Something you can use as a punch (I used a broken 1/2 extension) Spray lubrication (I used stuff that is a rust inhibitor and lubricator for aircraft) Special Tool See Images (make it) Step 1: Remove Exhaust from Y pipe back. Step 2: Remove the frame supports & rear sway bar. Clean and re-lube sway bushings. Step 3: Us 12mm end wrench and remove the drive shaft protection shield. If you skip this like i did just bend it down if you need to. step 4: Undo the 15mm bolt using the beep socket and extension. The location of the bolt is on the back of the diff cover. You will need to access it from the rear of the frame support behind the diff. I you can get it off, get a breaker bark or slide a piece of pipe over your wrench. Once it pop's you will think you broke it. As soon as it's free it spins easy. Completely remove bolt. Step 5: Using your 14mm end wrench (I used a ratcheting end wrench) undo the axle shafts from the side of the diff flange. 6 bolts - may need to use your 17mm wrench to spin the drive shaft to access the top bolts. Tie the shafts up so they don't slide out. Step 6: Okay, To remember where your drive shaft is take a paint pen of file and make a mark on the drive shaft flange and Diff flange. This will keep everything lined up when you re-install. Use your (2) 17mm end wrenches and undo the 4 drive shaft bolts. You may need to spin the drive shaft to reach the upper bolts. For AT undo safety break and put transmission in neutral. 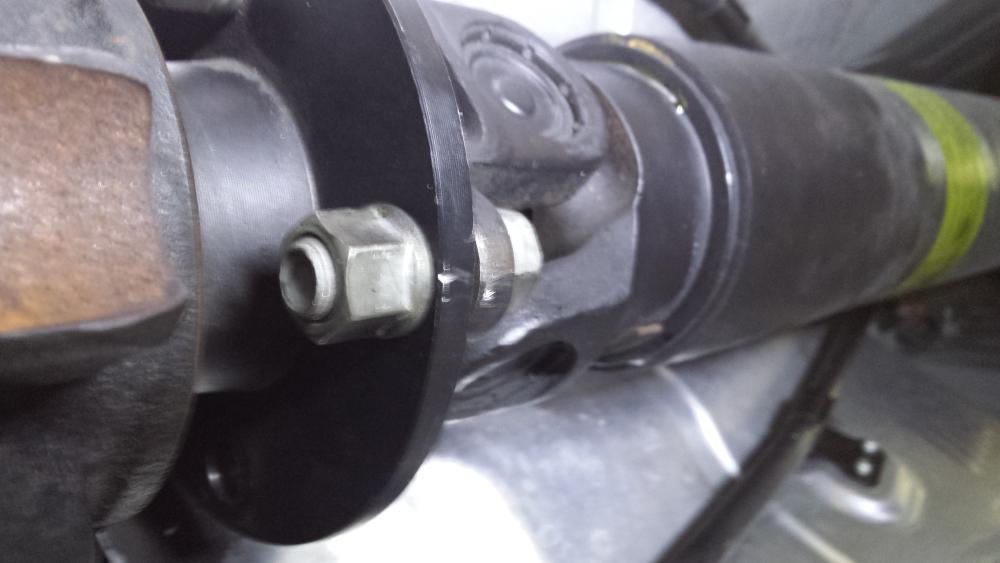 Step 7: Use your 12mm end wrench to undo the 2 sensors. (1) on each side, push them up and in a place they wont get damaged. Step 8: Slide the floor jack under the rear diff. The rear is heaviest thats the best spot to set floor jack. Step 9: With Drive shaft off, Axles off and tied up, floor jack in place; undo the last 2 15mm bolts holding the diff up. Slowly lower it far enough to access the breather hose on the diff cover. Pull it off & tuck it up and out of the way. Lower diff and pull it out. 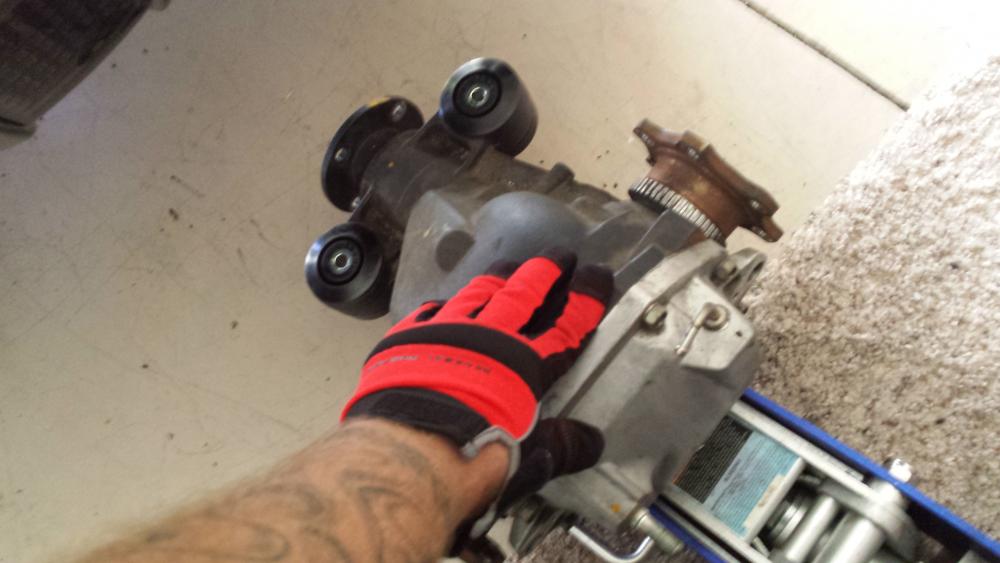 Step 10: Using your punch & 3/8 drill bit (i used 1/2 extension) drill and beat the crap  out of the old rubber bushing on the diff to remove them. out of the old rubber bushing on the diff to remove them. Once you get them off, put the thin Whiteline bushings on the top and thick bushings on the bottom. Fallow the instructions on your kit, lube pins up to make it easier. Step 11: If your bushing on the frame hasn't burst yet you will need to drill hole on top and bottom on both sides to get the liquid out. Use a oil pan and a rage to keep the stuff from blowing out all over you. Drain the fluid, when done keep drilling out the rubber. Your trying to make a spot large enough to fit your sawzall blade. Step 12: Using your sawzall position it were you can cut flush all the way through. I did it from the rear of the car and cut strait through the bushings side wall. Once cut use your punch (I used 1/2 extension) and pop the ring out. Clean the side walls to prep it for next step. Step 13: Your directions tell you to bolt the sub frame bushing on to the diff before install. One word for you ( NO )!!!! I took a piece of angle iron, 6 inch 3/8 bolt & nut & washer and made a press to get the bushing in with out damaging it or my calm nature  . Attached is the image of it. The angle iron and bolt are set on rear of car. The bushing is slid over the bolt. I used the 3/8 washer and the thick washer we removed from the diff bolt and using a ratchet end wrench and hammer i tightened it in to place. May have to tap the washer to align the bushing as it goes in to position. Took 5 min. . Attached is the image of it. The angle iron and bolt are set on rear of car. The bushing is slid over the bolt. I used the 3/8 washer and the thick washer we removed from the diff bolt and using a ratchet end wrench and hammer i tightened it in to place. May have to tap the washer to align the bushing as it goes in to position. Took 5 min. 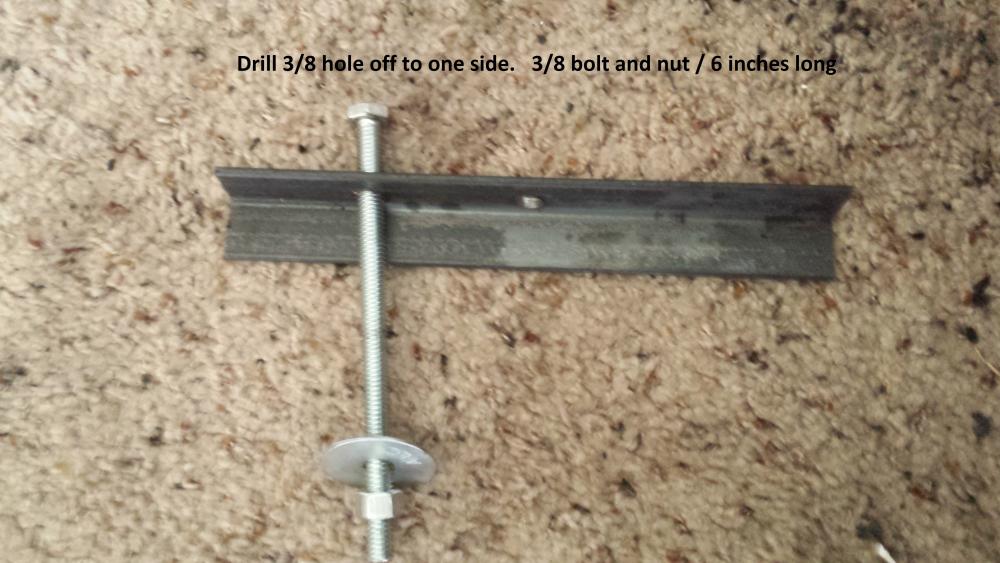 What bushing looks like on the tool:  What the bushing looks like on the tool & on the car getting pressed in:  What it looks like almost done: 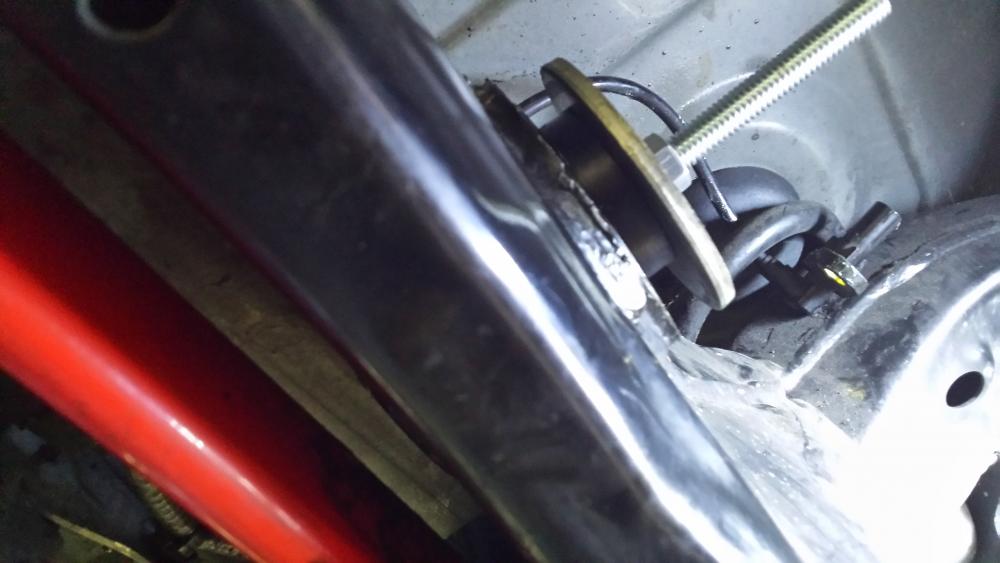 What it looks like done: 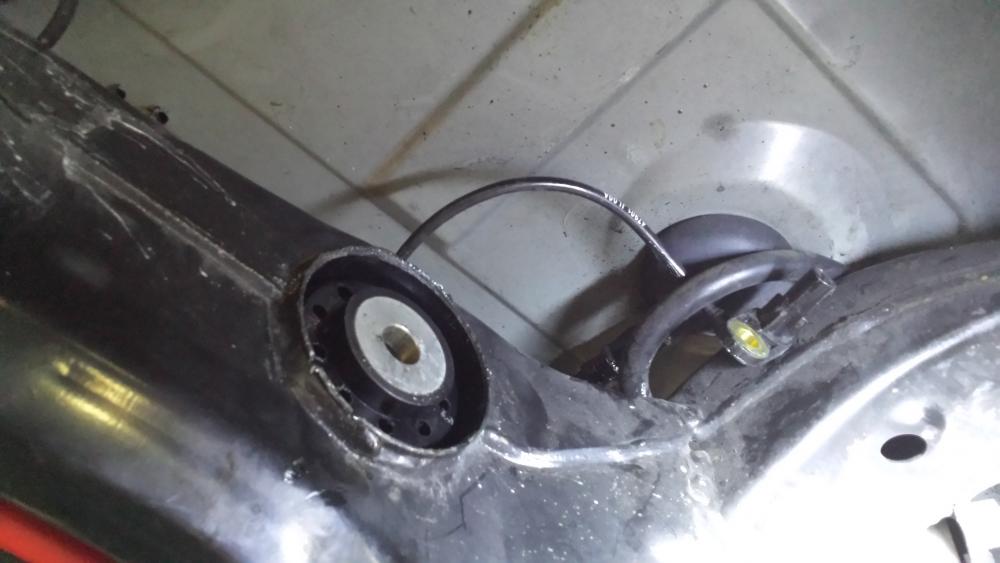 When you go to put diff back in it takes 10 min when the bushing is in already. Step 14: Put it all back together in reverse order .... Done  The order the washers go on. Metal washer goes on top and needs to be slide in place once diff is back up in position. 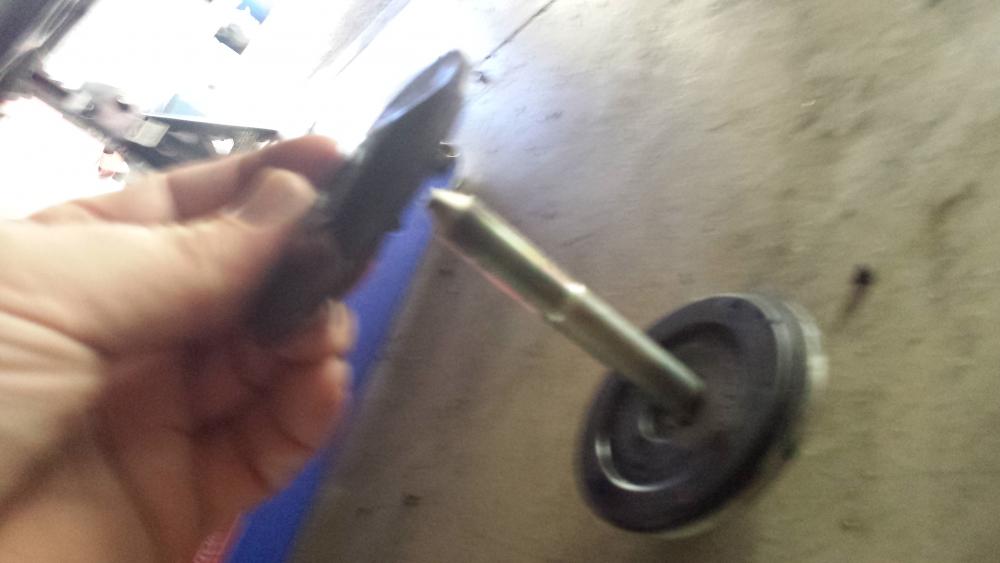 Warning: Used the proper torque specs for your drive shaft and axle bolts. This is under extreme load and is not to be taken lighting. I mark each bolt after torqued, will recheck after a few drives to work and back. .
__________________
Did new cool science stuff to the car !!!
http://www.the370z.com/mazoc/99606-z...y-14-17-a.html http://www.the370z.com/diy-section-d...-w-videos.html Last edited by Nut_N_Much; 03-06-2015 at 03:38 PM. |

|

|
|
03-06-2015, 10:42 AM
|
#4 (permalink) |
|
Track Member
Join Date: Mar 2012
Location: San Antonio
Posts: 714
Drives: '09 370Z PW M6
Rep Power: 21 |
I was reading through your directions and noticed a difference between what you said and what Whiteline said in their instructions for the front diff bushings. The instructions say to put the thick on the bottom, but you said to put the thick on the top?
__________________
VSR Single-turbo kit: 611hp/517tq @ 10psi (Q16 race gas) Dan's VSR top-mount turbo 370z |
|
|
|
|
03-06-2015, 03:37 PM
|
#5 (permalink) | |
|
A True Z Fanatic
Join Date: Dec 2011
Location: Pensacola Florida
Posts: 1,696
Drives: Awesome Car
Rep Power: 28 |
Quote:
Thanks for the catch!!!
__________________
Did new cool science stuff to the car !!!
http://www.the370z.com/mazoc/99606-z...y-14-17-a.html http://www.the370z.com/diy-section-d...-w-videos.html |
|
|
|
|
|
03-07-2015, 12:43 PM
|
#6 (permalink) |
|
A True Z Fanatic
Join Date: Jun 2013
Location: Houston
Posts: 1,449
Drives: 2010 Nismo
Rep Power: 65 |
I used a bottle jack to take the old rear bushing out and to put the new one back it. You can wedge it between the frame and the bushing after you drill a dozen holes in it. Then you use the jack to push the inside rubber part out and give yourself more space to work with the saw. Once out, you "jack" the new bushing in. That DIY "puller is a very easy and simple tool to make. It will come in handy with other things.
GJ bro! YzGyz |
|
|
|
|
03-07-2015, 03:55 PM
|
#7 (permalink) |
|
A True Z Fanatic
Join Date: Dec 2011
Location: Pensacola Florida
Posts: 1,696
Drives: Awesome Car
Rep Power: 28 |
Drives much tighter. I love it, I set the Whiteline Sways on the rear on the center hole. 1st hole with new bushing felt really stiff. Drives like a dream!!!
__________________
Did new cool science stuff to the car !!!
http://www.the370z.com/mazoc/99606-z...y-14-17-a.html http://www.the370z.com/diy-section-d...-w-videos.html |
|
|
|
|
02-17-2024, 07:08 AM
|
#8 (permalink) |
|
Base Member
Join Date: May 2014
Location: Ottawa
Posts: 80
Drives: 2011 370Z 6Mt
Rep Power: 13 |
I have read many of these DIY and the pretty much all say to put large half on the bottom when re-installing. I just received my kit (KDT911), I understand that this DIY is 8 years old, but the instructions from Whiteline that came with the kit now say to put the large half on top and to discard the top OE washer. Do people here know something that Whiteline does not? Do you get to reuse the lower stopper? (item 3 in attached diagram)
|
|
|
|
|
| Bookmarks |
|
|
 Similar Threads
|
||||
| Thread | Thread Starter | Forum | Replies | Last Post |
| Z1 Motorsports: Full Differential Upgrade Kit/Whiteline Diff Bushings | John@Z1 | Drivetrain/Engine | 39 | 06-12-2017 09:46 AM |
| [FOR SALE] Brand new Whiteline poly diff bushings. | synolimit | Parts for sale (Private Classifieds) | 104 | 01-27-2015 02:36 AM |
| [FOR SALE] Whiteline Poly Diff Bushings | elliotty | Parts for sale (Private Classifieds) | 2 | 07-08-2014 11:10 AM |
| SPL diff bushings and whiteline diff bushings?? | synolimit | Engine & Drivetrain | 7 | 01-12-2014 12:24 AM |
| Whiteline Diff Bushings Question | cdoxp800 | Engine & Drivetrain | 15 | 09-04-2013 04:22 AM |


 Linear Mode


