Nissan 370Z Forum  

DIY: Sway bar installation (rear)

This DIY describes the removal/installation of the rear sway bar. For the front sway bar see here . Tools required: Jack stands Torque wrench 12mm socket 14mm socket Securely block

Go Back   Nissan 370Z Forum > Nissan 370Z Tech Area > DIY Section (Do-It-Yourself)


Like Tree3Likes

Reply
 
LinkBack Thread Tools Display Modes
Old 05-30-2009, 10:14 PM   #1 (permalink)
A True Z Fanatic
 
ChrisSlicks's Avatar
 
Join Date: Mar 2009
Location: North East
Posts: 6,203
Drives: 09 370Z Sport M6
Rep Power: 653
ChrisSlicks has a reputation beyond reputeChrisSlicks has a reputation beyond reputeChrisSlicks has a reputation beyond reputeChrisSlicks has a reputation beyond reputeChrisSlicks has a reputation beyond reputeChrisSlicks has a reputation beyond reputeChrisSlicks has a reputation beyond reputeChrisSlicks has a reputation beyond reputeChrisSlicks has a reputation beyond reputeChrisSlicks has a reputation beyond reputeChrisSlicks has a reputation beyond repute
Default DIY: Sway bar installation (rear)

This DIY describes the removal/installation of the rear sway bar.
For the front sway bar see here.

Tools required:
Jack stands
Torque wrench
12mm socket
14mm socket


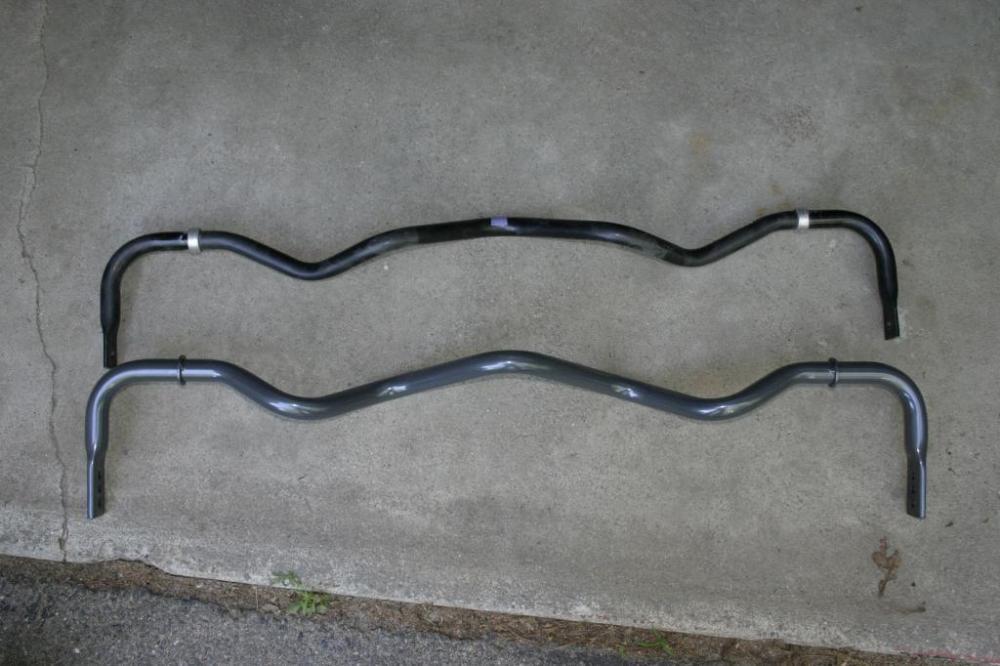
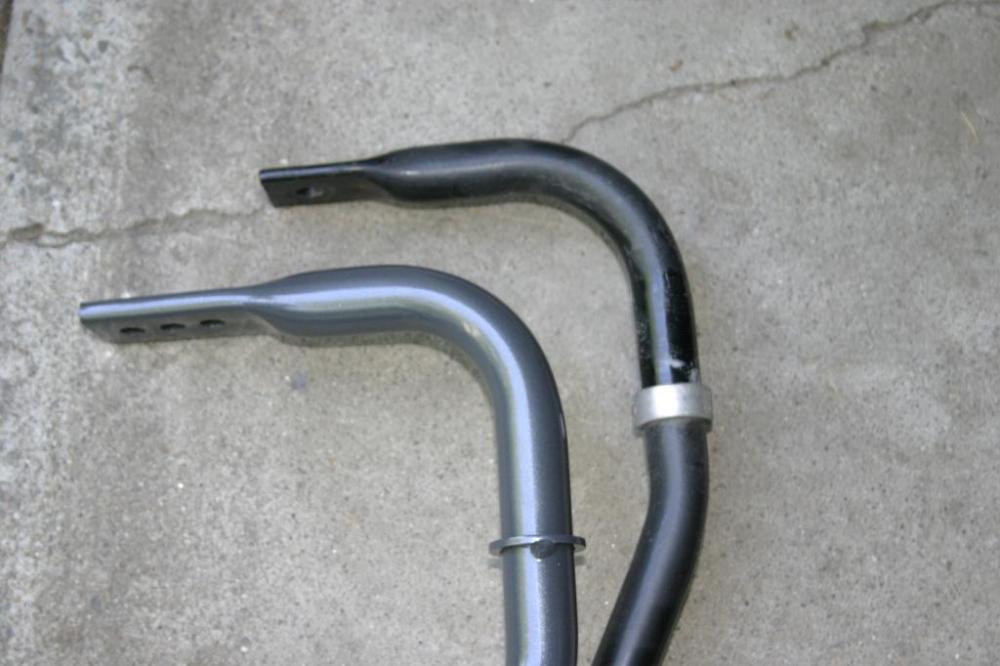
Securely block front wheels, jack rear of vehicle and support securely on jack stands. It is not necessary to remove the wheels but it does make access easier.


Loosen end links with 14mm socket but don't disconnect.


Disconnect rear exhaust from muffler, let the exhaust drop down gently.


Unbolt 4-point rear brace. Try to keep the 2 front bolts of the brace loosely connected to make reinstallation easier.


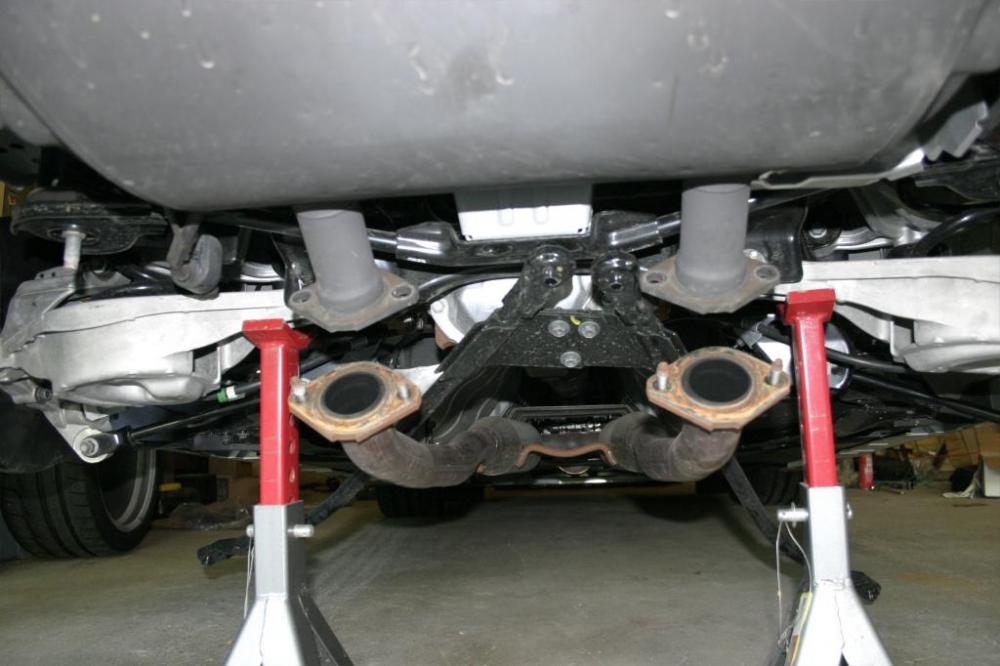
Remove sway bar clamps.


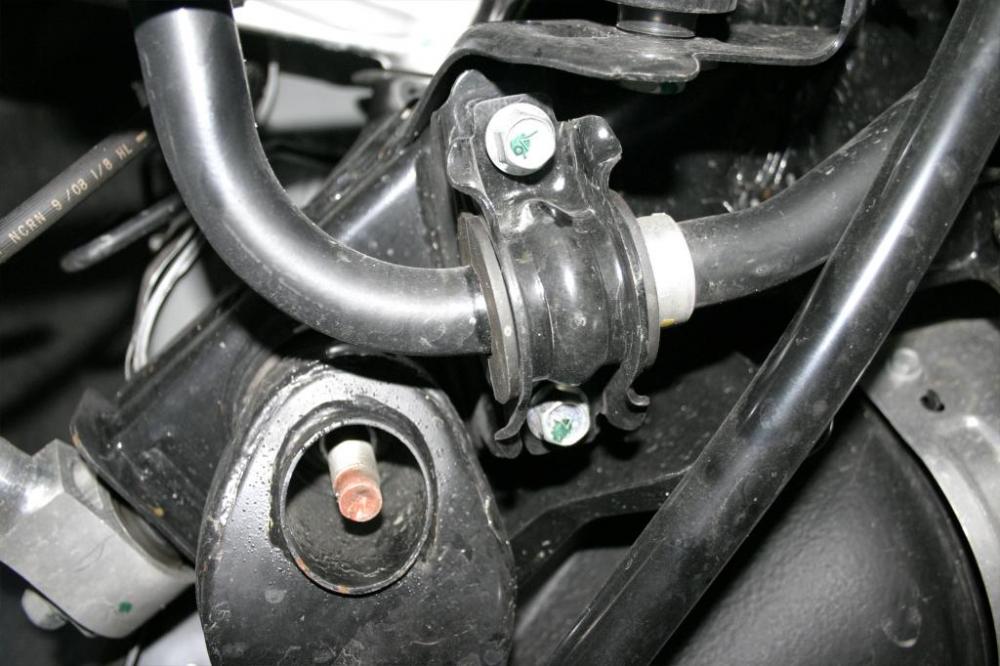
Disconnect end links. You should now be able to maneuver out the rear sway bar over the exhaust and rear brace. It is a fairly tight fit.


Grease bushings of new bar and install on bar.


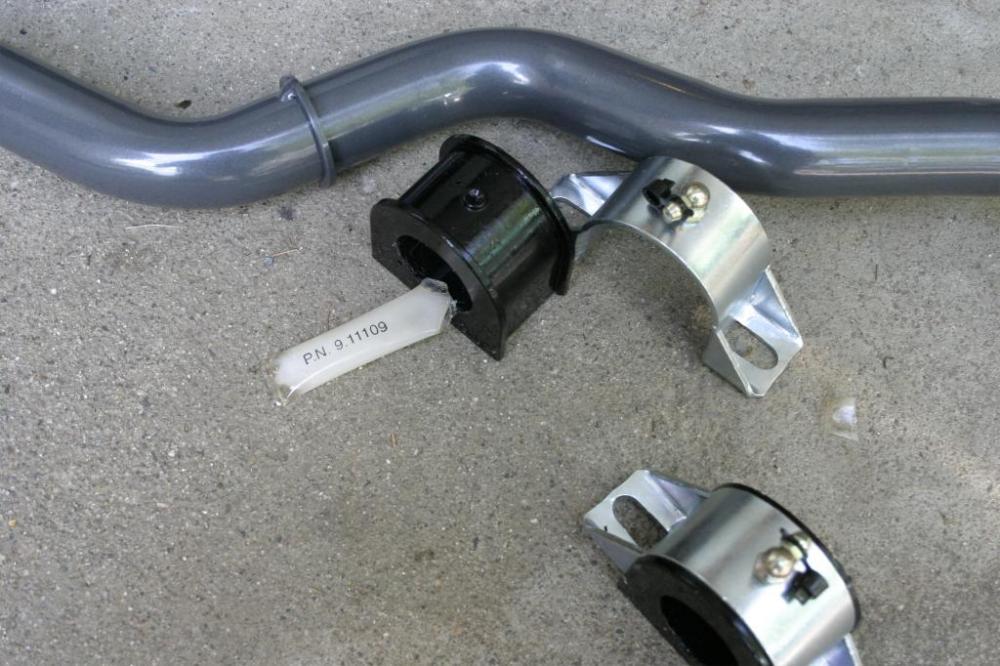
Installation
- Slide in new bar
- Loosely connect end links in selected hole setting. Outer hole is softest setting, inner hole it tightest setting.
- Bolt clamps to chassis and tighten to 33 ft/lb
- Tighten end links to 41 ft/lb
- Reconnect rear exhaust and tighten bolts to 43 ft/lb
haitech and Zbrah like this.

Last edited by ChrisSlicks; 03-17-2010 at 07:35 AM.
ChrisSlicks is offline   Reply With Quote
Old 05-31-2009, 09:22 AM   #2 (permalink)
Enthusiast Member
 
miguez's Avatar
 
Join Date: Apr 2009
Location: Columbus, Ohio
Posts: 359
Drives: '04 Cavalier
Rep Power: 181
miguez has a reputation beyond reputemiguez has a reputation beyond reputemiguez has a reputation beyond reputemiguez has a reputation beyond reputemiguez has a reputation beyond reputemiguez has a reputation beyond reputemiguez has a reputation beyond reputemiguez has a reputation beyond reputemiguez has a reputation beyond reputemiguez has a reputation beyond reputemiguez has a reputation beyond repute
Default

Thanks Chris!

It might be a good idea to place a link to the other sway bar install DIY post you made from this one and vice-versa?
miguez is offline   Reply With Quote
Old 05-31-2009, 10:12 PM   #3 (permalink)
Track Member
 
g96818's Avatar
 
Join Date: May 2009
Location: A rock in a big pond
Posts: 681
Drives: 2009 370Z, 2012 M56
Rep Power: 3393
g96818 has a reputation beyond reputeg96818 has a reputation beyond reputeg96818 has a reputation beyond reputeg96818 has a reputation beyond reputeg96818 has a reputation beyond reputeg96818 has a reputation beyond reputeg96818 has a reputation beyond reputeg96818 has a reputation beyond reputeg96818 has a reputation beyond reputeg96818 has a reputation beyond reputeg96818 has a reputation beyond repute
Default

Nice DIY. I suggest you guys wait on Hotchkis to develop better sways or buy another brand who doesn't have that stopper welded on the bar. That weld joint creates a high stress concentration and possibly small cracks which could fail due to creep, which was exactly what happened to my last pair of Hotchkis.
g96818 is offline   Reply With Quote
Old 06-01-2009, 05:09 AM   #4 (permalink)
Enthusiast Member
 
miguez's Avatar
 
Join Date: Apr 2009
Location: Columbus, Ohio
Posts: 359
Drives: '04 Cavalier
Rep Power: 181
miguez has a reputation beyond reputemiguez has a reputation beyond reputemiguez has a reputation beyond reputemiguez has a reputation beyond reputemiguez has a reputation beyond reputemiguez has a reputation beyond reputemiguez has a reputation beyond reputemiguez has a reputation beyond reputemiguez has a reputation beyond reputemiguez has a reputation beyond reputemiguez has a reputation beyond repute
Default

Interesting feedback, g96818, thanks!
miguez is offline   Reply With Quote
Old 06-01-2009, 06:34 AM   #5 (permalink)
A True Z Fanatic
 
ChrisSlicks's Avatar
 
Join Date: Mar 2009
Location: North East
Posts: 6,203
Drives: 09 370Z Sport M6
Rep Power: 653
ChrisSlicks has a reputation beyond reputeChrisSlicks has a reputation beyond reputeChrisSlicks has a reputation beyond reputeChrisSlicks has a reputation beyond reputeChrisSlicks has a reputation beyond reputeChrisSlicks has a reputation beyond reputeChrisSlicks has a reputation beyond reputeChrisSlicks has a reputation beyond reputeChrisSlicks has a reputation beyond reputeChrisSlicks has a reputation beyond reputeChrisSlicks has a reputation beyond repute
Default

Quote:
Originally Posted by g96818 View Post
Nice DIY. I suggest you guys wait on Hotchkis to develop better sways or buy another brand who doesn't have that stopper welded on the bar. That weld joint creates a high stress concentration and possibly small cracks which could fail due to creep, which was exactly what happened to my last pair of Hotchkis.
Interesting point. I noticed the stock bar has a crimped on stopper.
ChrisSlicks is offline   Reply With Quote
Old 06-01-2009, 10:48 AM   #6 (permalink)
A True Z Fanatic
 
Join Date: Apr 2009
Location: Sacramento, CA
Posts: 2,188
Drives: 370z MB 6mt
Rep Power: 914
shabarivas has a reputation beyond reputeshabarivas has a reputation beyond reputeshabarivas has a reputation beyond reputeshabarivas has a reputation beyond reputeshabarivas has a reputation beyond reputeshabarivas has a reputation beyond reputeshabarivas has a reputation beyond reputeshabarivas has a reputation beyond reputeshabarivas has a reputation beyond reputeshabarivas has a reputation beyond reputeshabarivas has a reputation beyond repute
Default

+1 for torque specs
shabarivas is offline   Reply With Quote
Old 06-03-2009, 01:20 AM   #7 (permalink)
Track Member
 
g96818's Avatar
 
Join Date: May 2009
Location: A rock in a big pond
Posts: 681
Drives: 2009 370Z, 2012 M56
Rep Power: 3393
g96818 has a reputation beyond reputeg96818 has a reputation beyond reputeg96818 has a reputation beyond reputeg96818 has a reputation beyond reputeg96818 has a reputation beyond reputeg96818 has a reputation beyond reputeg96818 has a reputation beyond reputeg96818 has a reputation beyond reputeg96818 has a reputation beyond reputeg96818 has a reputation beyond reputeg96818 has a reputation beyond repute
Default

it's crimped? well that might be a little better, but we'll see. i can't believe they are still making sways with that stopper. let us know if anything happens, hopefully they relieved the stresses.

sry if it seems like i'm bashing hotchkis, but great DIY write up

Quote:
Originally Posted by ChrisSlicks View Post
Interesting point. I noticed the stock bar has a crimped on stopper.

Last edited by g96818; 06-03-2009 at 02:23 AM.
g96818 is offline   Reply With Quote
Old 06-03-2009, 09:10 AM   #8 (permalink)
A True Z Fanatic
 
ChrisSlicks's Avatar
 
Join Date: Mar 2009
Location: North East
Posts: 6,203
Drives: 09 370Z Sport M6
Rep Power: 653
ChrisSlicks has a reputation beyond reputeChrisSlicks has a reputation beyond reputeChrisSlicks has a reputation beyond reputeChrisSlicks has a reputation beyond reputeChrisSlicks has a reputation beyond reputeChrisSlicks has a reputation beyond reputeChrisSlicks has a reputation beyond reputeChrisSlicks has a reputation beyond reputeChrisSlicks has a reputation beyond reputeChrisSlicks has a reputation beyond reputeChrisSlicks has a reputation beyond repute
Default

The stock bar has the stopper crimped. The Hotchkis has the stopper welded but it is only spot welded in 2 places, shouldn't create a large stress point ... hopefully. Time will tell I suppose.
ChrisSlicks is offline   Reply With Quote
Old 06-06-2009, 02:53 PM   #9 (permalink)
Track Member
 
Forrest's Avatar
 
Join Date: Mar 2009
Location: california 707!
Posts: 677
Drives: 09 370z Blk 6mt sprt
Rep Power: 258
Forrest has a reputation beyond reputeForrest has a reputation beyond reputeForrest has a reputation beyond reputeForrest has a reputation beyond reputeForrest has a reputation beyond reputeForrest has a reputation beyond reputeForrest has a reputation beyond reputeForrest has a reputation beyond reputeForrest has a reputation beyond reputeForrest has a reputation beyond reputeForrest has a reputation beyond repute
Default

Wow chris. This looks so easy with your instructions i think i can do it my self.
Forrest is offline   Reply With Quote
Old 06-06-2009, 08:09 PM   #10 (permalink)
A True Z Fanatic
 
ChrisSlicks's Avatar
 
Join Date: Mar 2009
Location: North East
Posts: 6,203
Drives: 09 370Z Sport M6
Rep Power: 653
ChrisSlicks has a reputation beyond reputeChrisSlicks has a reputation beyond reputeChrisSlicks has a reputation beyond reputeChrisSlicks has a reputation beyond reputeChrisSlicks has a reputation beyond reputeChrisSlicks has a reputation beyond reputeChrisSlicks has a reputation beyond reputeChrisSlicks has a reputation beyond reputeChrisSlicks has a reputation beyond reputeChrisSlicks has a reputation beyond reputeChrisSlicks has a reputation beyond repute
Default

It really is easy even if you don't have a lot of mechanical experience. The front is a lot easier than the rear, especially if you synchronize it with an oil change as you have to remove the splash guard. After that the front is just a couple of bolts. The rear has the hassle of disconnecting the muffler from the exhaust pipe, but other than that it is a piece of cake. When you do the rear I would recommend that you remove one wheel to give yourself more room for sliding the bar in and out as you still have to get it over the rear brace. When you slide the new one in just make sure it is facing the right way or it wont fit A torque wrench is definitely recommended, but if you don't have a torque wrench take care not to over-tighten the brackets in particular.
ChrisSlicks is offline   Reply With Quote
Old 06-19-2009, 06:44 PM   #11 (permalink)
A True Z Fanatic
 
wstar's Avatar
 
Join Date: Mar 2009
Location: Houston, TX
Posts: 4,024
Drives: too slow
Rep Power: 3594
wstar has a reputation beyond reputewstar has a reputation beyond reputewstar has a reputation beyond reputewstar has a reputation beyond reputewstar has a reputation beyond reputewstar has a reputation beyond reputewstar has a reputation beyond reputewstar has a reputation beyond reputewstar has a reputation beyond reputewstar has a reputation beyond reputewstar has a reputation beyond repute
Default

Just did the rear with the Stillen exhaust. With the muffler section detached (as above for the stock exhaust) and the rubber hangers disconnected it's barely doable. It's easier to just go ahead and disconnect the single center flange as well to get more play in the exhaust. I went with the medium setting for now. Now on to the front...
__________________
7AT Track Car!
Journal thread / Car setup details
wstar is offline   Reply With Quote
Old 07-30-2009, 07:24 PM   #12 (permalink)
Enthusiast Member
 
pulpz's Avatar
 
Join Date: May 2009
Location: Dayton, Ohio
Posts: 281
Drives: 09 PG 370Z Sport 6MT
Rep Power: 15
pulpz is on a distinguished road
Default

Quote:
Originally Posted by ChrisSlicks View Post
It really is easy even if you don't have a lot of mechanical experience. The front is a lot easier than the rear, especially if you synchronize it with an oil change as you have to remove the splash guard. After that the front is just a couple of bolts. The rear has the hassle of disconnecting the muffler from the exhaust pipe, but other than that it is a piece of cake. When you do the rear I would recommend that you remove one wheel to give yourself more room for sliding the bar in and out as you still have to get it over the rear brace. When you slide the new one in just make sure it is facing the right way or it wont fit A torque wrench is definitely recommended, but if you don't have a torque wrench take care not to over-tighten the brackets in particular.
Agreed. I think sway bar installs are a great way to practice working on your car. If you feel comfortable jacking the car, and changing the oil, then sways and brakes are a great next step in becoming a DIYer. Just take your time and don't get frustrated. Always good to have a second pair of hands around also.

I strongly urge always using a torque wrench. Its very important not to under or over torque. Most service manuals or Forums will have torque specs
__________________

2016 Cayman GTS 6MT / 2017 Q60 Sport / 2012 Acura TL SH-AWD / 2015 Lexus IS 350 AWD F-Sport (Sold) / 2009 PG 370Z Sport 6MT, (Sold) / 2003 SS 350Z Enthusiast 6MT (Sold)
pulpz is offline   Reply With Quote
Old 08-17-2009, 11:56 PM   #13 (permalink)
Base Member
 
boosted180's Avatar
 
Join Date: Jul 2009
Location: long beach
Posts: 187
Drives: '09 370z sport 6m
Rep Power: 15
boosted180 is on a distinguished road
Default

chris, which setting did you use in the rear? how does the balance of the car feel now with both front and rear? at yesterday's auto-x, there was way too much body roll and more understeer than i'd like for auto-x (but for track, the bit of understeer is probably not too bad). sway bars would be a huge help. esp., if they could be adjusted to be a bit stiffer in the rear relative to front compared to stock.

i'm debating b/t hotchkis and stillen. need to decide soon.

thanks.
boosted180 is offline   Reply With Quote
Old 10-19-2009, 09:18 PM   #14 (permalink)
A True Z Fanatic
 
ChrisSlicks's Avatar
 
Join Date: Mar 2009
Location: North East
Posts: 6,203
Drives: 09 370Z Sport M6
Rep Power: 653
ChrisSlicks has a reputation beyond reputeChrisSlicks has a reputation beyond reputeChrisSlicks has a reputation beyond reputeChrisSlicks has a reputation beyond reputeChrisSlicks has a reputation beyond reputeChrisSlicks has a reputation beyond reputeChrisSlicks has a reputation beyond reputeChrisSlicks has a reputation beyond reputeChrisSlicks has a reputation beyond reputeChrisSlicks has a reputation beyond reputeChrisSlicks has a reputation beyond repute
Default

Sorry, didn't see your post until now.

I went full stiff on the rear, but unfortunately without correcting the front camber you will actually get more low speed understeer due to the reduced body roll. If you add front camber arms in addition to the sway bars the car turns in amazingly. Adding either rear-sway or camber arms bumps you to BSP though.

I have -2.6 front camber, 0 toe, stock caster.
Rear is -2.0 camber, 0.125 toe-in.
ChrisSlicks is offline   Reply With Quote
Old 03-17-2010, 03:41 AM   #15 (permalink)
A True Z Fanatic
 
1slow370's Avatar
 
Join Date: Aug 2009
Location: In the D
Posts: 3,732
Drives: v8 74 260z ;)
Rep Power: 7250
1slow370 has a reputation beyond repute1slow370 has a reputation beyond repute1slow370 has a reputation beyond repute1slow370 has a reputation beyond repute1slow370 has a reputation beyond repute1slow370 has a reputation beyond repute1slow370 has a reputation beyond repute1slow370 has a reputation beyond repute1slow370 has a reputation beyond repute1slow370 has a reputation beyond repute1slow370 has a reputation beyond repute
Default

don't forget to say to unbolt the large rear brace. I see you did it in a pic but didn't see the instruction for doing that there is now way to get that bar off with it still on.
__________________
ANSWER PRICE LIST
Answers - - - - - - - - - - - - - - - - $0.75
Answers (requiring thought) - - - - $1.25
Answers (correct) - - - - - - - - - - $12.50
1slow370 is offline   Reply With Quote
Reply

Bookmarks

Thread Tools
Display Modes

Posting Rules
You may not post new threads
You may not post replies
You may not post attachments
You may not edit your posts

BB code is On
Smilies are On
[IMG] code is On
HTML code is Off
Trackbacks are On
Pingbacks are On
Refbacks are On


Similar Threads
Thread Thread Starter Forum Replies Last Post
DIY installation of genuine factory rear spoiler.... simota1 DIY Section (Do-It-Yourself) 60 04-10-2018 11:44 AM
DIY: Sway bar installation (front) ChrisSlicks DIY Section (Do-It-Yourself) 68 05-01-2017 12:13 PM
WTB::NY:: Rear OEM sway bar nelson89 Wanted 9 08-29-2014 09:15 AM
Sway Bar Installation Question joshs09slvrZ Brakes & Suspension 6 02-18-2012 08:28 AM
Rear spoiler installation jb370z Exterior & Interior 2 04-05-2010 02:16 PM


All times are GMT -5. The time now is 07:18 PM.


Powered by vBulletin® Version 3.8.4
Copyright ©2000 - 2024, Jelsoft Enterprises Ltd.
Search Engine Optimization by vBSEO 3.6.0 PL2