
|
After one season of having an oil cooler on the car and watching the rear view mirror for catastrophic leaks if a line blew, I finally installed an oil pressure
|
|||||||
 |
|
|
LinkBack | Thread Tools | Display Modes |
 04-01-2011, 05:49 PM
|
#1 (permalink) |
|
A True Z Fanatic
Join Date: Mar 2009
Location: Naples, FL
Posts: 4,117
Drives: to work
Rep Power: 1858    |
After one season of having an oil cooler on the car and watching the rear view mirror for catastrophic leaks if a line blew, I finally installed an oil pressure gauge for some peace of mind.
Here we go... Required Parts: 1) Oil pressure gauge kit (gauge, harnesses, pressure sensor). I chose the AEM analog 0-150 PSI oil pressure gauge. The LED color is adjustable and it comes with both white and black faces and black and silver bezels. It's as close to OEM look as you'll get. They also offer a digital version, but the numbers and LEDs jump all over and will drive you crazy. AEM Oil Pressure Gauge 0-150PSI w/Analog Face (Black and White Faceplate Include 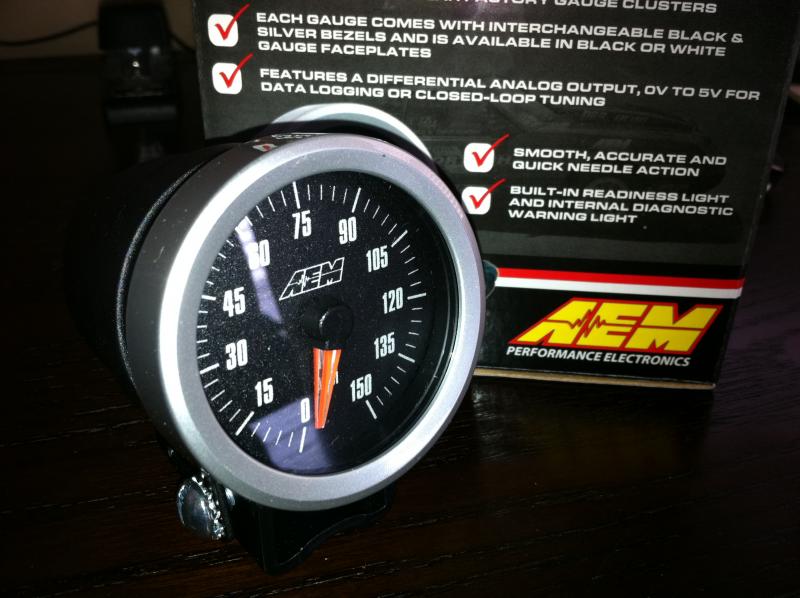 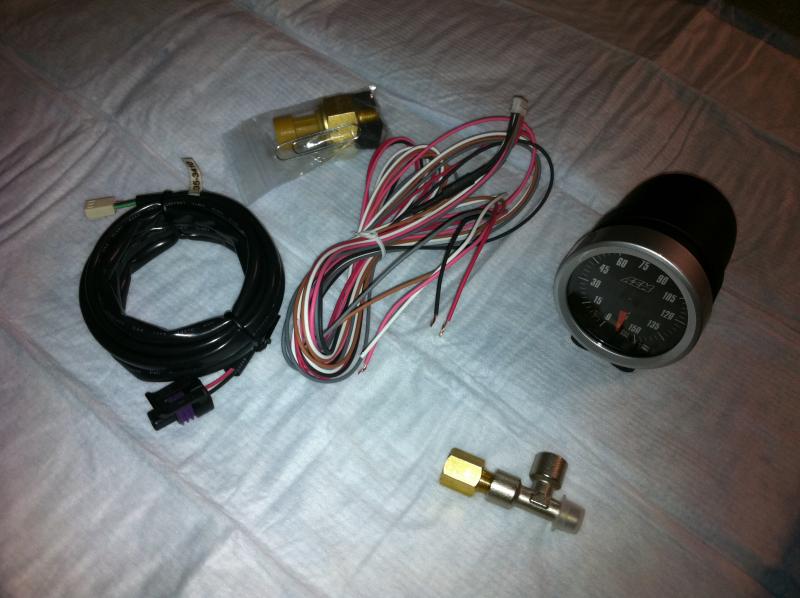 2) Fittings to make the OEM oil pressure sensor a three way to accomodate the new gauge sensor. The OEM sensor is BSP thread. Aftermarket gauge sensors are NPT. 2113-02-02-02 | MALE BSPT x FEMALE BSPP x FEMALE BSPP 3036-02-02 | MALE BSPT x FEMALE NPT 3) Teflon tape (you need to seal tapered fittings) 4) Extra 22 gauge wire (preferably in 3 colors) 5) Add-a-circuit for easy fuse box power tapping (mini-ATM, there is no low-profile version but this fits). You need at least one, more if you choose a more complicated wiring scheme. (see Part 3 below) Amazon.com: Bussmann BP/HHH ATM Add-A-Fuse: Automotive 6) Wire end fittings and crimp links for electrical work 7) Wire crimper/cutter/stripper 8) Adjustable open face wrench to unscrew and reinstall pressure sensors 9) Zip or twist ties 10) Gauge pod to hold your gauge (Autometer 2204, http://www.amazon.com/Auto-Meter-220.../dp/B0009RUXPG) 11) Vecro or mounting tape (plastic compatible) to hold gauge if you don't want to drill the dash 12) Oil extractor (if you want to save your oil and reuse) 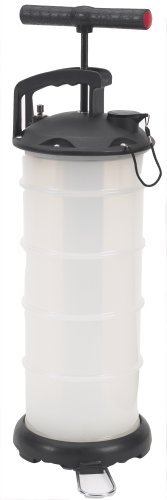 Instructions: Part 1, pressure sensor install: 1) If you're saving your oil to reuse (aka not doing an oil change), use your oil extractor to remove your oil through the dipstick. *Skip to step 2 if you're doing an oil change. 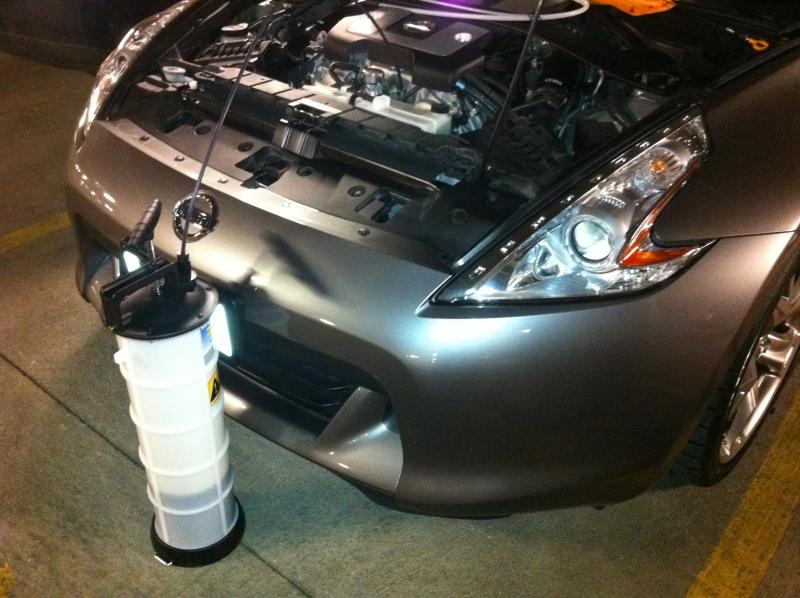 2) Jack up the front of the car and place on jack stands. I'd recommend chocks behind the rear tires for safety. 3) Remove the undertray as if you're doing an oil change. 4) If you didn't extract your oil, pull the oil pan drain plug and drain your oil. Change your filter as you normally would too. 5) Locate the OEM oil pressure sensor. It has the harness plugged into it and is closest to the oil filter. It has a larger profile than the oil temp sensor (which is next to it), so this can further help you ID it. 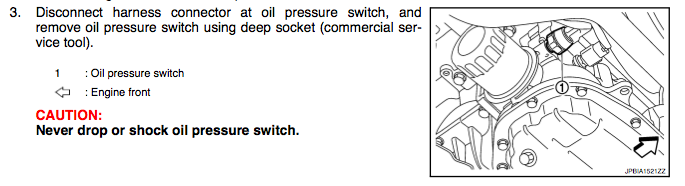 6) If you have a deep socket this big, that would be ideal for removing the OEM sensor. I only had an adjustable open face wrench and it worked fine. Set aside the OEM sensor (DON'T DROP IT) 7) Wrap the male BSP threads of the T-adapter with 2-3 turns of Teflon tape and then screw into the socket where the OEM pressure sensor was. The OEM sensor was tight, so you can torque this similarly. The service manual lists it at 11 ft/lbs, but mine had to be tighter than that. 8) Wrap the OEM sensor threads with Teflon tape and screw into one of the T-adapter ports, torquing similarly again (3-4 turns with a wrench after hand tight is good). 9) Wrap the NPT aftermarket pressure sensor threads with Teflon tape and screw it into the BSP male to NPT female adapter. Then wrap the adapter's threads with Teflon tape and screw them into the remaining T-adapter port. 10) Reconnect the OEM harness to the OEM sensor. Don't worry about the aftermarket harness yet. 11) Refill your engine oil and start the car. Check for leaks. The oil pressure jumps significantly with RPM so give the throttle a few blips to check for leaks at full pressure. Part 2, pressure sensor harness routing: 1) The AEM pressure sensor harness was only 6' long...not nearly long enough to run from the cockpit to the sensor. I cut the harness about 6 inches from the end that connects to the gauge. Put both pieces aside for now. 2) Get your extra wire and measure out 18 feet of each of the three colors. 3) If you have a power drill, tie one end of the wires together and stretch them out so they're all running parallel in a group. Clamp one end of the bundle in a vise (or tie to something), and tighten the free end of the wires in a drill chuck. Use the drill to twist them together. This makes working with them much easier. I did this by hand since my drill was missing. 4) Remove the battery cover and all the press-pop rivets around the battery. Remove the battery cover surrounding. 5) Remove the pop rivets to free the plastic grill that abutts the windshield and remove. You'll now be able to see a tightly wrapped bundle of wires passing through a ~4" round grommet in the firewall. 6) Lift up on the edges of the grommet and gently pop it out. Using a small knife, screw driver, or the hole punching tool on a Swiss Army Knife (best option), poke a hole in the grommet. Be careful not to damage the other wires passing through. 7) Thread your twisted wire bundle through the grommet leaving enough length on the engine bay side to connect to your harness (pressure sensor side). 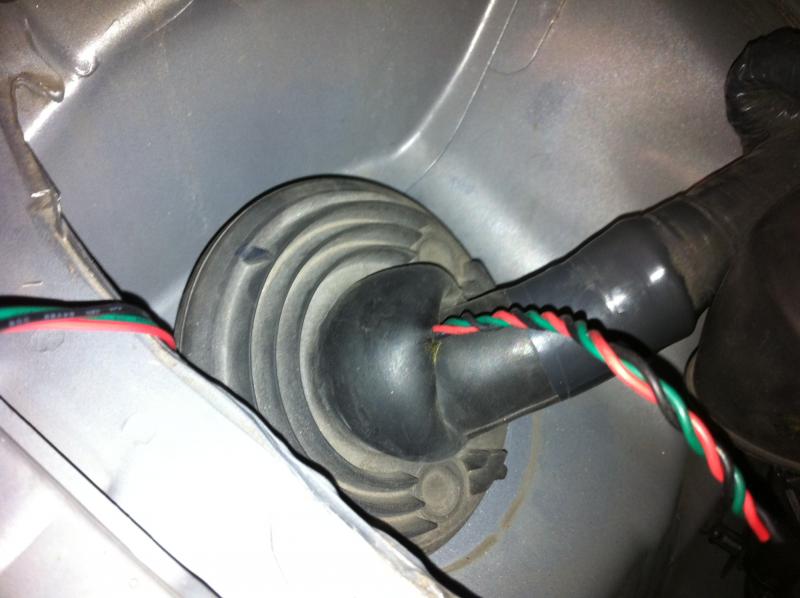 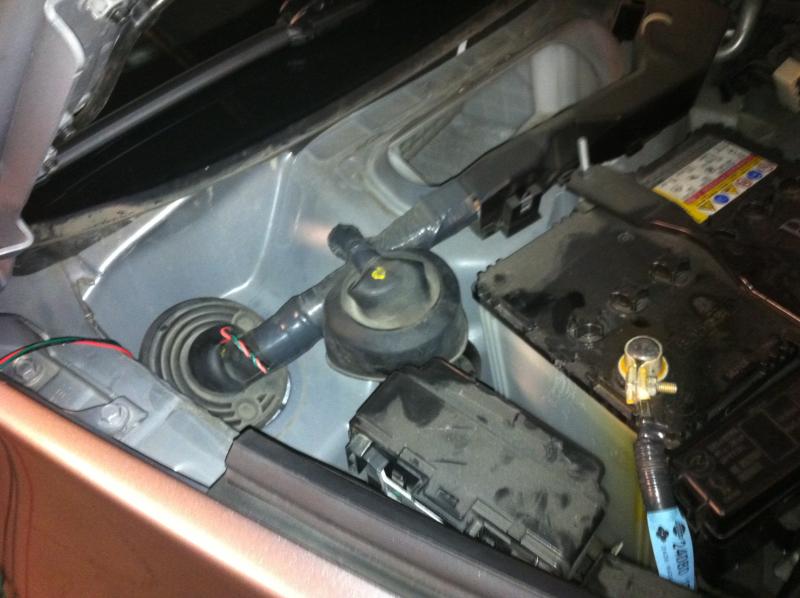 8) Thread the other end of the wires through the firewall and the hole in the carpet that the OEM wire bundle passes through. 9) Reach under the glove box in the passenger footwell and feel for your wire bundle. Pull all the excess through the firewall and into the passenger footwell. 10) Replace the grommet by pushing it back until it pops in place. 11) Solder or crimp the wire bundle to the pressure sensor end of the harness. Be sure to thread on your shrink wraps before making the connections. Replace all the battery cover parts that you removed previously. I positioned my connection up by the firewall so they were more protected from the elements. 12) Tie something heavy to the pressure sensor socket at the end of the harness. This will serve as a plumb so you can drop the harness down to the sensor. I ran the wires along the top right side of the engine bay and then dropped the harness plug down next to the power steering reservoir. You'll see there's a nice path that's clear of moving parts on the right wall of the engine bay. 13) From under the car, grab the harness end and remove your plumb (I used a deep socket tied to the harness end with some twisted Seran wrap). 14) Plug the harness connector into the aftermarket pressure sensor. Reconnect the OEM harness to the OEM pressure sensor at this time as well if you didn't previously. 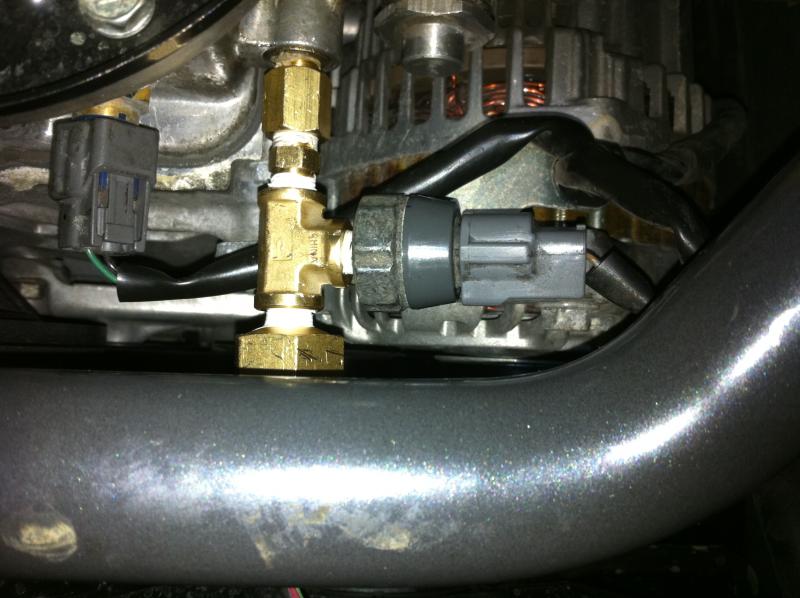  15) A couple of zip ties around the radiator fan frame to secure the harness is a good idea. The belt and pulleys aren't far away. 16) Return to the passenger footwell and find your wire bundle end. The plan is to now route this to the driver's side. Here is how I chose to do it. I'm sure there are other ways: I removed the driver and passenger side knee pads, took off the center console (that has the start button in it), and threaded the wire around the front of the console, below the radio. With the knee pads removed, you'll see there is still a plastic panel on each side of the center console. This pops off if you pull on it, and I threaded the wire behind this panel, then around the front of the exposed console, and then up the center console on the driver's side. When you replace the center console trim with the start button in it, use it to trap and conceal the wires as they run up the driver's side edge. I had the wires then exit from behind the console up at the level of the brightness adjustment buttons on the steering column. This concealed the full wire run. (***I'll post a picture and draw in the wire path in the near future, but you can figure this out!) 17) Once the end of the wire bundle was where I planned to mount my gauge, I cut the excess wire off and crimp connected the gauge end of the sensor harness. Part 3, power harness routing: 1) Find the power harness for the gauge. The AEM gauge has 6 wires. The brown and white are for an analog output. I'm never going to use them, so I cut those wires off. 2) Run the power wire harness behind the steering wheel gauge cluster and around to the bottom of the steering column. Push the wires into the space behind the panel under the steering column, and reach up from the driver's side footwell and grab them from behind the panel. Pull the wires through and into the footwell leaving the harness connector up where you'll mount the gauge. 3) Pull off the plastic outside panel that incorporates the cover for the fuse box in the driver's footwell. It's easier wiring things with this side panel removed. It just pops off but this is one pop rivet thing all the way at the firewall edge (twist and pull it off). 4) Get your add a circuit and choose how you're going to wire the gauge. There are many options. Here are some of your choices (the AEM instructions are very good and explain this too) a) Connect the red, pink, and grey wires together in a single switched 12V circuit using your add a circuit. This will keep the gauge illumination at maximum, and the gauge will stay at the last pressure reading when you turn the car off. This is the easiest method b) Intermediate: Connect your red and pink wires to the same switched 12V circuit. The gauge needle will stay at the last gauge reading when the ignition is turned OFF. Connect the grey wire to the same circuit (bundle them all and then crimp to the add-a-circuit) if you want the gauge to stay at full illumination at all times (the easy A method above). Connect the grey wire to the dash illumination power (good luck finding it) if you want your gauge to dim with your headlights. It's not that bright and the OEM gauges (oil temp and voltage) don't dim anyway, so I recommend the easy route instead. c) Most complicated: Connect your red wire to a full-time 12V source (I couldn't find one quickly so I gave up and used option A). Connect your pink wire to a switched 12V source using your add a circuit (there are many, I used the cigarette lighter circuit). Your grey wire then connects to the gauge cluster illumination wire (good luck finding it). This is the most complicated wiring scheme and dims your gauge illumination when your headlights are ON and also returns the gauge needle to 0 when the ignition is turned off. Personally, I have no problem with the gauge staying at the last recorded pressure value. Connect the black ground wire to a good ground. I crimped a U fork end on the wire attached it to the bolt that holds the fuse box (you can't miss it when you look at the fuse box with the side panel removed). You've now wired your gauge! 5) Replace your side footwell panel and tuck your extra wire in a location that won't be visible or interfere with driving. Part 4, Gauge connection and mounting: 1) Thread both harnesses through the back of your gauge pod and plug them into the gauge. You can stop here, turn on the engine, and test out the gauge. It should work! 2) Change the gauge color by inserting a small flat head (eye glass repair size) screwdriver in the hole in the back of the gauge. Slowly turn the screw to change the gauge color. 3) Insert the gauge into the pod and tighten down the holding ring to secure it. 4) Clean the area you wish to mount the gauge with some isopropyl alcohol and then stick the gauge in place using heavy-duty mounting tape or velcro. You can drill the dash to mount it if you hate your car. Ensure your wires are hidden. Run the engine and check for leaks again. If all looks good, replace the under tray and put the car back down on the ground. Congratulations! You now have an oil pressure gauge. Sorry I fizzled out on taking pictures. My hands were filthy. I'll be happy to clarify if you need help with various steps. NOTE: Various people have recommended to me over the years to never rev the engine over 2k RPM until the oil warms up. I now know why. Oil pressures will top 100psi when the oil is cold. By the time the oil hits 180F, it's less viscous and flows more easily...you'll have lower oil pressures. No wonder why some guys probably blew their oil cooler lines! I may switch to a lower viscosity oil next winter since my oil is always on the cold end during winter months.
__________________
2013 Cadillac V-Wagon, RIP Z Last edited by spearfish25; 06-19-2011 at 09:33 PM. |

|

|
|
04-01-2011, 08:14 PM
|
#2 (permalink) |
|
A True Z Fanatic
 Join Date: Mar 2009
Location: North East
Posts: 6,203
Drives: 09 370Z Sport M6
Rep Power: 655 |
Nice detailed writeup.
Any concern about something hitting the sensor/adapter assembly and breaking it off? Seems as though it would be somewhat more prone to damage now, even hash bumps could add a large load to the fittings.
__________________
Hotchkis ARB | Stillen CAI | Art Pipes | Berk CBE | Stillen AP Racing Brakes | AE Performance Oil Cooler | BC Racing ER Coilovers | Doran Control Arms |
|
|
|
|
04-01-2011, 09:07 PM
|
#3 (permalink) |
|
Track Member
Join Date: Mar 2009
Location: Chicagoland
Posts: 748
Drives: 09 Nissan 370Z sold
Rep Power: 19 |
Nice writeup buddy!
__________________
Black Fangs // Black rear Valance // Berk CBE // COBB post MAF tubes // K&N drop in filters // Setrab Oil Cooler // Stillen Sway bars // Z1 SS brake lines // Stillen brake cooling kit // Harness bar // |
|
|
|
|
04-02-2011, 06:17 AM
|
#4 (permalink) | ||
|
A True Z Fanatic
Join Date: Mar 2009
Location: Naples, FL
Posts: 4,117
Drives: to work
Rep Power: 1858 |
Quote:
Quote:
__________________
2013 Cadillac V-Wagon, RIP Z Last edited by spearfish25; 04-02-2011 at 11:38 AM. |
||
|
|
|
|
04-02-2011, 07:55 AM
|
#5 (permalink) | |
|
A True Z Fanatic
Join Date: Mar 2009
Location: North East
Posts: 6,203
Drives: 09 370Z Sport M6
Rep Power: 655 |
Quote:
__________________
Hotchkis ARB | Stillen CAI | Art Pipes | Berk CBE | Stillen AP Racing Brakes | AE Performance Oil Cooler | BC Racing ER Coilovers | Doran Control Arms |
|
|
|
|
|
04-02-2011, 08:37 AM
|
#6 (permalink) | |
|
A True Z Fanatic
Join Date: Mar 2009
Location: Naples, FL
Posts: 4,117
Drives: to work
Rep Power: 1858 |
Quote:
__________________
2013 Cadillac V-Wagon, RIP Z |
|
|
|
|
|
04-02-2011, 09:44 AM
|
#7 (permalink) |
|
Track Member
Join Date: May 2010
Location: Bay Area
Posts: 923
Drives: Infiniti G37
Rep Power: 18 |
would something like this work as a dual port output?
GTM Motorsports*::*ENGINE EXTERNALS*::*OIL SENDER ADAPTER KIT |
|
|
|
|
04-02-2011, 10:31 AM
|
#8 (permalink) | |
|
A True Z Fanatic
Join Date: Mar 2009
Location: Naples, FL
Posts: 4,117
Drives: to work
Rep Power: 1858 |
Quote:
Chris is talking about a single sensor that both harnesses could connect to, thus negating the need for a t-adapter and both aftermarket and OEM sensors to cut down on hardware used. It would send both variable signal for exact voltage (for the aftermarket gauge) and a yes/no signal for the OEM bus to read as 'ok' or 'low pressure'. It's simpler to just use the T-adapter. An extension tube can be used if you want to mount the sender remotely a few inches away, but I'm not sure where you'd secure it.
__________________
2013 Cadillac V-Wagon, RIP Z Last edited by spearfish25; 04-02-2011 at 11:39 AM. |
|
|
|
|
|
04-03-2011, 09:20 AM
|
#9 (permalink) | |
|
Base Member
Join Date: Feb 2011
Location: in the cowboys stadium
Posts: 183
Drives: your mom crazy..
Rep Power: 16 |
Quote:
|
|
|
|
|
|
04-03-2011, 09:56 AM
|
#10 (permalink) |
|
A True Z Fanatic
Join Date: Mar 2009
Location: Naples, FL
Posts: 4,117
Drives: to work
Rep Power: 1858 |
I can tell you that the oil pressure gauge reads a constant 90-100psi even at idle when completely cold started. After about 2-3min, the idle pressure will start to drop to ~60-70psi and doesn't settle to 20psi until the oil is at 180F. When driving, anything over 2k rpm will produce 90-100psi oil pressures until you get up to the 180F oil temp range as well. It's dramatic...as the oil climbs to 180F, the pressure finally starts to fall. Once the oil is 180F or above, highway 2-3k rpm driving in 6th gear gives steady oil pressures in the 65-75psi range. Anything over 3k rpm makes the pressure climb to 100-105, especially WOT. My guess is the oil pump relief valves opens around 100 psi since I've never seen a pressure peak above ~100-105 psi.
Since installing the gauge, I'm much more cognicent of driving conservatively until my oil temps come all the way up to 180F. I'm also glad my oil cooler has a 200F thermostat instead of 180F. To answer your question, yes this still applies to you without an oil cooler. It just underscores the need for people with coolers to wait until oil temps come up to 180F before driving more aggressively.
__________________
2013 Cadillac V-Wagon, RIP Z |
|
|
|
|
04-03-2011, 10:06 AM
|
#11 (permalink) |
|
A True Z Fanatic
Join Date: Feb 2009
Location: US of A
Posts: 2,842
Drives: Answers
Rep Power: 35 |
I'd rather have a factory oil pressure gauge than the digital clock in the triple dash cluster.
I always, always, always warm-up all my vehicles before driving. Great thread = rep point!
__________________

( Click to show/hide )
|
|
|
|
|
04-03-2011, 10:49 AM
|
#12 (permalink) | |
|
A True Z Fanatic
Join Date: Mar 2009
Location: Naples, FL
Posts: 4,117
Drives: to work
Rep Power: 1858 |
Quote:
In looking through the steps again, I'm tempted to see if I can reach the four triple meter screws with just the center console trim removed. It wouldn't be easy though and if you can't get the gauges mounted again, you get to take the whole dash apart...
__________________
2013 Cadillac V-Wagon, RIP Z |
|
|
|
|
|
04-03-2011, 02:25 PM
|
#13 (permalink) | |
|
A True Z Fanatic
Join Date: Nov 2008
Location: Edmonton, Alberta ...eh
Posts: 1,171
Drives: 2017 Touring auto
Rep Power: 20 |
Quote:
__________________
[B]2009 & 2017 370Z Touring Sport Autos SOLD |
|
|
|
|
|
04-03-2011, 02:33 PM
|
#14 (permalink) | |
|
A True Z Fanatic
Join Date: Mar 2009
Location: Naples, FL
Posts: 4,117
Drives: to work
Rep Power: 1858 |
Quote:
__________________
2013 Cadillac V-Wagon, RIP Z |
|
|
|
|
|
04-03-2011, 02:40 PM
|
#15 (permalink) | |
|
A True Z Fanatic
Join Date: Nov 2008
Location: Edmonton, Alberta ...eh
Posts: 1,171
Drives: 2017 Touring auto
Rep Power: 20 |
Quote:

__________________
[B]2009 & 2017 370Z Touring Sport Autos SOLD |
|
|
|
|
|
| Bookmarks |
|
|
 Similar Threads
|
||||
| Thread | Thread Starter | Forum | Replies | Last Post |
| 370 oil pressure and AEM gauge | binto100 | Nissan 370Z General Discussions | 0 | 05-26-2010 07:04 PM |
| Oil Pressure Gauge | jpit | Engine & Drivetrain | 3 | 03-16-2010 09:33 PM |
| Oil Pressure Gauge | jpit | Exterior & Interior | 6 | 03-07-2010 08:36 PM |
| Oil Pressure Gauge | 37Z | Exterior & Interior | 0 | 06-14-2009 09:21 PM |
| What happened to the tire pressure gauge and speedo in the middle gauge cluster? | rbratton | Nissan 370Z General Discussions | 33 | 01-24-2009 10:28 PM |


 52Likes


 Linear Mode


