
|
Alright, so recently my power steering rack start leaking from one of the boots and I needed to replacement. Couldn't find any online sources that showed how to do it,
|
|||||||
 |
|
|
LinkBack | Thread Tools | Display Modes |
 11-03-2017, 07:25 PM
|
#1 (permalink) |
|
Base Member
Join Date: Feb 2011
Location: in the cowboys stadium
Posts: 183
Drives: your mom crazy..
Rep Power: 16  |
Alright, so recently my power steering rack start leaking from one of the boots and I needed to replacement. Couldn't find any online sources that showed how to do it, but i was able to tackle it over the course of 3 days after work by looking at the service manual.
will update over the course of next week as i group pictures and recollect everything I did. Tools Needed: Turkey baster or syringe with a hose end Steering Wheel Holder (https://www.amazon.com/Tool-Aid-6640...dp/B0002UNRB2/) 2lb hammer Large needle nose plier 10mm socket 15mm socket 17mm socket 17mm wrench 19mm socket 19mm wrench Drain pan Vice grips Breaker Bar or Impact Gun (helps breaks bolts easier) Blue Loctite Torque wrench Replacement Parts: New Power Steering Rack (note there is a difference between the manual & automatic version) - I chose to buy mine refurbished online. You can pick up a used for cheaper. New Tie Rod ends (if worn or you can reuse the existing ones) Cotter Pin (Link) Part Number: 4932503E0A - PORT ASSY-DRAIN,POWER STEERING Part Number: 4974501E00 - SEAL-O RING Dextron VI - ATF 1 Qt Hopefully this will help out some folks: Step 1: Try to put the steering wheel as straight as possible and then use the steering wheel holder to keep it in place. Step 2: Open up the Power Steering Reservoir and try to pull out all the fluid using a turkey baster or other removal tool Step 3: Loosen up any wheel locks and loosen up any lug nuts. Step 4: Jack up your car. Step 5: Remove front plastic splash guard. Step 6: Remove tie rods linkage by first removing the cotter pin (#1 in the diagram below) on top of the castle nut. I used a needle nose plier to unwrap the the cotter pin and whole lot of pulling 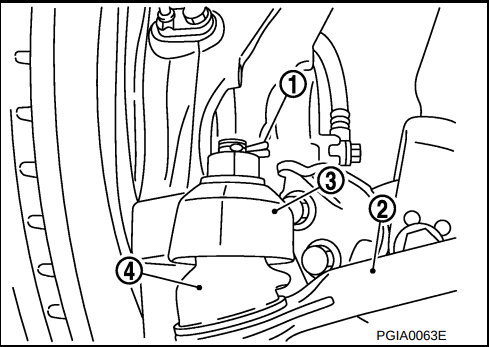 Step 7: Break loose the castlenut (#3 in the image above) with a 17mm socket (i believe its a 17mm socket). Step 8: Now you have the get the tie rod out of the knuckle. There are two ways to go about this: a) Spin the castle nut to the top of the tie rod bolt and using your 2lb hammer pound it from the top down b) Hit the steering knuckle as highlighted in the picture below. I found this method to be the fastest. 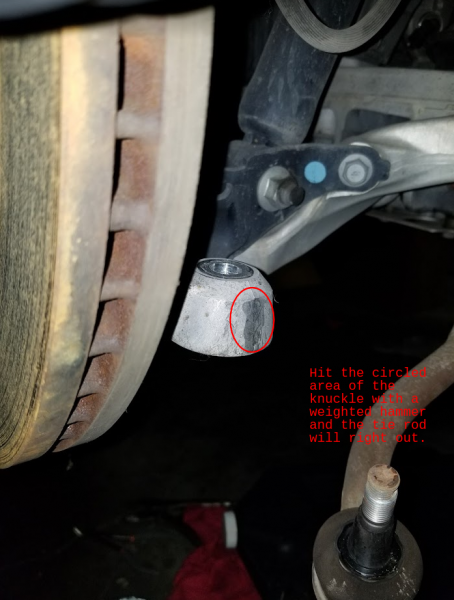 Step 9: Now is also a good time to remove the tie rod locking nut at the end. If you are replacing the tie rods with new tie rods, then you can skip this step. Go ahead and put the tie rod end back into the knuckle and loosely tighten with the castle nut. Then proceed to break loose the tie rod locking nut. Its much easier to break it loose now, than it is to break it loose later. 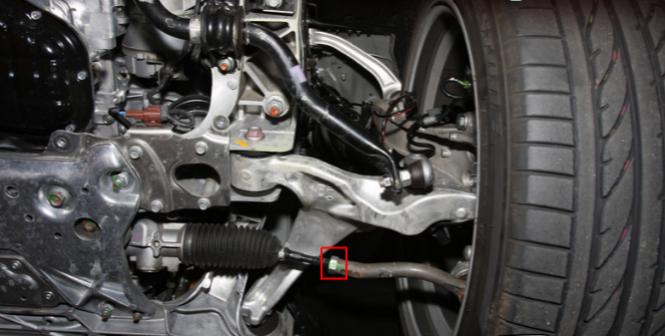 Step 10: Remove the suspension member stay held on by 8 bolts. Note some of them have washers, so be careful to catch them as they fall. See the image below for a picture of this.  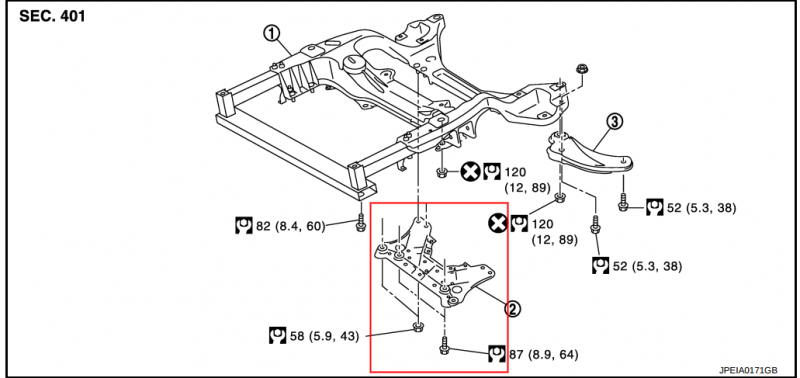 Step 11: Before we proceed to drain the power steering line, we are going to need to unclip the power steering harness from the plug. It should be attached towards the front of the frame, also in front of the steering rack. Step 12: Draining the power steering from the rest of the lines. (Note: There will some fluid stuck in the cooler. I chose not to drain it.) Locate the low pressure line. This is the line with a rubber hose with a clamp attached to a hard line. Using a vice grip, lock the clamp down and move it to the right of the tube. Now is also a good time to position the drain pan and pull the rubber hose off the hard line. Opening the reservoir will help speed up the draining process. Also the low pressure line attachment at the steering rack was hard to access, so I left this rubber hose detached. See picture below for reference.  Step 13: Before we tackle the high pressure line fitting at the steering rack, we will need to break some zip ties. Following the low pressure line that we just drained towards the steering rack, touch to feel for any zip ties. Break the zip ties as you go along. There is one section of the line that is taped together, one that is zip tied and one that is a zip tie clip (I could not loosen this one, so i just cut through the zip tie). Step 14. You will now want to move over to to the driver's side wheel well. You will now remove the bolt highlighted in the picture below from the lower joint of the steering column assembly.  Step 15. Going back under the car, we'll now loosen the high pressure fitting (see image below) to the steering rack. Now is a great time to move the drain pan under this area. You will have some PS fluid in the lines drain through. Be careful with the end of the fitting as not to damage it. Also note there is a rubber o-ring at the end of the hard line, remove it. It could actually be stuck inside the threading of the steering rack as well. 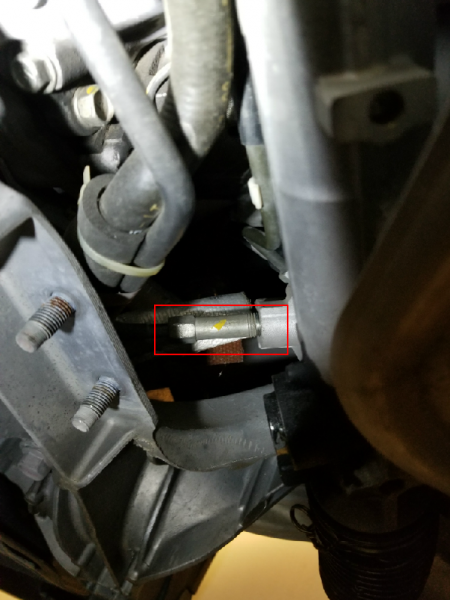 Note: The low pressure line was hard to tackle from both the driver's side wheel and from under the car. So i left it attached to the power steering, but left the hard line to the rubber hose detached that we drained from in step 12. Step 16. Now comes the fun part, dropping the power steering rack. Note the rack is heavy and it will fall and could damage the hard line end for the high pressure side. Its best to have a buddy or something to support the steering rack as you unbolt it from the frame. There are 4 bolts holding in in. One set goes through the power steering mounting holes to the body. One goes directly through the plate to the body. Its best to work the outside ones first. You can break it loose without having to locate the nut, but you will need to reach your hand above the frame and hold the 19mm nut to fully undo the lower bolt. (See the image below). Once the outer bolts are removed, you can remove the inner bolts. Since the low pressure line is attached, you will have to rotate the power steering to fully drop it. Again make sure to be careful with the hard lines for the high pressure lines.  Step 17: Grab yourself a beer. The hard part is done with! Last edited by rambunctious; 11-09-2017 at 08:51 PM. |

|

|
|
11-03-2017, 07:25 PM
|
#2 (permalink) |
|
Base Member
Join Date: Feb 2011
Location: in the cowboys stadium
Posts: 183
Drives: your mom crazy..
Rep Power: 16 |
Prep before reassembly
Step 1: If the low pressure line is still attached to the steering rack, then using a 15mm wrench, break the fitting loose. You dont necessarily need to replace this drain port assembly, but I couldnt find where Nissan sells the O-ring without the drain port assembly. Go ahead and pull back the clamp from the line and then remove the rubber hose from the drain port. Step 2: You will now want to lubricate the O-ring before inserting the new port assembly (4932503E0A) that you bought, into the steering rack. Just dip your finger into the PS fluid and apply a small amount PS to the O-ring. Step 3. Then tighten the drain assembly to 25-ft/lbs (if you dont have a torque wrench, its about lightly snug fit or hand tighten). Step 4. Before you take off the tie rod, you're going to want to count the number of thread from the end (the thread starting closes to the steering rack) to the locking nut for the tie rod on both sides. You will want to do this for both sides. Write down these numbers somewhere. This way you can remain as close to alignment specs. Step 5. Now you will remove the tie rod ends from the old steering rack. Make sure to note how many spins it took to remove for each side. This will help you remain as close to your alignment specs. Step 6. Now with the tie rod ends and locking bolts off. Do a visual comparison between the old and new steering rack. Make sure the mounting holes are in the same place. Make sure steering rack is centered to your old one. If one end is too far off, spin the top spindle to align properly. The top spindle had a indented circle, you will want to position the new steering spindle as close to that as possible. Step 7. With the new steering steering rack centered, you will first want to put locking nut onto the new steering rack. Make sure the leave the number of threads we noted in step 4 visible. Step 8. Now you will spin on the tie rod ends. The number of spins should be the same amount as number counted in step 5. We wont tighten down the locking nut, just yet. Step 9. Go ahead and slide back under the car and replace the o-ring that we took off in Step 15 of the removal process. You will want to lubricate this with some fresh power steering fluid. Last edited by rambunctious; 11-11-2017 at 07:03 PM. |
|
|
|
|
11-09-2017, 11:52 AM
|
#5 (permalink) |
|
A True Z Fanatic
Join Date: Mar 2011
Location: Austin, TX
Age: 45
Posts: 36,450
Drives: 11 Z34, 98 E36 M3
Rep Power: 2684442  |
Very nice
 I could have used this about a year ago, but thankfully I still had warranty coverage and let a dealership do the work. I could have used this about a year ago, but thankfully I still had warranty coverage and let a dealership do the work.
__________________
 2011 370Z 6MT Sport Gun Metallic | ARC | CJM | Ecutek | FI | Fujimura | R2C | SPL | Stillen | TWM | Z1 | ZSpeed | |
|
|
|
|
11-09-2017, 12:05 PM
|
#6 (permalink) | |
|
Premium Member
 Join Date: May 2013
Location: St. Pete, FL
Posts: 3,848
Drives: 520whp Fire Breather
Rep Power: 86953 |
Great DIY so far.
__________________
2013 Gun Metallic Sport - Gamma V3 Twin Turbogized DIY Gamma V3 TT Install * Jayhovah's Gamma V3 TT Install Pic'Z and Vid'Z * DIY: Washer Reservoir for the Boosted Quote:
|
|
|
|
|
|
01-16-2019, 09:03 AM
|
#7 (permalink) |
|
Enthusiast Member
Join Date: Jul 2010
Location: Florida
Posts: 287
Drives: 10 370Z BLK 6M
Rep Power: 16 |
Sorry to revive an old thread, but I figured since I had to tackle this a couple days ago that I’d add my two cents in. I purchased a refurbished steering rack from Z1 Motorsports which came with everything but the outer tie rods (it even came with new locking nuts so I didn’t have to reuse the old ones). Here are some tips of mine:
Spray some penetrating lubricant on the return line nut that attaches to the steering rack assembly, then tackle it with a flare nut wrench through the driver side wheel well. It is accessible and doable, so that when it is time to drop the assembly you won’t risk damaging any lines. Especially if you’re wanting to send your core item back with miminal damage. High pressure line is accessible from the bottom, using a 3/8 inch ratchet, 3” extension, a swivel joint, and (I believe) a 14mm flare nut wrench head. Ensure that if you don’t have a tool to keep your steering wheel straight throughout the install process, that you regularly check to see if it is straight. If not, straighten before you reattach the pinch bolt that connects the pinion to the steering shaft. Don’t forget to undo the harness clip that leads from the rack assembly toward the front of the vehicle. It is held on by a zip tie that will need to be removed between the rack and where the harnesses connect. Also, as the OP stated, tackle the outer 17 mm bolts with 19 mm nuts first, then the inner 17 mm bolts that hold the steering rack bracket in place. Upon reinstall, fasten the inner bolts first to keep the rack situated while you work on reattaching the two hard lines and steering shaft. The rack assembly will still have plenty of play to accommodate this process until you’re ready to fasten the outer bolts. When trying to rotate the outer tie rod ends off and/or trying to undo the locking nuts, I had to use a propane torch to get then to budge. After heating about 20-30 seconds, they came off with ease. Penetrating lube did not work here when I tried. It was my first time dealing with a repair of this kind and it took 6 hours, so definitely set aside time and clear out your schedule if this is your only method of transportation. Tell the wife to go on a long shopping spree, lol. Hope this helps others! Last edited by 1325; 01-23-2019 at 09:43 PM. |
|
|
|
|
| Bookmarks |
|
|
 Similar Threads
|
||||
| Thread | Thread Starter | Forum | Replies | Last Post |
| Steering rack issue/replacment | harman.khinda | Brakes & Suspension | 9 | 09-24-2023 11:58 AM |
| Something leaking at the steering rack | ZeN | Engine & Drivetrain | 32 | 04-19-2023 09:19 PM |
| Rack & Pinion Broken "power steering gear" | Carbon_z | Brakes & Suspension | 15 | 01-21-2012 10:07 AM |

![[DIY] Power Steering Rack Replacement](http://www.the370z.com/iconimages/diy-section-do-yourself/diy-power-steering-rack-replacement_ltr.gif)
 8Likes


 Linear Mode


