
|
I installed the Z1 Motorsports 25 row oil cooler this weekend in a matter of about 5 hours. The kit itself is great and thanks to John@Z1 for the deal.
|
|||||||
 |
|
|
LinkBack | Thread Tools | Display Modes |
 07-30-2012, 08:25 AM
|
#1 (permalink) |
|
Track Member
Join Date: Feb 2012
Location: 10aC
Posts: 978
Drives: Taco
Rep Power: 77   |
I installed the Z1 Motorsports 25 row oil cooler this weekend in a matter of about 5 hours. The kit itself is great and thanks to John@Z1 for the deal. I also have to point out these guys hook it up as I ordered it and it was at my house two days later. The kit was packaged very well and everything was supplied. Even got some stickers for an added 25hp boost.
 The supplied instructions are some of the best Ive seen for aftermarket installs but I wanted to add some ideas here that might make it a little bit easier for the next guy. The main thing is the instructions state to take the passenger front wheel off and I can tell you this is not needed. Also, I felt there were different ways to go about the steps and still end up with the same result. The supplied instructions are some of the best Ive seen for aftermarket installs but I wanted to add some ideas here that might make it a little bit easier for the next guy. The main thing is the instructions state to take the passenger front wheel off and I can tell you this is not needed. Also, I felt there were different ways to go about the steps and still end up with the same result.This was installed on a 2011 Touring so you NISMO guys have some other steps you'll have to take. Tools needed: Jack and jack stands or ramps 4mm Allen key 10mm socket 12mm socket Ratchet Couple of extensions 10mm combo wrench 25mm combo wrench OR a big crescent wrench 25mm or 1 socket Torque wrench Flat head screwdriver Drill and drill bits ranging in size up to ¼ inch Piece of scrap wood Consumables: Safety wire or equivalent Lock-tite Zip-ties (if not provided) Engine oil Oil filer 1.In the cozy confines of your work shop/garage/living room become familiar with the supplied instructions from Z1 Motorsports. This is a good time to install the brackets to the oil cooler itself and insure you have all the needed hardware before tearing the car down. You will need a 4mm allen key and 10mm wrench/socket. 2.Get the front end off the ground. 3.Remove bumper. Thanks to DIGItoniums write up that can be found here DIY: Front Bumper Removal  4.If you are planning on changing the oil in conjunction with this install (I did) remove the plastic shroud underneath the car. Refer to AK370s write-up here DIY: Nissan 370Z Oil change (AK370Z way) Pictures inside 5.Remove crash bar using 12mm socket. There are 4 nuts and 4 bolts holding it on. 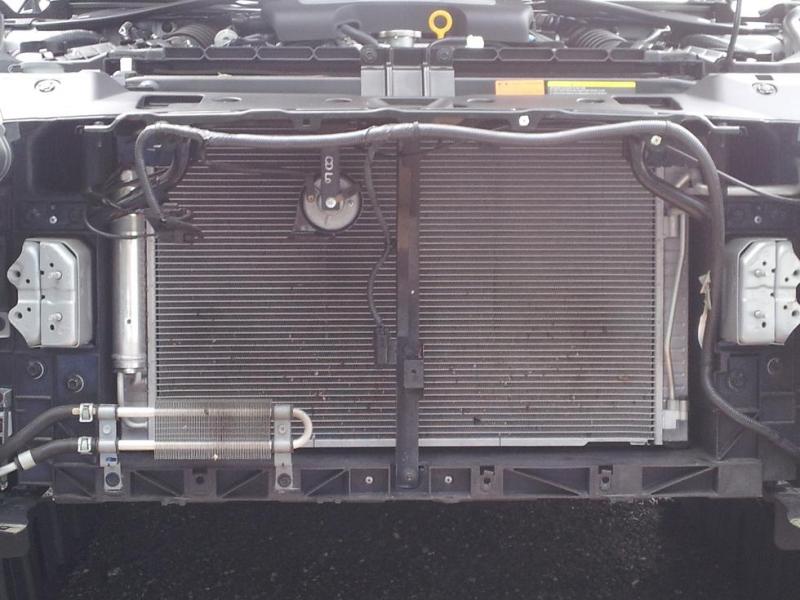 6.Remove 3 ea. 10mm bolts holding the windshield washer reservoir in place. This is tricky to balance so a friend may come in handy here. I didnt feel like disconnecting the supply line and have fluid everywhere so I used some safety wire and hung it off to the side. It gave me some needed room for later steps. 7.Remove 4 ea. 10mm bolts securing the power steering cooler. Three of them will be right in front of you and one will be tucked up in there. This will be the one you also add the spacer to when routing your oil cooler lines.   8.Install the supplied 2 ea. nutplates on the core support and have the upper bracket sitting on the forward side on center brace. This gives you a template of where to drill to secure the upper mount fastener. I used the smallest drill bit I had to score the metal. Do NOT drill trough at this time. 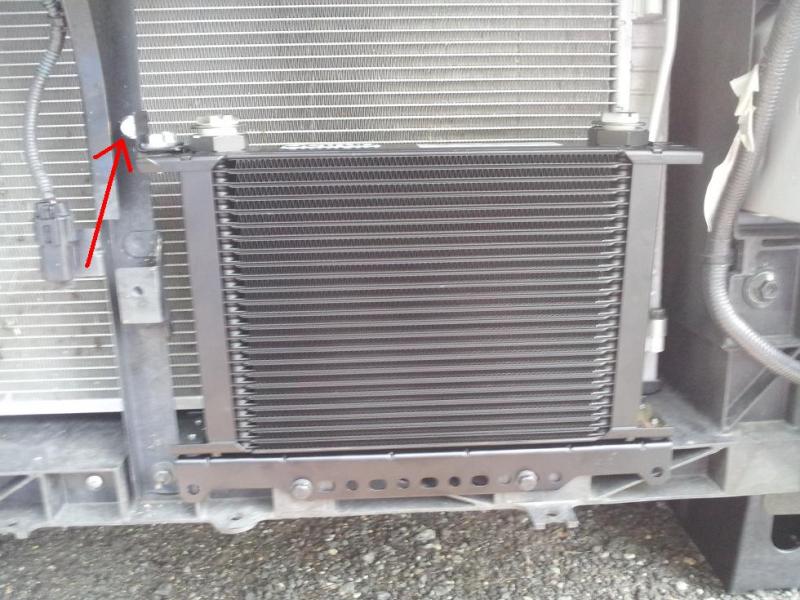 9.Remove the cooler and set aside. 10.Place your piece of scrap wood behind where you are going to drill. Please do not forget this as there is a good chance the drill will punch right through the metal and into your radiator. Drill the hole up to at least ¼ inch in diameter. This is all I needed to fit the upper mount bolt through. 11. Install the oil cooler. 12.This is where I deviated from the instructions supplied from Z1. It says to fill the cooler up and install the lines. I choose to hold off and install the lines to the thermostatic plate first and wait on the oil cooler side. 13.Follow the instructions from Z1 and route the two oil cooler lines along the right side between the power steering bracket and body, through the frame (yes, I know we are unibody but you get the point) and get you some slack near the oil filter. 14.How you go about the next few steps is up to you but here is what I did. I drained the oil and removed the oil filter at this point. 15.Get your thermostatic plate in hand and lube the O-rings on the fittings. Tighten those down. The biggest wrench I have is 24mm and it looked like a 25mm would work but I used a crescent wrench. 16.Once everything was drained I fought with and finally got the oil cooler lines installed on the plate. Refer to Z1s instructions. They recommend fitting the lines to the plate, tighten till snug, remove the plate, torque lines down, and install the plate at 10 oclock position for 09-11 and 7 oclock position for 2012s. I got everything finally tightened down and you will too with some creativity and cuss words. Dont forget to use some fresh engine oil to lube up the O-ring on the plate before torquing it down to the block-I had a 1 socket the fit perfectly and torqued to 25 ft/lbs. This is also where it was very handy to have the other end of the lines not connected to the cooler as I could manipulate them around. 17.Whew, that was the hard part!! At this point I re-installed the power steering bracket with the supplied spacer and started routing my lines back to the oil cooler. 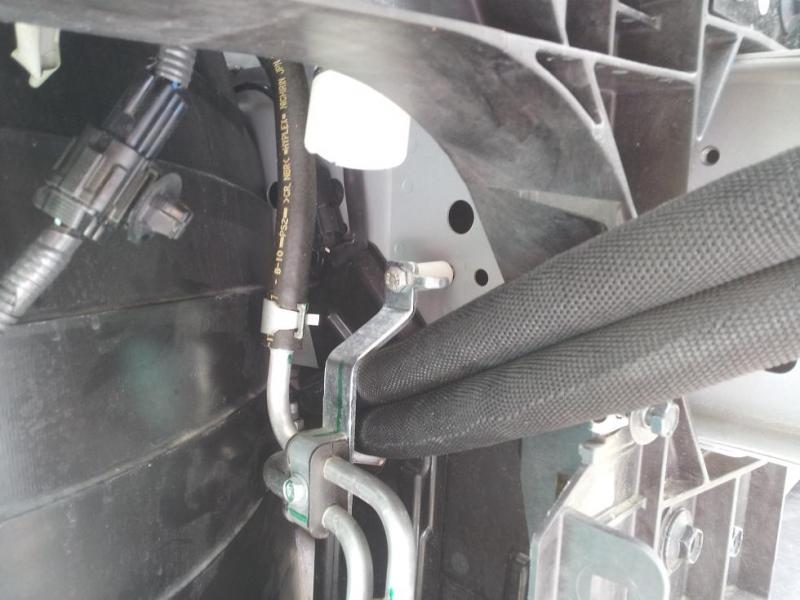 18.Following the supplied instructions I took the caps off the oil cooler and started pouring fresh oil in it. Take this step slow. I went a little too fast and ended up with oil burping out and making a mess. Lube up the O-rings on the fittings with fresh oil and tighten them down. 19.Install the lines and make sure there are no kinks and everything looks good. 20.Install the windshield washer reservoir. 21.If you drained the oil during this task make sure your plug is in and a new filter is installed. Fill the block up with fresh oil. I started with 5 1/8 quarts. 22.Clean everything off around the fitting and start the car. Check for any leaks and fix as required. 23.Zip tie the lines neatly and out of the way. 24.Install the crash bar. I used the Lock-tite here.  25.Install the bottom shroud. 26.Install the bumper. 27.Put the car on the ground and double and triple check oil level. I ended pouring approx 6 ¾ quarts of oil in to hit the H mark on the dipstick but like I said, I spilled some while filling the cooler itself. I was hitting 250-260 on spirited runs in the high 90s but the weather has cooled down a little. Took the car out Sunday and the temp outside was high 80s but never got above 190 oil temp per the guage. Sure, it takes a little longer to come up to temp but I went into this knowing that. For the winter months I'll just install a shroud over the cooler. |

|

|
|
07-30-2012, 09:02 AM
|
#2 (permalink) |
|
Base Member
Join Date: Jun 2011
Location: Washington
Posts: 192
Drives: 2011 Touring/Sport
Rep Power: 31 |
Great write up.
I just recently installed their 25 row oil cooler as well as their 19 row transmission cooler. Both kits were top quality. I haven't really seen my oil temp go higher than 200f since the install.
__________________
2011 Metallic Black, Touring/Sport, Nav, AT | F.I. Twin Turbo #060 | E85 | F.I. Built 7AT | F.I. Flex Plate | F.I. 34 Row Oil Cooler | F.I. 19 Row 7AT Cooler | ECUTEK Tuned By Sebastian | 647 WHP 605 TQ | 
|
|
|
|
|
07-30-2012, 12:44 PM
|
#4 (permalink) |
|
Base Member
Join Date: Apr 2012
Location: Texas
Posts: 37
Drives: '10 MB 7AT Sport
Rep Power: 14 |
Great post. Thanks. I have been debating this exact set up for a few months now. I just haven't quite worked up the nerve to start it.
__________________
| 2010 MB 7AT Touring, Sport | Stillen Gen III CAI | H&R DRS 15/20 | SunTek CXP 20% | Hankook V12 evo | F.I. 18" CBE | |
|
|
|
|
07-30-2012, 01:12 PM
|
#5 (permalink) | |
|
Base Member
Join Date: Jun 2011
Location: Washington
Posts: 192
Drives: 2011 Touring/Sport
Rep Power: 31 |
Quote:
__________________
2011 Metallic Black, Touring/Sport, Nav, AT | F.I. Twin Turbo #060 | E85 | F.I. Built 7AT | F.I. Flex Plate | F.I. 34 Row Oil Cooler | F.I. 19 Row 7AT Cooler | ECUTEK Tuned By Sebastian | 647 WHP 605 TQ |
|
|
|
|
|
|
05-30-2014, 04:32 PM
|
#6 (permalink) |
|
Base Member
 Join Date: Apr 2014
Location: Rockford
Posts: 129
Drives: 370 Sport
Rep Power: 12 |
I just did this install and wanted to add a few things for you guys. First, the edge of the crash bar/bumper is like a razor, be careful around it. I grabbed a fine file and cut the edges of it so it has round edge, don't need no cut oil lines. (the lines run right down that edge too) Also, the power steering bracket bolt, just below the one installed from the kit... sticks out a good 1/8 inch or more and that is right where the hose wants to lay. I pulled the bolt out and cut it back just over an 1/8th and installed it back in... no worries.
Thanks to the OP for his thoughts and write up. I've been lurking here for some time, but I know how to use the search. lol Level of skill needed: 2 JT |
|
|
|
|
| Bookmarks |
|
|
 Similar Threads
|
||||
| Thread | Thread Starter | Forum | Replies | Last Post |
| DIY: Stillen 19 Row Oil Cooler Install - driver side (stock PS cooler unmoved) | djpathfinder | DIY Section (Do-It-Yourself) | 21 | 11-30-2015 05:47 AM |
| Nissan Motorsports Oil Cooler vs. Stillen Oil Cooler | Dustin@Z1 | Engine & Drivetrain | 158 | 03-10-2014 02:27 PM |
| Z1 Motorsports Thermostatic Sandwich Plate kit (For Nissan Motorsports Oil Cooler) | Dustin@Z1 | Drivetrain/Engine | 3 | 06-08-2012 11:10 AM |
| Z1 Motorsports Thermostatic Sandwich Plate kit (For Nissan Motorsports Oil Cooler) | Dustin@Z1 | Z1 Motorsports | 0 | 08-06-2010 11:26 AM |
| DIY: GT Motorsports Oil Cooler Kit Install/Review | rackley | DIY Section (Do-It-Yourself) | 28 | 03-10-2010 10:38 AM |


 4Likes
 How hard was the transmission cooler to install?


 Linear Mode


