
|
Alright boys, here it is! Thanks to ChrisSlicks for ironing out some electrical details. DIY: Wiring a rear fog light via the BCM and stock wiring harness. The stock 370Z
|
|||||||
 |
|
|
LinkBack | Thread Tools | Display Modes |
 04-18-2011, 05:19 PM
|
#1 (permalink) |
|
A True Z Fanatic
Join Date: Mar 2009
Location: Naples, FL
Posts: 4,117
Drives: to work
Rep Power: 1858    |
Alright boys, here it is! Thanks to ChrisSlicks for ironing out some electrical details.
DIY: Wiring a rear fog light via the BCM and stock wiring harness. The stock 370Z comes wired for a rear fog light from the dumby light to the BCM in the passenger footwell. What's missing is the control stalk combination switch that relays a momentary signal into the BCM to tell the computer to turn the light on/off. This DIY will help you wire a momentary switch into the BCM to turn the rear fog light on/off. The fog will function as intended by the factory...on with headlights only, off if the headlights aren't on. The catch is that the car doesn't come equipped with the instrument cluster light to tell you if the fog is on or off. To know if the fog is on, I wired a separate light to the 12V power line going to the fog light (coming out of the BCM). So if the fog is on, the 12V light is on too. The light is positioned right by the momentary switch that controls the fog light, which I located in the dumby space between the heated seats. Necessary parts/tools: 1. OEM or aftermarket rear fog light 2. 22 gauge stranded electrical wire (various colors helpful) 3. wire crimper 4. spade connectors for 22 gauge wire (female and male) 5. (3) two-way 22 gauge wire taps (to tap into the necessary circuits) 6. Dremel and/or drill to prepare dumby slot for switch and light 7. 1N4001 diode to rig in line with the switch wiring (radioshack is your friend) 8. Momentary push button switch of your liking 9. LED or incandescent light to indicate when the fog is on/off (or incorporate in your switch above) Here goes: 1. Install a rear fog light in place of the dumby as outlined in other DIYs. Plug in the factory harness to the fog light...this will be your power source which is already plugged into the BCM. 2. Locate the BCM on the outside wall of the passenger footwell. The trim pieces snap off, just pull outward on them. There is one screw/rivet that you can pull off deep in the footwell...use a flashlight before you pull off the trim piece and you'll see it. Once this is removed, the side footwell trim can be placed out of the way. 3. The BCM is what's now staring you in the face (multiple wire harnesses plugged into it. It's time to locate the necessary wires for the Input 5 and Output 3 of the combination switch entering the BCM. ***Note, these can also be accessed on the other end of the harness at the combination switch (control stalks by the steering wheel). I found the BCM to be easier to work on and run wires from. 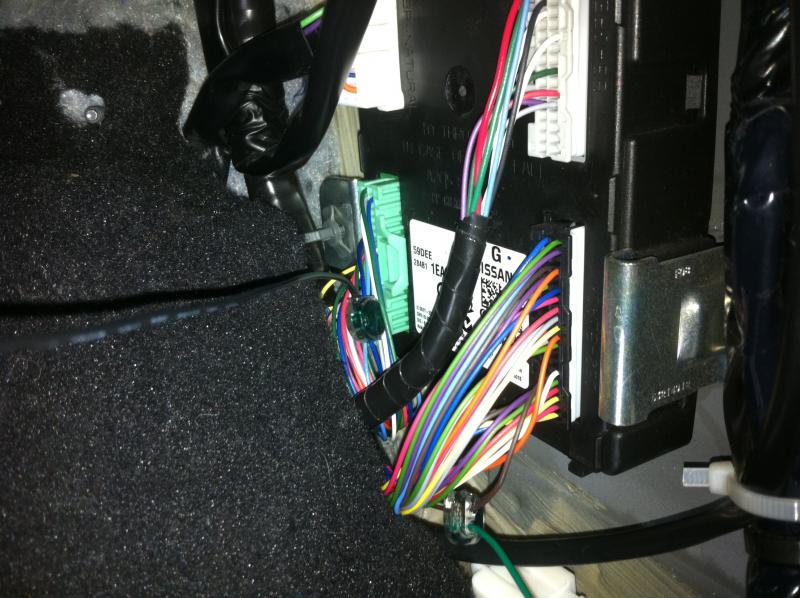 4. Locate Input 5 wire which is BROWN and in the RIGHT LOWER harness entering the BCM if you were facing it head-on. This harness is called M122 and the Input 5 wire is in slot 87. Again, if you're facing the BCM this is the fifth slot up from the bottom in the left column of wires (see photo). 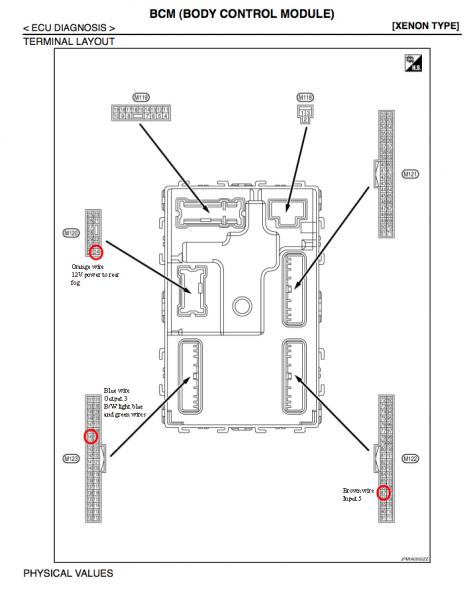 5. Put a wire tap on this wire, thread in the end of a 6-8ft long piece of 22 gauge wire which will run to your switch, and squeeze the tap to join the wires (use pliers). 6. Find the Output 3 Light Blue wire in the LOWER LEFT harness entering the BCM. This harness is called M123. The light blue wire is deceiving as right next to it is a lighter blue wire called SB or sky blue by Nissan. The wire you want is the slightly darker blue which is adjacent to a green wire and the sky blue wire. It's in space 145 of M123 or the 7th slot from the top in the left hand column (again, when facing the BCM). (See picture) 7. Put a wire tap on this wire, insert another 6-8ft 22 gauge wire that you'll also be running to your switch, and squeeze with pliers to complete the tap. use crimp connectors to connect your 1N4001 diode in line with this wire. The stripe on the diode should face towards the BCM side of the wire. 8. Find the ORANGE wire in the MIDDLE LEFT harness. This harness is called M120 and the orange wire is in space 24. This is the lowest right slot when facing the BCM (and the only obvious orange wire...very easy to see and access). 9. Apply another wire tap and connect another 6-8ft wire that will power the fog indicator light which you'll place by your switch. 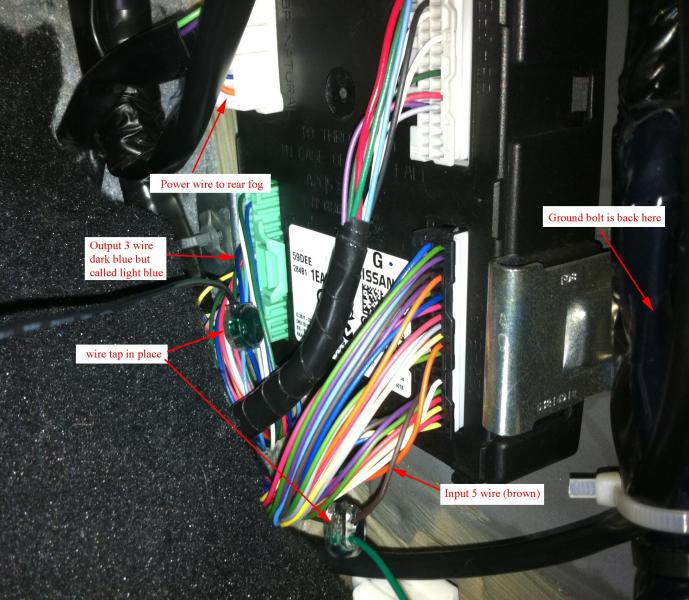 10. Finally, take a final piece of wire, crimp on a fork connector, and attach this to the bolt that holds the BCM in place. This is the ground for your indicator light. 11. Run the wires along the underside of the glove box, and then up under the trim pieces along the inside edge of the passenger footwell (under the knee pad and the other side trim piece. You may find it much easier if you remove the shifter trim and take off the knee pad (see separate DIY for these steps). 12. Run the wires toward the cup holder. Lift up on the cup holder to pop it out. It's connected by heated seat harnesses (if you have them), so it won't come all the way out. Fish the wires into this space so you can access the ends, and put spade connectors on all four of them. 13. Pop out the dumby switch piece by gently lifting the tabs on each end. It pushes down out of the cup holder trim for removal. 14. Using a Dremel, grind out all the reinforcing plastic crosswork on the inside of the dumby piece. It's useless and doesn't hurt the structural integrity. 15. Once the inside of the dumby piece is smooth and all the ribs are gone, mark off two spots where you'll drill for your switch and light. The switch and light I chose each required 1/2" holes, so you have to measure twice and get it right the first time. Drill the holes and mount your switch and light to the dumby piece. 16. The switch I used had spade connectors, and I connected these directly to the wire ends leading to Output 3 and Input 5. 17. My light had bare wires, so I attached spade connectors and connected it to the wire tapped into the 12V rear fog power (wire tapped to the orange wire) and the other wire is attached to the ground wire. 18. Pop the dumby piece with light and switch back into the cup holder and reassemble all the trim.  19. Turn on your headlights, and push your momentary switch once. Your indicator light should illuminate and your rear fog light should be ON. Congratulations. You just wired your rear fog through the factory harness for about $10. 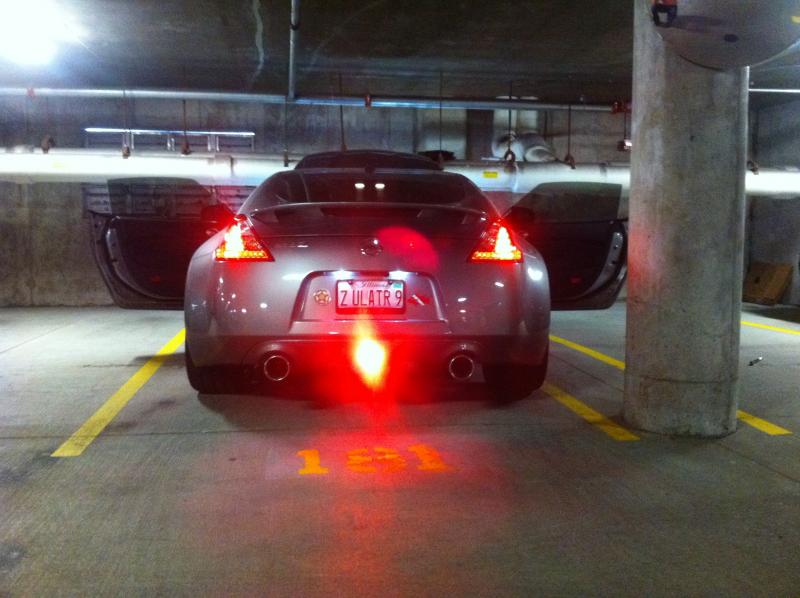
__________________
2013 Cadillac V-Wagon, RIP Z Last edited by spearfish25; 08-15-2011 at 11:01 AM. |

|

|
|
04-18-2011, 05:31 PM
|
#2 (permalink) |
|
A True Z Fanatic
 Join Date: Mar 2009
Location: North East
Posts: 6,203
Drives: 09 370Z Sport M6
Rep Power: 655 |
Nice write up Alex

__________________
Hotchkis ARB | Stillen CAI | Art Pipes | Berk CBE | Stillen AP Racing Brakes | AE Performance Oil Cooler | BC Racing ER Coilovers | Doran Control Arms |
|
|
|
|
04-18-2011, 08:03 PM
|
#3 (permalink) |
|
Track Member
Join Date: Mar 2009
Location: Chicagoland
Posts: 748
Drives: 09 Nissan 370Z sold
Rep Power: 19 |
And yet another great Spearfish DIY, nice job buddy!
Are you sure that big red button isn't connected to a rocket launcher instead of a fog light? 
__________________
Black Fangs // Black rear Valance // Berk CBE // COBB post MAF tubes // K&N drop in filters // Setrab Oil Cooler // Stillen Sway bars // Z1 SS brake lines // Stillen brake cooling kit // Harness bar // Last edited by JB1; 04-18-2011 at 09:51 PM. |
|
|
|
|
04-18-2011, 09:16 PM
|
#4 (permalink) |
|
A True Z Fanatic
Join Date: Mar 2009
Location: Naples, FL
Posts: 4,117
Drives: to work
Rep Power: 1858 |
My options were limited for momentary switches. I may keep looking for replacements that are less visible, but for now I'll tell people it's the headlight missile launcher button. The red LED is cool though. Reminds me of the lighting panel on my dad's old Alfa Romeo Montreal.
__________________
2013 Cadillac V-Wagon, RIP Z |
|
|
|
|
04-18-2011, 09:40 PM
|
#5 (permalink) |
|
Track Member
Join Date: Mar 2009
Location: Chicagoland
Posts: 748
Drives: 09 Nissan 370Z sold
Rep Power: 19 |
Alfa Montreal, sweet!
__________________
Black Fangs // Black rear Valance // Berk CBE // COBB post MAF tubes // K&N drop in filters // Setrab Oil Cooler // Stillen Sway bars // Z1 SS brake lines // Stillen brake cooling kit // Harness bar // |
|
|
|
|
04-19-2011, 06:46 AM
|
#6 (permalink) |
|
A True Z Fanatic
Join Date: Mar 2009
Location: North East
Posts: 6,203
Drives: 09 370Z Sport M6
Rep Power: 655 |
I've got a big catalog of switches that I was looking through. I found some rectangular ones, just need to know the cut out dimensions.
__________________
Hotchkis ARB | Stillen CAI | Art Pipes | Berk CBE | Stillen AP Racing Brakes | AE Performance Oil Cooler | BC Racing ER Coilovers | Doran Control Arms |
|
|
|
|
04-19-2011, 06:57 AM
|
#7 (permalink) |
|
A True Z Fanatic
Join Date: Mar 2009
Location: Naples, FL
Posts: 4,117
Drives: to work
Rep Power: 1858 |
The holes for both the light and switch were 1/2". The switch blank is only 3/4" wide, so 16mm switches seem best. Let me know what you find. I'd love to redo it with a single 16mm momentary black flushmount push-button that incorporates a 12v light. I've found a couple computer power switches that may do the trick.
__________________
2013 Cadillac V-Wagon, RIP Z |
|
|
|
|
04-19-2011, 10:57 AM
|
#9 (permalink) |
|
Base Member
Join Date: Mar 2009
Location: cali
Posts: 89
Drives: 40th Anniv Z
Rep Power: 18 |
Question though... So in theory if I tap a wire to connect output wire 3 and input wire 5, the rear fog light will turn on every time the headlights are on? Thanks and +1 REP!!!
|
|
|
|
|
04-19-2011, 11:13 AM
|
#10 (permalink) | |
|
A True Z Fanatic
Join Date: Mar 2009
Location: Naples, FL
Posts: 4,117
Drives: to work
Rep Power: 1858 |
Quote:
If you want the light on every time the headlights are on, it's easier to just tap the rear fog light harness into one of the tail lights.
__________________
2013 Cadillac V-Wagon, RIP Z |
|
|
|
|
|
04-22-2011, 01:12 PM
|
#11 (permalink) |
|
Base Member
Join Date: Mar 2009
Location: cali
Posts: 89
Drives: 40th Anniv Z
Rep Power: 18 |
Spear, Can you pls take a look at this and tell me which one will work...MOM-OFF SPST, MOM-OFF-MOM SPDT, MOM-OFF-MOM DPDT (link below)
Full Size Rocker Switches - 1/4'' Tabs Someone here used the MOM-OFF SPDT switch in his garage door diy. It fit perfect in the blank space on the console. Thanks. |
|
|
|
|
04-22-2011, 02:12 PM
|
#12 (permalink) | |
|
A True Z Fanatic
Join Date: Mar 2009
Location: North East
Posts: 6,203
Drives: 09 370Z Sport M6
Rep Power: 655 |
Quote:
__________________
Hotchkis ARB | Stillen CAI | Art Pipes | Berk CBE | Stillen AP Racing Brakes | AE Performance Oil Cooler | BC Racing ER Coilovers | Doran Control Arms |
|
|
|
|
|
04-22-2011, 08:58 PM
|
#13 (permalink) |
|
A True Z Fanatic
Join Date: Mar 2009
Location: Naples, FL
Posts: 4,117
Drives: to work
Rep Power: 1858 |
Chris is right.
I just ordered this to get my indicator light and switch all in one. It will also require a 500 ohm resistor in series since the LED is 2.1V. Digi-Key - 679-2343-ND (Manufacturer - IRR3S422L0S)
__________________
2013 Cadillac V-Wagon, RIP Z |
|
|
|
|
04-22-2011, 09:41 PM
|
#14 (permalink) | |
|
A True Z Fanatic
Join Date: Mar 2009
Location: North East
Posts: 6,203
Drives: 09 370Z Sport M6
Rep Power: 655 |
Quote:
__________________
Hotchkis ARB | Stillen CAI | Art Pipes | Berk CBE | Stillen AP Racing Brakes | AE Performance Oil Cooler | BC Racing ER Coilovers | Doran Control Arms |
|
|
|
|
|
04-25-2011, 10:06 PM
|
#15 (permalink) |
|
Base Member
Join Date: Feb 2010
Location: Milky Way
Posts: 245
Drives: 2010 370z T+S+N 6MT
Rep Power: 17 |
I have a question for you, if I were to apply 12V to the orange wire, would the fog light simply turn on?
__________________
2010 Cherry Black Nissan 370z + Black Interior + 6MT Touring + Sport + Navigation + Painted Splash Guards + Illuminated Kick Plates + Fog Light + Floor Mats + Clear Bra |
|
|
|
|
| Bookmarks |
|
|
 Similar Threads
|
||||
| Thread | Thread Starter | Forum | Replies | Last Post |
| wiring rear fog light as brake light | Parrotguy | Nissan 370Z Roadster (Convertible) | 12 | 09-03-2015 10:34 AM |
| Stock rear dummy fog light | Marco_xyz | Wanted | 3 | 08-11-2010 08:39 PM |
| Where to buy the fog light wiring harness??? | tacoma151 | Exterior & Interior | 2 | 04-21-2010 05:00 PM |
| stock speaker wire color config. | tbonesteak | Audio & Video | 6 | 03-26-2010 05:02 AM |
| 370Z Rear Fog Light In Stock!!!!! @ The 370ZSOURCE!!! | Michael@TheZStore | Body Interior/Exterior | 5 | 01-22-2010 03:38 PM |


 7Likes


 Linear Mode


