
|
IF YOU FIND THIS GUIDE HELPFUL, GIVE ME SOME REPPPP!! :-) Hey guys, I picked up a set of TEIN lowering springs, and since I searched around for a DIY
|
|||||||
 |
|
|
LinkBack | Thread Tools | Display Modes |
|
|
 11-19-2010, 01:40 PM
|
#1 (permalink) |
|
A True Z Fanatic
Join Date: Jul 2010
Location: Baton Rouge, LA
Posts: 2,682
Drives: BSM 370
Rep Power: 1853    |
IF YOU FIND THIS GUIDE HELPFUL, GIVE ME SOME REPPPP!! :-)
Hey guys, I picked up a set of TEIN lowering springs, and since I searched around for a DIY and couldn't find one, I decided to make one! Tools required. - Metric Socket Set - Breaker bar - Ratchets - Metric Wrenches - Spring compressor - Jack and Jack Stands - Vice Recommended: - Car Lift - Air tools - Pizza & Beer Install time (with all of the right tools and a lift): 2.5 hrs (with pizza and beer breaks) Install time (estimated without a lift and no air tools): 4.5hrs Difficulty: (scale 1-10) Solid 2 TEIN Springs (4 if you don't have access to a lift and air tools) Solid 4-5 if you have different springs, (Eibach, Megan,ect) Camera: Nikon D60 w/speedlite For this guide, I used TEIN S-Tech springs, but the idea should be the same for all other brands of springs. **Update** Different springs, other than TEINs seem to be wound closer together so there is some difficulty if you don't have the proper thin spring compressor. Make sure you compress enough of the spring so that you can put the hat back on. Because of that, I'm going to update the difficulty. Stock ride height before 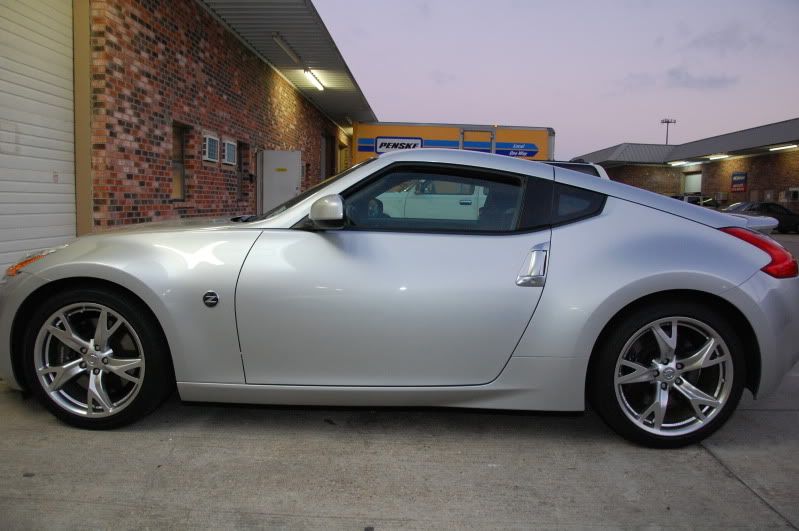 Front 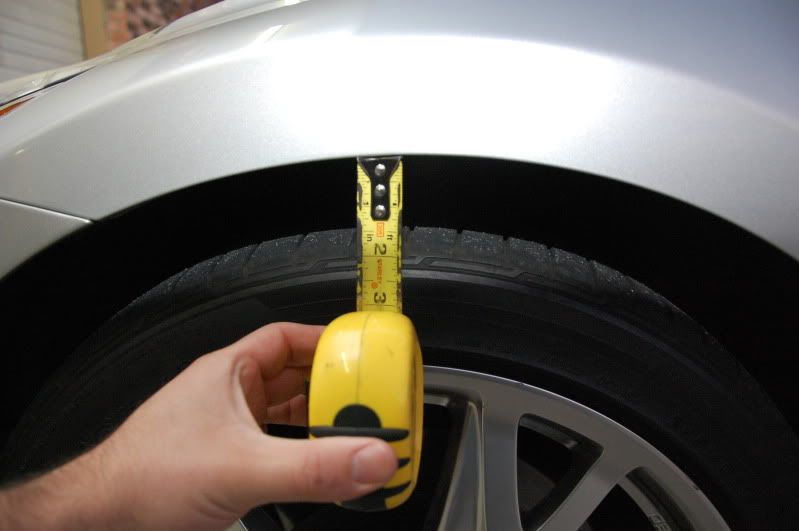 Rear 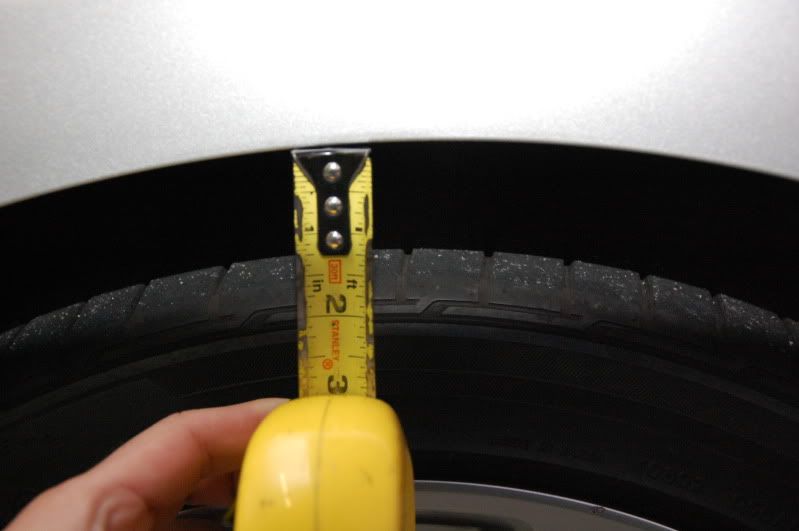 Removal of the front struts Step 1. Loosen all of the lug nuts. This is generally easier to do if you don't have the car in the air. Break them free on the ground so you don't have to hold the wheel from turning. 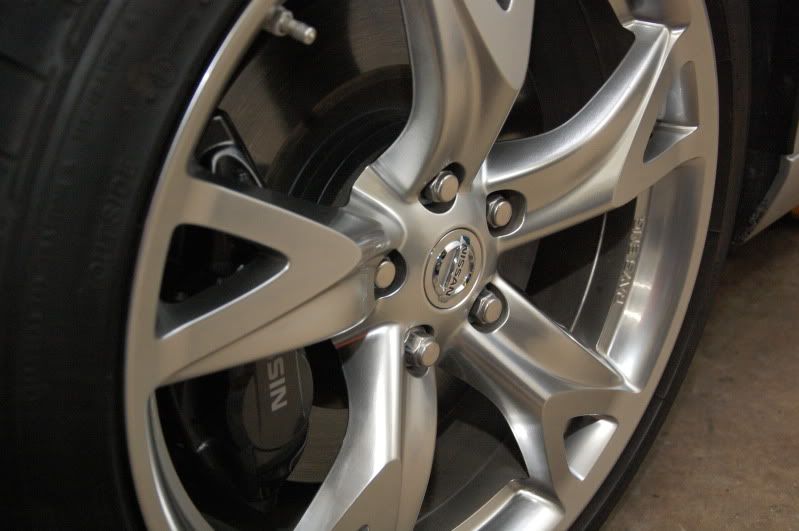 Step 2. Put the car on the lift, or jack up the front. **Make sure you visit the OEM manual for the proper jackpoints** 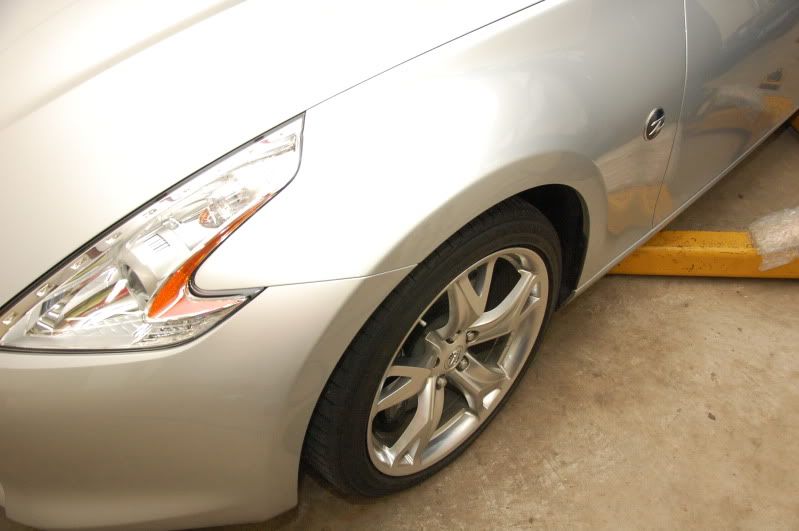 Step 3. Remove the wheel and keep track of your lug nuts.  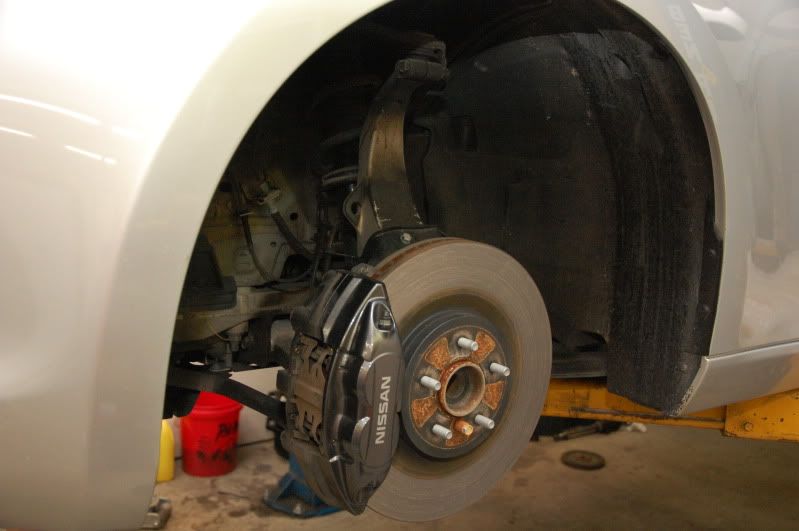 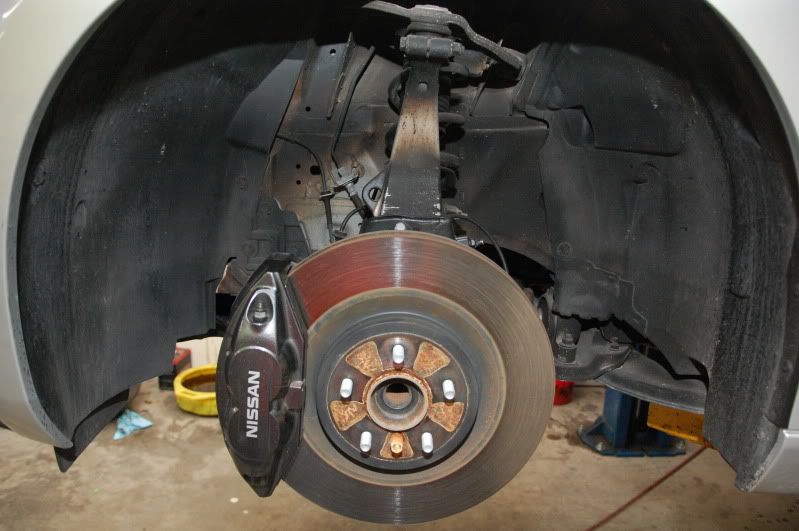 Step 4. Pull the ABS wiring off of the lower strut mount. 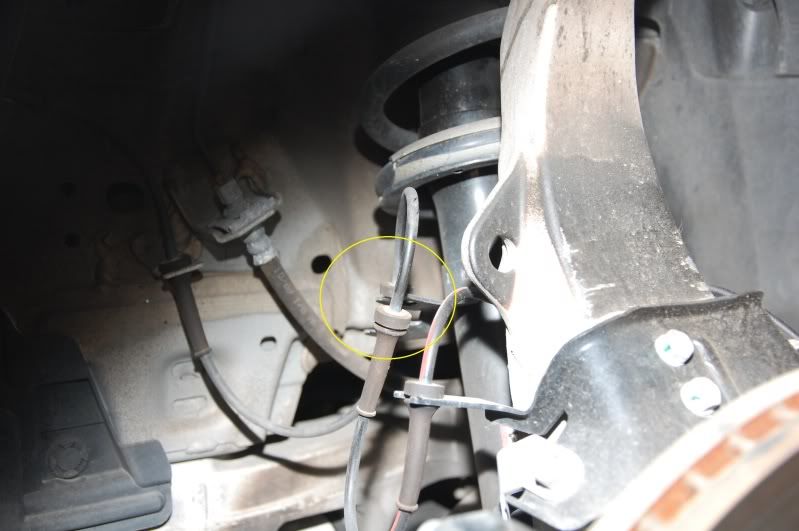 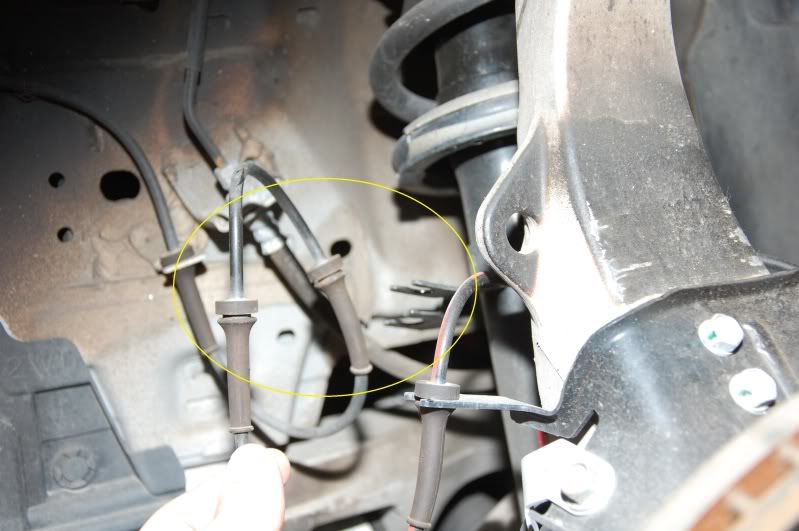 Step 5. Remove the 12mm nut holding the brake line block on the other side of the lower strut. 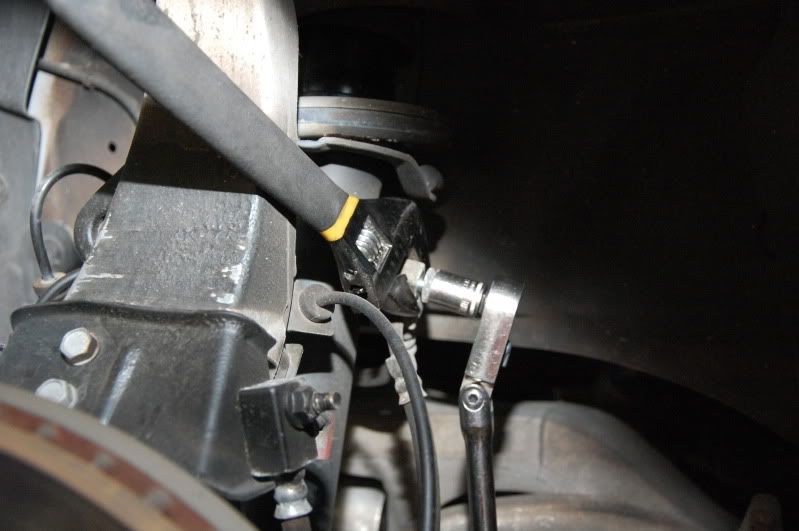 **NOTE** I held the block with a wrench because the bolt was so tight, it wanted to bend the bracket. Hold it while loosening the bolt so you don't bend or break anything. Step 6. Remove the 17mm lower control arm bolt & 14mm sway bar link 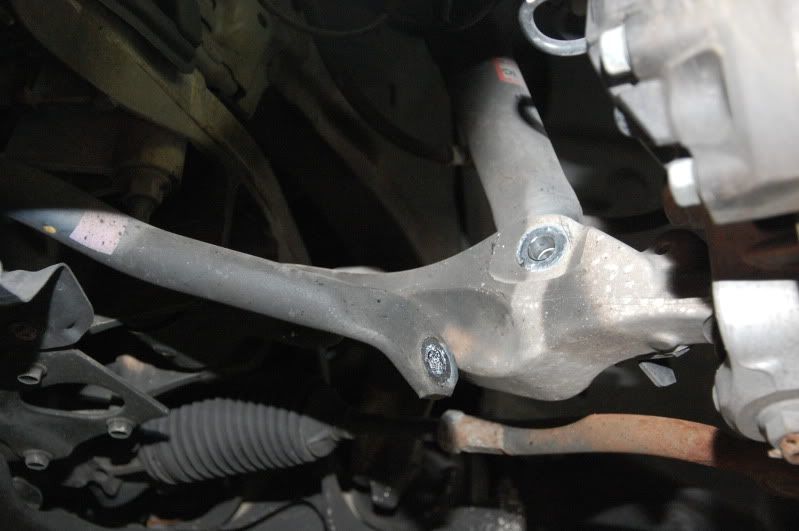 Step 7. Remove the 14mm lower strut mount plate bolts 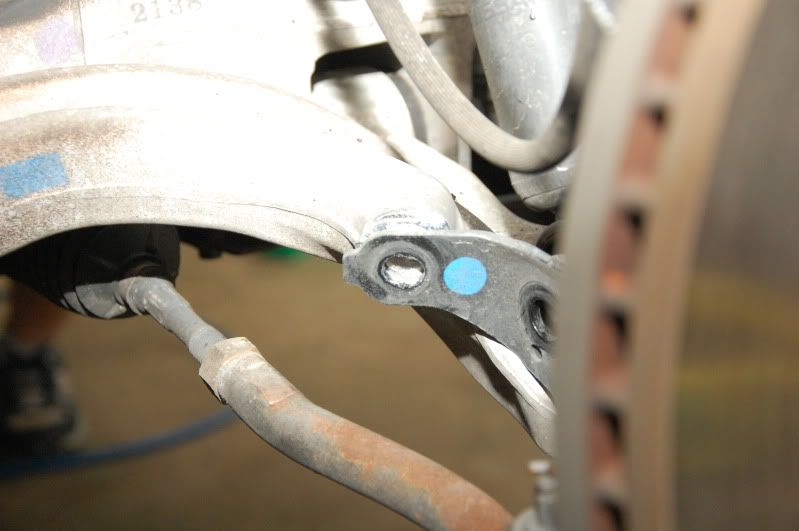 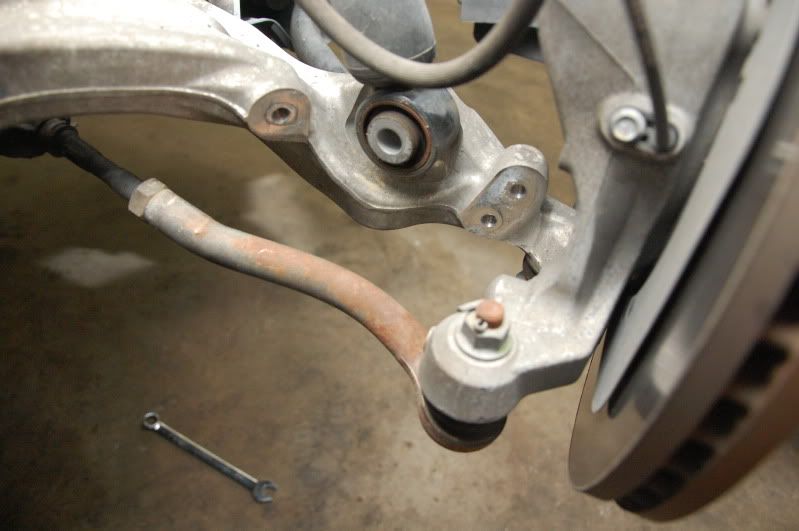 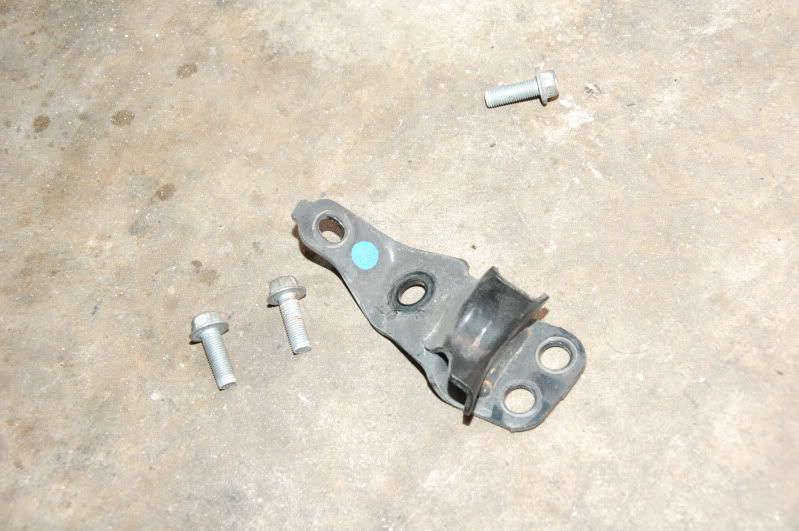 Step 8. Remove the 12mm upper strut mount nuts 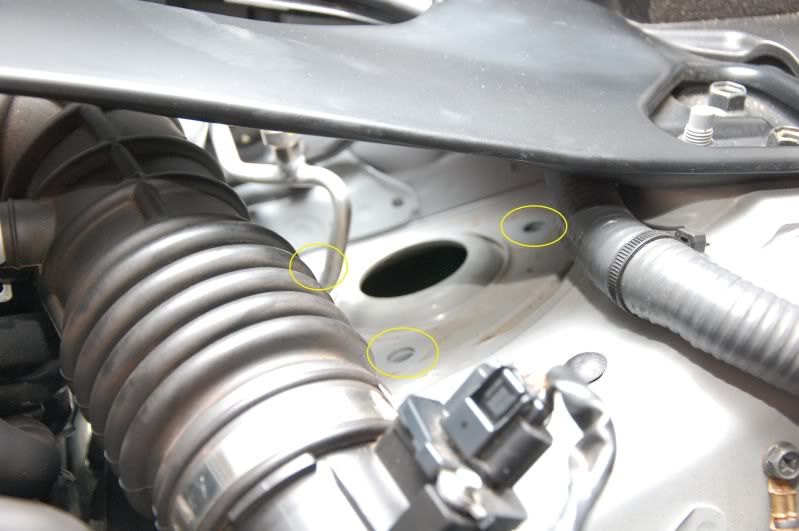 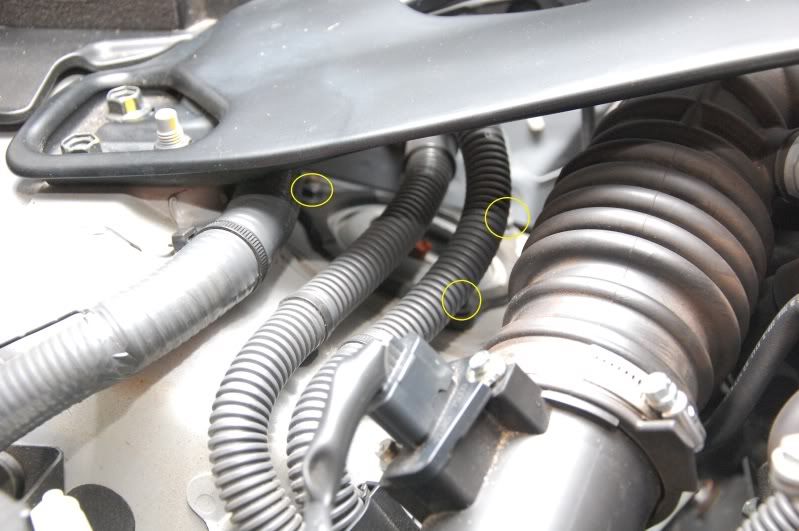 Step 9. Remove the strut. *NOTE: You may have to have a buddy pull down on the knuckle to allow enough room for the strut to come out. You can the struts out without removing any other parts. 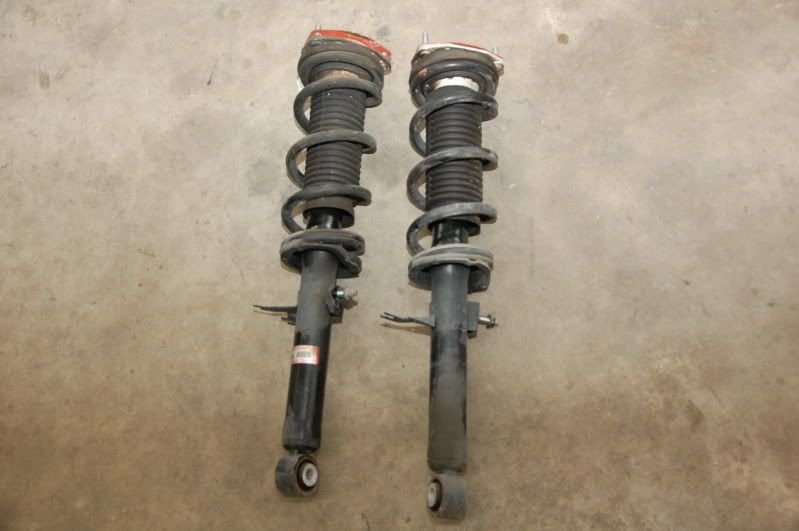 Removal of factory springs 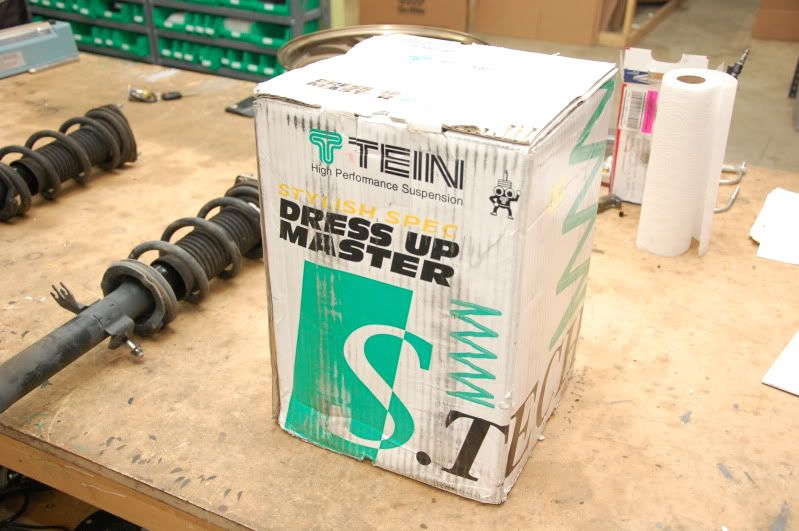 Step 10. This is probably the hardest part of the install. Hold the strut in the vice, apply spring compressors and compress the springs. Once the springs are fairly compressed, remove the 14mm nut holding the strut top on. Impact wrenches are your friend. 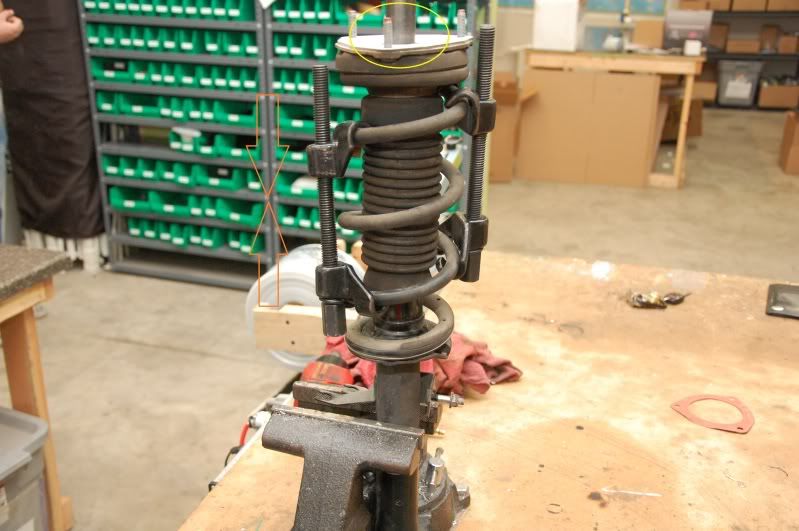 Once the top hat comes off, remove the spring and decompress the OEM spring. 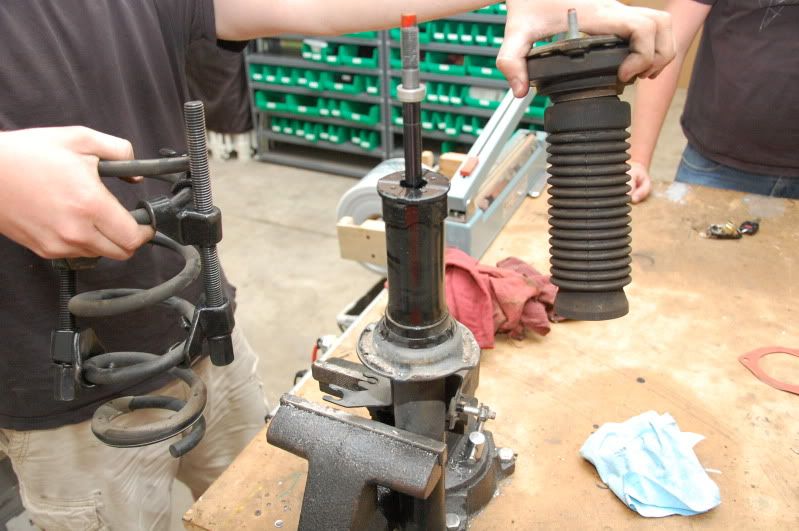 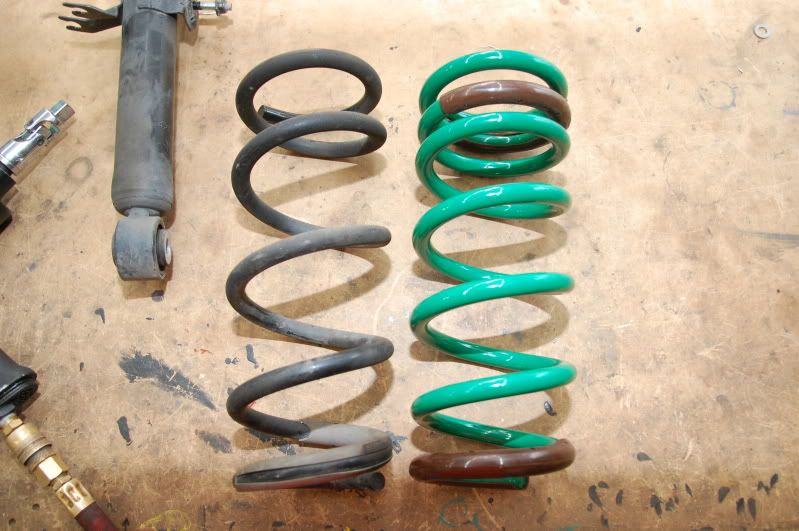 Step 11. Time to install the new lowering spring on the stock strut. I can't speak for all brands of springs, but the TEIN springs must be compressed in order for you to be able to put the top hat back on. So....  Installation of the top hat is the reverse of removal. Put the hat back on, and make sure you put the hat back on the right way. It has to sit on the spring a certain way, look on the rubber piece and you'll see what I mean. TEIN Spring - OEM  Both done and ready to go back in, installation is reverse of removal. Make sure you impact all of the lower control arm bolts. 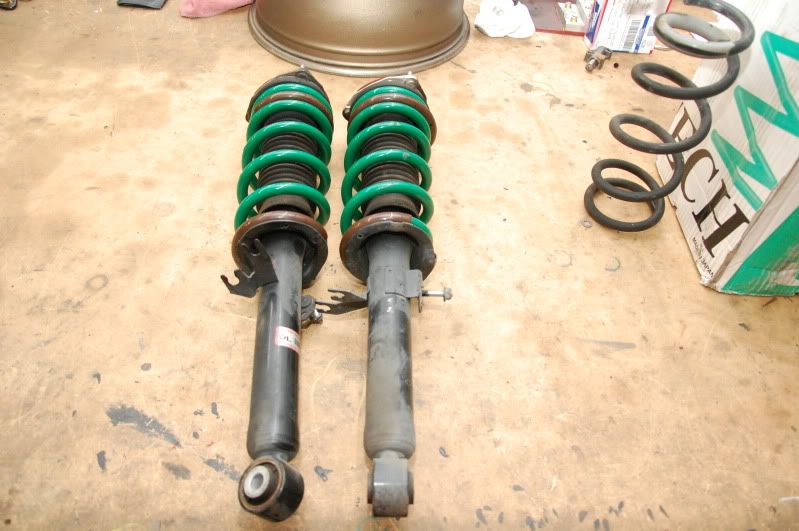 Done. 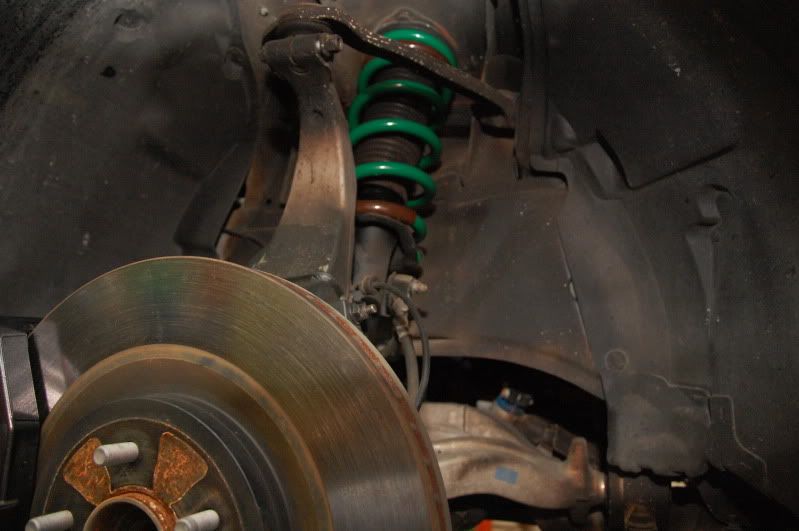 Rear Spring Removal & Installation Step 12. Remove the rear wheel (keep track of your nuts!) and support the car on a jack and jack stands or use a car lift. (as pictured) 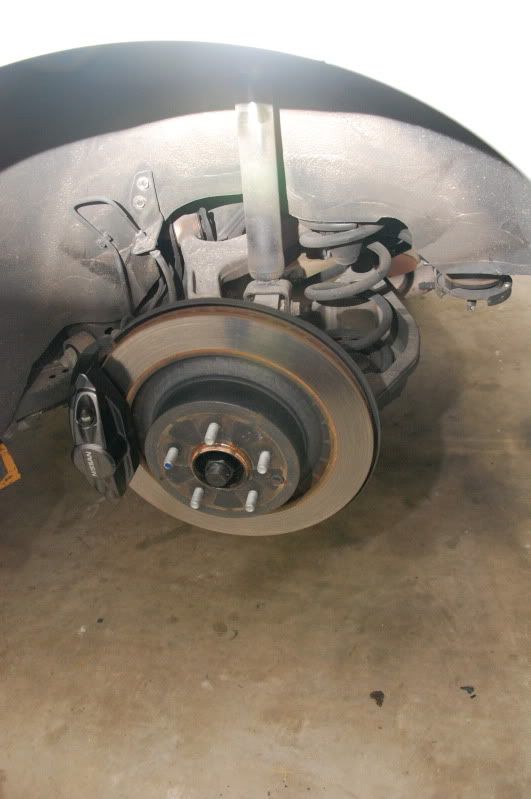 Step 13. Support the rear spring perch with a jackstand. 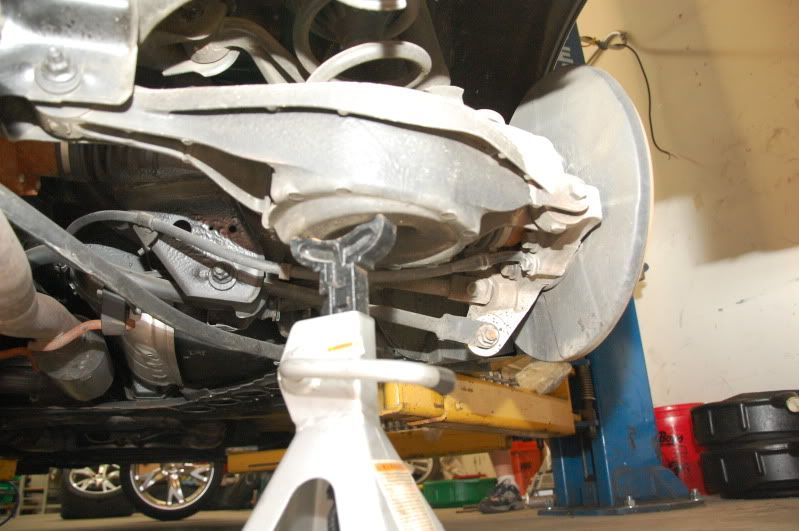 Step 14. Remove the lower perch nut and bolt and jack (or raise) the car up slowly to let the spring decompress. 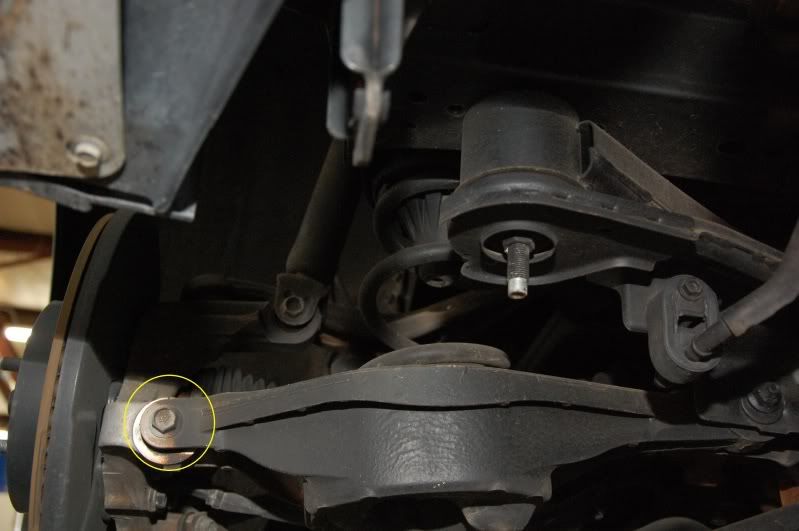 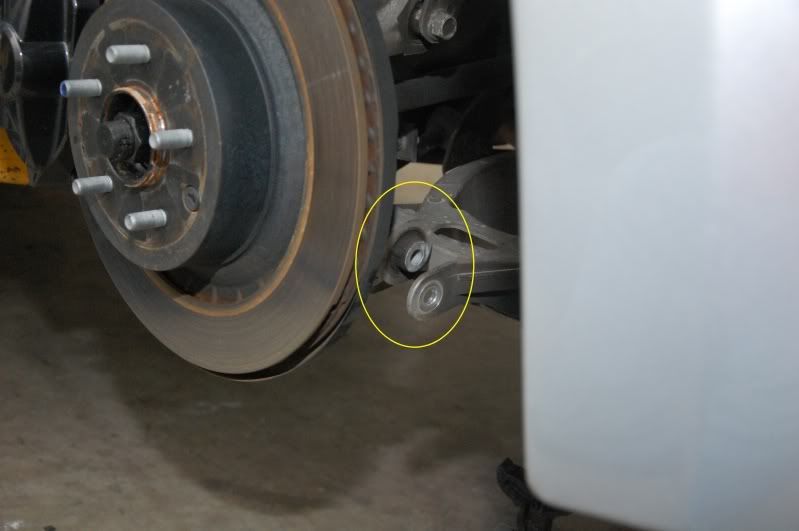 Step 15. Pull the lower perch down and pull out the spring. The rubber bottom part may come out with the spring, make sure you put it back in and align it properly. 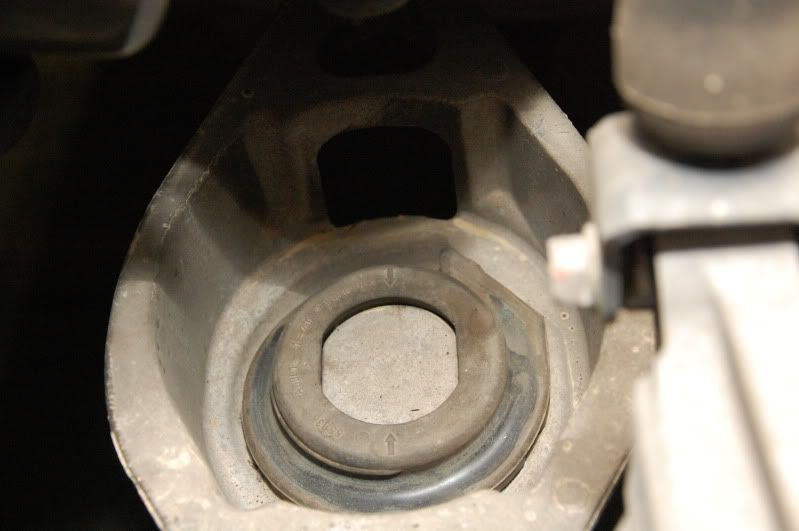 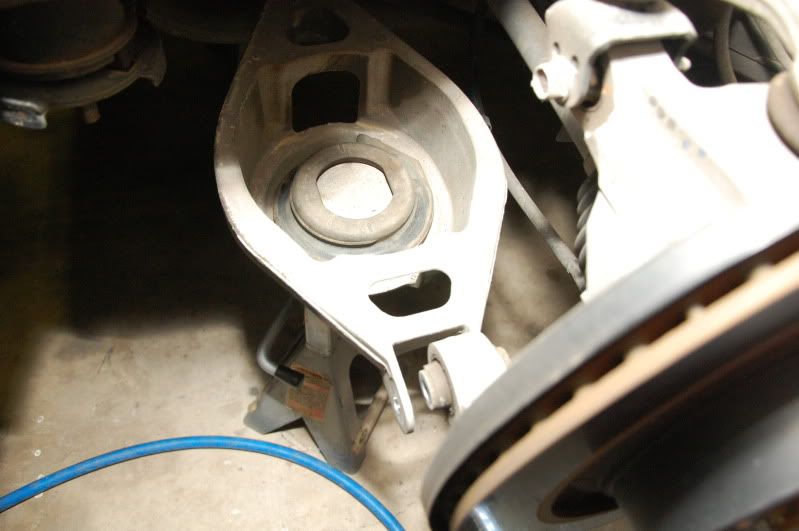 Step 16. Install the spring back into the perch and lower the car back down to compress it. Reinstall the lower perch bolt and nut. 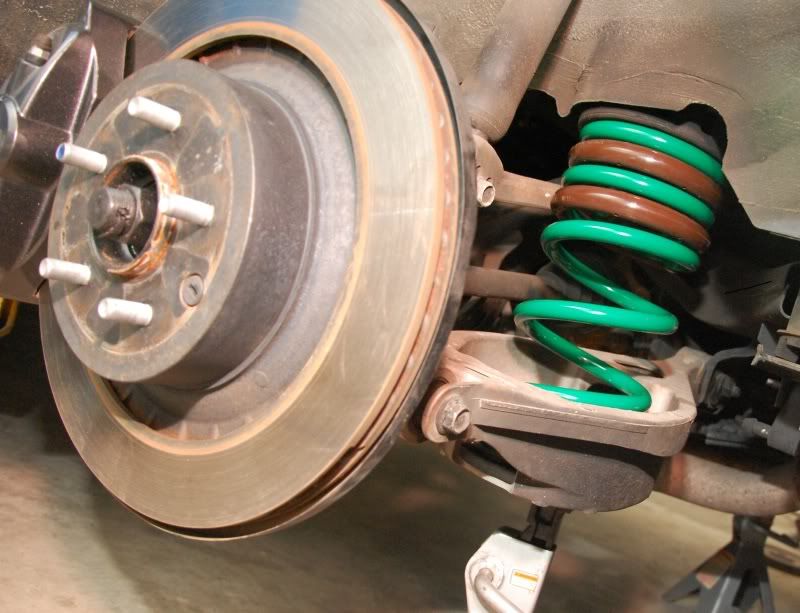 Step 17. Reinstall wheels and torque to proper specs. Front w/ TEIN Springs. 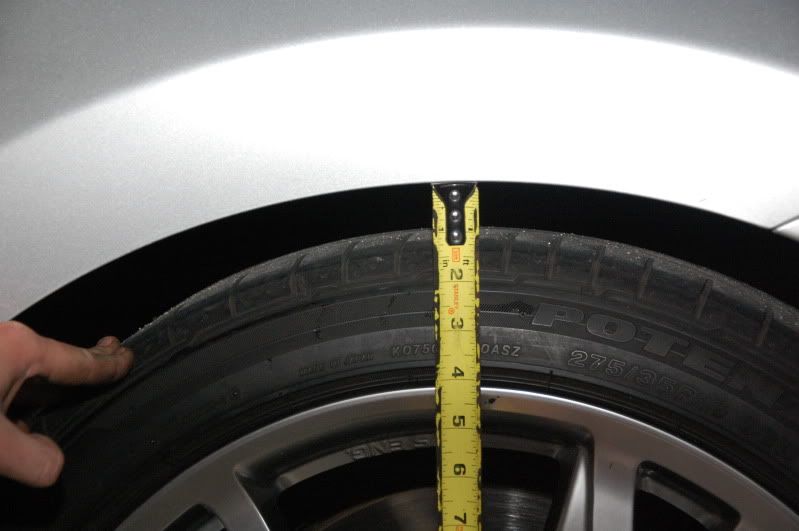 Rear w/TEIN Springs 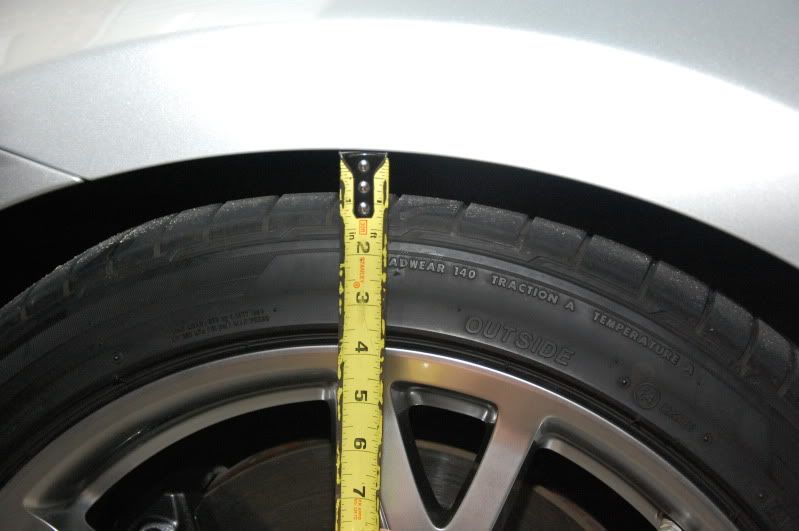 That's it! Go over all of your bolts and lug nuts, test drive the car for any squeaks, rattles or odd sounds. If everything is good, enjoy! I'll be doing another DIY front lip install soon, if this is helpful, give me rep!  -David Last edited by TypeOne; 01-11-2012 at 04:53 PM. |

|

|
|
11-19-2010, 04:17 PM
|
#4 (permalink) |
|
A True Z Fanatic
Join Date: Dec 2009
Location: Tacoma
Age: 54
Posts: 2,497
Drives: Z34, R35
Rep Power: 21    |
Nice job!
Might want to mention to use a 6 point socket set and NOT a 12 point! I stripped bolts and could not remove the lower shock bracket without one. Made my install a real PITA. But subsequent installs went very smoothy. Also I had to remove the strut bar to get access to the top shock bolts--not sure how you did it without doing this!!!
__________________
2009 370Z Monterey Blue,Nismo Conversion,RE-11's, K&N Typhoon intakes,Blue Kickplates,Homelink,FI 18" CBE,ERZ HFCs,Hotchkis sways, Swift Spec-R, EVO-R Highwing, UPREV 
|
|
|
|
|
11-19-2010, 04:24 PM
|
#5 (permalink) |
|
A True Z Fanatic
Join Date: Jul 2010
Location: Baton Rouge, LA
Posts: 2,682
Drives: BSM 370
Rep Power: 1853 |
I didn't have any issues with it removing the upper strut nuts with my snap on ratchet. It make have been a little easier to do by removing the brace, but it would have cost me more time to take it off, than it would have to just leave it on and unscrew the nuts.
Generally, as a rule of thumb you don't ever want to use a 12 point socket on anything that isn't a 12 point head. You will round bolts off with the quickness. Thanks!! |
|
|
|
|
11-19-2010, 04:30 PM
|
#6 (permalink) |
|
A True Z Fanatic
Join Date: Dec 2009
Location: Tacoma
Age: 54
Posts: 2,497
Drives: Z34, R35
Rep Power: 21 |
Well it would of been nice to know for myself as I wasted several hours of time, sweat and aches! I had to go out and buy a 6 point socket set when It was mentioned to me. So if this helps one person then I will feel better...

__________________
2009 370Z Monterey Blue,Nismo Conversion,RE-11's, K&N Typhoon intakes,Blue Kickplates,Homelink,FI 18" CBE,ERZ HFCs,Hotchkis sways, Swift Spec-R, EVO-R Highwing, UPREV
|
|
|
|
|
11-19-2010, 04:35 PM
|
#7 (permalink) |
|
A True Z Fanatic
Join Date: Nov 2008
Location: Seattle
Posts: 1,722
Drives: z34 - R1
Rep Power: 491 |
Nice to see a spring install diy.
I think a difficulty of 2 out of 10 is misleading for anyone without a lift, power tools, and all the other tools a garage has. For the rest of us with the few tools and doing it solo, I think a 6 out of 10. Also I recommend people save themselves the time and grief and take it to sears or a garage and pay $50 to get the springs switched out. There's a guy on this forum who stripped the seal in his strut doing it himself.
__________________
2010 k23 H&R sport springs / Spc rear camber arms / SSR SP1 / Berk cbe / Varis cf lip / Nismo S-Tune side skirts 
|
|
|
|
|
11-19-2010, 05:08 PM
|
#8 (permalink) |
|
A True Z Fanatic
Join Date: Jul 2010
Location: Baton Rouge, LA
Posts: 2,682
Drives: BSM 370
Rep Power: 1853 |
Ok... maybe my idea of it being an easy install gives a little bias.
Taking into account having to use jacks and hand tools, I can't see it being more than a 4... mainly for time sake. I build cars from the ground up that take hundreds of hours to complete, so changing springs isn't anything to do. I'll make a note about the level of difficulty. Thanks for your input. |
|
|
|
|
11-20-2010, 07:26 AM
|
#9 (permalink) |
|
Base Member
 Join Date: Sep 2009
Location: Louisville, ky.
Posts: 6
Drives: 2009 370Z
Rep Power: 183 |
Hey TypeOne.... Was your front alignment ok...I see you didn't change your front upper camber control arms...I was told one would have to install adjustable one for proper alignment

|
|
|
|
|
11-20-2010, 01:27 PM
|
#10 (permalink) | |
|
A True Z Fanatic
Join Date: Jul 2010
Location: Baton Rouge, LA
Posts: 2,682
Drives: BSM 370
Rep Power: 1853 |
Quote:
I can say that it does have a noticeable amount of negative camber with the stock UCAs. If you wanted to have the camber set to factory specs to reduce irregular tire wear, I'd get a set of adjustable camber arms. I plan on getting new wheels and tires so I'll change out the arms when the time comes. |
|
|
|
|
|
06-25-2011, 10:51 AM
|
#11 (permalink) | |
|
Track Member
Join Date: Apr 2011
Location: New York
Posts: 532
Drives: 2011 370Z
Rep Power: 17 |
Quote:
|
|
|
|
|
|
11-30-2010, 10:22 AM
|
#13 (permalink) |
|
A True Z Fanatic
Join Date: Jul 2010
Location: Charleston, SC
Posts: 12,045
Drives: a Civic VP!
Rep Power: 446 |
Great write up! I could have used this a couple of weeks ago.
One more thing to mention. Make sure you get the top hat back on the in the same position with the strut bottom. If it's not lined up you will have a hard time getting the strut/spring back in the car.
__________________
Slightly modded
 |
|
|
|
|
11-30-2010, 10:58 AM
|
#14 (permalink) |
|
A True Z Fanatic
Join Date: Dec 2009
Location: Tacoma
Age: 54
Posts: 2,497
Drives: Z34, R35
Rep Power: 21 |
Would you guys have any ideas why the front Camber would be way off after an install like this? I am getting -1.2 on driver side, and -1.8 on passenger side. What could go wrong on the install to throw off the camber so much on one side? I do not think there is any damage to my suspension.
__________________
2009 370Z Monterey Blue,Nismo Conversion,RE-11's, K&N Typhoon intakes,Blue Kickplates,Homelink,FI 18" CBE,ERZ HFCs,Hotchkis sways, Swift Spec-R, EVO-R Highwing, UPREV
|
|
|
|
|
12-07-2010, 04:34 PM
|
#15 (permalink) |
|
A True Z Fanatic
Join Date: Jul 2010
Location: Baton Rouge, LA
Posts: 2,682
Drives: BSM 370
Rep Power: 1853 |
It's hard to say... without anything really being adjustable, the only thing I can think of is that you've got one of your springs not sitting right.
Is the height exactly the same on both sides? I would maybe try to loosen the suspension up and re-tighten everything.. it might help get that little bit of camber back. |
|
|
|
|
| Bookmarks |
|
|
 Similar Threads
|
||||
| Thread | Thread Starter | Forum | Replies | Last Post |
| best spring to buy for lowering and ride qualituy | ddvette9 | Brakes & Suspension | 16 | 11-18-2010 09:33 AM |
| New Eibach Pro Kit Lowering Springs 370Z | al370z | Parts for sale (Private Classifieds) | 13 | 06-23-2010 10:09 PM |
| 370z lowering springs on sale now | ERZperformance | ERZperformance | 0 | 06-25-2009 04:18 AM |
| Selling Eibach spring and OEM spring | spia | Parts for sale (Private Classifieds) | 8 | 06-13-2009 08:18 AM |


 44Likes


 Hybrid Mode


