
|
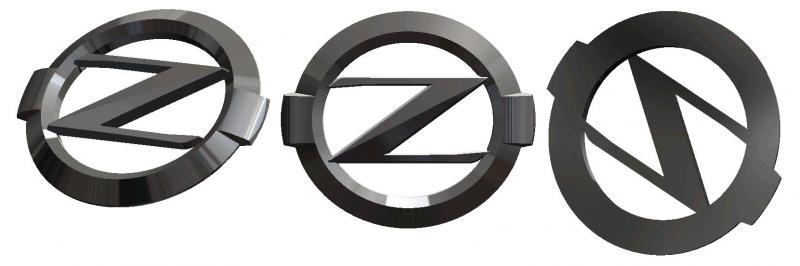
I like 2B. I think I'd like to keep the z fully contained within the "crest" of the ring. also If I'm going to make a fully cut out version
|
|||||||
 |
|
|
LinkBack | Thread Tools | Display Modes |
 06-03-2010, 10:52 PM
|
#136 (permalink) |
|
Base Member
Join Date: May 2010
Location: SF bay area
Posts: 95
Drives: Car
Rep Power: 17  |

I like 2B. I think I'd like to keep the z fully contained within the "crest" of the ring. also If I'm going to make a fully cut out version like #0 there needs to be a fair amount of material to connect the z to the ring
|

|
|
06-03-2010, 10:58 PM
|
#138 (permalink) |
|
Base Member
Join Date: May 2010
Location: SF bay area
Posts: 95
Drives: Car
Rep Power: 17 |
actually scratch that, 2C might not translate well on the machine due to the nose radius of the tool (.031 inches) we'll have to discuss this as it will affect the look of all the badges
|
|
|
|
06-03-2010, 11:01 PM
|
#139 (permalink) |
|
A True Z Fanatic
Join Date: Jan 2009
Location: Nor Cal
Posts: 1,113
Drives: with his eyes close
Rep Power: 719  |
So I decided to put some part number to make it easier to reference it by.
Example: ZF-2A-O Z - Emblem Code F - Front 2 - Design Number A - Size of the Z logo (Will be removed once we determine which size is best) O - Open Here are the different Z logo size: 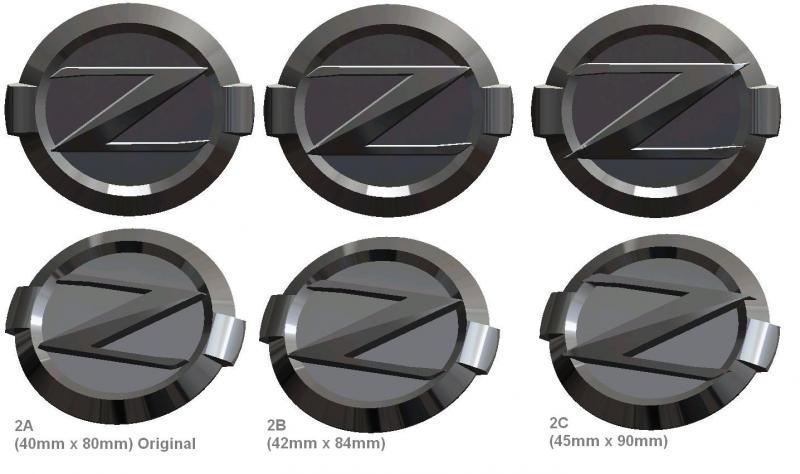 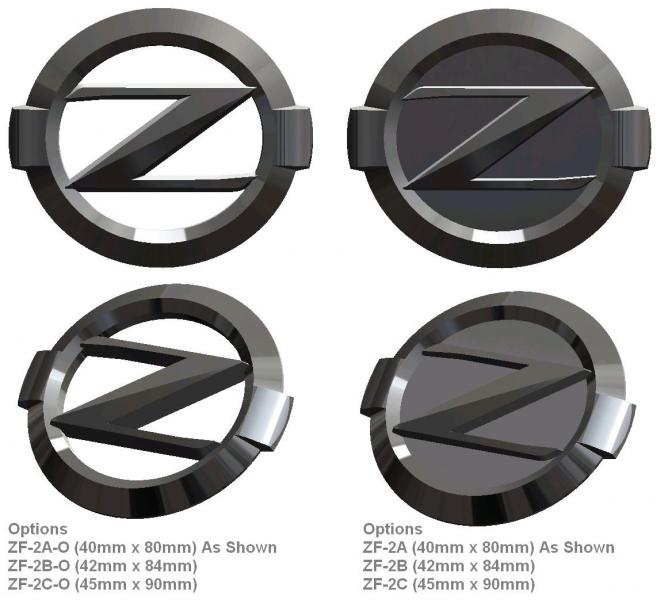 NOTE: Remember the Open version will have a rectangular filler block for the bumper, unless you fill the bumper with some kind of resin or what not. Then it'll be as shown. Last edited by scruffydog; 06-03-2010 at 11:08 PM. |
|
|
|
06-03-2010, 11:11 PM
|
#141 (permalink) | |
|
Base Member
Join Date: May 2010
Location: SF bay area
Posts: 95
Drives: Car
Rep Power: 17 |
Quote:
|
|
|
|
|
06-03-2010, 11:20 PM
|
#142 (permalink) | |
|
A True Z Fanatic
Join Date: Jan 2009
Location: Nor Cal
Posts: 1,113
Drives: with his eyes close
Rep Power: 719 |
Quote:
But if you're going to that extra mile to the body shop already, why don't i just make you a Z emblem doesn't have the wing (hamburger part) You should just fill the wing part. Hell, I can even make you a circular one just like the hub center cap one! Can you imagine how nice that'd be? |
|
|
|
|
06-03-2010, 11:31 PM
|
#143 (permalink) |
|
Base Member
Join Date: May 2010
Location: SF bay area
Posts: 95
Drives: Car
Rep Power: 17 |
Could you please send me ZF-2B-O, ZF-2A and ZR-2A in .sldprt format. I'm going to start CAMing them tomorrow.
I plan on taking some thickness off the backside of ZF-2B-O. its like .180 inches in the blacked out area of ZF-2A right? If you don't mind changing your drawing yet again maybe you could bring this in a bit(ZF-2B-O only). I think the Z looks a little too meaty. If not don't worry I can do it. Also I mentioned something about how I liked the minimal side tabs on design #3. have you given any thought to applying a similar idea to #2? Last edited by AgStacker; 06-03-2010 at 11:53 PM. |
|
|
|
06-03-2010, 11:36 PM
|
#144 (permalink) | |
|
Base Member
Join Date: May 2010
Location: SF bay area
Posts: 95
Drives: Car
Rep Power: 17 |
Quote:
I dont know let me think about it... wingless would look awesome though.... 
Last edited by AgStacker; 06-03-2010 at 11:38 PM. |
|
|
|
|
06-04-2010, 12:04 AM
|
#145 (permalink) | ||
|
A True Z Fanatic
Join Date: Jan 2009
Location: Nor Cal
Posts: 1,113
Drives: with his eyes close
Rep Power: 719 |
Quote:
 I thought the moment you open the parasolid from solidworks it automatically create the part file for you which you could modify. Do you need all the features in the model part for CAMWorks to work? Quote:
Last edited by scruffydog; 06-04-2010 at 12:06 AM. |
||
|
|
|
06-04-2010, 12:23 AM
|
#146 (permalink) |
|
Base Member
Join Date: May 2010
Location: SF bay area
Posts: 95
Drives: Car
Rep Power: 17 |
No, I don't want the floating Z. I was talking about doing an extruded cut from the back in towards the front about (.05-.08 in ), reducing the over all thickness of the badge. But now that I think about it this will decrease the outer diameter and it will be too small for the indentation on the bumper.
Yes, I need the feature tree to use CAMworks. I've tried doing it with a parasolid model but the software cant seem to handle it. It's much easier if I can isolate individual features. and yes, the same rim thickness please. Last edited by AgStacker; 06-04-2010 at 12:26 AM. |
|
|
|
06-04-2010, 12:35 AM
|
#147 (permalink) | |
|
A True Z Fanatic
Join Date: Jan 2009
Location: Nor Cal
Posts: 1,113
Drives: with his eyes close
Rep Power: 719 |
Quote:
I modified all the Z emblems, apparently the diagonal chamfer that cuts across the Z logo is 28° not 27°. But to your request....here's a lower tab...lemme know what you think. 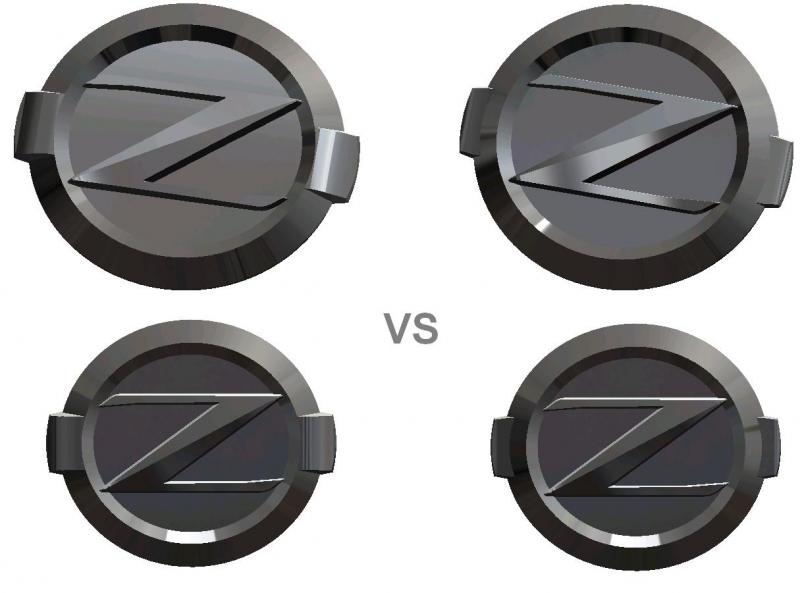 Here's a better view with the contour lines turned on: 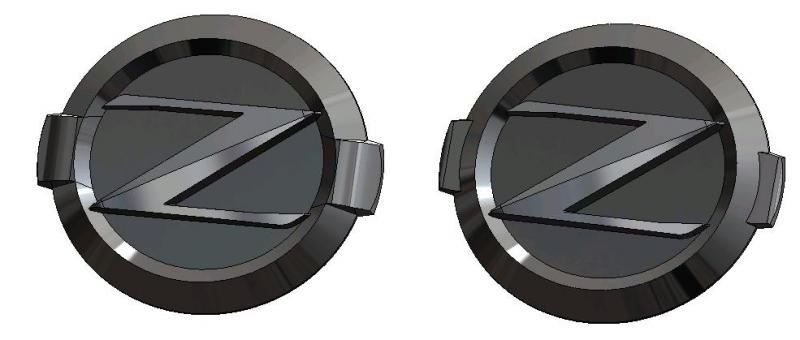
Last edited by scruffydog; 06-04-2010 at 12:39 AM. |
|
|
|
|
06-04-2010, 12:41 AM
|
#148 (permalink) |
|
Base Member
Join Date: May 2010
Location: SF bay area
Posts: 95
Drives: Car
Rep Power: 17 |
If the files are too large don't send them yet. Lets get every thing the way we want it first.
Could you go in between those two examples I'd like to see the crest of the rim all the way around and have the tabs just below it, but not as far as the ones in the example. about half way between the two you've shown please. |
|
|
|
06-04-2010, 12:46 AM
|
#149 (permalink) | |
|
Base Member
Join Date: May 2010
Location: SF bay area
Posts: 95
Drives: Car
Rep Power: 17 |
Quote:
|
|
|
|
|
06-04-2010, 12:53 AM
|
#150 (permalink) | |
|
A True Z Fanatic
Join Date: Jan 2009
Location: Nor Cal
Posts: 1,113
Drives: with his eyes close
Rep Power: 719 |
Quote:
I just sent the models over, I didn't quite understand you meant with your previous request. Please advice. |
|
|
|
|
| Bookmarks |
|
|
 Similar Threads
|
||||
| Thread | Thread Starter | Forum | Replies | Last Post |
| GT Motoring - custom tow hook finshing pics, Custom finishes now available | GT Motoring | Exterior & Interior | 45 | 09-05-2010 03:31 AM |
| FS: Custom fit 370Z sunshield. sunshade. | Steven | Parts for sale (Private Classifieds) | 0 | 01-24-2010 11:48 PM |
| Ebay: Custom Speaker box for 370z | Phimosis | Audio & Video | 8 | 06-09-2009 05:00 PM |
| My Custom speaker box for the 370z | Phimosis | Audio & Video | 20 | 06-05-2009 10:48 AM |
| Custom Sub Enclosure - 370z KY owners | customboxman | Nissan 370Z General Discussions | 40 | 04-06-2009 05:37 PM |


 Linear Mode


