
|
Originally Posted by Matthew You def. have to be fast once they come out of the oven!! Also I recommend using a flash light to make sure you get all
|
|||||||
 |
|
|
LinkBack | Thread Tools | Display Modes |
 01-05-2011, 01:49 PM
|
#16 (permalink) | |
|
A True Z Fanatic
Join Date: Aug 2009
Location: Chicago Burbs
Posts: 1,439
Drives: 09 370z Supercharged
Rep Power: 45   |
Quote:
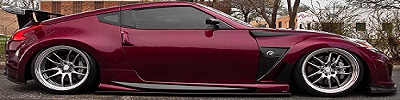
Its tough to notice little dust particles or fingerprints until you shine a light through the outside housing. Nice job OP.
__________________
|
|

|

|
|
01-05-2011, 04:04 PM
|
#18 (permalink) |
|
A True Z Fanatic
 Join Date: May 2009
Location: Dededo, Guam
Posts: 6,642
Drives: solid red 370z 6mt
Rep Power: 407 |
nice bro!!!!
__________________
 ***TOP SECRET/POWERHOUSE AMUSE/ARC/DAYTONA RACING/VARIS/MINES/GANADOR/J-LINE/WORK EMOTION CR KAI/GT SPEC/CARBON SIGNAL/ZOOM ENGINEERING/ CARBON FIBER ELEMENT/STILLEN/***
|
|
|
|
|
01-05-2011, 04:38 PM
|
#19 (permalink) |
|
The370Z.com Vendor
Join Date: Nov 2008
Location: San Diego
Posts: 934
Drives: 1997 Acura NSX
Rep Power: 19 |
Looks good! More pics!
Bat
__________________
email: bluebatmobile@san.rr.com custom vinyl overlays: WWW.BLUEBATOVERLAYS.COM facebook:https://www.facebook.com/groups/bluebatoverlays/ @bluebatoverlays on IG |
|
|
|
|
01-05-2011, 05:38 PM
|
#20 (permalink) | |
|
A True Z Fanatic
 Join Date: Feb 2010
Location: Covington, GA
Age: 47
Posts: 14,844
Drives: Waiting on next Z
Rep Power: 223 |
Quote:
|
|
|
|
|
|
01-06-2011, 01:56 AM
|
#21 (permalink) | |
|
Track Member
Join Date: Apr 2010
Location: Clemson, SC
Posts: 519
Drives: Red Rocket
Rep Power: 18 |
Quote:
__________________
|
|
|
|
|
|
01-06-2011, 05:07 AM
|
#22 (permalink) |
|
Base Member
Join Date: Oct 2009
Location: Alexandria, VA
Posts: 175
Drives: 2009 370z Black M/T
Rep Power: 17 |
great job with the headlights, love em. a little off topic though, where did you get those emblems? ive been wanting to do that for the longest time and i wanted to order the ones from the z store but have heard mixed reviews
|
|
|
|
|
01-06-2011, 04:35 PM
|
#23 (permalink) | |
|
Track Member
Join Date: Apr 2010
Location: Clemson, SC
Posts: 519
Drives: Red Rocket
Rep Power: 18 |
Quote:
__________________
Last edited by Matthew; 01-06-2011 at 04:40 PM. |
|
|
|
|
|
01-06-2011, 04:38 PM
|
#24 (permalink) | |
|
WFLYIDNNE
Join Date: Jul 2009
Location: In The Fastlane
Posts: 50,648
Drives: 02 GDB WRX
Rep Power: 453 |
Quote:
 After the way my door handles went, I'm just gonna let MRWorks do mine... After the way my door handles went, I'm just gonna let MRWorks do mine... 
__________________
 Bonnie - Stage 2, Audio build coming this fall! R.I.P. Abby 3/29/10 - 3/30/14 |
|
|
|
|
|
01-07-2011, 01:48 AM
|
#25 (permalink) | |
|
Base Member
Join Date: Oct 2009
Location: Alexandria, VA
Posts: 175
Drives: 2009 370z Black M/T
Rep Power: 17 |
Quote:
|
|
|
|
|
|
01-07-2011, 07:08 AM
|
#26 (permalink) | |
|
A True Z Fanatic
Join Date: Feb 2010
Location: Covington, GA
Age: 47
Posts: 14,844
Drives: Waiting on next Z
Rep Power: 223 |
Quote:
|
|
|
|
|
|
01-08-2011, 02:21 AM
|
#27 (permalink) | |
|
Base Member
Join Date: Jun 2010
Location: southern california
Posts: 168
Drives: 09 nissan 370z
Rep Power: 17 |
Quote:
__________________
 09 Monterey Blue 6 SPD::Stillen Gen 3 Intakes::Berk CBE::DIY Black Fang and Rear Valance::Z Enclosure 2 10" Upfire Box::Berk HFC 09 Monterey Blue 6 SPD::Stillen Gen 3 Intakes::Berk CBE::DIY Black Fang and Rear Valance::Z Enclosure 2 10" Upfire Box::Berk HFC
|
|
|
|
|
|
01-08-2011, 02:23 AM
|
#28 (permalink) | |
|
Base Member
Join Date: Jun 2010
Location: southern california
Posts: 168
Drives: 09 nissan 370z
Rep Power: 17 |
Quote:
__________________
09 Monterey Blue 6 SPD::Stillen Gen 3 Intakes::Berk CBE::DIY Black Fang and Rear Valance::Z Enclosure 2 10" Upfire Box::Berk HFC
|
|
|
|
|
|
01-08-2011, 11:50 PM
|
#29 (permalink) | |
|
Track Member
Join Date: Apr 2010
Location: Clemson, SC
Posts: 519
Drives: Red Rocket
Rep Power: 18 |
Quote:
Any other questions please feel free to PM me or post here.
__________________
Last edited by Matthew; 01-08-2011 at 11:54 PM. |
|
|
|
|
|
01-09-2011, 02:16 AM
|
#30 (permalink) | |
|
Base Member
Join Date: Jun 2010
Location: southern california
Posts: 168
Drives: 09 nissan 370z
Rep Power: 17 |
Quote:
__________________
09 Monterey Blue 6 SPD::Stillen Gen 3 Intakes::Berk CBE::DIY Black Fang and Rear Valance::Z Enclosure 2 10" Upfire Box::Berk HFC
|
|
|
|
|
|
| Bookmarks |
|
|
 Similar Threads
|
||||
| Thread | Thread Starter | Forum | Replies | Last Post |
| black head lights | Nismo221 | Exterior & Interior | 3 | 09-08-2010 05:55 PM |
| Changing burned out head lights | Strangler | Exterior & Interior | 2 | 06-21-2010 11:40 PM |
| CinCity Custom Head Lights in Australia | Aus370z | Australia/New Zealand | 0 | 08-12-2009 04:00 PM |
| The 370Z's Head lights | nogoodname | Exterior & Interior | 72 | 01-29-2009 02:11 AM |


 Linear Mode


