
|
Tools Needed: 12v battery for testing. I used some old RC car batteries and wired them up for 12 volts. Attached alligator clips for ease of testing drill with 3/16"
|
|||||||
 |
|
|
LinkBack | Thread Tools | Display Modes |
|
|
 06-28-2009, 11:30 PM
|
#1 (permalink) |
|
I shake Caravans
 Join Date: Apr 2009
Location: north Dallas
Posts: 9,517
Drives: everyone crazy
Rep Power: 44   |
Tools Needed:
12v battery for testing. I used some old RC car batteries and wired them up for 12 volts. Attached alligator clips for ease of testing drill with 3/16" bit and a much smaller bit for pilot holes screwdrivers wire-strippers soldering iron w/ solder and flux 2-part epoxy adhesive Oven (large enough for your headlights, test-fit please) A hobby knife will make some things easier Materials Needed: * 18x White LED's - Part # C513A-WSN-CV0Y0151 or C513A-WSS-CV0Y0151 Buy them here * 6x 150 ohm 1/4 watt or 150 ohm 1/2 watt resistors from radio shack 3x strings of 24 guage wire, sold as a set from radio shack. 25 feet long each (Red, Black, and Green) 1x can of krylon fuzion paint, I used Satin Black and it is about 75% gloss I ordered a set of spray-can matched paint to my pearl white from Paint Website tons of heat shrink tubing that will fit the 24 gauge wire. make sure you have some that can fit 2 of them in one as well. Patience, you will need a lot of it  *Note, for the LED's and resistors, it doesn't hurt to get more than you need. I got 25 LED's and 10 resistors, but ended up using only the 18 and 6 since they all worked perfectly. Be safe and grab a few extra. ********** For those that are mechanically inclined that want to do this themselves, but aren't comfortable working with the LED wiring: If you want me to make an identical wire harness for you, I am willing to wire everything for you. You can feel free to pm me and I will send instructions on what you have to do. ********** Step 1: Remove bumper DIY: Front Bumper Removal Step 2: Remove headlights DIY: Headlight Removal Thanks DIGItonium for those DIY's! Picture of the back of the headlight to see what all is back there:  Now, strip one headlight of everything you can easily get off. Remove the wiring harness w/ bulbs, all brackets that come off, all visible screws besides the headlight adjustment screws, remove ballast but you'll have to leave the wire between it and the bulb, remove the HID bulb as well. I suggest doing 1 side at a time, that way you always have a completed assembly to reference if you need it. It is time to bake, so preheat the oven to 250 degrees, and pull all but the bottom rack out. (you may want to test fit the lights before preheating, mine BARELY fit in my oven). You will set the light on a cookie sheet with a damp wash cloth between the cookie sheet and the headlights to ensure the cookie sheet doesn't melt anything. Bake for 8-12 mins. I pulled mine out at 8 and it needed a bit longer. I suggest having a pair of mechanix gloves for this, but now it is time to pull the lens off. Once the light is out of the oven, start at the very top of the light and start peeling the lens off. I don't suggest using a screwdriver or anything like that to pry it open, just use some muscle and maybe a plastic spreader or something. Be careful of all the tabs holding the lights on and take your time getting the lens off, there is no room for screwing this up  Alright, the scary part is over now! this is what you should see: 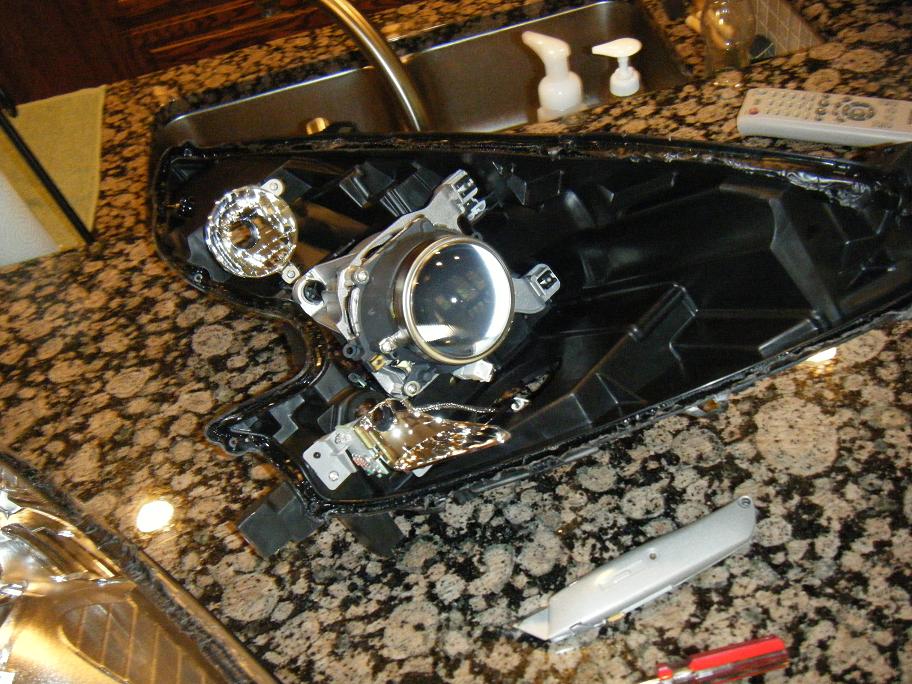 Lets get all of those reflectors out now. You should see 6 or 7 small phillips head screws holding the reflectors to the lens. Remove all of them and pull the assembly out. If you removed all of the screws, the rest of the parts should be easily popped out too.  Time to start the drilling for the holes. I used 5mm LED's, so the drill bit that I used to get the right size for the LED was 3/16", but definitely don't start out with that big of a bit. I used a really small bit to drill a pilot hole for each one before using the 3/16" bit. You want to drill the holes on the very back side of each dimple, so position your pilot hole right in the middle of where you want your hole to be. Just go in straight against the surface, and when you get the bit all the way through, tilt the drill down to where the bit is going through from the front. You will do the same thing with the bigger bit. Basically have the drill bit coming out where you want your LED pointing. 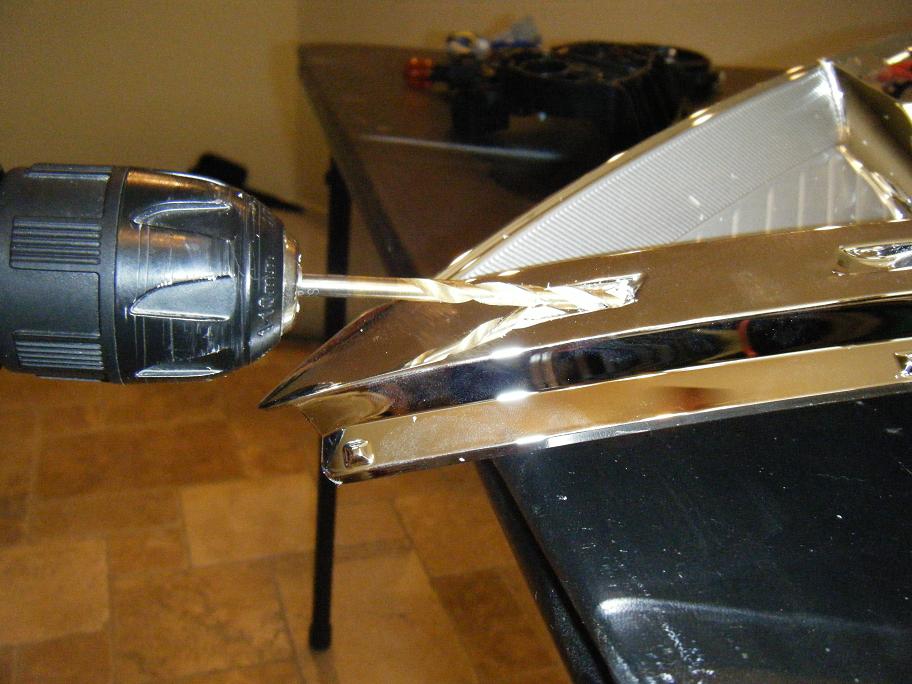 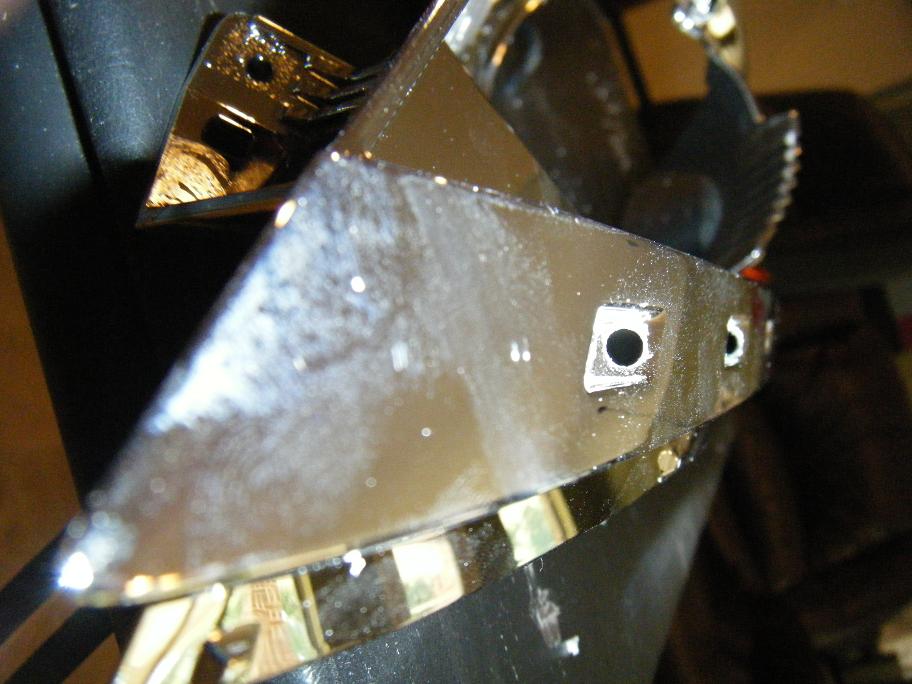 A View from the back side: 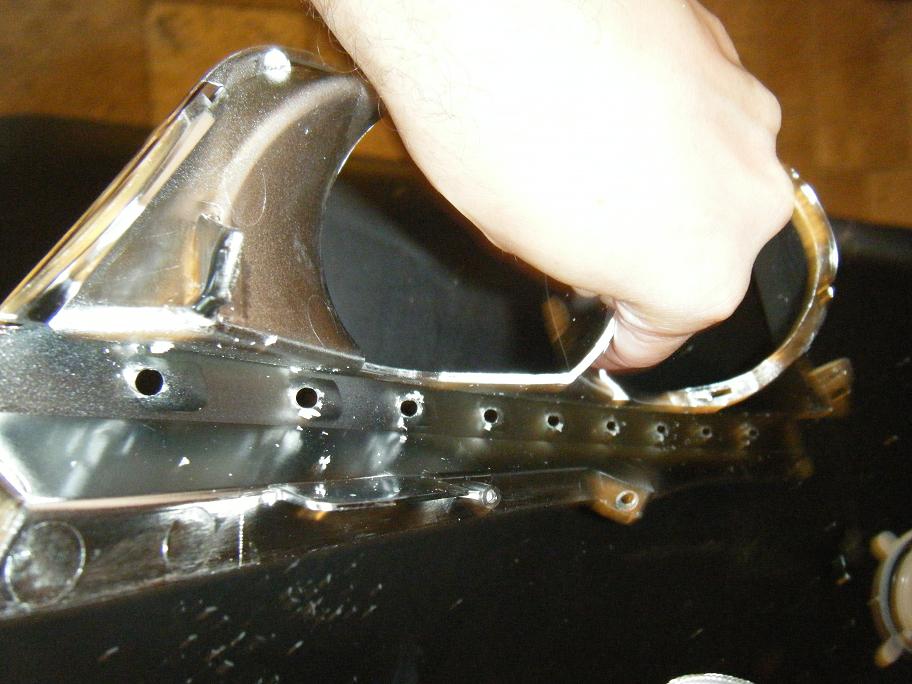 These holes will position your LED's, so take your time and make sure you get the angles right, you'll see in one of my pictures the 3rd LED from the front wasn't angled correctly, and I had to maneuver it a little more to get it right. That extra step would have been saved with a little more time taken on this step. Alright, with your holes drilled, it's time to wire up a strand of LED's for testing to make sure the holes are exactly right before you go paint. Cut 6 strips of green wire at about 3 inches in length each. cut 2 strips of red, and 2 strips of black in the same length. I also trimmed the leads on my LED's so they weren't quite so long, just remember that the side with the longer lead is the positive side, so if you trim them keep that side a little longer for reference. I trimmed the resistors leads as well, these don't matter which side is positive and which is negative. Here is the basic wiring diagram for 1 side of headlights: 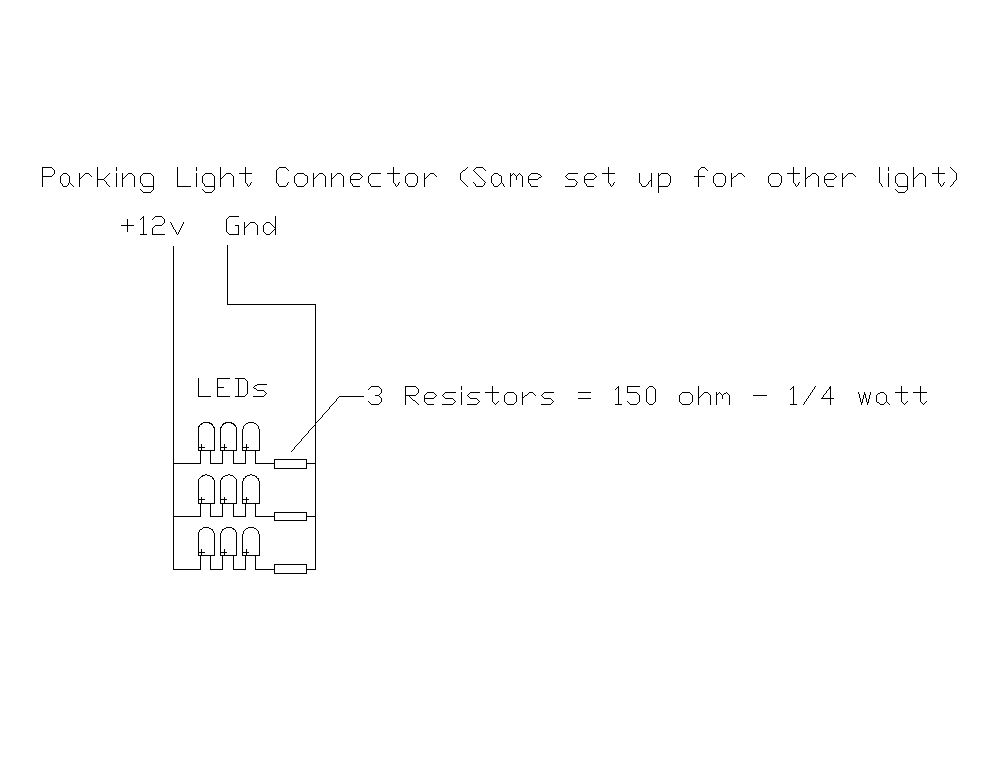 I'd just wire up 1 strand of 3 right now to test with, the rest you can wire up while your paint is drying. Take 1 end of the red wire and solder it to the positive side of an LED. Then on the negative side of that LED run a green wire to the positive of another, then do the same thing so you have: red wire -> LED -> green wire -> LED -> green wire -> LED. Now the resistor needs to go on the negative side of this wiring. I soldered mine directly to the LED lead, and then soldered on the black wire on the other end of that. Make sure you use heat shrink over each solder, you don't want any shorts after you get it together. Use a 12v battery with alligator clips to test that your string works. once it is working plug it into the holes you drilled and test each one for angle and make sure you are happy: 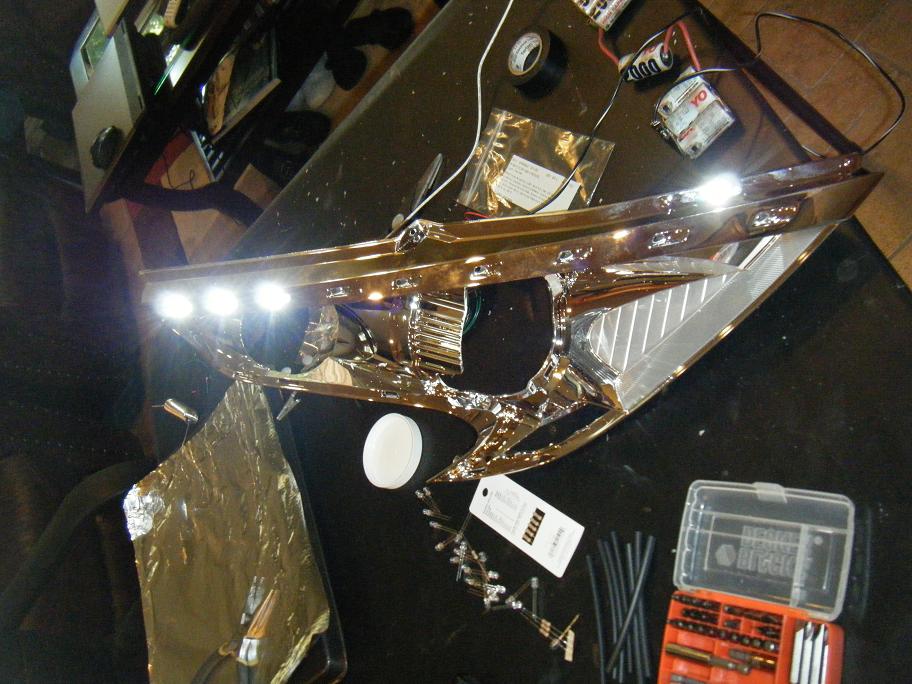 back side: 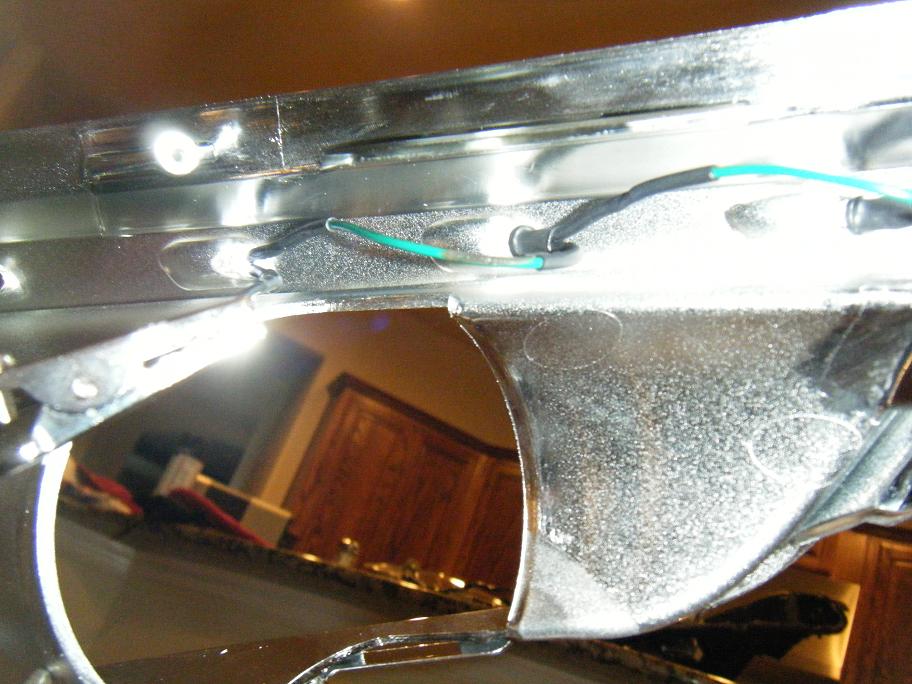 A shot of the whole wiring harness to give you an idea of what 1 of the strands would look like:  Ok, once you are happy you can go paint your headlights whatever style you want. Make sure you mask the turn signal lens, and I masked behind the amber side marker as well since I wanted to keep it amber. You can paint black behind it for the "smoked" look. You can look at Simota's DIY for painting tips: DIY: how to make your headlights black housing with 20 bucks... While your paint is drying, wire up another string of 3 just like you did with the first. You should have 2 strings now, with a total of 6 LED's wired. on the last string of 3 for this headlight, don't use the short red and black wire. This will be the top set, and will have a length of wire to go all the way to the wiring harness you tap into outside of the headlight. On this one I used 5ft lengths of each, red and black, and wired those in place of the 3 inch strips on each end. Now to pull it all together into 1 harness. You will need your housing again for this, so you will probably have to wait until it is dry (or between coats if it is dry enough to put 3 LED's in there real fast). Put the strip with the 5ft leads in the top 3 slots, and mark each wire every third hole. I put the negative side at the very top, so I marked the black wire on the 4th hole from the top, then at the 7th hole from the top. The red wire was the n marked at the 6th hole from the top, and the 1st hole at the very bottom. Theoretically both sides should be about the same length so you should only NEED to mark 1 and just copy it on the other side, but I marked both. Once you have them marked you are done with the housing for now, so you can finish painting if you haven't. On each of the marks, strip off about 1/2" of the insulation, but don't cut the wire. Start on the middle one and wire in your string of 3 LED's and just connect the red end of the strip to the red wire, black end to black. Make sure the wire is facing in such a way that you can slip some heat shrink tubing on the very end of the wire and bring it up and over the joint. once you have the shrink tubing on do the same thing with the bottom. Your completed wiring harness should look like: 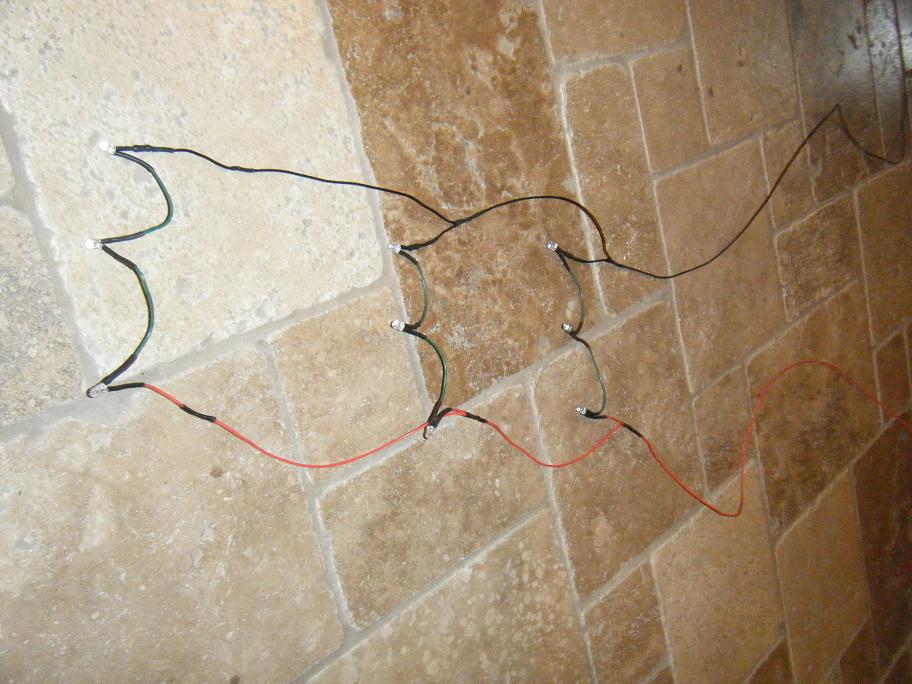 Go ahead and test your work and hook up your harness to the 12v battery you have and make sure all 9 LEDs are working and at the same brightness. I hope your painting is done because it's time to mount the LED's and start re-assembling. Alright, time to install the harness. You will want the extra length of wire at the bottom end of the headlight, so keep that in mind when you are putting the LED's in their holes. You should just have to lightly press the LED's into each slot, if it takes too much force you may have to drill it out a tiny bit more with the same 3/16" drill bit...that may happen if you got a decent bit of paint in the holes. Don't worry about where the wires are right now, just get all the LED's in the housing and test them again to make sure the angles are good. (here is where you see that 3rd LED from the bottom that isn't angled correctly, this was fixed later)   Once you are happy, flip it back over and mix up some Epoxy. I used a Q-tip to get some epoxy on the backside of each LED to hold them in place. Since they are pressed in holes that are the right diameter for them, they will likely stay by themselves, but the epoxy is a safety precaution so they don't move later on. Once you get all the LED's glue'd down tuck the wires in that channel you can use a little epoxy sparingly to hold it down in there. the back side should look like this: 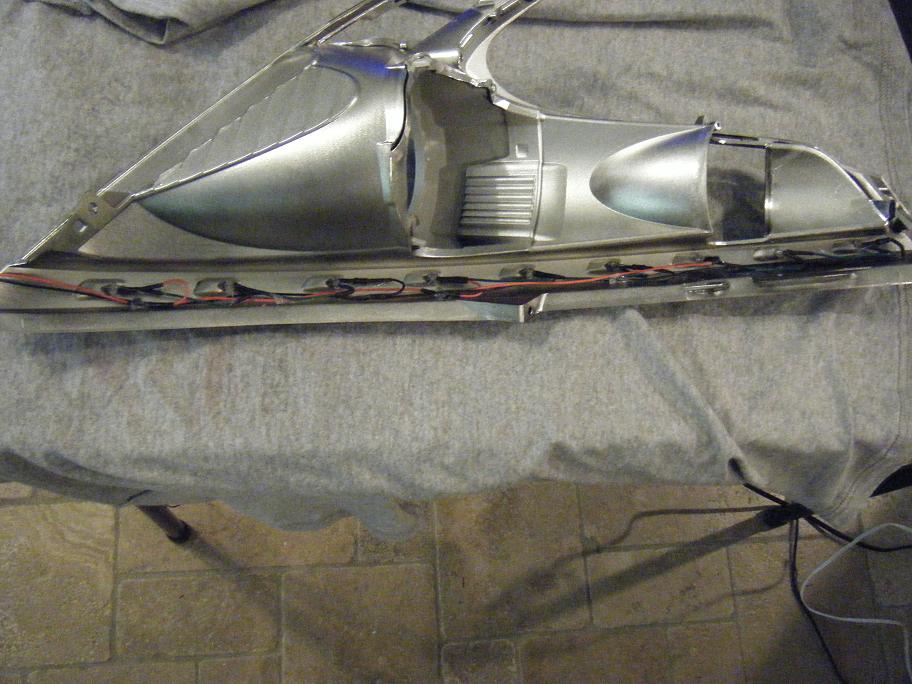 flash+chrome = fail 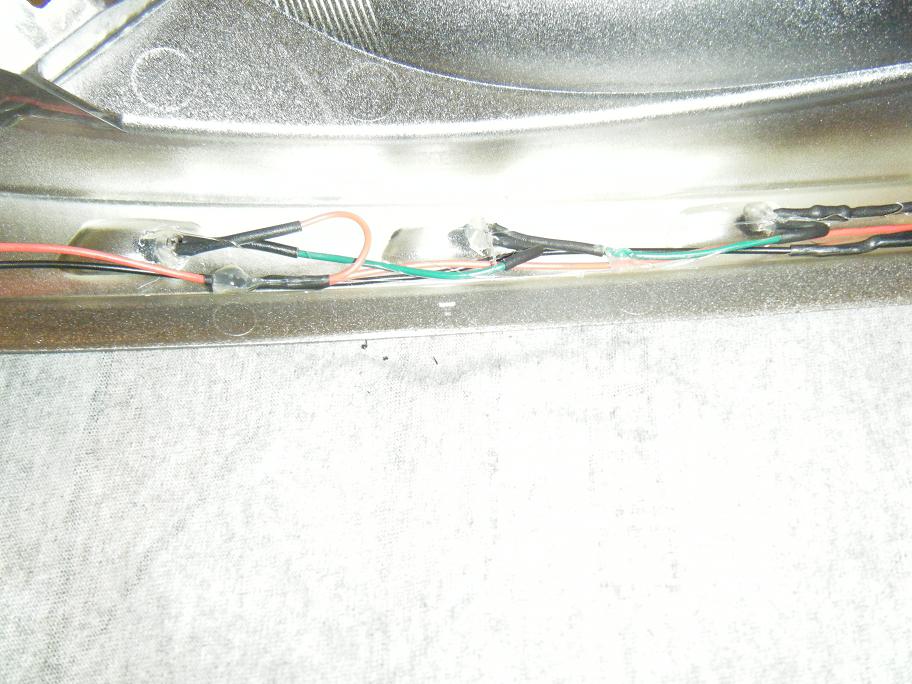 Once that is done, re-attach all of the pieces of the housing and get it ready to re-install. Now is a good time to make sure the inside of the lens is nice and clean, before you put the reflector assembly back into the lens. Ok, now we need to route the wiring through the rest of the housing and out to where we can tap into the parking light wiring. This is how I did it. I ran the wires behind the projector housing to keep them out of the way, and then brought them through this grommet that is holding the wiring for the turn signal LED's: 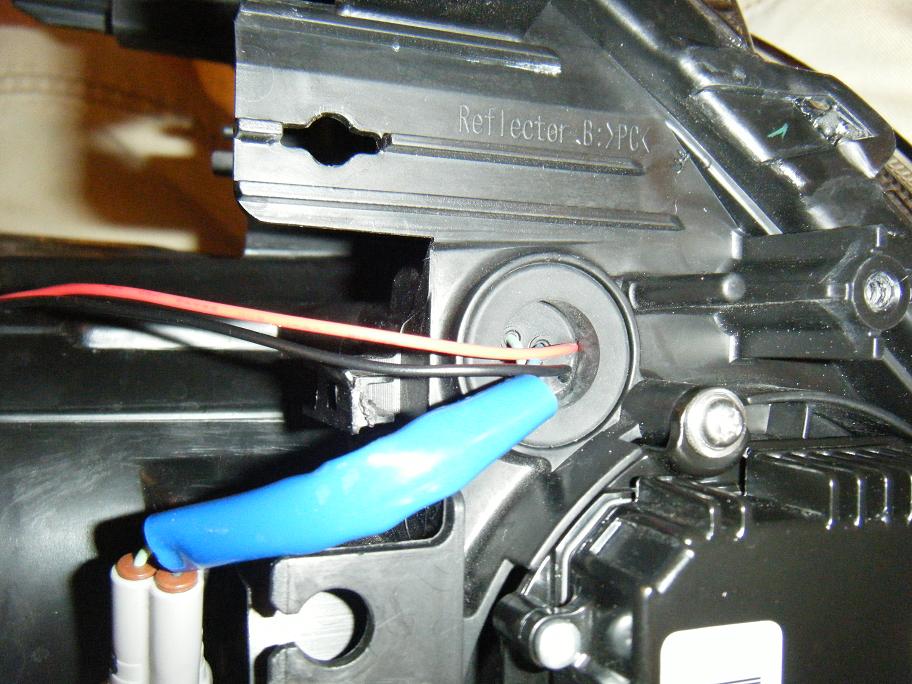 I just drilled 2 small holes into the rubber grommet and brought the wire through. Once you have them through you are ready to seal the lens. Heat that oven back up! *** Update: I have figured out an easier way to wire it to the parking lights. Just run the wires to the small connector inside the housing that goes to the little circuit board with the Amber LED sidemarkers in it. This connector gets power with the parking lights, and now you won't have to run any sort of wireo utside of the headlight itself. *** How I put them back together was I put the lens on as best as I could with the old silicone still in place, then heated it up just as I did when I removed the lens. Pull the headlight out of the oven and just pinch the lens down all around the seal. you should be able to get the lens back into place, with all of the tabs locked by hand. Let the housing cool about 5-10 mins, and then secure the lens with all of the screws. This should pull the lens in just like it was from the factory. For added security, I took a bead of new silicone all the way around the seal. Now to finish off the wiring. If you want your LED's on with your parking lights you can do what I did. Put the wiring harness back together on the headlight, except leave the parking light out of it's socket. There is a green and a black wire going into that bulb, just match red to green and black to black and you are good to go. I stripped a little insulation off on each one and soldered them on and just wrapped each of them in electrical tape. 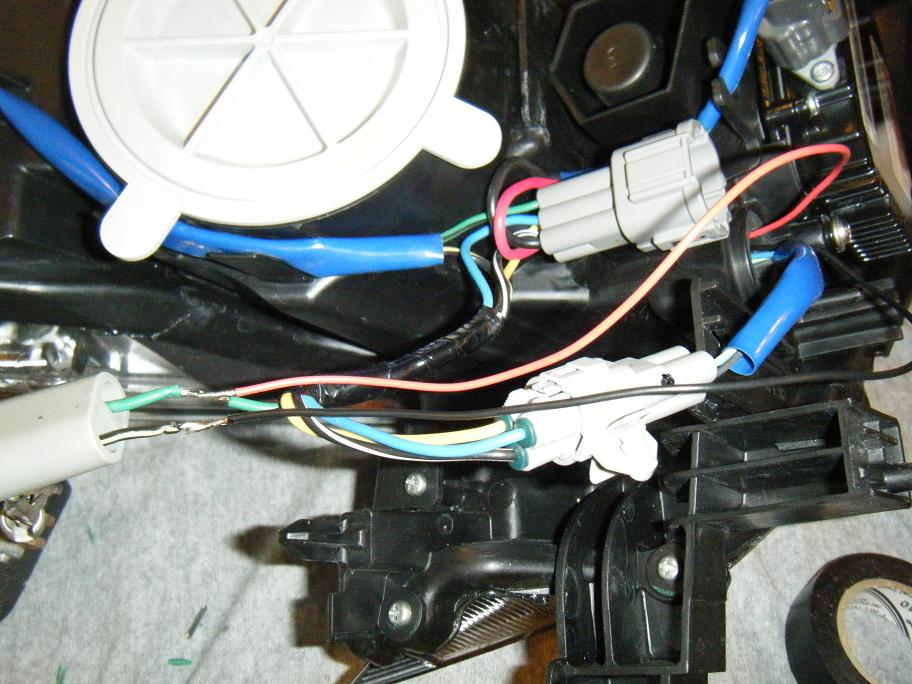 Re-assemble everything and repeat everything above for the other light. Your second set will probably go quicker since you are now experienced =) Finished product: 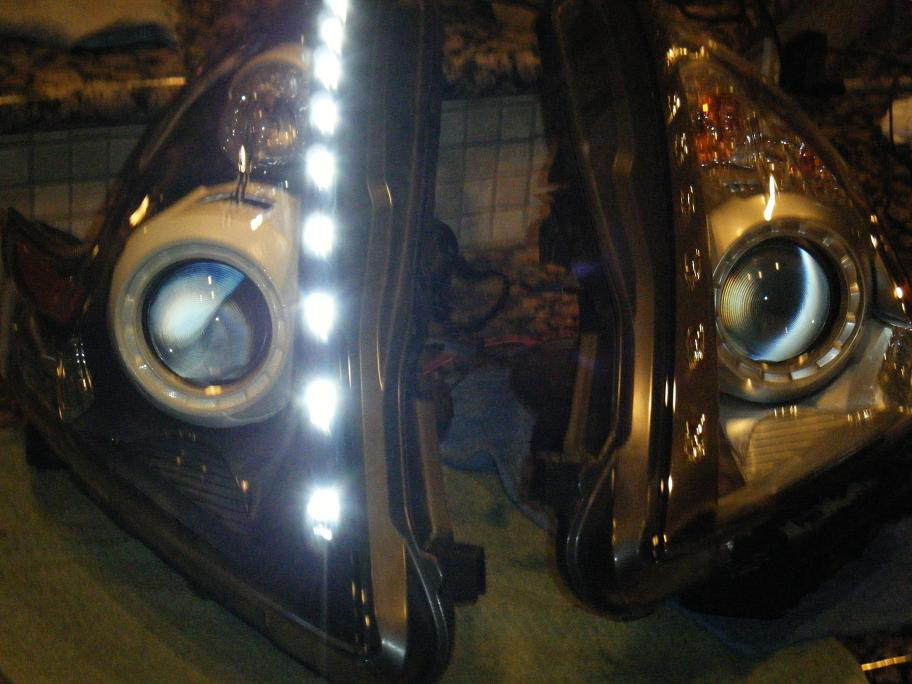 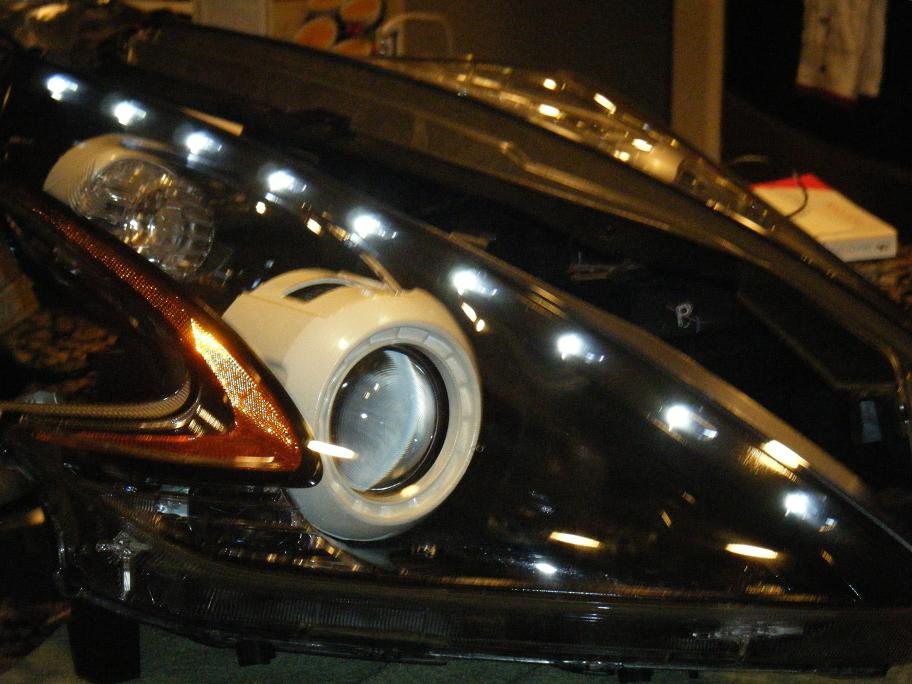 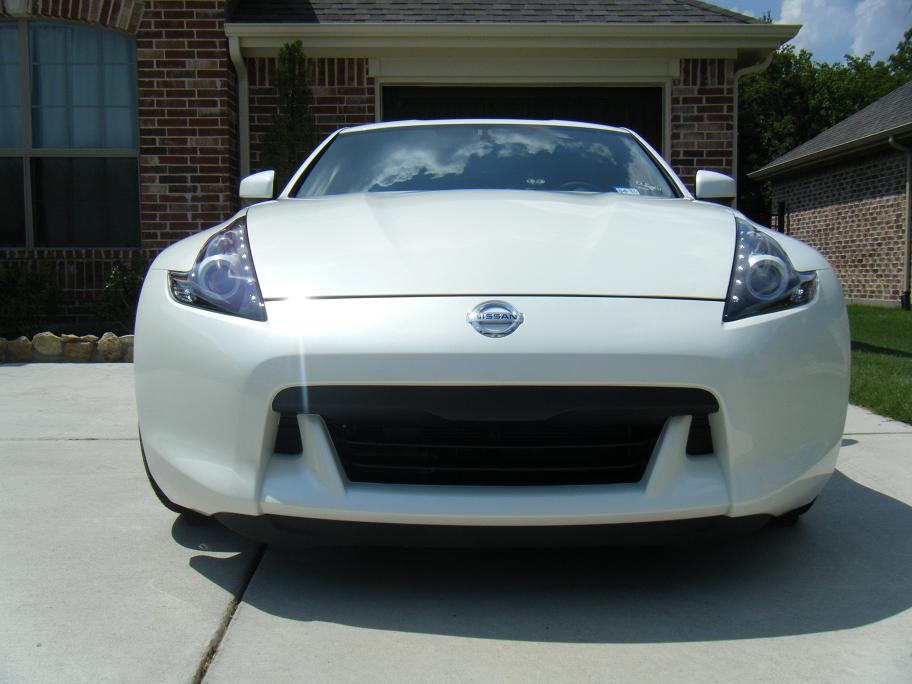 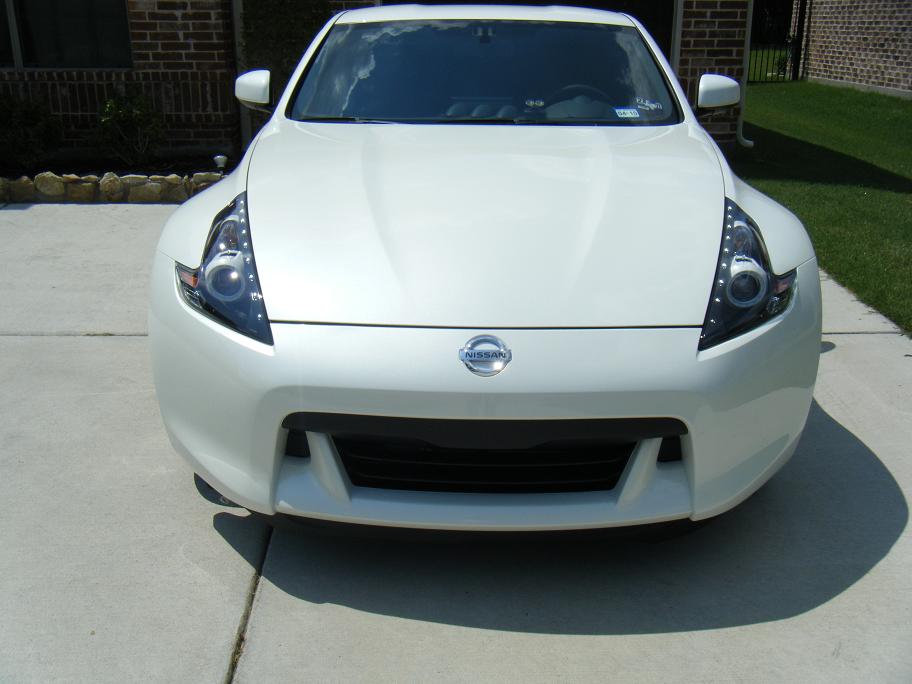
Last edited by Caravanshaka; 11-30-2009 at 11:55 AM. |

|

|
|
06-28-2009, 11:49 PM
|
#2 (permalink) |
|
I shake Caravans
Join Date: Apr 2009
Location: north Dallas
Posts: 9,517
Drives: everyone crazy
Rep Power: 44 |
Got some Morimoto 6000k bulbs in today from the retrofit source and decided it was time to post a quick video of the headlights
 Last edited by Caravanshaka; 08-01-2009 at 12:41 AM. Reason: adding video |
|
|
|
|
11-19-2010, 10:52 PM
|
#3 (permalink) |
|
Base Member
Join Date: Jun 2010
Location: houston, tx
Posts: 7
Drives: '10 Nizzan 370z 40th
Rep Power: 17 |
Caravanshaka, thanks for the detailed post. I have a 40th anniversary. I am in the process of buying things for my headlight led and blackout.
I see that you did not strip out and add new headlight sealer. How is the seal on your headlight holding? I am wondering if I should buy Nissan OEM sealer from MyNismo.com - NISSAN OEM Sealer ? Just in case. |
|
|
|
|
12-07-2010, 03:34 PM
|
#4 (permalink) | |
|
Track Member
Join Date: Feb 2010
Location: Indiana
Posts: 886
Drives: G37S Sedan
Rep Power: 18 |
Quote:
 Did you wind up using this sealer? Seems like good insurance for only $20. I am going to be doing mine over the winter.
__________________
2012 G37S Sedan 6MT - Project Practicality 2009-6MT-Sport/Touring-Dembflyr's Journal-TT Build Thread-CAR IS SOLD |
|
|
|
|
|
12-08-2010, 06:45 AM
|
#5 (permalink) | |
|
Base Member
Join Date: Jun 2010
Location: houston, tx
Posts: 7
Drives: '10 Nizzan 370z 40th
Rep Power: 17 |
Quote:
Before I opened my headlights, I wrote to Caravanshaka and he told me that there is no need for extra sealant. Its been a year since he did his mod and has not had any issues. |
|
|
|
|
|
12-08-2010, 08:33 AM
|
#6 (permalink) | |
|
I shake Caravans
Join Date: Apr 2009
Location: north Dallas
Posts: 9,517
Drives: everyone crazy
Rep Power: 44 |
Quote:
__________________
____________________ PROJECT DiaD - Sold but not forgotten! The first testicular guard, the "Cup," was used in Hockey in 1874 and the first helmet was used in 1974. That means it only took 100 years for men to realize that in order to work the penis, the brain must remain whole. |
|
|
|
|
|
06-29-2009, 12:08 AM
|
#9 (permalink) | |
|
I shake Caravans
Join Date: Apr 2009
Location: north Dallas
Posts: 9,517
Drives: everyone crazy
Rep Power: 44 |
Quote:

|
|
|
|
|
|
06-29-2009, 08:29 AM
|
#11 (permalink) |
|
I shake Caravans
Join Date: Apr 2009
Location: north Dallas
Posts: 9,517
Drives: everyone crazy
Rep Power: 44 |
You can see them on the other side of the highway
The LED's are "super-bright". I haven't seen exactly how bright they are at night, but I think the headlights will make it so they don't appear blinding for oncoming traffic. I'll test tonight and try and get more pictures. |
|
|
|
|
06-29-2009, 09:44 AM
|
#12 (permalink) |
|
Track Member
Join Date: May 2009
Location: Las Vegas
Posts: 578
Drives: N/A
Rep Power: 19 |
at 8500mcd, they shouldnt be too bright as to blind people or bother people. They put out about 20lm max which is decent enough.
if anyone wanted to copy the Audi's, you'd need upwards of 75 or more lumens. thats when you have to splurge (about 7 bucks a pop) and buy something like these: Luxeon K2-TFFC LED - Cool White Lambertian, 160 lm @ 1000mA [LXK2-PWC4-0160] The nice thing about the LED i just posted, is the temperature is good for up to 135 degree's Celsius. Awesome write up. I was waiting for someone else to do this writeup before I went into baking the headlamps. thats the part im scared of. Cant wait to get my car and do this! |
|
|
|
|
06-29-2009, 09:53 AM
|
#13 (permalink) | |
|
I shake Caravans
Join Date: Apr 2009
Location: north Dallas
Posts: 9,517
Drives: everyone crazy
Rep Power: 44 |
Quote:
These are bright enough to be noticed during full texas sun, which is definitely bright enough for me 
|
|
|
|
|
|
| Bookmarks |
|
|
 Similar Threads
|
||||
| Thread | Thread Starter | Forum | Replies | Last Post |
| DIY: Headlight Removal | DIGItonium | DIY Section (Do-It-Yourself) | 34 | 09-03-2017 08:01 PM |
| 180 Custom Headlight Review! | bullitt5897 | Exterior & Interior | 43 | 12-10-2010 05:26 PM |
| Blacked out headlight for PG !!! | msl82 | Exterior & Interior | 31 | 05-02-2009 06:06 PM |
| Blacked out headlight | msl82 | Nissan 370Z General Discussions | 6 | 01-02-2009 12:47 PM |


 19Likes


 Hybrid Mode


