
|
The GTM Stage 1 supercharger kit deletes the windshield washer reservoir during the install to make room for the air filters, IC piping, and by-pass valve. While not the end
|
|||||||
 |
|
|
LinkBack | Thread Tools | Display Modes |
|
|
 04-23-2012, 09:22 AM
|
#1 (permalink) |
|
Enthusiast Member
Join Date: Apr 2011
Location: The 49th State
Posts: 296
Drives: NISMOSIS
Rep Power: 16   |
The GTM Stage 1 supercharger kit deletes the windshield washer reservoir during the install to make room for the air filters, IC piping, and by-pass valve. While not the end of the world, I sometimes need the clean the windshield and having a reservoir would help. This DIY shows how to add a small reservoir back to the car.
As with all DIY, you are responsible for the safety of yourself and your vehicle. If you are not comfortable or do not have the correct tools, please consult with a shop. If you self installed or had a shop install the supercharger kit, you should have the OEM windshield washer pump gasket, the washer pump itself, and the short wiring harness with the OEM plug for the pump. I had all of these parts in a box from my supercharger install. Parts and Tool List
Step One Jack up the passenger side and put the car on a jack stand. Remove the wheel and the fender protector to allow room to work inside the bumper area. Step Two Locate the OEM rubber pump gasket, OEM pump, and OEM wiring extension from the OEM windshield washer reservoir. You should have taken these items off the car during the SC install. Remove the pump and rubber gasket from the GTM washer reservoir and then install the OEM pump gasket and OEM pump onto the smaller GTM washer reservoir. Swapping these allows you to use the OEM wiring adapter. Just pull off the pump, pull off the black gasket and then replace with the OEM hardware. I did not take a picture but you will get the idea when looking at the parts. Then snap the black mounting plate onto the washer reservoir itself. This plate comes with the GTM washer reservoir. So now you have the pump installed on the reservoir and the bracket snapped oto the reservoir. You then attach all of this to the L bracket using zip ties. Step Three I drilled a few strategic holes into the metal L bracket and then used 6 different zip ties to attach the reservoir mounting bracket onto the metal L bracket from Lowes. It is hard to see in the picture, but I added an additional metal support piece to the L bracket for rigidity. Essentially, you want a good, solid connection because this holds the reservoir to the L bracket. I could not determine a better way to attach everything other than using zip ties. While not ideal, I think it should hold up ok. Now fill up the reservoir with your choice of fluid. Then use the Nissan bolt part number 08146-6205H to attach all of this to a speed nut located above the air filters. This is kind of obtuse to describe all of this but here is a picture of the final result.  Green arrows show the zip ties attaching everything to the L bracket Blue arrows show the black mounting plate that comes with the GTM kit Red arrows show the OEM wiring harness to connect to the pump Yellow arrows show the metal L mounting plate from Lowes Grey arrows show the location of the speed nut and where to use the Nissan bolt part number 08146-6205H to attach the entire assembly you just put together. NOTE: I used a lock washer and really torqued down the bolt shown in the grey arrows. Only time will tell if this is enough to keep everything in place during hard driving. Step Four Yellow arrows show were you snap the electrical connector on for the pump and attach the rubber washer line for the fluid delivery to the nipple on the washer reservoir. 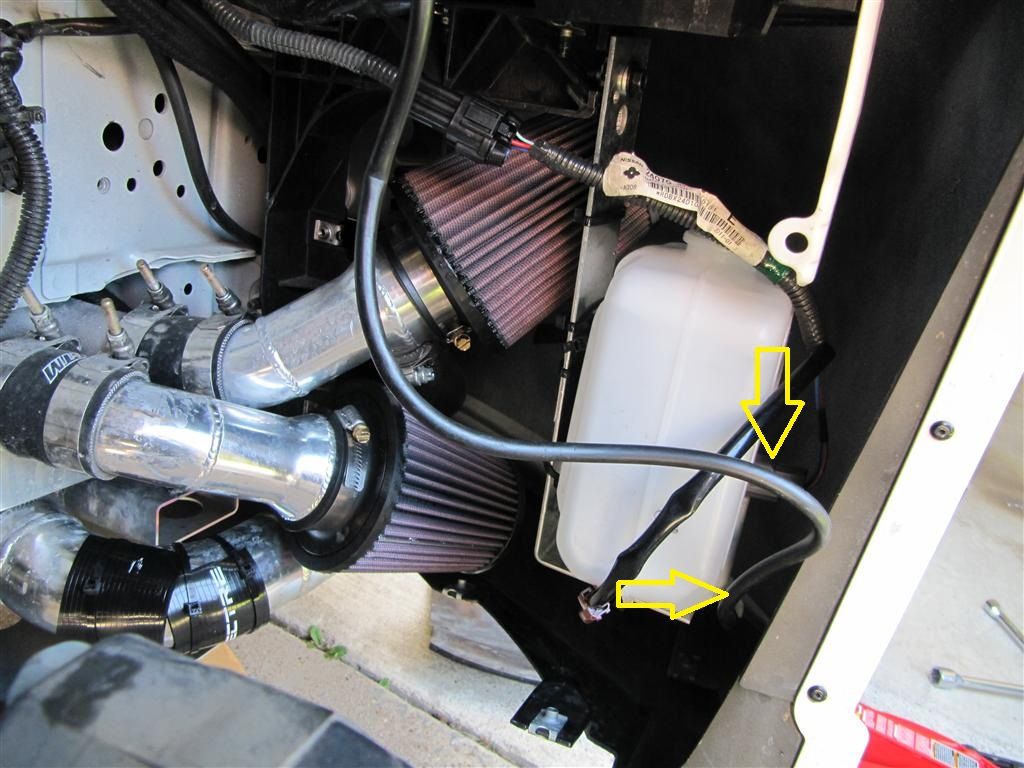 Test the operation of the system and you should get water sprayed onto the windshield. Assuming everything works zip tie the wiring harness and rubber washer fluid line down. I did this but do not have a picture showing it. Step Five Reinstall the fender protector, the wheel, lug nuts, lower down the car, and then torque the lug nuts. Hopefully this helps give people ideas on how to add a washer reservoir after installing the GTM stage 1 supercharger kit. |

|

|
|
10-21-2013, 09:39 PM
|
#4 (permalink) | |
|
Base Member
Join Date: Jun 2009
Location: Winchester, TN
Posts: 77
Drives: '92 Nissan 300zx
Rep Power: 268 |
Quote:
__________________
Whtfairladyz formerly Dustin@Z1 
|
|
|
|
|
|
10-24-2013, 03:35 PM
|
#5 (permalink) | |
|
Enthusiast Member
Join Date: Apr 2011
Location: The 49th State
Posts: 296
Drives: NISMOSIS
Rep Power: 16 |
Quote:
This .. If you pull the passenger wheel off, then the fender liner, you can fill the reservoir with a plastic, flexible funnel. |
|
|
|
|
|
10-24-2013, 06:05 PM
|
#6 (permalink) | |
|
A True Z Fanatic
Join Date: May 2013
Location: Columbus, OH
Posts: 5,051
Drives: 2013 Silver 370z
Rep Power: 3391 |
Quote:
__________________
13 370z- |
|
|
|
|
|
| Bookmarks |
|
|
 Similar Threads
|
||||
| Thread | Thread Starter | Forum | Replies | Last Post |
| GTM Supercharger Stage 1 w/ F.I. LTH | theDreamer | Forced Induction | 140 | 03-16-2013 04:50 PM |
| [FOR SALE] Used Gtm stage 1 supercharger kit | Jamaica | Parts for sale (Private Classifieds) | 58 | 06-20-2012 09:12 PM |
| Washer Fluid Reservoir Level | axio | Nissan 370Z General Discussions | 15 | 10-18-2011 01:05 AM |
| Injen CAI windshield washer tank | Holliday | Intake/Exhaust | 31 | 07-24-2011 08:33 PM |


 Hybrid Mode


