
|
This is a DIY for the install, please keep discussion about "do they do anything?" in this thread: http://www.the370z.com/engine-drivet...nding-kit.html Parts: Stillen Grounding Kit: STILLEN : STILLEN Grounding Kit ~ $80
|
|||||||
 |
|
|
LinkBack | Thread Tools | Display Modes |
 06-12-2010, 12:32 PM
|
#1 (permalink) |
|
Base Member
Join Date: Mar 2010
Location: 370z
Posts: 178
Drives: 09 Touring
Rep Power: 17  |
This is a DIY for the install, please keep discussion about "do they do anything?" in this thread: stillen grounding kit
Parts: Stillen Grounding Kit: STILLEN : STILLEN Grounding Kit ~ $80 Tools: Phillips screw driver 12mm Socket 10mm Socket Metric 5 Allen Wrench References: None Install: ----------------------------------------------------------------- This install took about 45-60min. Most of the link points are in very tight locations, and dropping a tool and then having to recover it on the underbody plastic is almost inevitable. I figured this was a 20min job, I was wrong. 1. So our overall layout looks like this: 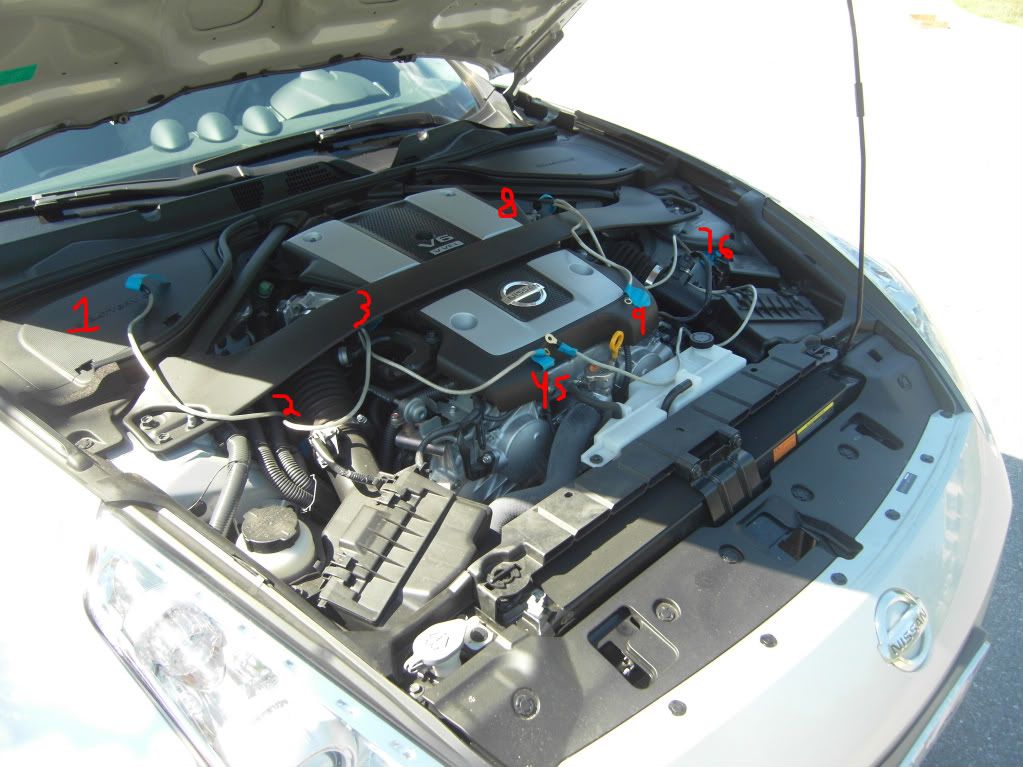 We have the following points: 1. Battery 2. Passenger Strut Area 3. Passenger Throttle Body 4. Center Head (end of 1st cable) 5. Center Head 6. Driver Strut Near Fuse Box (end of 2nd cable) 7. Driver Strut Near Fuse Box 8. Driver Thorttle Body 9. Center TOP Head (end of 3rd cable) Cables 2 and 3 layed out: 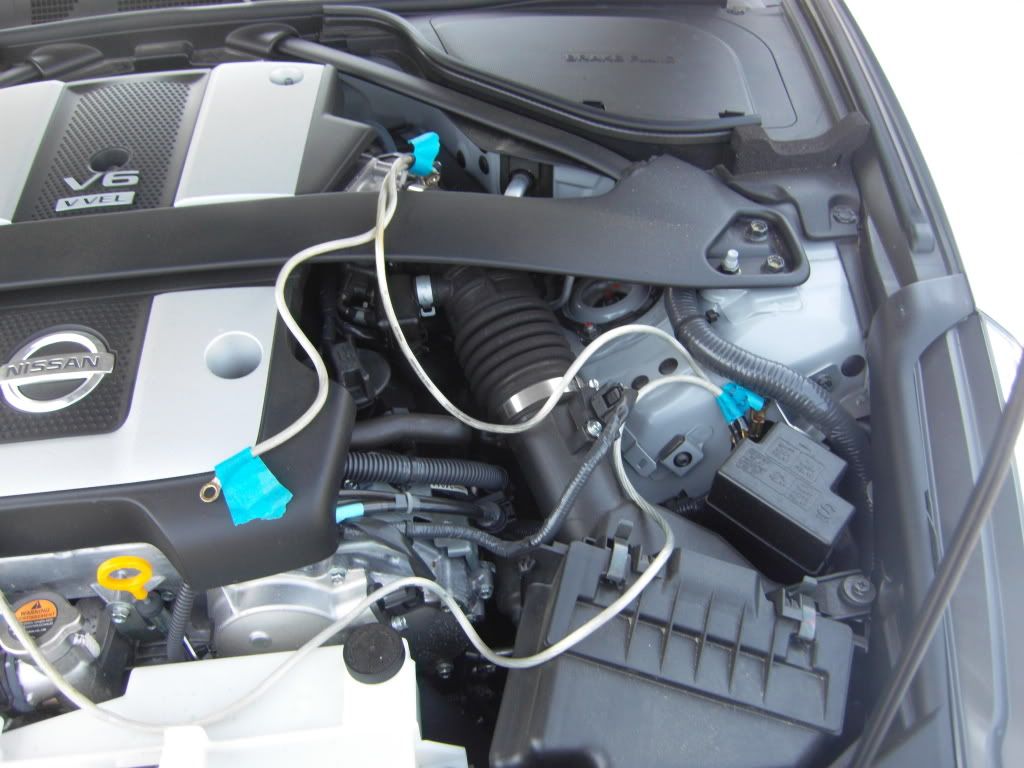 2. So the first thing I hooked up was the battery. Now there was an issue here, my negative terminal connector bolt is stamped on the end so it is not *easily* possible to either take the nut off, or add a nut to the end. In this case, I ziptied it until I figure out something better. There is a little hole that you can pass the cable through to get it into the battery compartment as seen in the picture. If you have a bolt that isn't stamped (modshack's wasn't) then a 10mm nut will work (as seen in the throttle body picture on the blue tape) 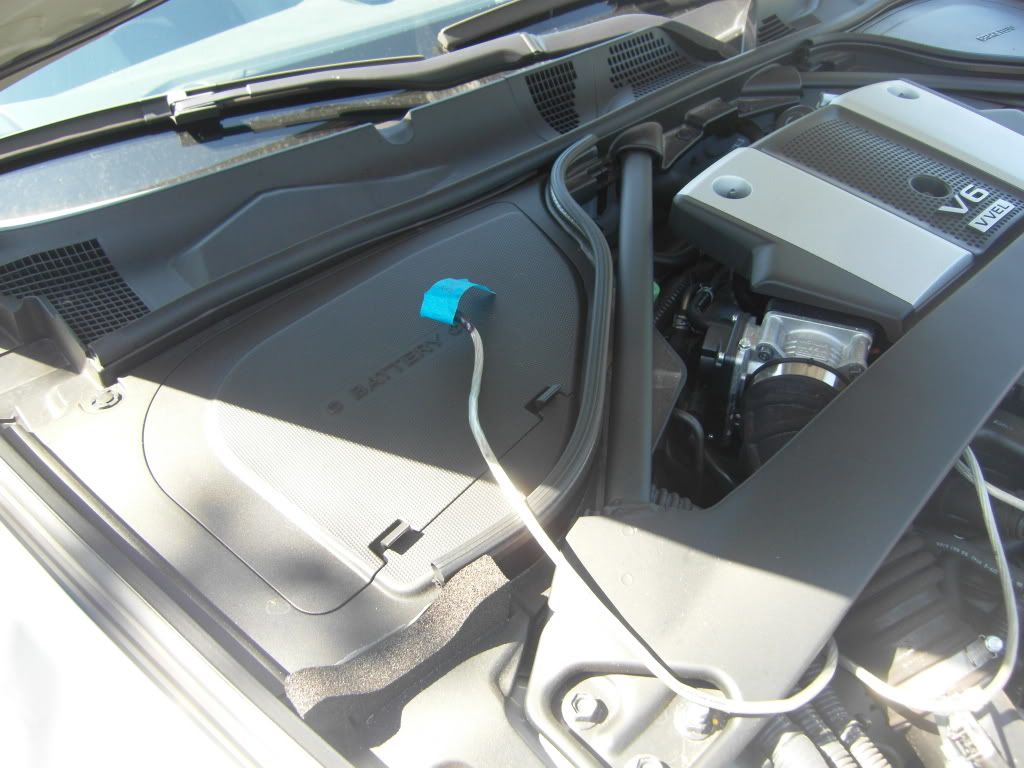 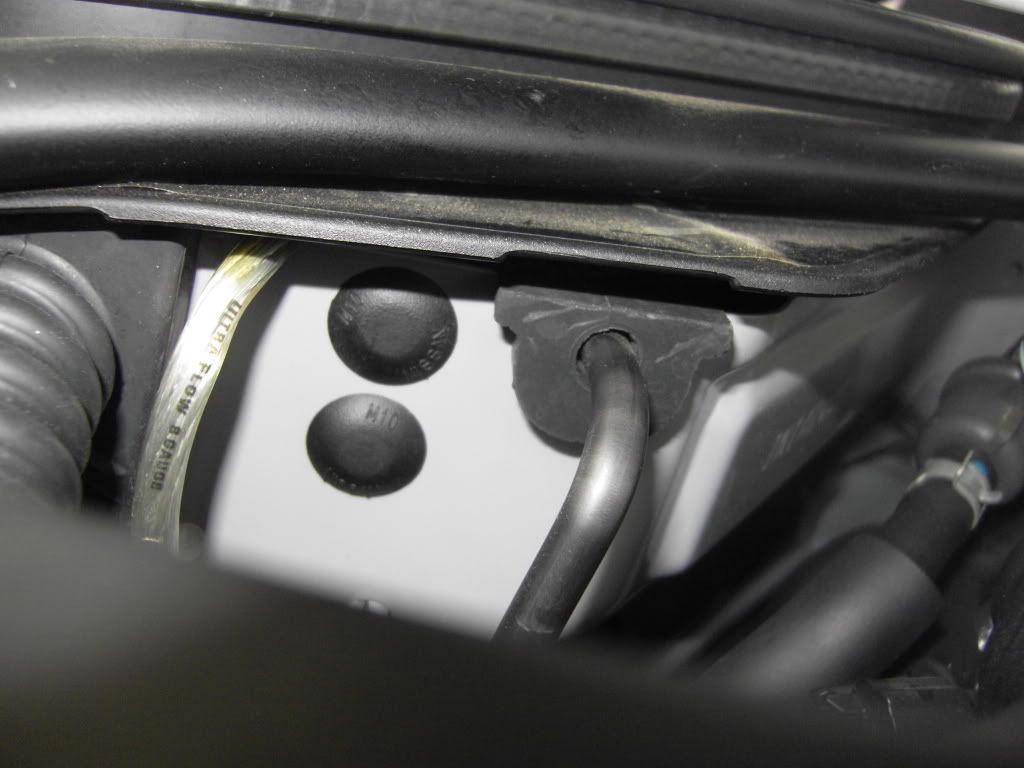 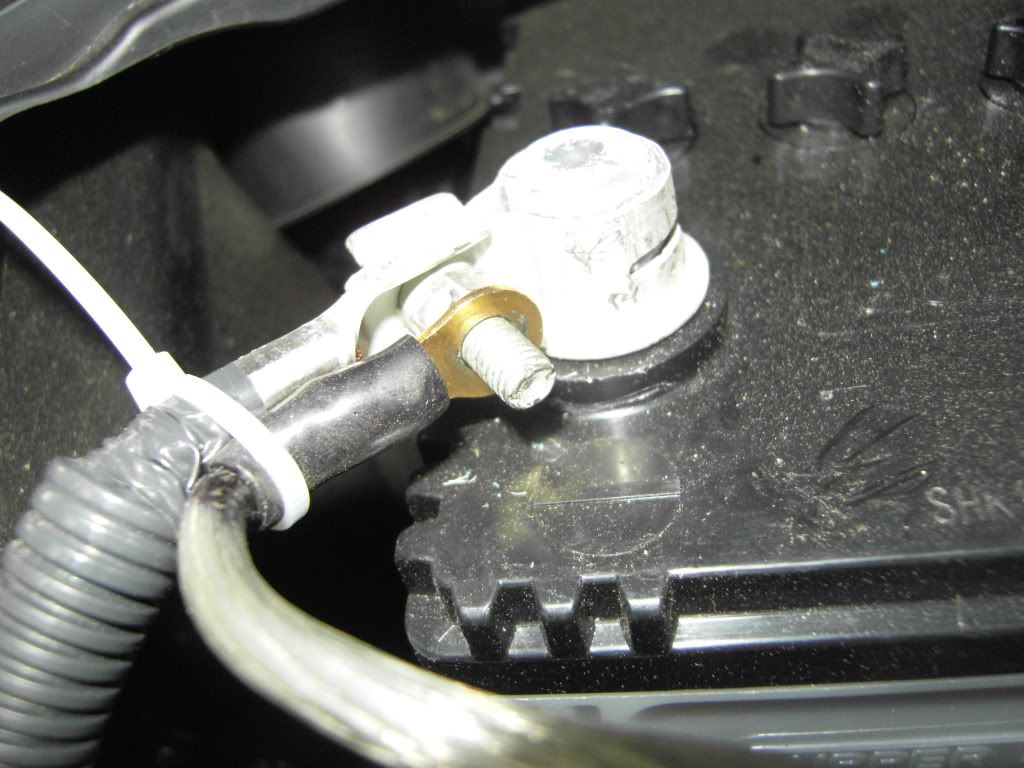 3. The next point is the throttle body, the bolt is on tight and you can move the allen wrench about 1/8th of a turn, so this one might take some time to get out. It is a simple take the bolt out, put the terminal end on, put the bolt back in. 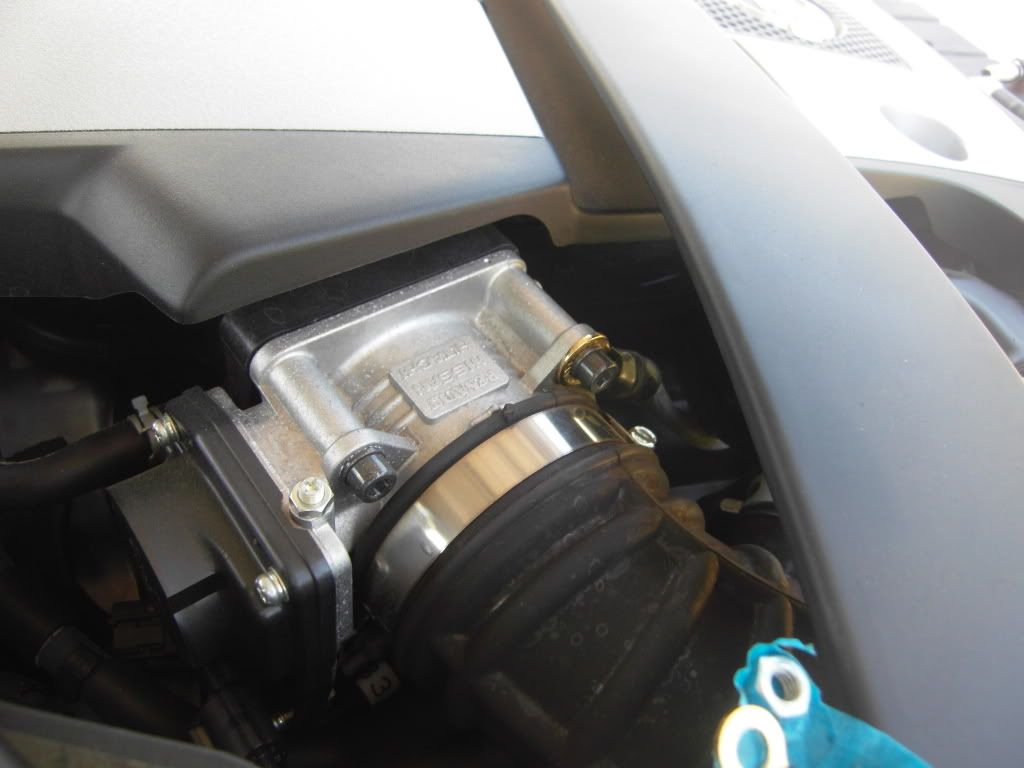 4. The next point is on the body where the strut is. Look under the black rubber tubing between the throttle body and the air box. It is an extremly tight fit. I tried a few things to make more room like moving the black tubing, but ended up just being thankful for small hands and skinny arms. Be careful here not to drop your wrench, both modshack and I did, and its a *pain* to go under the car and remove the plastic to get it back. Simply take the bolt off, put your terminal on, put the bolt back on. 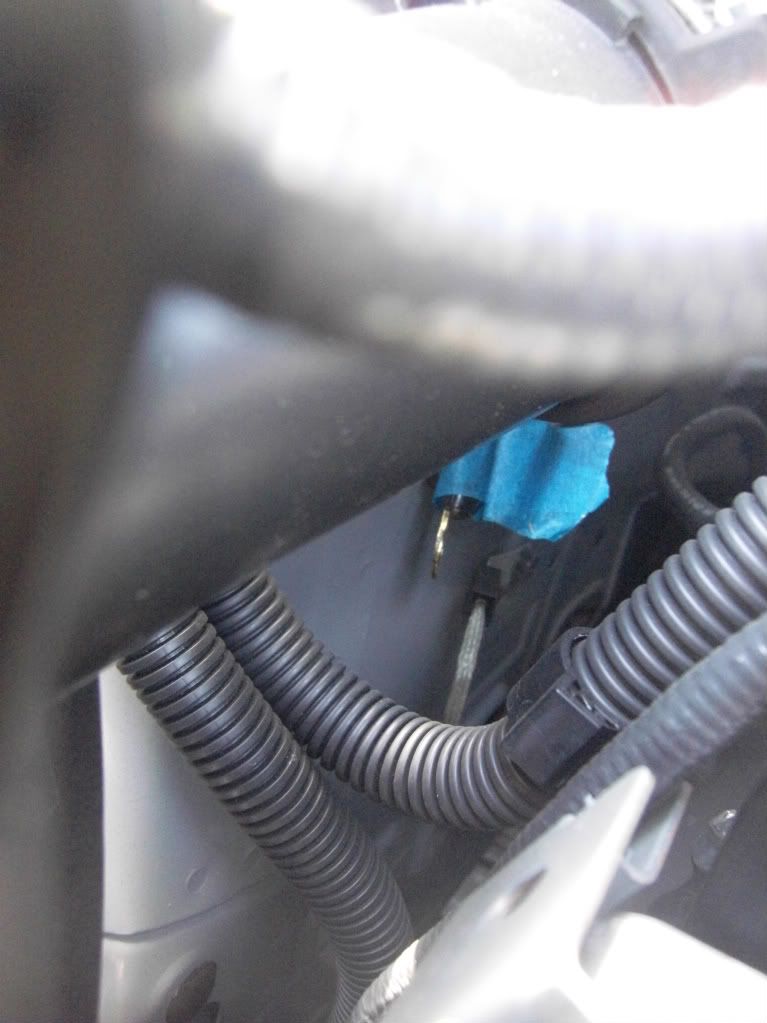 5. This is the end of the first cable, and beginning of the second. You are going to do it at the 10mm bolt which already has 2 small ground cables on it. 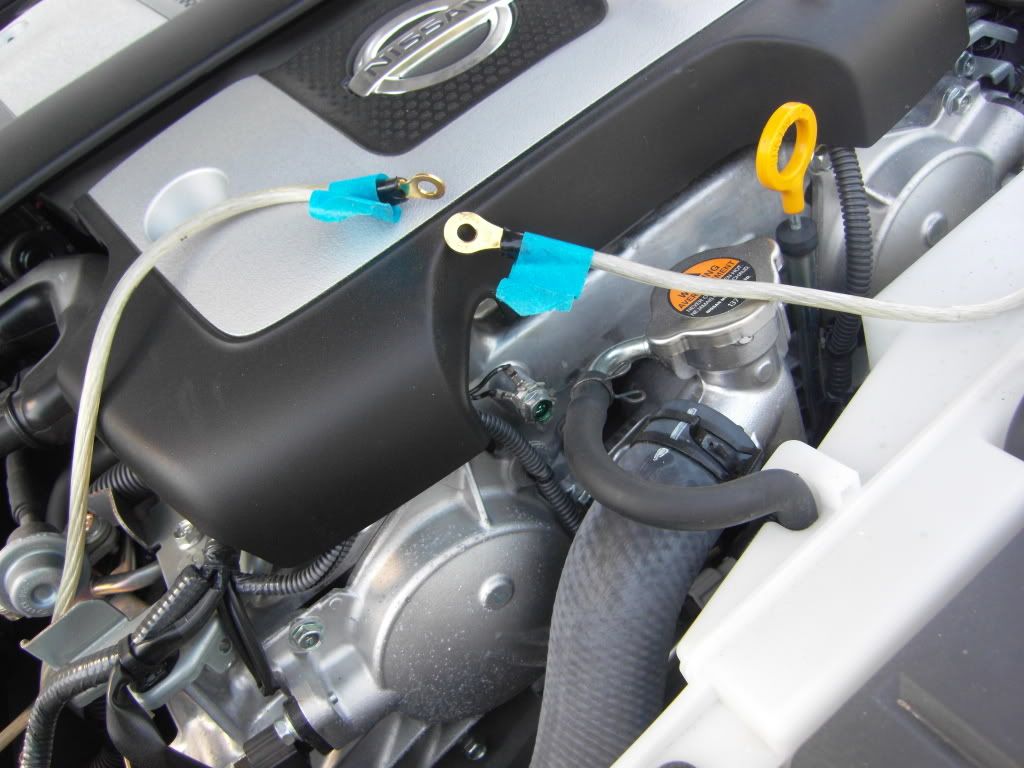 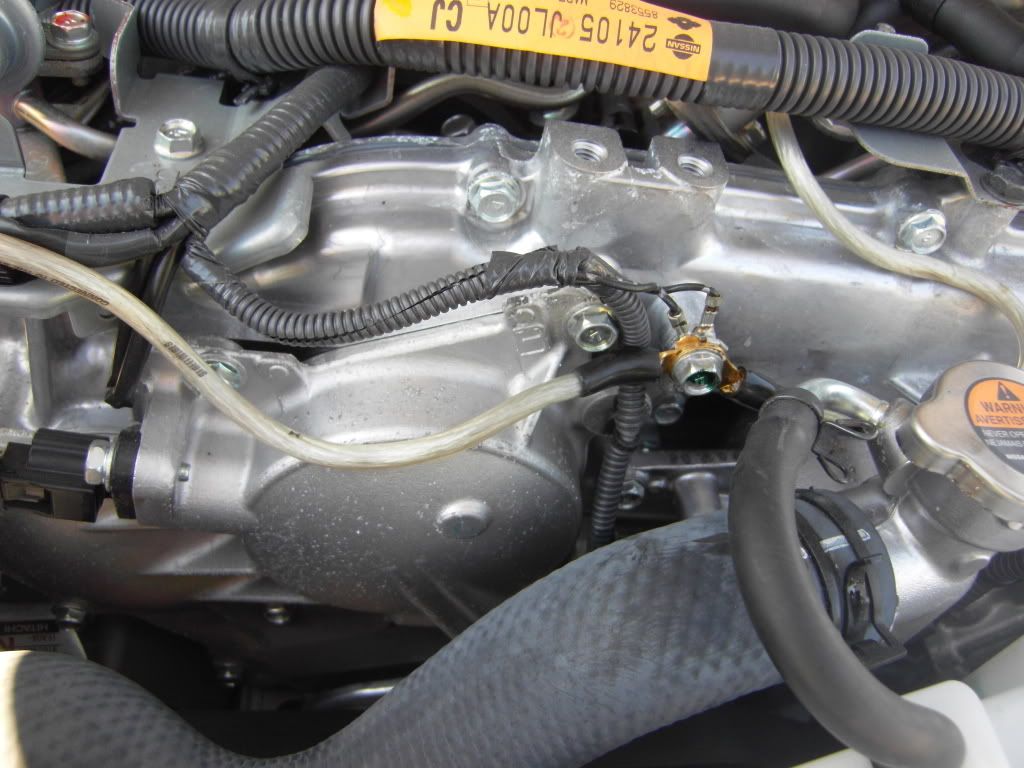 6. You are now beginning one of the second cables from the 10mm bolt we were previously at. This cable is short and only has one other hook-up, at the small black fuse box. Simply remove the fuse box thing by pushing in a little clip that is towards the strut, it is very simple to take off. Now we are removing the bolt where the ground goes. This is a 10mm, the picture is done with a screw driver, but its rather hard to take off w/o using a ratchet. Also you are starting your 3rd cable at this bolt. 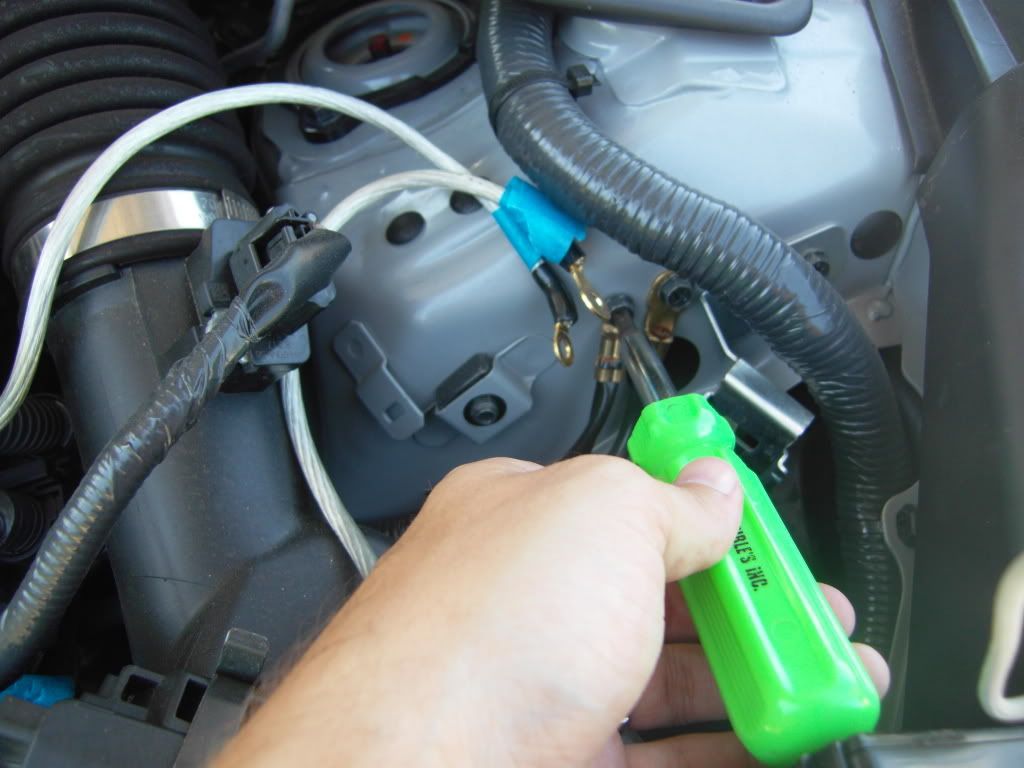 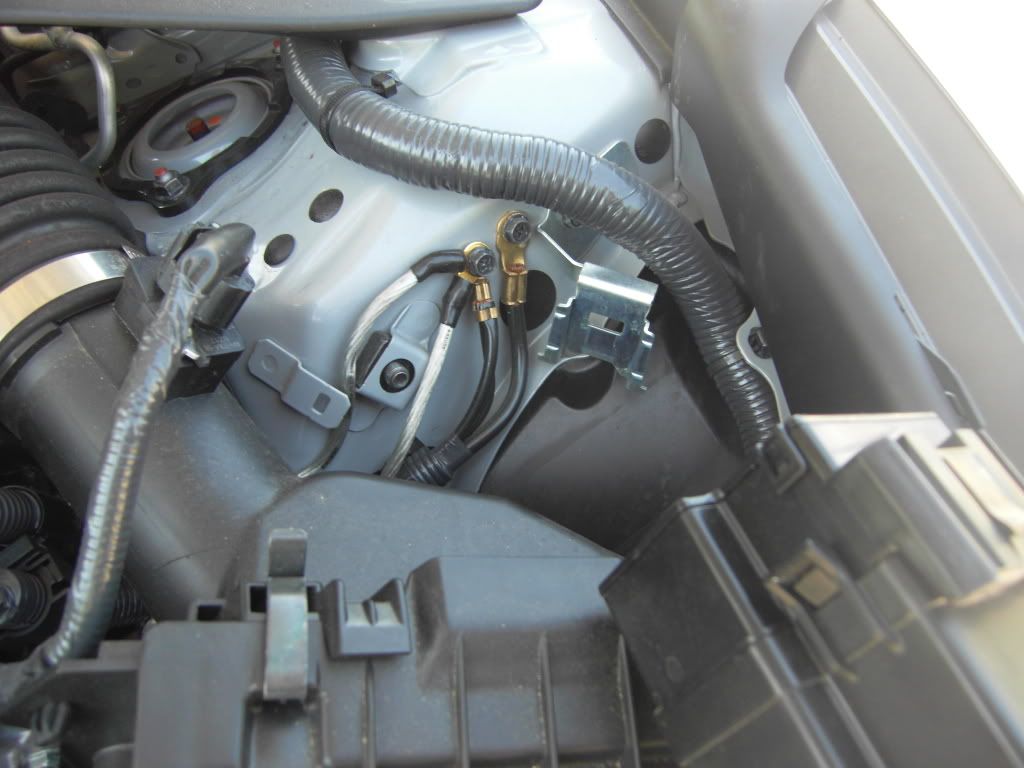 7. We now go to the driver side throttle body. Once again, 5M allen wrench just like before, and it is a tight bolt with not alot of working room. 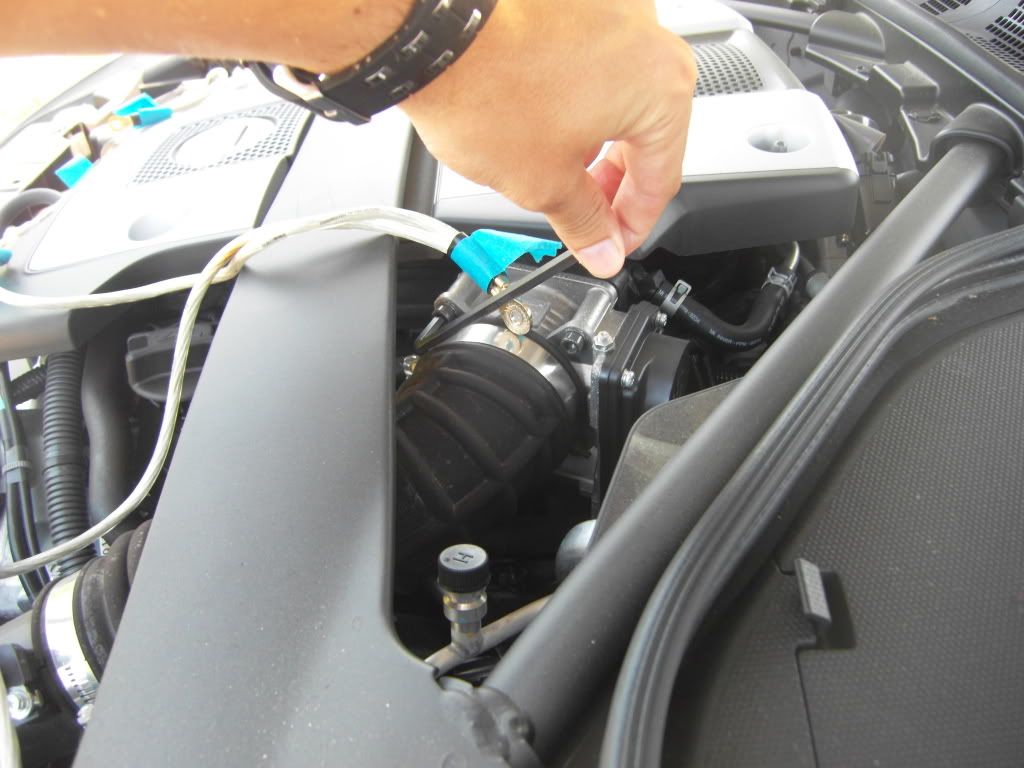 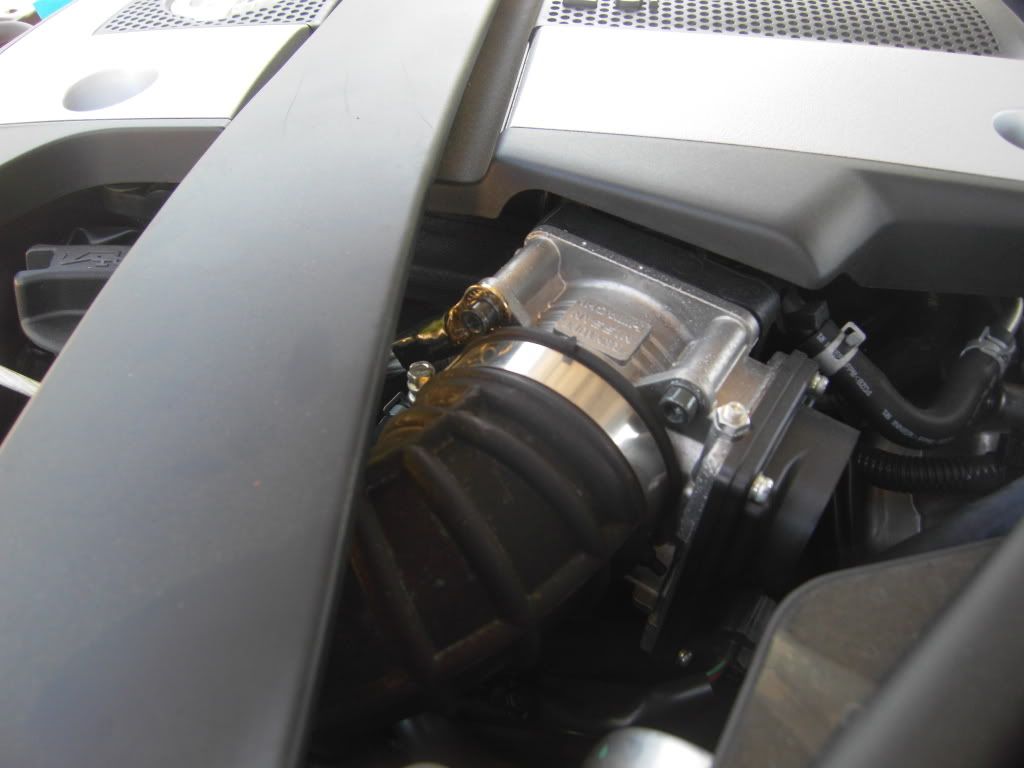 8. Last one to do is on top of the head, near the front of the car. You will need to remove the front (bottom) half of the engine cover. 2 10mm bolts on top and it comes right off. This bolt is a 12mm, and I honestly thing you could use either of the two bolts, but I did the one farther to the DRIVER side. My picture may make it hard to see, but I tried to make these as inconspicuous as possible. So they are very woven under other cables and such. Also see the side picture to see how i wove it to the spot. 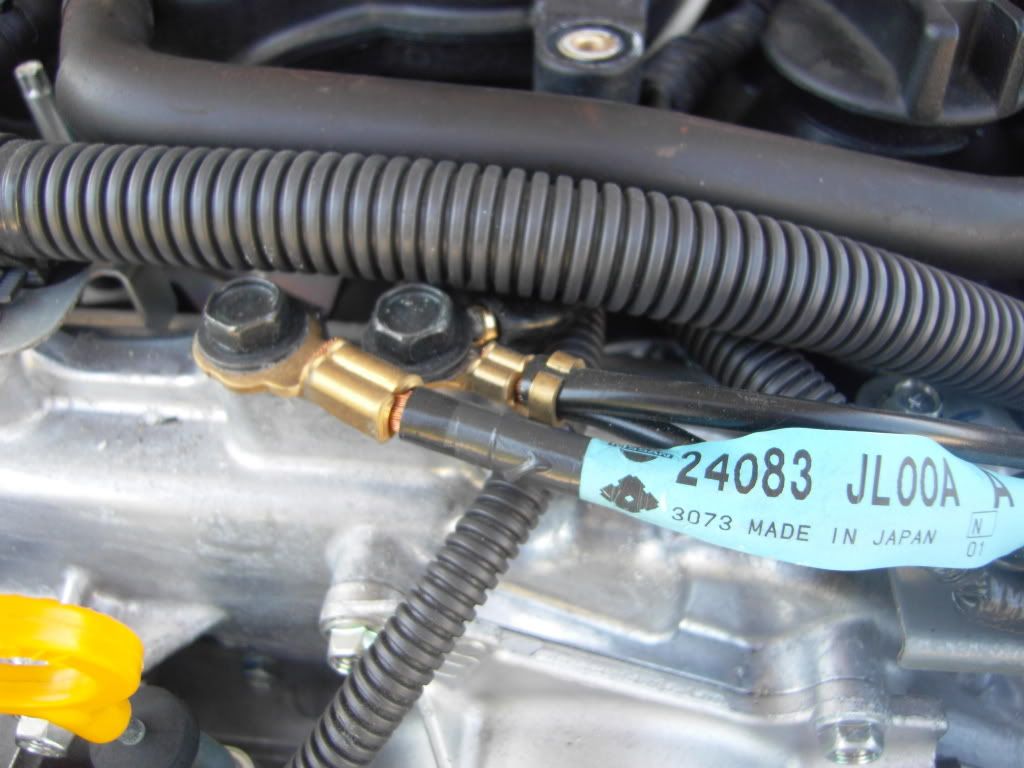 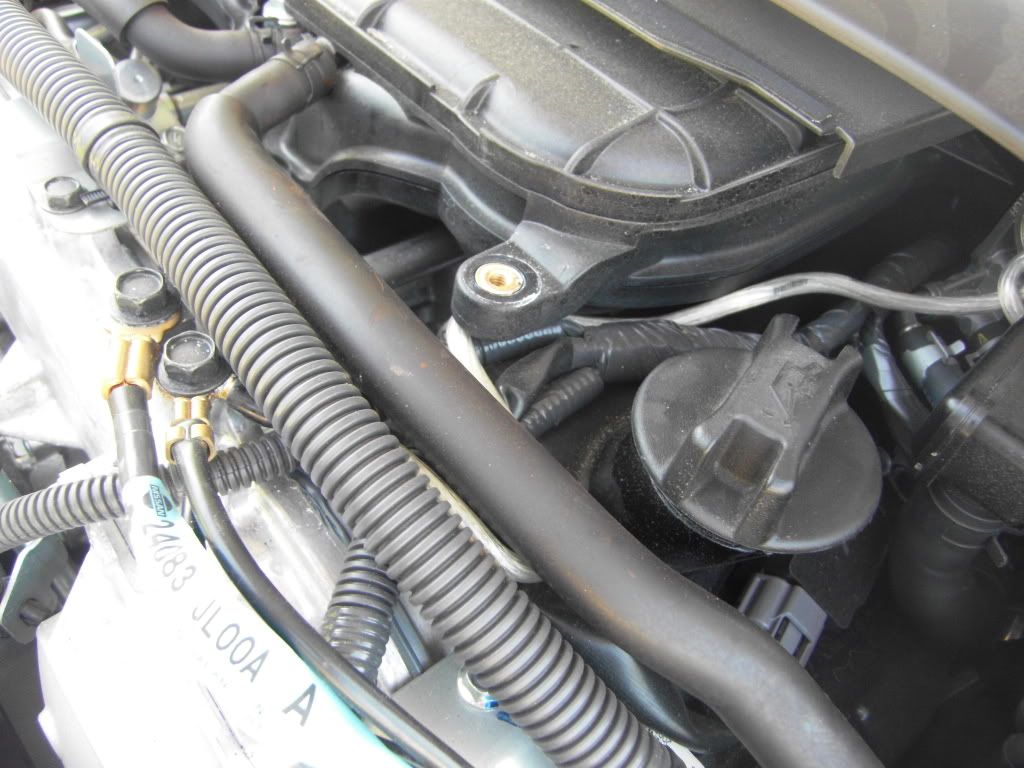
Last edited by rarwz; 06-12-2010 at 08:47 PM. Reason: finished the post |

|

|
|
06-12-2010, 01:38 PM
|
#2 (permalink) |
|
Administrator
Join Date: May 2009
Location: Disneyland
Posts: 8,736
Drives: 🔰
Rep Power: 10  |
This comment "please keep discussion about "do they do anything?" somewhere else"
Makes you look like a weenie. DiY's are to help people, and most in here will appreciate the work and expense someone else went through, so there is no need to put this stuff on a thread like this, Have you seen any DiY's get trashed? I don't think so. But suit yourself. It looks pretty easy by the look of the pics. Did you notice any improvements from this? I'm looking on doing this later on.
__________________
  |
|
|
|
|
06-12-2010, 08:48 PM
|
#4 (permalink) |
|
Base Member
Join Date: Mar 2010
Location: 370z
Posts: 178
Drives: 09 Touring
Rep Power: 17 |
I updated the original post with a link to discussion of if they work or not. I will quote both of your comments over on the other thread and answer to them.
PS: finished the writeup. |
|
|
|
|
06-20-2010, 03:45 AM
|
#5 (permalink) |
|
A True Z Fanatic
Join Date: Mar 2010
Location: Edmonton, Canada
Posts: 12,910
Drives: 2012 GT-R BE
Rep Power: 735 |
Thanks for the DIY and pictures. I have one comment and one question.
Comment: Regarding the stamped end on the bolt for fastening the negative terminal, I just carefully filed down the last thread with the stamp and was able to remove And reinstall the nut afterwards. Question: you used several grounding locations that were different than the instructions that came with the kit, notably the same mounting location for mounting points referred to as D and E, as well as F and I in the Stillen instructions (they mounted these at different places), and you used a bolt from each throttle body (Stillen did not). What was the reasoning behind that, especially the throttle bodies?
__________________
2012 GT-R Black Edition Jet Black 2010 370Z 40th Anniversary // SOLD 
|
|
|
|
|
06-21-2010, 04:37 AM
|
#6 (permalink) | |
|
Base Member
Join Date: Mar 2010
Location: 370z
Posts: 178
Drives: 09 Touring
Rep Power: 17 |
Quote:
|
|
|
|
|
|
06-21-2010, 09:12 AM
|
#7 (permalink) |
|
A True Z Fanatic
Join Date: Mar 2010
Location: Edmonton, Canada
Posts: 12,910
Drives: 2012 GT-R BE
Rep Power: 735 |
Oh, I see. Stillen's website has a downloadable PDF of the instructions. Here's the link to it. You'll see a little wrench icon under "Notes" when you select a specific product (in this case "2009-10 370Z silver"). Just click on the icon to download the file. Here's the link to the product and instructions:
STILLEN : STILLEN Grounding Kit
__________________
2012 GT-R Black Edition Jet Black 2010 370Z 40th Anniversary // SOLD
Last edited by djpathfinder; 06-21-2010 at 11:28 AM. |
|
|
|
|
06-21-2010, 11:19 AM
|
#8 (permalink) |
|
A True Z Fanatic
 Join Date: Aug 2009
Location: N/A
Posts: 76,801
Drives: N/A
Rep Power: 141522 |
http://www.stillen.com/product_files/606358~inst.pdf
i like their warning: IF YOU ARE NOT EXPERIENCED IN THE AREA OF AUTOMOTIVE MECHANICS WE STRONGLY URGE THAT YOU REFER THIS INSTALLATION TO YOUR MECHANIC. 
|
|
|
|
|
06-21-2010, 11:36 AM
|
#9 (permalink) | |
|
Administrator
Join Date: May 2009
Location: Disneyland
Posts: 8,736
Drives: 🔰
Rep Power: 10 |
Quote:

__________________
|
|
|
|
|
|
01-08-2014, 08:20 AM
|
#10 (permalink) |
|
Base Member
Join Date: Oct 2012
Location: Little Elm, TX
Posts: 66
Drives: 2010 370Z Red, auto
Rep Power: 14 |
 Say I have my battery relocated to the trunk, will I need to run a wire all the way the neg terminal in the trunk or just secure the lead to the chassis somewhere? Say I have my battery relocated to the trunk, will I need to run a wire all the way the neg terminal in the trunk or just secure the lead to the chassis somewhere?
__________________
Beluga catback exhaust and Y-Pipe. Sport brakes upgrade. 24 row oil cooler. Battery relocated to the trunk. |
|
|
|
|
01-08-2014, 09:56 AM
|
#12 (permalink) |
|
A True Z Fanatic
Join Date: Nov 2011
Location: Houston
Posts: 12,265
Drives: 2011 370ztt
Rep Power: 29540 |
It might be a good idea to sand the paint off the spot in the trunk you choose for your ground.
__________________
2011 MB Touring-Sport-6sp-Nav/GTM TT/FI TT TDX/JTran/Kosmic/Eibach/Hotchkis/SPC/CSF/RPS/SoThatsWhereAllMyMoneyWent |
|
|
|
|
01-09-2014, 08:38 AM
|
#13 (permalink) | |
|
Base Member
Join Date: Oct 2012
Location: Little Elm, TX
Posts: 66
Drives: 2010 370Z Red, auto
Rep Power: 14 |
Quote:

__________________
Beluga catback exhaust and Y-Pipe. Sport brakes upgrade. 24 row oil cooler. Battery relocated to the trunk. |
|
|
|
|
|
01-09-2014, 08:48 AM
|
#14 (permalink) |
|
A True Z Fanatic
Join Date: Nov 2011
Location: Houston
Posts: 12,265
Drives: 2011 370ztt
Rep Power: 29540 |
I'd just leave that wire off. You won't notice a difference.
__________________
2011 MB Touring-Sport-6sp-Nav/GTM TT/FI TT TDX/JTran/Kosmic/Eibach/Hotchkis/SPC/CSF/RPS/SoThatsWhereAllMyMoneyWent |
|
|
|
|
| Bookmarks |
|
|
 Similar Threads
|
||||
| Thread | Thread Starter | Forum | Replies | Last Post |
| FS: Stillen Ground kit....> | Modshack | Parts for sale (Private Classifieds) | 9 | 06-11-2010 05:31 AM |
| How to make your own ground wires. | Ivoidwarranty | DIY Section (Do-It-Yourself) | 16 | 01-13-2010 12:46 PM |
| ground kit | thispecialk | Engine & Drivetrain | 14 | 08-06-2009 12:58 AM |
| Z Ground Stock Available- RIGHT NOW!! | FuszNissan | Nissan 370Z Pricing / Ordering Discussions | 2 | 07-08-2009 04:35 PM |
| where is a good ground | TSterling | Audio & Video | 1 | 06-11-2009 09:54 PM |


 2Likes


 Linear Mode


