
|
Our engines are so beautiful... so why did Nissan decide to drap the starter wire over the top of the timing cover? Did the design team get to the end
|
|||||||
|
|
LinkBack | Thread Tools | Display Modes |
 10-20-2018, 03:27 PM
|
#1 (permalink) |
|
A True Z Fanatic
Join Date: Aug 2018
Location: USA
Age: 39
Posts: 5,264
Drives: A Garage Queen
Rep Power: 2684372   |
Our engines are so beautiful... so why did Nissan decide to drap the starter wire over the top of the timing cover? Did the design team get to the end and realize "oh sh*t, it needs to be able to start, doesn't it?" Anywhoo, here is how you get from this:
 to this:  For a replacement loom I purchased this wire loom from Amazon. I didn't trust the manufacturer's melting point claims, so I used a heat gun and a laser thermometer and did some experimenting. Turns out the this loom will begin to deform at mas o menos the same temp as the factory loom. I also purchased this bag of hose clamps to help route the cable. I would also recommend a 1.5 inch M6 bolt and a .75 inch long 1/4 inch diameter stainless steel sleeve or whatever, referenced in step 4 arrow #3. I picked mine up at Truvalue but any hardware store should have them. 1. Jack up the car. Pull the engine bay plastics, tower strut bar, underbay splash guard, and driver's side intake tube. Disconnect and remove the battery. Get all up under your vehicle and unbolt the starter cable from the starter and all the various mounting points in the bay. I did this and the rest of my loom/tuck when I was removing the timing cover so I had plenty of room to work and forgot to take pics... but I'm confident you'll figure it out.  2. Remove the plastic guard and the factory loom. NOTE: keep the shiny insulation on the starter end. 3. Cut a length of the loom equivalent to the length of the cable from where the shiny insulation ends to an inch or so before the end of the battery connector. Put the loom on the cable. Don't put the loom over the shiny insulation. For peace of mind, I taped the loom from the shiny insulation end to about 18 inches up. 4. 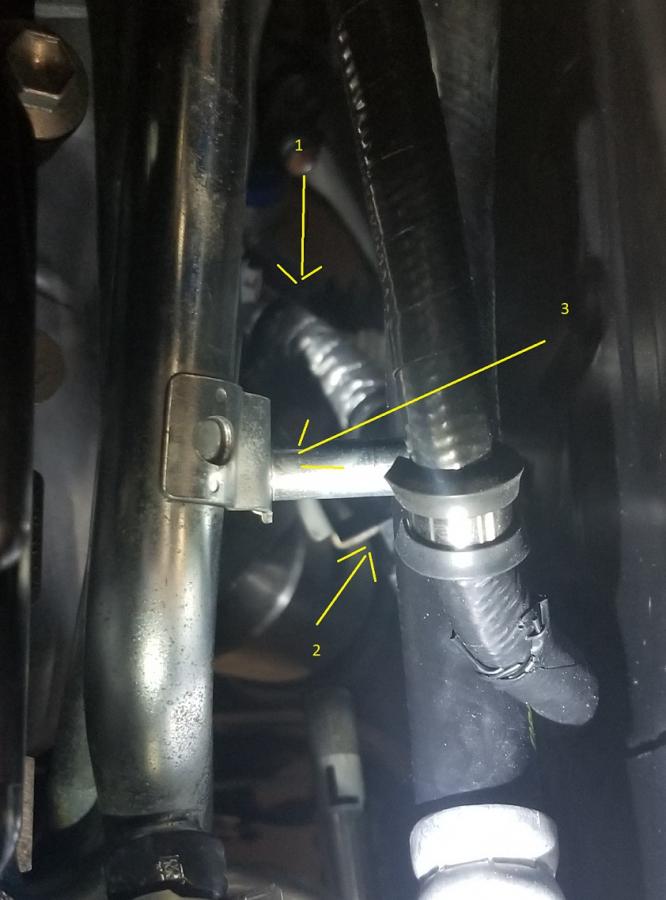 #1 indicates where the cable runs into the starter. #2 indicates the lower connecting point for the plastic cable runner that you removed earlier. It is bolted to the engine mount. Attach the cable here, either with one of the cable retaining clamps that used to hold the cable or with a very stout zip tie. Route the cable between the high pressure AC hose and the side of the engine bay. #3 indicates where you mount the cable to the hole that the former plastic cable runner was bolted to. I used a hose clamp, M6 bolt, and one of those stainless steel sleeves or whateveritis. This keeps the cable away from the headers. 5. 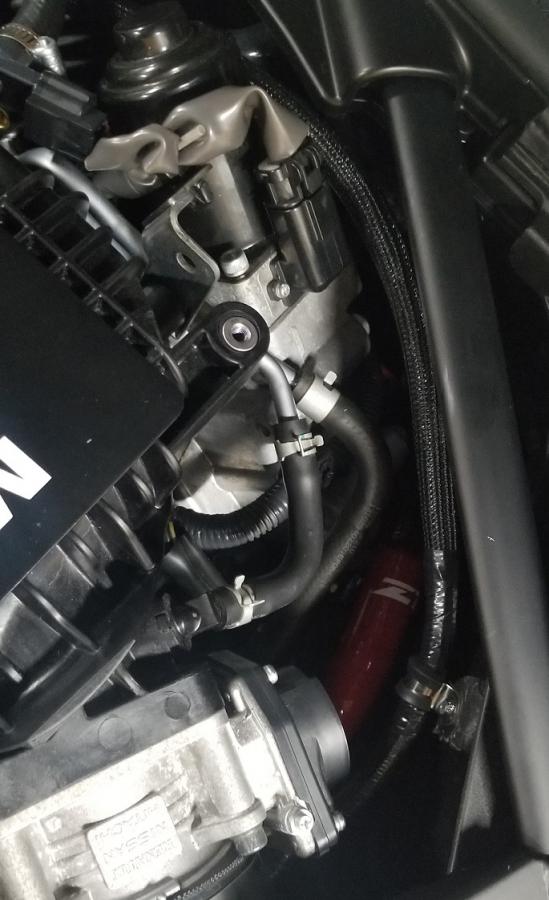 Run the cable under the intake and use another hose clamp to mount the cable against the brake compartment firewall. There is a pre-drilled hole there courtesy of Nissan. I put some loctite 242 on a bolt, slipped it through, and slapped a washer and nut on the other end. 6. 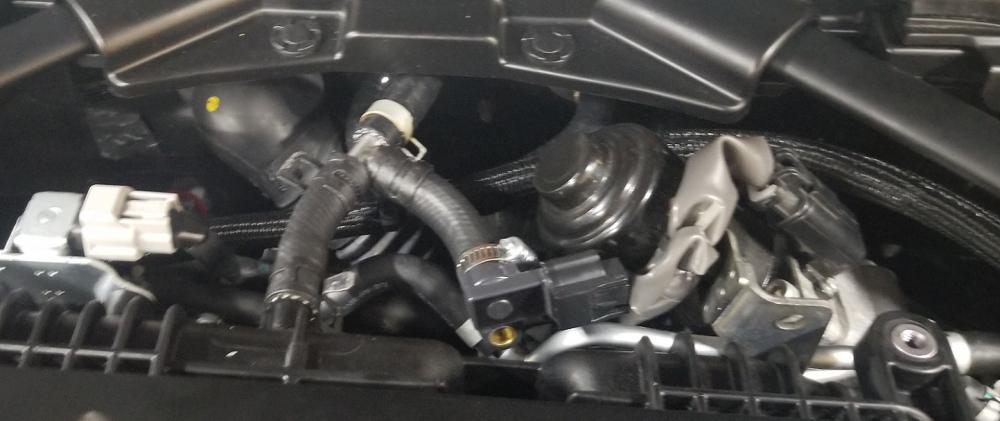 Run the cable around the VVEL gig and under the brake vacuum hose. I zip-tied the cable to the vacuum hose so as to prevent droopage. 7. 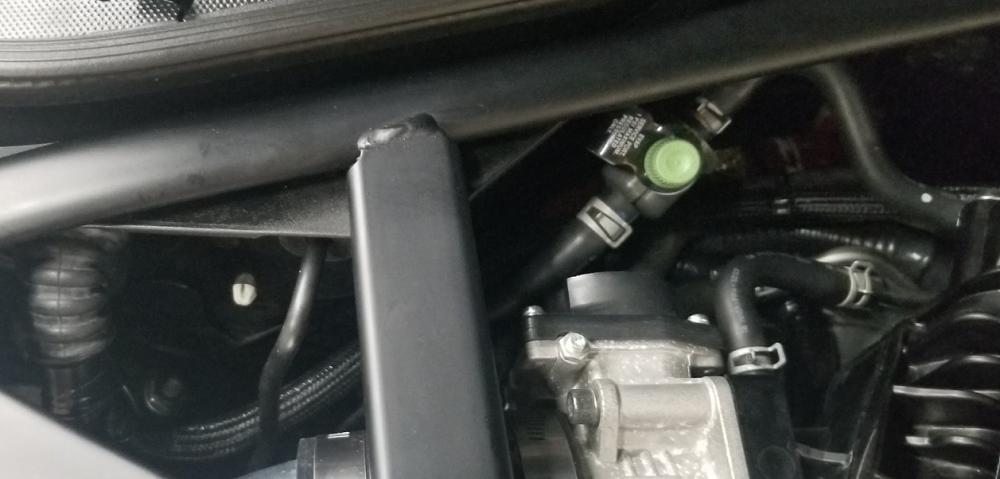 Run the cable around the throttle body, in between the hard line running out of the battery firewall and said firewall, and then into the rubber grommet where the cable originally came out of the firewall. 8. Attach the cable to the battery and ensure that the fitment is correct. 9. If fitment is correct, wrap a whole lot of Super 33 tape around the grommet neck and the cable so as to ensure a good seal. 10. Put your car back together and crack open a beer! You're done! |

|

|
| Bookmarks |
|
|
 Similar Threads
|
||||
| Thread | Thread Starter | Forum | Replies | Last Post |
| DIY engine bay wire tuck | Rid3_FaM0uS | DIY Section (Do-It-Yourself) | 54 | 01-02-2022 08:09 PM |
| DIY: Engine Bay Wire Tuck | O&G | DIY Section (Do-It-Yourself) | 39 | 03-31-2014 01:52 PM |
| Wire Tuck anyone? | RyanWest | Engine & Drivetrain | 4 | 12-19-2012 06:48 PM |
| Tuck in your shirt. | insalubrious | The Lounge (Off Topic) | 29 | 10-10-2009 09:39 PM |


 1Likes


 Threaded Mode

