
|
Originally Posted by Modshack Zpirates Butt....Looks good!..... that does look really good...i didn't know they made a flat black one? i thought they only made carbon fiber
|
|||||||
 |
|
|
LinkBack | Thread Tools | Display Modes |
 03-03-2010, 02:13 PM
|
#211 (permalink) | |
|
Base Member
Join Date: Jan 2010
Location: Chicago
Age: 49
Posts: 128
Drives: '10 Roadster T/S 6MT
Rep Power: 17  |
Quote:
|
|

|
|
03-03-2010, 02:15 PM
|
#212 (permalink) |
|
Track Member
Join Date: Dec 2008
Location: Greenville, NC
Posts: 792
Drives: 09' 370Z & 03' 350Z
Rep Power: 19 |
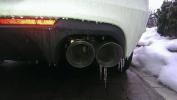
Sorry I still haven't taken any pictures of the diffuser, but as you can see Modshack did when I was over at the Modshack last Saturday. I forgot he took the picture. Thanks Steve!
Overall I think the diffuser looks pretty good on the car. Better than before anyway. I'll try to take some more pictures later this week and post them up.
__________________
2003 Daytona Blue 350Z Touring/Nismo 2009 Platinum Graphite 370Z Touring/Sport (Sold) 2009 BMW 135i/Dinan Stage 2 software upgrade/M3 suspension piecies/Koni Sports/ETS FMIC/Alufelgen SF-71 wheels |
|
|
|
03-03-2010, 02:21 PM
|
#213 (permalink) | |
|
Track Member
Join Date: Dec 2008
Location: Greenville, NC
Posts: 792
Drives: 09' 370Z & 03' 350Z
Rep Power: 19 |
Quote:
__________________
2003 Daytona Blue 350Z Touring/Nismo 2009 Platinum Graphite 370Z Touring/Sport (Sold) 2009 BMW 135i/Dinan Stage 2 software upgrade/M3 suspension piecies/Koni Sports/ETS FMIC/Alufelgen SF-71 wheels |
|
|
|
|
03-03-2010, 02:28 PM
|
#214 (permalink) | |
|
Base Member
Join Date: Jan 2010
Location: Chicago
Age: 49
Posts: 128
Drives: '10 Roadster T/S 6MT
Rep Power: 17 |
Quote:
|
|
|
|
|
03-03-2010, 02:30 PM
|
#215 (permalink) | |
|
Track Member
Join Date: Dec 2008
Location: Greenville, NC
Posts: 792
Drives: 09' 370Z & 03' 350Z
Rep Power: 19 |
Quote:
__________________
2003 Daytona Blue 350Z Touring/Nismo 2009 Platinum Graphite 370Z Touring/Sport (Sold) 2009 BMW 135i/Dinan Stage 2 software upgrade/M3 suspension piecies/Koni Sports/ETS FMIC/Alufelgen SF-71 wheels |
|
|
|
|
03-03-2010, 02:34 PM
|
#216 (permalink) | |
|
Enthusiast Member
Join Date: May 2009
Location: New York
Posts: 293
Drives: 2009 370z 6MT
Rep Power: 18 |
Quote:
 Def in for some more pics when you get a chance.
__________________
Mods list and pics Click |
|
|
|
|
03-03-2010, 09:39 PM
|
#217 (permalink) | |
|
A True Z Fanatic
 Join Date: Mar 2009
Location: Charleston, SC
Posts: 15,181
Drives: '07 Z4 "M" Roadster
Rep Power: 59  |
Quote:

__________________
Time is a companion, who goes with us on the journey, and reminds us to cherish every moment............ because it will never come again |
|
|
|
|
03-05-2010, 04:37 AM
|
#218 (permalink) |
|
A True Z Fanatic
 Join Date: May 2009
Location: Dededo, Guam
Posts: 6,642
Drives: solid red 370z 6mt
Rep Power: 407 |
alright guys i just ordered one!!! woooot wooooo
 fiberglass version fiberglass version
__________________
 ***TOP SECRET/POWERHOUSE AMUSE/ARC/DAYTONA RACING/VARIS/MINES/GANADOR/J-LINE/WORK EMOTION CR KAI/GT SPEC/CARBON SIGNAL/ZOOM ENGINEERING/ CARBON FIBER ELEMENT/STILLEN/***
|
|
|
|
03-05-2010, 01:40 PM
|
#219 (permalink) |
|
Track Member
Join Date: Dec 2008
Location: Greenville, NC
Posts: 792
Drives: 09' 370Z & 03' 350Z
Rep Power: 19 |
Alright I have finally had a chance to do a write up on the diffuser install. I purcahsed and installed the FRP diffuser rather than the carbon fiber diffuser, but both diffusers should fit the same. First let me say that my caveat to the install is that I didn't follow the provided install instructions. The reason being that I did not want to drill holes through the rear fascia that would be visible in the event I decided to remove the diffuser at a later date so what I post here may not be so helpful to those of you who do follow the instructions. BTW I am sure that EVO-R would prefer that you follow the install instructions provided with the diffuser. That being said here is what I did.
As I said in a prior post the fit and finish of my FRP diffuser are very good right down to the finish on the back side. The finish on the back side of the diffuser is just like the front so there are no rough surfaces to worry about and no prep work to be done to the diffuser before installing it. First I used some spring clamps to hold the diffuser in place while I explored options for mounting it without drilling holes through the outside of the bumper cover. What I quickly learned was that tape alone wasn't going to be enough to hold it in place. Mainly this is due to needing to pull the outside edges of the diffuser back and up to meet the bumper where it curves in and the size and weight of the diffuser. In the end I determined that I could use some one and a half inch black trim screws at the bottom of the diffuser near the outside edges to not only pull the diffuser in place, but to help hold it on the car. Those screws go through the bottom of the diffuser and the bottom edge of the bumper cover, but since they are under the diffuser you can't see them unless you look under the diffuser. When you put pressure on the diffuser from the bottom near the outside of the diffuser the top is held in place by the groove in the bumper cover. I also used the supplied 3M tape along the top of the diffuser just below the edge of the top groove from one side to the other. I supplemented the screws and the tape with a generous amout of clear silicone caulk on the back of the diffuser and along the bottom edge. I held it all in place with six spring clamps for 48 hours until the silicone dried. The combination of the screws, tape and silicone hold the diffuser on solidly. You could also ad a couple more screws to the bottom toward the middle of the diffuser, but I did not and don't plan to at this time. I did end up using three trim screws near the bottom outside edge of the diffuser on both sides. I have them spaced out in a mini triangle. The only issue I had was along the very outside edges where I ended up with a small gap on both sides where the diffuser is not quite up to the groove in the bumper. You really need an extra pair of hands to hold the ends of the diffuser in place while you drill the pilot holes for the screws. Clamps alone aren't enough to hold it in place while you drill. In the end I didn't mind three screws on each side under the bottom of the bumper to hold the diffuser in place. Also the tape and the silicone can be removed without damaging the bumper if you ever decide to remove the diffuser. I'm certain that following the directions and drilling holes through the bumper cover as provided in the instructions would make the diffuser even more secure, but I don't think mine is going anywhere with the combination of the screws, tape and silicone. I hope this helps everyone who is interested in a diffuser and doesn't make installation more confusing. I'll try to get some pictures and post them later this weekend.
__________________
2003 Daytona Blue 350Z Touring/Nismo 2009 Platinum Graphite 370Z Touring/Sport (Sold) 2009 BMW 135i/Dinan Stage 2 software upgrade/M3 suspension piecies/Koni Sports/ETS FMIC/Alufelgen SF-71 wheels |
|
|
|
03-05-2010, 03:27 PM
|
#220 (permalink) | |
|
A True Z Fanatic
Join Date: May 2009
Location: Dededo, Guam
Posts: 6,642
Drives: solid red 370z 6mt
Rep Power: 407 |
Quote:
great job bro i think i might install mine like the way you did....
__________________
***TOP SECRET/POWERHOUSE AMUSE/ARC/DAYTONA RACING/VARIS/MINES/GANADOR/J-LINE/WORK EMOTION CR KAI/GT SPEC/CARBON SIGNAL/ZOOM ENGINEERING/ CARBON FIBER ELEMENT/STILLEN/***
|
|
|
|
|
03-05-2010, 05:43 PM
|
#221 (permalink) |
|
A True Z Fanatic
Join Date: Mar 2009
Location: Charleston, SC
Posts: 15,181
Drives: '07 Z4 "M" Roadster
Rep Power: 59 |
Great job, I was thinking the exact same thing.......... didn't see why screws on the bottom combined with the tape and silicone adhesive wouldn't work. Glad you proved it right
__________________
Time is a companion, who goes with us on the journey, and reminds us to cherish every moment............ because it will never come again |
|
|
|
04-26-2010, 09:54 PM
|
#222 (permalink) |
|
A True Z Fanatic
Join Date: Sep 2009
Location: New York
Posts: 1,647
Drives: 09 Nismo 370Z #80
Rep Power: 46 |
Thanks for the write up Zpirate. This is very useful for someone don't want screw holes on the cente rof the bumper. BTW I got 2 CF and 1 FRP in stock.
__________________
WWW.EVO-R.NET |
|
|
|
04-27-2010, 08:00 AM
|
#223 (permalink) |
|
Track Member
Join Date: Dec 2008
Location: Greenville, NC
Posts: 792
Drives: 09' 370Z & 03' 350Z
Rep Power: 19 |
Your welcome. I was hoping I wasn't going to make it more difficult for you by coming up with another way to mount the diffuser.
__________________
2003 Daytona Blue 350Z Touring/Nismo 2009 Platinum Graphite 370Z Touring/Sport (Sold) 2009 BMW 135i/Dinan Stage 2 software upgrade/M3 suspension piecies/Koni Sports/ETS FMIC/Alufelgen SF-71 wheels |
|
|
|
04-27-2010, 08:13 AM
|
#224 (permalink) | |
|
RIP Tony :( (1969-2015)
Join Date: Feb 2009
Location: Northern Virginia
Posts: 18,802
Drives: '14 Mustang GT/CS
Rep Power: 69 |
Quote:
__________________
 SpinTech Mufflers, Airaid CAI, JBA H-Pipe, Lethal Performance Over Axle Pipes, MMD Quarter Panel Louvers, Cervini's Ram Air Type IV Hood, Carbon Fiber Radiator Cover, GT500 Rear Valance, Quad Exhaust Tips
|
|
|
|
|
04-27-2010, 09:16 AM
|
#225 (permalink) | |
|
A True Z Fanatic
Join Date: May 2009
Location: Dededo, Guam
Posts: 6,642
Drives: solid red 370z 6mt
Rep Power: 407 |
Quote:
mine fit perfectly... the only prob im having is the gap from the shine replicas... its starting to bother me...
__________________
***TOP SECRET/POWERHOUSE AMUSE/ARC/DAYTONA RACING/VARIS/MINES/GANADOR/J-LINE/WORK EMOTION CR KAI/GT SPEC/CARBON SIGNAL/ZOOM ENGINEERING/ CARBON FIBER ELEMENT/STILLEN/***
|
|
|
|
|
| Bookmarks |
|
|
 Similar Threads
|
||||
| Thread | Thread Starter | Forum | Replies | Last Post |
| Oil change, Jack stands or ramps with diffuser? | spearfish25 | Nissan 370Z General Discussions | 31 | 08-10-2010 08:38 PM |
| Name this rear diffuser! | JoeD | Exterior & Interior | 13 | 05-22-2010 07:45 PM |
| rear diffuser | jrmlk | Exterior & Interior | 5 | 08-20-2009 09:58 PM |
| k40 calibre laser diffuser and detector. | dahbour | The Lounge (Off Topic) | 2 | 08-17-2009 03:16 PM |
| Rear Diffuser 370Z | 355890 | Exterior & Interior | 9 | 07-01-2009 08:17 PM |


 3Likes


 Linear Mode


